- 浏览: 108184 次
- 性别:

- 来自: 武汉
-

文章分类
最新评论
-
luluandbobo:
为什么要先释放table[T]呢,它不是一个指针吗?如果释放掉 ...
《算法导论》笔记--平摊分析 -
liuxuejin:
全为理论,我在网上找了N久都找 不到一个具体的B树操作磁盘文件 ...
《算法导论》笔记--B树 -
westice:
非常好!正苦于怎么确定贝塞尔曲线的控制点,很好的思路。
[翻译] AGG 之贝塞尔插值 -
liyiwen007:
dracularking 写道第三种情况的图是不是不对,z成左 ...
《算法导论》笔记--红黑树(一) -
dracularking:
第三种情况的图是不是不对,z成左子节点了?
《算法导论》笔记--红黑树(一)
Rendering Buffer
我们先从这里开始:在内存中开辟一块存储区,然后将它的内容以最简单的光栅格式写到文件中,也就是 PPM(Portable Pixel Map)格式。虽然 Windows 对这种格式并没有原生的支持,但很多图像浏览器和转换器都能使用这种格式,比如 IrfanView(www.irfanview.com)。所有 AGG 的控制台例子都使用了 P6 256 格式,也就是 RGB,每个字节代码一个颜色。现在假设我们将在下图所示的 RGB-buffer 内存区中工作:
The first and the Simplest Example
这是第一个例子:
#include <stdio.h>
#include <string.h>
#include "agg_rendering_buffer.h"

enum
{
    frame_width = 320,
    frame_height = 200
};

// Writing the buffer to a .PPM file, assuming it has
// RGB-structure, one byte per color component
//--------------------------------------------------
bool write_ppm(const unsigned char* buf,
               unsigned width,
               unsigned height,
               const char* file_name)
{
    FILE* fd = fopen(file_name, "wb");
    if(fd)
    {
        fprintf(fd, "P6 %d %d 255 ", width, height);
        fwrite(buf, 1, width * height * 3, fd);
        fclose(fd);
        return true;
    }
    return false;
}

// Draw a black frame around the rendering buffer, assuming it has
// RGB-structure, one byte per color component
//--------------------------------------------------
void draw_black_frame(agg::rendering_buffer& rbuf)
{
    unsigned i;
    for(i = 0; i < rbuf.height(); ++i)
    {
        unsigned char* p = rbuf.row_ptr(i);
        *p++ = 0; *p++ = 0; *p++ = 0;
        p += (rbuf.width() - 2) * 3;
        *p++ = 0; *p++ = 0; *p++ = 0;
    }
    memset(rbuf.row_ptr(0), 0, rbuf.width() * 3);
    memset(rbuf.row_ptr(rbuf.height() - 1), 0, rbuf.width() * 3);
}


int main()
{
    // In the first example we do the following:
    //--------------------
    // Allocate the buffer.
    // Clear the buffer, for now "manually"
    // Create the rendering buffer object
    // Do something simple, draw a diagonal line
    // Write the buffer to agg_test.ppm
    // Free memory

    unsigned char* buffer = new unsigned char[frame_width * frame_height * 3];

    memset(buffer, 255, frame_width * frame_height * 3);

    agg::rendering_buffer rbuf(buffer,
        frame_width,
        frame_height,
        frame_width * 3);

    unsigned i;
    for(i = 0; i < rbuf.height()/2; ++i)
    {
        // Get the pointer to the beginning of the i-th row (Y-coordinate)
        // and shift it to the i-th position, that is, X-coordinate.
        //---------------
        unsigned char* ptr = rbuf.row_ptr(i) + i * 3;

        // PutPixel, very sophisticated, huh? :)
        //-------------
        *ptr++ = 127; // R
        *ptr++ = 200; // G
        *ptr++ = 98;  // B
    }

    draw_black_frame(rbuf);
    write_ppm(buffer, frame_width, frame_height, "agg_test.ppm");

    delete [] buffer;
    return 0;
}
在这个例子中,你甚至不需要链接任何的 AGG 的代码文件,你只需要在你的编译器命令行中设置好 AGG 的包含路径就行了。
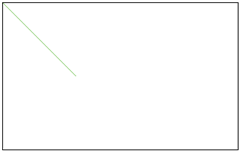
编译并运行它,你会看到现图所示的结果:
这个例子中几乎所有东西都“手工打制”的,使用的唯一一个现成的类是 rendering_buffer。这个类本身并不知道关于内存中像素格式的任何信息,它只是保存了一个数组,数组中的元素分别指向每行(像素的开头)。为申请和释放这块存储区是使用者的责任,你可以使用任何可行的方式来申请和释放内存,比如使用系统提供的 API 函数,或是简单的用内存分配器(译注:应该是new、delete、malloc、free等),甚至是直接使用一个静态数组。在上面这个例子中,因为每个像素要占用3个字节,所以我们申请了 width*height*3 字节的内存,在实际内存中是不存在“行”这种布局方式的,但这样做可以提高程序的性能,而且有时候在使用 API 的时候需要。 包含文件: agg_rendering_buffer.h rendering_buffer 这个类保存了指向每一行像素的指针,基本上这个类做的事就是这些了。看起来好像不是什么了不起的事,不过我们还是继续分析下去。这个类的接口和功能都很简单,它只是模板类 row_ptr_cache 的一个 typedef 而已: row_prt_cache 这个类的接口的功能如下: 这个类的实现里没有使用断言或是验证的措施,所以,使用者有责任在用这个类对象时正确地将它初始化到实际的内存块中,这可以在构造函数中完成,也可以使用 attach() 函数。它们的参数解释如下: Class rendering_buffer
typedef row_ptr_cache<int8u> rendering_buffer;
template<class T> class row_ptr_cache
{
public:
    row_ptr_cache();

    row_ptr_cache(T* buf, unsigned width, unsigned height, int stride);

    void attach(T* buf, unsigned width, unsigned height, int stride);

    T* buf();
    const T* buf()    const;
    unsigned width()  const;
    unsigned height() const;
    int      stride() const;
    unsigned stride_abs() const;

    T* row_ptr(int, int y, unsigned);
    T* row_ptr(int y);
    const T* row_ptr(int y) const;
    row_data row    (int y) const;
    T const* const* rows() const;

    template<class RenBuf> void copy_from(const RenBuf& src);

    void clear(T value)
};
- buf — 指向内存块的指针。
- width — 以像素为单位表示的图像宽度。rendering buffer(渲染内存区)并不知道像素格式和每个像素在内存中大小等信息。这个值会直接存储在m_width这个成员变量中,使用 width() 函数就可以获取它的值。
- height — 以像素为单位表示的图像高度(同样也是行数)
- stride — Stride(大步幅,-_-; 不知道怎么翻了……),也就是用类型T来度量的一行的长度。 rendering_buffer是一个 typedef,也就是 row_prt_cache<int8u>,所以这个值是以字节数来算的。Stride 决定内存中每一行的实现长度。如果这个值是负的,那么Y轴的方向就是反过来的。也就是说 Y 等 0 的点是是内在块的最后一行的。Y == height - 1 则是第一行。stride 的绝对值也很重要,因为它让你可以方便地操作内存中的“行”(就像 windows 中的 BMP)。另外,这个参数允许使用者可以像操作整个内存区块一样,操作其中任意一个“矩形”内存区。
attach()函数会改变缓冲区或是它的参数,它自己会为“行指针”数组重新分配内存,所以你可以在任何时候调用它。当(且仅当)新的height值比之前使用过的最大的height值还要大时,它才会重新申请内存。
构造的这个对象的开销仅仅是初始化它的成员变量(设置为0),attach()的开销则是分配sizeof(ptr)*height个字节的内存,然后将这些指针指向对应的“行”。
最常使用的函数是 row_prt(y),这个函数只是简单地返回指向第y函数指针,这个指针指向的位置已经考虑到了Y轴的方向了。
注意:
渲染内存区(rendering buffer)并不管任何裁减或是边界检查的事,这是更高层的类的责任。
buf(), width(), height(), stride(), stride_abs() 这些函数的意义显而易见,就不解释了。
copy_from()函数会将其它内存的内容拷贝至“本”内存中。这个函数是安全的,如果(两者的)width和height值不相同,那它会尽可能拷贝大一些的区域。一般来讲都用于拷贝相同大小区域。
Two Modifications of the Example
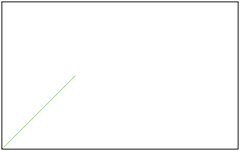
首先,在创建 rendering buffer 的对象时将 stride 取负值:
agg::rendering_buffer rbuf(buffer,
                           frame_width,
                           frame_height,
                           -frame_width * 3);
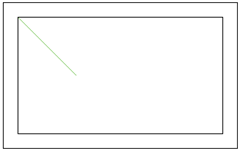
然后,我们试下将 rendering buffer 附着(attach)到被分配的内存区的某部分。这个修改会使得 rendering buffer 两次附着在同一块内存区上,第一次是整个被分配的内存区域,第二次是其中的一部分:
int main()
{
    unsigned char* buffer = new unsigned char[frame_width * frame_height * 3];

    memset(buffer, 255, frame_width * frame_height * 3);

    agg::rendering_buffer rbuf(buffer,
        frame_width,
        frame_height,
        frame_width * 3);

    // Draw the outer black frame
    //------------------------
    draw_black_frame(rbuf);

    // Attach to the part of the buffer,
    // with 20 pixel margins at each side.
    rbuf.attach(buffer +
        frame_width * 3 * 20 +      // initial Y-offset
        3 * 20,                     // initial X-offset
        frame_width - 40,
        frame_height - 40,
        frame_width * 3               // Note that the stride
        // remains the same
        );

    // Draw a diagonal line
    //------------------------
    unsigned i;
    for(i = 0; i < rbuf.height()/2; ++i)
    {
        // Get the pointer to the beginning of the i-th row (Y-coordinate)
        // and shift it to the i-th position, that is, X-coordinate.
        //---------------
        unsigned char* ptr = rbuf.row_ptr(i) + i * 3;

        // PutPixel, very sophisticated, huh? :)
        //-------------
        *ptr++ = 127; // R
        *ptr++ = 200; // G
        *ptr++ = 98;  // B
    }

    // Draw the inner black frame
    //------------------------
    draw_black_frame(rbuf);

    // Write to a file
    //------------------------
    write_ppm(buffer, frame_width, frame_height, "agg_test.ppm");

    delete [] buffer;
    return 0;
}
最后描画出来的结果是这样:
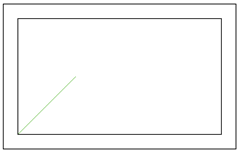
最后一处修改是:
// Attach to the part of the buffer,
// with 20 pixel margins at each side and negative 'stride'
rbuf.attach(buffer +
            frame_width * 3 * 20 +      // initial Y-offset
            3 * 20,                     // initial X-offset
            frame_width - 40,
            frame_height - 40,
            -frame_width * 3              // Negate the stride
            );
运行结果如下:
在最后的一个例子里,我们只是使 stride 取了负值,而指针则和上个例子一样,仍然指向内存区的起启处。
注意:Function
write_ppm()writes the pixel map to a file. Hereafter it will be omited in this text, but duplicated when necessary in source code in theagg2/tutorialdirectory.。
Pixel Format Renderers
首先,我们创建一个更“文明”(译注:显得更高级一点)的例子:
#include <stdio.h>
#include <string.h>
#include "agg_pixfmt_rgb24.h"

enum
{
    frame_width = 320,
    frame_height = 200
};

// [...write_ppm is skipped...]

// Draw a black frame around the rendering buffer
//--------------------------------------------------
template<class Ren>
void draw_black_frame(Ren& ren)
{
    unsigned i;
    agg::rgba8 c(0,0,0);
    for(i = 0; i < ren.height(); ++i)
    {
        ren.copy_pixel(0,               i, c);
        ren.copy_pixel(ren.width() - 1, i, c);
    }
    for(i = 0; i < ren.width(); ++i)
    {
        ren.copy_pixel(i, 0,                c);
        ren.copy_pixel(i, ren.height() - 1, c);
    }
}


int main()
{
    //--------------------
    // Allocate the buffer.
    // Clear the buffer, for now "manually"
    // Create the rendering buffer object
    // Create the Pixel Format renderer
    // Do something simple, draw a diagonal line
    // Write the buffer to agg_test.ppm
    // Free memory

    unsigned char* buffer = new unsigned char[frame_width * frame_height * 3];

    memset(buffer, 255, frame_width * frame_height * 3);

    agg::rendering_buffer rbuf(buffer,
        frame_width,
        frame_height,
        frame_width * 3);

    agg::pixfmt_rgb24 pixf(rbuf);

    unsigned i;
    for(i = 0; i < pixf.height()/2; ++i)
    {
        pixf.copy_pixel(i, i, agg::rgba8(127, 200, 98));
    }

    draw_black_frame(pixf);
    write_ppm(buffer, frame_width, frame_height, "agg_test.ppm");

    delete [] buffer;
    return 0;
}
这个例子看起来和前面的没什么不一样的,但其实他们差别很大,看看这个声明:
agg::pixfmt_rgb24 pixf(rbuf);
这里我们创建了一个底层的像素渲染对象(pixel rendering object)并将它附着到渲染内存区(rendering buffer)上,它是这样定义的:
typedef pixel_formats_rgb24<order_rgb24> pixfmt_rgb24;
类模板 pixel_formats_rgb24 掌握了内存中具体的像素格式信息。唯一的模板参数可以是 order_rgb24 或是 order_rgb23,它们定义了颜色字节(color channels)的顺序。
与 rendering buffer 不同的是,这些类使用整型的像素坐标进行操作,因为它们知道怎么计算对于特定点 X 的偏移。你可能会说,如果在 rendering buffer 中保存像素的宽度值的话会更容易,但是在实践中会有很多限制。别忘了,像素宽度可能比一个字节还小,比如在打印机渲染高解析度的 B&W 图像的时候就是这样。因此,我们需要将这个功能分离出来,rendering_buffer 这个类就用于加速对“行”的访问,而 pixel format renderers 就负责如何解析“行”是什么。
现在,AGG 里下面这些文件实现了各种不同的像素格式:
-
agg_pixfmt_gray8.h:每个字节表示一个像素灰度。这种像素格式允许你将它和 rgb24 或是 rgb23 中的某个颜色成分放在一起工作。它有两个模板参数:Step 和 Offset,为方便起见,还有下面这些 typedef :
- typedef pixfmt_gray8_base<1, 0> pixfmt_gray8;
- typedef pixfmt_gray8_base<3, 0> pixfmt_gray8_rgb24r;
- typedef pixfmt_gray8_base<3, 1> pixfmt_gray8_rgb24g;
- typedef pixfmt_gray8_base<3, 2> pixfmt_gray8_rgb24b;
- typedef pixfmt_gray8_base<3, 2> pixfmt_gray8_bgr24r;
- typedef pixfmt_gray8_base<3, 1> pixfmt_gray8_bgr24g;
- typedef pixfmt_gray8_base<3, 0> pixfmt_gray8_bgr24b;
- typedef pixfmt_gray8_base<4, 0> pixfmt_gray8_rgba32r;
- typedef pixfmt_gray8_base<4, 1> pixfmt_gray8_rgba32g;
- typedef pixfmt_gray8_base<4, 2> pixfmt_gray8_rgba32b;
- typedef pixfmt_gray8_base<4, 3> pixfmt_gray8_rgba32a;
- typedef pixfmt_gray8_base<4, 1> pixfmt_gray8_argb32r;
- typedef pixfmt_gray8_base<4, 2> pixfmt_gray8_argb32g;
- typedef pixfmt_gray8_base<4, 3> pixfmt_gray8_argb32b;
- typedef pixfmt_gray8_base<4, 0> pixfmt_gray8_argb32a;
- typedef pixfmt_gray8_base<4, 2> pixfmt_gray8_bgra32r;
- typedef pixfmt_gray8_base<4, 1> pixfmt_gray8_bgra32g;
- typedef pixfmt_gray8_base<4, 0> pixfmt_gray8_bgra32b;
- typedef pixfmt_gray8_base<4, 3> pixfmt_gray8_bgra32a;
- typedef pixfmt_gray8_base<4, 3> pixfmt_gray8_abgr32r;
- typedef pixfmt_gray8_base<4, 2> pixfmt_gray8_abgr32g;
- typedef pixfmt_gray8_base<4, 1> pixfmt_gray8_abgr32b;
- typedef pixfmt_gray8_base<4, 0> pixfmt_gray8_abgr32a;
-
agg_pixfmt_rgb24.h, 每个像素占 3 个字节,有 RGB 或是 BGR 两种颜色顺序。定义了下面这些像素类型:
- typedef pixel_formats_rgb24<order_rgb24> pixfmt_rgb24;
- typedef pixel_formats_rgb24<order_bgr24> pixfmt_bgr24;
- agg_pixfmt_rgb555.h, 每个像素占 15 bits。 每 5 个 bits 代表一种颜色成分,最低位没用到。
- agg_pixfmt_rgb565.h, 每个像素占 16 bits。红色占 5 bits, 绿色占 6 bits, 蓝色 5 bits。
-
agg_pixfmt_rgba32.h, 每个像素占 4 个字节, RGB 再加 Alpha 通道值。下面有不同的颜色顺序类型:
- typedef pixel_formats_rgba32<order_rgba32> pixfmt_rgba32;
- typedef pixel_formats_rgba32<order_argb32> pixfmt_argb32;
- typedef pixel_formats_rgba32<order_abgr32> pixfmt_abgr32;
- typedef pixel_formats_rgba32<order_bgra32> pixfmt_bgra32;
像素格式的类定义了它们原始的颜色空间和颜色类型,像下面这样:
typedef rgba8 color_type;
对于 pixfmt_gray8_nnn,这些都是 gray8,这种机制允许你写自己的像素和颜色格式,举个例子,HSV、CMYK 等等,AGG 的其它部分可以完全无误地和你自己定义的新的像素格式一起工作。
注意
区分清楚 color type 和 buffer 代表的原始的颜色空间是非常重要的。比如说,你可以假设你正在使用 CMYK 进行工作,但使用的是 RGB 的 buffer (你只需要写一个简单的转换函数,就可以从 CMYK结构 中创建 rgba8 的对象)。但这种转换只是一个近似,可能会因此出现颜色上的失真,因为有些 CMYK 中的颜色无法用 RGB 来表示,反之亦然。如果想完全使用某种颜色空间的表现能力,你可能要写一个为这种颜色空间写一个可以避免中间转换的 pixel format renderer 。
Creation
重要!
像素格式相关的类并不进行任何的裁剪操作,也就是说直接使用这些类进行工作一般来说不太安全。裁剪是上层类的功能。采用这样设计的理由很简单:要让用户设计自定义的像素格式类越简单越好。像素格式可能会五花八门,但裁剪操作的代码一般都没有什么区别。
pixel_formats_rgb24(rendering_buffer& rb);
像素格式渲染器(pixecl format renderers)的构造函数需要一已经创建并良好初始化的rendering_buffer对象的引用。这个构建工作的开销很小,基本上只是初始化一个指针。
Member Functions
像素格式渲染器(pixecl format renderers)必须要实现以下这些接口:
unsigned width()  const { return m_rbuf->width();  }
unsigned height() const { return m_rbuf->height(); }
返回内存区的宽和高(以像素数来衡量)
color_type pixel(int x, int y);
返回(x,y)坐标处的像素的颜色
void copy_pixel(int x, int y, const color_type& c);
将带颜色的像素拷入缓存区中。如果是本身 RGB 像素格式,那么它就不考虑 rgba8 拷贝源中的存在的 alpha 通道。如果本身是 RGBA,那么它就简单地把所有值都拷贝过来,包括 R、G、B,以及 alpha 通道值。
void blend_pixel(int x, int y, const color_type& c, int8u cover);
这个函数将带颜色信息的像素 c 与缓存区(x,y)处的像素进行混合(blending)。现在我们来解释一下“混合”的概念。混合(blending)是抗锯齿(anti-aliasing)的关键特性。在 RGBA 的颜色空间中,我们使用 rgba8 结构体来代表颜色。这个结构体有一个数据成员 int8u a ,它就是 alpha 通道。不过,在这个函数里,我们还看到一个参数 cover ,表示像素的覆盖值大小,比如,这个像素被多边形所“覆盖”的部分的大小(译注:这涉及到亚像素精度,因为一个像素可以分为 256*256 份,所以这个像素并不一定全部被“覆盖”,详细可参考 AGG 对于亚像素的说明)。其实你可以把它看成是另一个 alpha(或者应该叫它Beta?:))。这么做有两个原因,首先,颜色类型(color type)不一定非要包含 alpha 值)。就算颜色类型带有 alpha 值,它的类型也不一定非要与抗锯齿算法中使用的颜色类型一致。假设你现在使用的是 "Hi-End" RGBA 颜色空间,这种颜色空间使用4个取值范围是[0,1]浮点型来表示,alpha 通道值也使用浮点数————对于这种情况来说,混合时使用一个byte实在太少了,但在去锯齿时却非常够用。所以,cover 值就是为去锯齿而使用的一个统一的备用 alpha 值。在大部分情况来说,用 cover_type 来定义它,但在光栅化处理器(rasterizers)中是直接显示地使用 int8u 类型的。这是故意这么定义的,因为如果需要加强 cover_type 的能力时,会使得所有已经存在的像素格式光栅化处理器(pixel format rasterizres)变得与 cover_type 不兼容。它们确实是不兼容的,在进行颜色混合时,如果中间值使用 32-bit 值来暂存的话,那么最大只能使用 8-bit 的覆盖值(coverage value)和 8-bit 的 alpha 值(alpha) 。如果使用 16-bit 的值的话,就要用 64-bit 的中间值暂存,这对于 32-bit 的平台来说会有非常昂贵的开销。
void copy_hline(int x, int y, unsigned len, const color_type& c);
void copy_vline(int x, int y, unsigned len, const color_type& c);
使用某种颜色描画一条水平或是垂直的线。
void blend_hline(int x, int y, unsigned len, const color_type& c, int8u cover);
void blend_vline(int x, int y, unsigned len, const color_type& c, int8u cover);
采用混合颜色的模式描画一带某种颜色的水平(或垂直线)线。之所以要分开 copy 和 blend 两个版本,是因为考虑到效率问题。虽然可以使用一个 if/else (其实在 blend 版的描画函数中就有)来区分,但对于某些场合,比如要描画很多小型标识(markers)时,这会很影响效率,这种场景在不同的散点图描画程序(scatter plot applicatioin)中常常遇到。
void blend_solid_hspan(int x, int y, unsigned len,
                       const color_type& c, const int8u* covers);
void blend_solid_vspan(int x, int y, unsigned len,
                       const color_type& c, const int8u* covers);
混合描画一条水平或是垂直的 solid-color 的 span, Span与 hline 和 vline 几乎是一样的,但它拥有一个存有 coverage value 的数组。这两个函数在渲染实心的去锯齿多边形时会用到。
void blend_color_hspan(int x, int y, unsigned len,
                       const color_type* colors, const int8u* covers);
void blend_color_vspan(int x, int y, unsigned len,
                       const color_type* colors, const int8u* covers);
混合描画水平或是垂直的颜色 span ,这两个函数用于不同的 span 产生器中,比如说 gradient,image,patterns,Gouraud interpolation 等等。函数接受一个颜色数组参数,这个颜色数组必须与所使用的像素格式兼容。比如说,所有 AGG 中已经有的 RGB 像素格式都与 rgb8 类型是兼容的。 covers 参数是一个 coverage value 的数组,这与 blend_solid_hspan 中的是一样的。这是参数可选,可以设置为 0 。
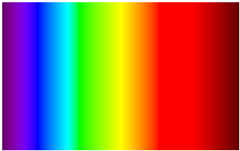
下面这个例子是描画阳光的光谱。rgba 类包含有 4 个浮点数的颜色部分(包括alpha),这个类有一个静态函数 from_wavelength ,以及相应的构造函数。rgba8 可以用 rgba 来构造(在 AGG 中这是一个常见的策略,也就是任何的颜色类型都可以用 rgba 来构造)。
#include <stdio.h>
#include <string.h>
#include "agg_pixfmt_rgb24.h"

enum
{
    frame_width = 320,
    frame_height = 200
};

// [...write_ppm is skipped...]
int main()
{
    //--------------------
    // Allocate the buffer.
    // Clear the buffer, for now "manually"
    // Create the rendering buffer object
    // Create the Pixel Format renderer
    // Create one line (span) of type rgba8.
    // Fill the buffer using blend_color_span
    // Write the buffer to agg_test.ppm
    // Free memory
    unsigned char* buffer = new unsigned char[frame_width * frame_height * 3];
    memset(buffer, 255, frame_width * frame_height * 3);
    agg::rendering_buffer rbuf(buffer,
        frame_width,
        frame_height,
        frame_width * 3);
    agg::pixfmt_rgb24 pixf(rbuf);
    agg::rgba8 span[frame_width];
    unsigned i;
    for(i = 0; i < frame_width; ++i)
    {
        agg::rgba c(380.0 + 400.0 * i / frame_width, 0.8);
        span[i] = agg::rgba8(c);
    }
    for(i = 0; i < frame_height; ++i)
    {
        pixf.blend_color_hspan(0, i, frame_width, span, 0);
    }
    write_ppm(buffer, frame_width, frame_height, "agg_test.ppm");
    delete [] buffer;
    return 0;
}
运行结果如下:
发表评论
-
[翻译]AGG 之适应性细分法描画贝塞尔曲线(下)
2010-07-04 23:05 1636<<<< 续上文 Collin ... -
[翻译]AGG 之适应性细分法描画贝塞尔曲线(上)
2010-07-04 23:04 2046Adaptive Subdivision of Bezier ... -
[翻译] AGG 之贝塞尔插值
2010-07-04 23:03 10412原文地址:http://www.antigrain.com/r ... -
[翻译]AGG 之 Gamma 校正
2010-07-04 23:01 1980Gamma Correction Using Gamma C ... -
[翻译]AGG reference 之 Scanline Containers
2010-07-04 23:00 1497Introduction (译注:这篇 reference ... -
[翻译] AGG Reference 之 Basic Renderers(基础渲染器)(二)
2010-07-04 22:59 1988Alpha-Mask Adaptor Alpha-Mask ... -
开始学习AGG
2010-07-04 22:46 2815发现一个很“帅”的二维图形库----AGG(Anti-G ...




相关推荐
这个库的名称"agg"是“Anti-Grain Geometry”的缩写,它是一个高度优化的C++库,专为高质量的矢量图形渲染而设计。这个库的版本号2.5表明它是该系列的一个特定稳定版本。 AGG库的核心设计理念是提供无锯齿、高精度...
- **Renderers**:包括基于像素和基于矢量的渲染器,如扫描线渲染器和光栅化渲染器,用于将图形转化为屏幕上的像素。 - **Transformations**:支持常见的几何变换,如旋转、缩放和平移,以及更复杂的投影变换。 -...
- **基础渲染器** (`Basic Renderers`) - **头文件**:`agg_renderer_base.h` - **类型**:`agg::renderer_base` - **构造函数**:`renderer_base(pixfmt)` - **成员方法**: - `draw_line(double x1, double ...
AGG(Anti-Grain Geometry)是一个开源的2D图形渲染引擎,主要设计用于高性能的图形绘制和处理。这个图形库是由Evgeny Panasenkov开发,它以C++编写,提供了高度优化的算法来处理图形操作,如线条绘制、曲线绘制、...
下面是一段示例代码,用于展示如何使用AGG绘制一个椭圆并进行渲染。 1. **导入所需头文件**:通过`#include`指令导入AGG库的基础类和函数定义,例如`agg_basics.h`、`agg_rendering_buffer.h`等。 2. **创建应用...
AGG(Anti-Grain Geometry)是一个开源的2D图形渲染引擎,主要设计用于高性能的图形绘制和处理。它提供了一套高效的算法和数据结构,用于实现高质量的矢量图形和位图图形操作。在MFC(Microsoft Foundation Classes...
AGG是一个开源、高效的跨平台2D图形库。AGG的功能与GDI+的功能非常类似,但提供了比GDI+更灵活的编程接口,其产生的图形的质量也非常高(自称超过GDI+) 1.下载AGG库,它的家在http://www.antigrain.com,目前最高版本...
渲染器有多种类型,例如基础渲染器、扫描线渲染器等,每种都有其特定的用途和性能特点。理解这些渲染器的工作原理和应用场景对于高效使用AGG至关重要。 4. **渲染缓存和混合器**:在AGG中,渲染缓存用于存储已渲染...
Agg(Anti-Grain Geometry)是一个开源的2D图形渲染引擎,主要由Alexander Romanov开发,用于创建高质量的矢量图形。这个库提供了一种高效且灵活的方式来处理图形,适用于各种应用程序,如图像处理软件、游戏开发、...
AGG,全称为“Anti-Grain Geometry”,是一款高级的2D图形开发库,专注于高质量的矢量图形渲染。这个库是由Evgeny Panasenkov创建,它以C++语言编写,提供纯C源代码,确保了跨平台的兼容性。AGG的设计目标是实现高...
AGG(Anti-Grain Geometry)是一个开源的二维图形绘制库,主要由C++编写,设计目标是提供高质量、高性能的2D图形渲染。在"agg二维开发入门例程"中,你将学习如何利用AGG进行图形绘制,以及如何进行开发工作。这个...
在计算机图形学中,抗锯齿处理是提高图像质量的关键技术之一。agg库采用先进的算法,提供平滑的边缘渲染,即使在高分辨率下也能保持良好的视觉效果,有效减少像素化的现象,使得线条和曲线看起来更加自然流畅。 **2...
AGG(Anti-Grain Geometry)是一个开源的2D图形渲染引擎,主要用于生成高质量的矢量图形。在Windows平台上,如果你需要使用AGG库进行图形处理或开发项目,你可能会遇到如何在Visual Studio 2013环境下编译和集成AGG...
在MFC中使用AGG,我们需要创建自定义的设备上下文类,以便在AGG渲染器和MFC之间建立桥梁。AGG的优势在于其卓越的绘制质量和高效率,尤其适合创建复杂的图形和动画。 在描述中提到,本示例实现了AGG下的各种属性设置...
AGG 是一个开源的二维图形引擎。它提供一套结合了亚像素(subpixel accuracy)技术与反走样(anti-aliasing)技术的图形算法,实现高效率、高质量的二维图形处理功能。AGG 的另一个特点在于它极大的灵活性。其作者将...
AGG,全称Anti-Grain Geometry,是一个著名的C++矢量图形库,用于高质量的2D图形渲染。它以其高性能、灵活性和精确度而闻名。 在描述中提到的"AGG Lite",可能意味着这个版本是AGG库的精简版,减少了原版的复杂性和...
AGG,全称为“Anti-Grain Geometry”,是一款开源的2D图形渲染库,专为生成高质量、抗锯齿的图像而设计。它提供了一种高效且灵活的方式来创建和操作图形,尤其适用于需要高精度和高性能的场景,比如专业级的图形设计...
一个很优秀的2D图形引擎. Anti-Grain Geometry (AGG) - Version 2.5 A high quality rendering engine for C++ Copyright (C) 2002-2006 Maxim Shemanarev
`agg`的目的是将一维数组(如一列)转化为单个标量值。 - `apply`: 相比之下,`apply`更加**通用**,它可以应用于整个DataFrame或其任何子部分,并执行任意的Python或NumPy函数,甚至用户自定义函数(UDF)。`apply...
总的来说,AGG是一个面向专业开发者,致力于提供高保真2D图形渲染的开源库。它集成了众多先进技术和功能,让开发者能够打造出具有顶级视觉体验的应用程序。对于那些追求细节和质量的项目,AGG无疑是值得信赖的选择。