AutoLoadCache 是一个高效的缓存管理解决方案,而且实现了自动加载(或叫预加载)和“拿来主义”机制,能非常巧妙地解决系统的性能及并发问题。
现在使用的缓存技术很多,比如Redis、 Memcache 、 EhCache等,甚至还有使用ConcurrentHashMap 或 HashTable 来实现缓存。但在缓存的使用上,每个人都有自己的实现方式,大部分是直接与业务代码绑定,随着业务的变化,要更换缓存方案时,非常麻烦。接下来我们就使用AOP + Annotation 来解决这个问题,同时使用自动加载机制来实现数据“常驻内存”,并通过“拿来主义”机制来减轻因并发给系统带来的压力。
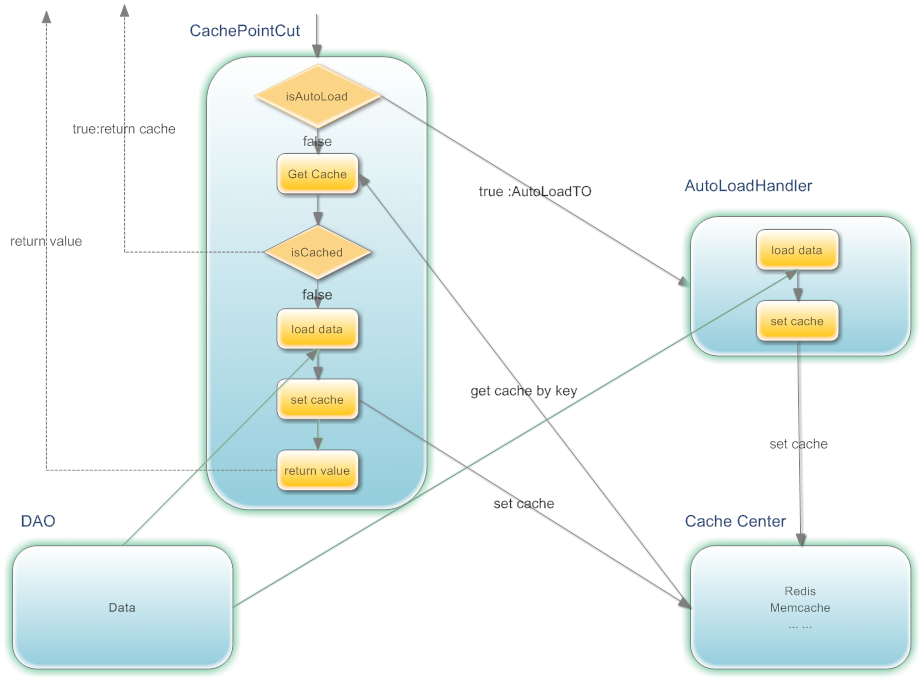
框架设计,如下图所示:
 AOP拦截到请求后:
- 根据请求参数生成Key,后面我们会对生成Key的规则,进一步说明;
- 如果是AutoLoad的,则请求相关参数,封装到AutoLoadTO中,并放到AutoLoadHandler中。
- 根据Key去缓存服务器中取数据,如果取到数据,则返回数据,如果没有取到数据,则执行DAO中的方法,获取数据,同时将数据放到缓存中。如果是AutoLoad的,则把最后加载时间,更新到AutoLoadTO中,最后返回数据;如是AutoLoad的请求,每次请求时,都会更新AutoLoadTO中的 最后请求时间。
- 为了减少并发,增加等待机制(拿来主义机制):如果多个用户同时取一个数据,那么先让第一个请求去DAO取数据,其它请求则等待其返回后,直接从内存中获取,等待一定时间后,如果还没获取到,则会去DAO中取数据。
AutoLoadHandler(自动加载处理器)主要做的事情:当缓存即将过期时,去执行DAO的方法,获取数据,并将数据放到缓存中。为了防止自动加载队列过大,设置了容量限制;同时会将超过一定时间没有用户请求的也会从自动加载队列中移除,把服务器资源释放出来,给真正需要的请求。
使用自加载的目的:
- 避免在请求高峰时,因为缓存失效,而造成数据库压力无法承受;
- 把一些耗时业务得以实现。
- 把一些使用非常频繁的数据,使用自动加载,因为这样的数据缓存失效时,最容易造成服务器的压力过大。
分布式自动加载
如果将应用部署在多台服务器上,理论上可以认为自动加载队列是由这几台服务器共同完成自动加载任务。比如应用部署在A,B两台服务器上,A服务器自动加载了数据D,(因为两台服务器的自动加载队列是独立的,所以加载的顺序也是一样的),接着有用户从B服务器请求数据D,这时会把数据D的最后加载时间更新给B服务器,这样B服务器就不会重复加载数据D。
使用方法
实例代码
1. Maven
<dependency>
  <groupId>com.github.qiujiayu</groupId>
  <artifactId>autoload-cache</artifactId>
  <version>${version}</version>
</dependency>
2. Spring AOP配置
从0.4版本开始增加了Redis及Memcache的PointCut 的实现,直接在Spring 中用aop:config就可以使用。
Redis 配置:
<!-- Jedis 连接池配置 -->
<bean id="jedisPoolConfig" class="redis.clients.jedis.JedisPoolConfig">
  <property name="maxTotal" value="2000" />
  <property name="maxIdle" value="100" />
  <property name="minIdle" value="50" />
  <property name="maxWaitMillis" value="2000" />
  <property name="testOnBorrow" value="false" />
  <property name="testOnReturn" value="false" />
  <property name="testWhileIdle" value="false" />
</bean>
<bean id="shardedJedisPool" class="redis.clients.jedis.ShardedJedisPool">
  <constructor-arg ref="jedisPoolConfig" />
  <constructor-arg>
    <list>
      <bean class="redis.clients.jedis.JedisShardInfo">
      <constructor-arg value="${redis1.host}" />
      <constructor-arg type="int" value="${redis1.port}" />
      <constructor-arg value="instance:01" />
    </bean>
    <bean class="redis.clients.jedis.JedisShardInfo">
      <constructor-arg value="${redis2.host}" />
      <constructor-arg type="int" value="${redis2.port}" />
      <constructor-arg value="instance:02" />
    </bean>
    <bean class="redis.clients.jedis.JedisShardInfo">
      <constructor-arg value="${redis3.host}" />
      <constructor-arg type="int" value="${redis3.port}" />
      <constructor-arg value="instance:03" />
    </bean>
    </list>
  </constructor-arg>
</bean>

<bean id="autoLoadConfig" class="com.jarvis.cache.to.AutoLoadConfig">
  <property name="threadCnt" value="10" />
  <property name="maxElement" value="20000" />
  <property name="printSlowLog" value="true" />
  <property name="slowLoadTime" value="500" />
  <property name="sortType" value="1" />
  <property name="checkFromCacheBeforeLoad" value="true" />
  <property name="autoLoadPeriod" value="50" />
</bean>
<!-- 可以通过implements com.jarvis.cache.serializer.ISerializer<Object> 实现 Kryo 和 FST Serializer 工具,框架的核对不在这里,所以不提供过多的实现 -->
<bean id="hessianSerializer" class="com.jarvis.cache.serializer.HessianSerializer" />

<bean id="cachePointCut" class="com.jarvis.cache.redis.ShardedCachePointCut" destroy-method="destroy">
  <constructor-arg ref="autoLoadConfig" />
  <property name="serializer" ref="hessianSerializer" />
  <property name="shardedJedisPool" ref="shardedJedisPool" />
  <property name="namespace" value="test_hessian" />
</bean>
Memcache 配置:
<bean id="memcachedClient" class="net.spy.memcached.spring.MemcachedClientFactoryBean">
    <property name="servers" value="192.138.11.165:11211,192.138.11.166:11211" />
    <property name="protocol" value="BINARY" />
    <property name="transcoder">
        <bean class="net.spy.memcached.transcoders.SerializingTranscoder">
            <property name="compressionThreshold" value="1024" />
        </bean>
    </property>
    <property name="opTimeout" value="2000" />
    <property name="timeoutExceptionThreshold" value="1998" />
    <property name="hashAlg">
        <value type="net.spy.memcached.DefaultHashAlgorithm">KETAMA_HASH</value>
    </property>
    <property name="locatorType" value="CONSISTENT" />
    <property name="failureMode" value="Redistribute" />
    <property name="useNagleAlgorithm" value="false" />
</bean>

<bean id="hessianSerializer" class="com.jarvis.cache.serializer.HessianSerializer" />
<bean id="cachePointCut" class="com.jarvis.cache.memcache.CachePointCut" destroy-method="destroy">
  <constructor-arg ref="autoLoadConfig" />
  <property name="serializer" ref="hessianSerializer" />
  <property name="memcachedClient", ref="memcachedClient" />
  <property name="namespace" value="test" />
</bean>
如果需要使用本地内存来缓存数据,可以使用: com.jarvis.cache.map.CachePointCut
AOP 配置:
<aop:config proxy-target-class="true">
<aop:aspect ref="cachePointCut">
<aop:pointcut id="daoCachePointcut" expression="execution(public !void com.jarvis.cache_example.common.dao..*.*(..)) && @annotation(cache)" />
<aop:around pointcut-ref="daoCachePointcut" method="proceed" />
</aop:aspect>
<aop:aspect ref="cachePointCut" order="1000"><!-- order 参数控制 aop通知的优先级,值越小,优先级越高 ,在事务提交后删除缓存 -->
<aop:pointcut id="deleteCachePointcut" expression="execution(* com.jarvis.cache_example.common.dao..*.*(..)) && @annotation(cacheDelete)" />
<aop:after-returning pointcut-ref="deleteCachePointcut" method="deleteCache" returning="retVal"/>
</aop:aspect>
</aop:config>
通过Spring配置,能更好地支持,不同的数据使用不同的缓存服务器的情况。
注意 如果需要在MyBatis Mapper中使用,则需要使用com.jarvis.cache.mybatis.CachePointCutProxy 来处理。
3. 将需要使用缓存操作的方法前增加 @Cache和 @CacheDelete注解(Redis为例子)
AutoLoadConfig 配置说明
- threadCnt 处理自动加载队列的线程数量,默认值为:10;
- maxElement 自动加载队列中允许存放的最大容量, 默认值为:20000
- printSlowLog 是否打印比较耗时的请求,默认值为:true
- slowLoadTime 当请求耗时超过此值时,记录目录(printSlowLog=true 时才有效),单位:毫秒,默认值:500;
- sortType 自动加载队列排序算法, 0:按在Map中存储的顺序(即无序);1 :越接近过期时间,越耗时的排在最前;2:根据请求次数,倒序排序,请求次数越多,说明使用频率越高,造成并发的可能越大。更详细的说明,请查看代码com.jarvis.cache.type.AutoLoadQueueSortType
- checkFromCacheBeforeLoad 加载数据之前去缓存服务器中检查,数据是否快过期,如果应用程序部署的服务器数量比较少,设置为false, 如果部署的服务器比较多,可以考虑设置为true
- autoLoadPeriod 单个线程中执行自动加载的时间间隔, 此值越小,遍历自动加载队列频率起高,对CPU会越消耗CPU
- functions 注册自定义SpEL函数
@Cache
public @interface Cache {

    /**
     * 缓存的过期时间,单位:秒,如果为0则表示永久缓存
     * @return 时间
     */
    int expire();

    /**
     * 自定义缓存Key,支持Spring EL表达式
     * @return String 自定义缓存Key
     */
    String key() default "";

    /**
     * 设置哈希表中的字段,如果设置此项,则用哈希表进行存储,支持Spring EL表达式
     * @return String
     */
    String hfield() default "";

    /**
     * 是否启用自动加载缓存, 缓存时间必须大于120秒时才有效
     * @return boolean
     */
    boolean autoload() default false;

    /**
     * 自动缓存的条件,可以为空,使用 SpEL 编写,返回 true 或者 false,如果设置了此值,autoload() 就失效,例如:null != #args[0].keyword,当第一个参数的keyword属性为null时设置为自动加载。
     * @return String SpEL表达式
     */
    String autoloadCondition() default "";

    /**
     * 当autoload为true时,缓存数据在 requestTimeout 秒之内没有使用了,就不进行自动加载数据,如果requestTimeout为0时,会一直自动加载
     * @return long 请求过期
     */
    long requestTimeout() default 36000L;

    /**
     * 缓存的条件,可以为空,使用 SpEL 编写,返回 true 或者 false,只有为 true 才进行缓存
     * @return String
     */
    String condition() default "";

    /**
     * 缓存的操作类型:默认是READ_WRITE,先缓存取数据,如果没有数据则从DAO中获取并写入缓存;如果是WRITE则从DAO取完数据后,写入缓存
     * @return CacheOpType
     */
    CacheOpType opType() default CacheOpType.READ_WRITE;

    /**
     * 并发等待时间(毫秒),等待正在DAO中加载数据的线程返回的等待时间。
     * @return 时间
     */
    int waitTimeOut() default 500;
    /**
     * 扩展缓存
     * @return
    */
    ExCache[] exCache() default @ExCache(expire=-1, key="");
}
@ExCache
public @interface ExCache {

    /**
     * 缓存的过期时间,单位:秒,如果为0则表示永久缓存
     * @return 时间
     */
    int expire();

    /**
     * 自定义缓存Key,支持Spring EL表达式
     * @return String 自定义缓存Key
    */
    String key();

    /**
     * 设置哈希表中的字段,如果设置此项,则用哈希表进行存储,支持Spring EL表达式
     * @return String
    */
    String hfield() default "";

    /**
     * 缓存的条件,可以为空,使用 SpEL 编写,返回 true 或者 false,只有为 true 才进行缓存
     * @return String
    */
    String condition() default "";

    /**
     * 通过SpringEL表达式获取需要缓存的数据,如果没有设置,则默认使用 #retVal
     * @return
    */
    String cacheObject() default "";

}
@CacheDelete
public @interface CacheDelete {

    CacheDeleteKey[] value();// 支持删除多个缓存
}
@CacheDeleteKey
public @interface CacheDeleteKey {

    /**
     * 缓存的条件,可以为空,使用 SpEL 编写,返回 true 或者 false,只有为 true 才进行缓存
     * @return String
     */
    String condition() default "";

    /**
     * 删除缓存的Key,支持使用SpEL表达式, 当value有值时,是自定义缓存key。
     * @return String
     */
    String value();

    /**
     * 哈希表中的字段,支持使用SpEL表达式
     * @return String
     */
    String hfield() default "";
}
缓存Key的生成
在@Cache中设置key,可以是字符串或Spring EL表达式:
例如:
    @Cache(expire=600, key="'goods.getGoodsById'+#args[0]")
    public GoodsTO getGoodsById(Long id){...}
为了使用方便,调用hash 函数可以将任何Object转为字符串,使用方法如下:
    @Cache(expire=720, key="'GOODS.getGoods:'+#hash(#args)")
    public List<GoodsTO> getGoods(GoodsCriteriaTO goodsCriteria){...}
生成的缓存Key为"GOODS.getGoods:xxx",xxx为args,的转在的字符串。
在拼缓存Key时,各项数据最好都用特殊字符进行分隔,否则缓存的Key有可能会乱的。比如:a,b 两个变量a=1,b=11,如果a=11,b=1,两个变量中间不加特殊字符,拼在一块,值是一样的。
Spring EL表达式支持调整类的static 变量和方法,比如:"T(java.lang.Math).PI"。
提供的SpEL上下文数据
| 名字 | 描述 | 示例 |
| args | 当前被调用的方法的参数列表 | #args[0] |
| retVal | 方法执行后的返回值(仅当方法执行之后才有效,如@Cache(opType=CacheOpType.WRITE),@ExCache() | #retVal |
提供的SpEL函数
| 名字 | 描述 | 示例 |
| hash | 将Object 对象转换为唯一的Hash字符串 | #hash(#args) |
| empty | 判断Object对象是否为空 | #empty(#args[0]) |
自定义SpEL函数
通过AutoLoadConfig 的functions 注册自定义函数,例如:
<bean id="autoLoadConfig" class="com.jarvis.cache.to.AutoLoadConfig">
  <property name="functions">
    <map>
      <entry key="isEmpty" value="com.jarvis.cache.CacheUtil" />
      <!--#isEmpty(#args[0]) 表示调com.jarvis.cache.CacheUtil中的isEmpty方法-->
    </map>
  </property>
</bean>
数据实时性
下面商品评论的例子中,如果用户发表了评论,要立即显示该如何来处理?
package com.jarvis.example.dao;
import ... ...
public class GoodsCommentDAO{
    @Cache(expire=600, key="'goods_comment_list_'+#args[0]", hfield = "#args[1]+'_'+#args[2]", autoload=true, requestTimeout=18000)
    // goodsId=1, pageNo=2, pageSize=3 时相当于Redis命令:HSET goods_comment_list_1 2_3  List
    public List<CommentTO> getCommentListByGoodsId(Long goodsId, int pageNo, int pageSize) {
        ... ...
    }

    @CacheDelete({@CacheDeleteKey(value="'goods_comment_list_'+#args[0].goodsId")}) // 删除当前所属商品的所有评论,不删除其它商品评论
    // #args[0].goodsId = 1时,相当于Redis命令: DEL goods_comment_list_1
    public void addComment(Comment comment) {
        ... ...// 省略添加评论代码
    }

    @CacheDelete({@CacheDeleteKey(value="'goods_comment_list_'+#args[0]", hfield = "#args[1]+'_'+#args[2]")})
    // goodsId=1, pageNo=2, pageSize=3 时相当于Redis命令:DEL goods_comment_list_1 2_3
    public void removeCache(Long goodsId, int pageNo, int pageSize) {
        ... ...// 使用空方法来删除缓存
    }
}
注意事项
1. 当@Cache中 autoload 设置为 ture 时,对应方法的参数必须都是Serializable的。
AutoLoadHandler中需要缓存通过深度复制后的参数。
2. 参数中只设置必要的属性值,在DAO中用不到的属性值尽量不要设置,这样能避免生成不同的缓存Key,降低缓存的使用率。
例如:
public CollectionTO<AccountTO> getAccountByCriteria(AccountCriteriaTO criteria) {
List<AccountTO> list=null;
PaginationTO paging=criteria.getPaging();
if(null != paging && paging.getPageNo() > 0 && paging.getPageSize() > 0) {// 如果需要分页查询,先查询总数
criteria.setPaging(null);// 减少缓存KEY的变化,在查询记录总数据时,不用设置分页相关的属性值
Integer recordCnt=accountDAO.getAccountCntByCriteria(criteria);
if(recordCnt > 0) {
criteria.setPaging(paging);
paging.setRecordCnt(recordCnt);
list=accountDAO.getAccountByCriteria(criteria);
}
return new CollectionTO<AccountTO>(list, recordCnt, criteria.getPaging().getPageSize());
} else {
list=accountDAO.getAccountByCriteria(criteria);
return new CollectionTO<AccountTO>(list, null != list ? list.size() : 0, 0);
}
}
3. 注意AOP失效的情况;
例如:
TempDAO {
public Object a() {
return b().get(0);
}
@Cache(expire=600)
public List<Object> b(){
return ... ...;
}
}
通过 new TempDAO().a() 调用b方法时,AOP失效,也无法进行缓存相关操作。
4. 自动加载缓存时,不能在缓存方法内叠加查询参数值;
例如:
@Cache(expire=600, autoload=true, key="'myKey'+#hash(#args[0])")
public List<AccountTO> getDistinctAccountByPlayerGet(AccountCriteriaTO criteria) {
List<AccountTO> list;
int count=criteria.getPaging().getThreshold() ;
// 查预设查询数量的10倍
criteria.getPaging().setThreshold(count * 10);
… …
}
因为自动加载时,AutoLoadHandler 缓存了查询参数,执行自动加载时,每次执行时 threshold 都会乘以10,这样threshold的值就会越来越大。
5. 对于一些比较耗时的方法尽量使用自动加载。
6. 对于查询条件变化比较剧烈的,不要使用自动加载机制。
比如,根据用户输入的关键字进行搜索数据的方法,不建议使用自动加载。
7. 如果DAO方法中需要从ThreadLocal 获取数据时,不能使用自动加载机制(@Cache的autoload值不能设置为true)。自动加载是用新的线程中模拟用户请求的,这时ThreadLocal的数据都是空的。
在事务环境中,如何减少“脏读”
不要从缓存中取数据,然后应用到修改数据的SQL语句中
在事务完成后,再删除相关的缓存
在事务开始时,用一个ThreadLocal记录一个HashSet,在更新数据方法执行完时,把要删除缓存的相关参数封装成在一个Bean中,放到这个HashSet中,在事务完成时,遍历这个HashSet,然后删除相关缓存。
大部分情况,只要做到第1点就可以了,因为保证数据库中的数据准确才是最重要的。因为这种“脏读”的情况只能减少出现的概率,不能完成解决。一般只有在非常高并发的情况才有可能发生。就像12306,在查询时告诉你还有车票,但最后支付时不一定会有。
使用规范
将调接口或数据库中取数据,封装在DAO层,不能什么地方都有调接口的方法。
自动加载缓存时,不能在缓存方法内叠加(或减)查询条件值,但允许设置值。
DAO层内部,没使用@Cache的方法,不能调用加了@Cache的方法,避免AOP失效。
对于比较大的系统,要进行模块化设计,这样可以将自动加载,均分到各个模块中。
为什么要使用自动加载机制?
首先我们想一下系统的瓶颈在哪里?
在高并发的情况下数据库性能极差,即使查询语句的性能很高;如果没有自动加载机制的话,在当缓存过期时,访问洪峰到来时,很容易就使数据库压力大增。
往缓存写数据与从缓存读数据相比,效率也差很多,因为写缓存时需要分配内存等操作。使用自动加载,可以减少同时往缓存写数据的情况,同时也能提升缓存服务器的吞吐量。
还有一些比较耗时的业务。
如何减少DAO层并发
- 使用缓存;
- 使用自动加载机制;“写”数据往往比读数据性能要差,使用自动加载也能减少写并发。
- 从DAO层加载数据时,增加等待机制(拿来主义):如果有多个请求同时请求同一个数据,会先让其中一个请求去取数据,其它的请求则等待它的数据,避免造成DAO层压力过大。
可扩展性及维护性
- 通过AOP实现缓存与业务逻辑的解耦。
- 非常方便更换缓存服务器或缓存实现(比如:从Memcache换成Redis,或使用hashmap);
- 非常方便增减缓存服务器(如:增加Redis的节点数);
- 非常方便增加或去除缓存,方便测试期间排查问题;
- 通过Spring配置,能很简单方便使用,也很容易修改维护;支持配置多种缓存实现;
- 可以通过继承AbstractCacheManager,自己实现维护的操作方法,也可以增加除Memcache、Redis外的缓存技术支持。
缓存管理页面
从1.0版本开始增加缓存管理页面。
web.xml配置:
<servlet>
  <servlet-name>cacheadmin</servlet-name>
  <servlet-class>com.jarvis.cache.admin.servlet.AdminServlet</servlet-class>
  <init-param>
    <param-name>cacheManagerNames</param-name>
    <param-value>cachePointCut</param-value>
  </init-param>
  <load-on-startup>1</load-on-startup>
</servlet>
<servlet-mapping>
  <servlet-name>cacheadmin</servlet-name>
  <url-pattern>/cacheadmin</url-pattern>
</servlet-mapping>
显示内容,如下图所示:


5 楼 lmf462696585 2016-04-29 09:51
4 楼 LinApex 2016-04-28 10:06
3 楼 sgq0085 2016-04-21 17:36
请查看这个文档:https://github.com/qiujiayu/AutoLoadCache/blob/master/SpringCache.md
soga
2 楼 qiujiayu 2016-04-20 11:46
请查看这个文档:https://github.com/qiujiayu/AutoLoadCache/blob/master/SpringCache.md
1 楼 sgq0085 2016-04-18 20:05