- 浏览: 1504933 次
- 性别:

- 来自: 南京
-

文章分类
- 全部博客 (419)
- XMPP (19)
- Android (180)
- Java (59)
- Network (4)
- HTML5 (13)
- Eclipse (9)
- SCM (23)
- C/C++ (4)
- UML (4)
- Libjingle (15)
- Tools&Softwares (29)
- Linphone (5)
- Linux&UNIX (6)
- Windows (18)
- Google (10)
- MISC (3)
- SIP (6)
- SQLite (5)
- Security (4)
- Opensource (29)
- Online (2)
- 文章 (3)
- MemoryLeak (10)
- Decompile (5)
- Ruby (1)
- Image (1)
- Bat (4)
- TTS&ASR (28)
- Multimedia (1)
- iOS (20)
- Asciiflow - ASCII Flow Diagram Tool.htm (1)
- Networking (1)
- DLNA&UPnP (2)
- Chrome (2)
- CI (1)
- SmartHome (0)
- CloudComputing (1)
- NodeJS (3)
- MachineLearning (2)
最新评论
-
bzhao:
点赞123!
Windows的adb shell中使用vi不乱码方法及AdbPutty -
wahahachuang8:
我觉得这种东西自己开发太麻烦了,就别自己捣鼓了,找个第三方,方 ...
HTML5 WebSocket 技术介绍 -
obehavior:
view.setOnTouchListenerview是什么
[转]android 一直在最前面的浮动窗口效果 -
wutenghua:
[转]android 一直在最前面的浮动窗口效果 -
zee3.lin:
Sorry~~
When I build "call ...
Step by Step about How to Build libjingle 0.4
http://www.c99.org/2010/01/23/writing-an-android-sync-provider-part-1/
http://www.c99.org/2010/01/23/writing-an-android-sync-provider-part-2/
One of the highlights of the Android 2.0 SDK is that you can write custom sync providers to integrate with the system contacts, calendars, etc. The only problem is that there’s very little documentation on how it all fits together. And worse, if you mess up in certain places, the Android system will crash and reboot! Always up for a challenge, I’ve navigated through the sparse documentation, vague mailing list posts, and the Android source code itself to build a sync provider for our Last.fm app. Want to know how to build your own? Read on!
Account Authenticators
The first piece of the puzzle is called an Account Authenticator , which defines how the user’s account will appear in the “Accounts & Sync” settings. Implementing an Account Authenticator requires 3 pieces: a service that returns a subclass of AbstractAccountAuthenticator from the onBind method, an activity to prompt the user to enter their credentials, and an xml file describing how your account should look when displayed to the user. You’ll also need to add the android.permission.AUTHENTICATE_ACCOUNTS permission to your AndroidManifest.xml.
The Service
The authenticator service is expected to return a subclass of AbstractAccountAuthenticator from the onBind method — if you don’t, Android will crash and reboot when you try to add a new account to the system. The only method in AbstractAccountAuthenticator we really need to implement is addAccount, which returns an Intent that the system will use to display the login dialog to the user. The implementation below will launch our app’s main launcher activity with an action of “fm.last.android.sync.LOGIN” and an extra containing the AccountAuthenticatorResponse object we use to pass data back to the system after the user has logged in.
AccountAuthenticatorService.java
-
import fm.last.android.LastFm;
-
import android.accounts.AbstractAccountAuthenticator;
-
import android.accounts.Account;
-
import android.accounts.AccountAuthenticatorResponse;
-
import android.accounts.AccountManager;
-
import android.accounts.NetworkErrorException;
-
import android.app.Service;
-
import android.content.Context;
-
import android.content.Intent;
-
import android.os.Bundle;
-
import android.os.IBinder;
-
import android.util.Log;
-
-
/**
-
* Authenticator service that returns a subclass of AbstractAccountAuthenticator in onBind()
-
*/
-
public class AccountAuthenticatorService extends Service {
-
private static final String TAG = "AccountAuthenticatorService" ;
-
private static AccountAuthenticatorImpl sAccountAuthenticator = null ;
-
-
public AccountAuthenticatorService( ) {
-
super ( ) ;
-
}
-
-
public IBinder onBind( Intent intent) {
-
IBinder ret = null ;
-
if ( intent.getAction ( ) .equals ( android.accounts .AccountManager .ACTION_AUTHENTICATOR_INTENT ) )
-
ret = getAuthenticator( ) .getIBinder ( ) ;
-
return ret;
-
}
-
-
private AccountAuthenticatorImpl getAuthenticator( ) {
-
if ( sAccountAuthenticator == null )
-
sAccountAuthenticator = new AccountAuthenticatorImpl( this ) ;
-
return sAccountAuthenticator;
-
}
-
-
private static class AccountAuthenticatorImpl extends AbstractAccountAuthenticator {
-
private Context mContext;
-
-
public AccountAuthenticatorImpl( Context context) {
-
super ( context) ;
-
mContext = context;
-
}
-
-
/*
-
* The user has requested to add a new account to the system. We return an intent that will launch our login screen if the user has not logged in yet,
-
* otherwise our activity will just pass the user's credentials on to the account manager.
-
*/
-
@Override
-
public Bundle addAccount( AccountAuthenticatorResponse response, String accountType, String authTokenType, String [ ] requiredFeatures, Bundle options)
-
throws NetworkErrorException {
-
Bundle reply = new Bundle( ) ;
-
-
Intent i = new Intent( mContext, LastFm.class ) ;
-
i.setAction ( "fm.last.android.sync.LOGIN" ) ;
-
i.putExtra ( AccountManager.KEY_ACCOUNT_AUTHENTICATOR_RESPONSE , response) ;
-
reply.putParcelable ( AccountManager.KEY_INTENT , i) ;
-
-
return reply;
-
}
-
-
@Override
-
public Bundle confirmCredentials( AccountAuthenticatorResponse response, Account account, Bundle options) {
-
return null ;
-
}
-
-
@Override
-
public Bundle editProperties( AccountAuthenticatorResponse response, String accountType) {
-
return null ;
-
}
-
-
@Override
-
public Bundle getAuthToken( AccountAuthenticatorResponse response, Account account, String authTokenType, Bundle options) throws NetworkErrorException {
-
return null ;
-
}
-
-
@Override
-
public String getAuthTokenLabel( String authTokenType) {
-
return null ;
-
}
-
-
@Override
-
public Bundle hasFeatures( AccountAuthenticatorResponse response, Account account, String [ ] features) throws NetworkErrorException {
-
return null ;
-
}
-
-
@Override
-
public Bundle updateCredentials( AccountAuthenticatorResponse response, Account account, String authTokenType, Bundle options) {
-
return null ;
-
}
-
}
-
}
The account authenticator service should be defined in your AndroidManifest.xml, with a meta-data tag referencing an xml definition file, as follows:
Snippet from AndroidManifest.xml
-
<service android:name ="AccountAuthenticatorService"
-
android:exported ="true" android:process =":auth" >
-
<intent-filter>
-
<action android:name ="android.accounts.AccountAuthenticator" />
-
</intent-filter>
-
<meta-data android:name ="android.accounts.AccountAuthenticator"
-
android:resource ="@xml/authenticator" />
-
</service>
The Activity
If you don’t already have a login screen, there’s a convenience class AccountAuthenticatorActivity you can subclass that will pass your response back to the authentication manager for you, however if you already have a login activity in place you may find it easier to just pass the data back yourself, as I have done here. When the user has successfully been authenticated, we create an Account object for the user’s credentials. An account has an account name, such as the username or email address, and an account type, which you will define in your xml file next. You may find it easier to store your account type in strings.xml and use getString() to fetch it, as it is used in multiple places.
Snippet from the Last.fm login activity
-
Account account = new Account( username, getString( R.string .ACCOUNT_TYPE ) ) ) ;
-
AccountManager am = AccountManager.get ( this ) ;
-
boolean accountCreated = am.addAccountExplicitly ( account, password, null ) ;
-
-
Bundle extras = getIntent.getExtras ( ) ;
-
if ( extras ! = null ) {
-
if ( accountCreated) { //Pass the new account back to the account manager
-
AccountAuthenticatorResponse response = extras.getParcelable ( AccountManager.KEY_ACCOUNT_AUTHENTICATOR_RESPONSE ) ;
-
Bundle result = new Bundle( ) ;
-
result.putString ( AccountManager.KEY_ACCOUNT_NAME , username) ;
-
result.putString ( AccountManager.KEY_ACCOUNT_TYPE , getString( R.string .ACCOUNT_TYPE ) ) ;
-
response.onResult ( result) ;
-
}
-
finish( ) ;
-
}
The XML definition file
The account xml file defines what the user will see when they’re interacting with your account. It contains a user-readable name, the system account type you’re defining, various icons, and a reference to an xml file containing PreferenceScreens the user will see when modifying your account.
authenticator.xml
-
<account-authenticator xmlns:android ="http://schemas.android.com/apk/res/android"
-
android:accountType ="fm.last.android.account"
-
android:icon ="@drawable/icon"
-
android:smallIcon ="@drawable/icon"
-
android:label ="@string/app_name"
-
android:accountPreferences ="@xml/account_preferences" />
account_preferences.xml
-
<PreferenceScreen
-
xmlns:android ="http://schemas.android.com/apk/res/android" >
-
<PreferenceCategory
-
android:title ="General Settings" />
-
-
<PreferenceScreen
-
android:key ="account_settings"
-
android:title ="Account Settings"
-
android:summary ="Sync frequency, notifications, etc." >
-
<intent
-
android:action ="fm.last.android.activity.Preferences.ACCOUNT_SETUP"
-
android:targetPackage ="fm.last.android"
-
android:targetClass ="fm.last.android.activity.Preferences" />
-
</PreferenceScreen>
-
</PreferenceScreen>
Putting it all together
Now we’re ready for testing! The Android accounts setting screen
doesn’t handle exceptions very well — if something goes wrong, your
device will reboot! A better way to test is to launch the emulator, run
the “Dev Tools” app, and pick “AccountsTester”.
You should see your new account type in the list, along with the
built-in “Corporate” account type. Go ahead and select your account type
from the drop-down list, and then press the “Add” button, and you
should be presented with your login activity. After authenticating, your
account should appear in a list below the buttons. At this point, it
should be safe to use the system “Accounts & Sync” settings screen
to remove or modify your account.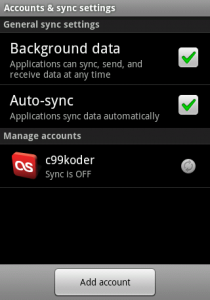
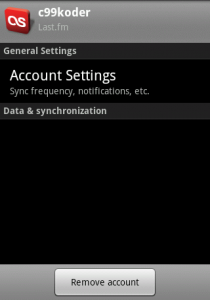
Ready to fill in that section below “Data & synchronization”? Let’s move on to part 2 !
The source code for the implementation referenced here is available in my Last.fm github project under the terms of the GNU General Public License. A standalone sample project is also available here under the terms of the Apache License 2.0. Google has also released their own sample sync provider on the Android developer portal that’s a bit more complete than mine.
One of the great new user-facing features of Android 2.0 is the is
the new Facebook app, which brings your Facebook contacts and statuses
into your Android contacts database: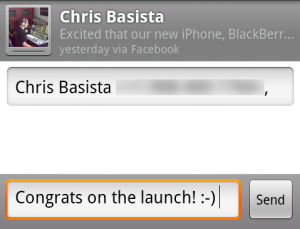
So, how exactly does my Nexus One know that Chris is excited about the
upcoming launch of his new mobile apps? The answer is a Contacts sync
provider in the Facebook app. Read on to learn how to create your own!
Sync Providers
Sync providers are services that allow an Account to synchronize data on the device on a regular basis. Not quite sure how to create an Account? Read part one first! To implement a Contacts sync provider, we’ll need a service, some xml files, and the following permissions added to the AndroidManifest.xml:
AndroidManifest.xml snippet
-
<uses-permission android:name ="android.permission.INTERNET" />
-
<uses-permission android:name ="android.permission.ACCESS_NETWORK_STATE" />
-
<uses-permission android:name ="android.permission.READ_CONTACTS" />
-
<uses-permission android:name ="android.permission.WRITE_CONTACTS" />
-
<uses-permission android:name ="android.permission.GET_ACCOUNTS" />
-
<uses-permission android:name ="android.permission.MANAGE_ACCOUNTS" />
-
<uses-permission android:name ="android.permission.AUTHENTICATE_ACCOUNTS" />
-
<uses-permission android:name ="android.permission.READ_SYNC_SETTINGS" />
-
<uses-permission android:name ="android.permission.WRITE_SYNC_SETTINGS" />
The Service
Similar to our Account Authenticator service, our Contacts Sync Provider service will return a subclass of AbstractThreadedSyncAdapter from the onBind method.
ContactsSyncAdapterService.java
-
public class ContactsSyncAdapterService extends Service {
-
private static final String TAG = "ContactsSyncAdapterService" ;
-
private static SyncAdapterImpl sSyncAdapter = null ;
-
private static ContentResolver mContentResolver = null ;
-
-
public ContactsSyncAdapterService( ) {
-
super ( ) ;
-
}
-
-
private static class SyncAdapterImpl extends AbstractThreadedSyncAdapter {
-
private Context mContext;
-
-
public SyncAdapterImpl( Context context) {
-
super ( context, true ) ;
-
mContext = context;
-
}
-
-
@Override
-
public void onPerformSync( Account account, Bundle extras, String authority, ContentProviderClient provider, SyncResult syncResult) {
-
try {
-
ContactsSyncAdapterService.performSync ( mContext, account, extras, authority, provider, syncResult) ;
-
} catch ( OperationCanceledException e) {
-
}
-
}
-
}
-
-
@Override
-
public IBinder onBind( Intent intent) {
-
IBinder ret = null ;
-
ret = getSyncAdapter( ) .getSyncAdapterBinder ( ) ;
-
return ret;
-
}
-
-
private SyncAdapterImpl getSyncAdapter( ) {
-
if ( sSyncAdapter == null )
-
sSyncAdapter = new SyncAdapterImpl( this ) ;
-
return sSyncAdapter;
-
}
-
-
private static void performSync( Context context, Account account, Bundle extras, String authority, ContentProviderClient provider, SyncResult syncResult)
-
throws OperationCanceledException {
-
mContentResolver = context.getContentResolver ( ) ;
-
Log.i ( TAG, "performSync: " + account.toString ( ) ) ;
-
//This is where the magic will happen!
-
}
-
}
The service is defined in AndroidManifest.xml like so:
AndroidManifest.xml snippet
-
<service android:name =".sync.ContactsSyncAdapterService"
-
android:exported ="true" android:process =":contacts" >
-
<intent-filter>
-
<action android:name ="android.content.SyncAdapter" />
-
</intent-filter>
-
<meta-data android:name ="android.content.SyncAdapter"
-
android:resource ="@xml/sync_contacts" />
-
</service>
Finally, we need an xml file to let Android know that our sync provider handles Contacts for the Account type we defined in part 1.
sync_contacts.xml
-
<sync-adapter xmlns:android ="http://schemas.android.com/apk/res/android"
-
android:contentAuthority ="com.android.contacts"
-
android:accountType ="fm.last.android.account" />
At this point we have a sync provider that doesn’t do anything, but
also shouldn’t crash the Android system. Just in case, lets test it in
Dev Tools first. Start the Android emulator and launch the “Dev Tools”
app, then scroll down to “Sync Tester”.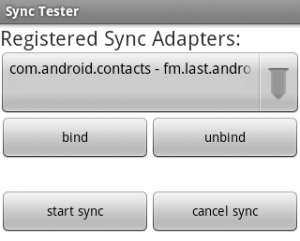
The drop-down should confirm that com.android.contacts can be synced
with the account type you’ve created. Select the entry for your account
type and press the “Bind” button to connect to your sync service. If all
goes well, Sync Tester will say it’s connected to your service. Now
click “Start Sync” and select your account from the popup. Sync Tester
will let you know that the sync succeeded (even though we didn’t
actually do anything). At this point it should be safe to enable contact
syncing from the Accounts & Sync settings screen without Android
crashing and rebooting.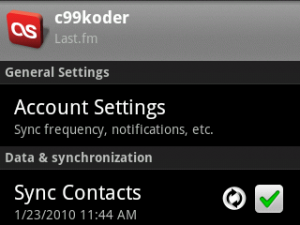
Contacts
Lets take a moment to discuss how Contacts on Android work. Each sync account, such as Google or Facebook, creates its own set of RawContacts which the Android system then aggregates into the single list of contacts you see in the Dialer. The RawContacts table contains several fields that Sync Providers can use for whatever they like, and in this implementation we will use the SYNC1 field to store the RawContact’s Last.fm username.
Contact Data
Data, such as name, phone number, email address, etc. is stored in a
table that references a RawContact ID. The Data table can contain
anything you like, and there are several predefined MIME-types available
for phone numbers, email addresses, names, etc. Android will
automatically try to combine RawContacts that contain the same name,
email address, etc. into a single Contact, and the user can also combine
and split Contacts manually from the contact edit screen.
Custom Data Types
A sync provider can store additional data about a RawContact in the Data table, and provide an xml file to tell the Contacts app how to format this row. To create a custom MIME type, we need to add an additional meta-data tag to our service entry in AndroidManifest.xml to reference a new ContactsSource XML file:
AndroidManifest.xml snippet
-
<meta-data android:name ="android.provider.CONTACTS_STRUCTURE"
-
android:resource ="@xml/contacts" />
This ContactsSource xml file will tell the Contacts app how to format our custom MIME-types. In the example below, we specify an icon, and tell the Contacts app to use the DATA2 and DATA3 columns to render the fields. Note that this file’s format doesn’t appear to be documented outside of the source code for the Contacts app .
contacts.xml
-
<ContactsSource xmlns:android ="http://schemas.android.com/apk/res/android" >
-
<ContactsDataKind
-
android:icon ="@drawable/icon"
-
android:mimeType ="vnd.android.cursor.item/vnd.fm.last.android.profile"
-
android:summaryColumn ="data2"
-
android:detailColumn ="data3"
-
android:detailSocialSummary ="true" />
-
</ContactsSource>
Here’s how Facebook’s custom “Facebook Profile” field looks when rendered by the Contacts app:
Creating a RawContact
Now lets put all the above information together to create a RawContact for a Last.fm user. Our contacts will display only a name and a custom field that links to the user’s Last.fm profile. We store the user’s username in the RawContact’s SYNC1 field so we can easily look it up later. We will batch together the creation of the RawContact and the insertion of the Data, as Android will run an aggregation pass after each batch completes.
addContact method
-
private static void addContact( Account account, String name, String username) {
-
Log.i ( TAG, "Adding contact: " + name) ;
-
ArrayList< ContentProviderOperation> operationList = new ArrayList< ContentProviderOperation> ( ) ;
-
-
//Create our RawContact
-
ContentProviderOperation.Builder builder = ContentProviderOperation.newInsert ( RawContacts.CONTENT_URI ) ;
-
builder.withValue ( RawContacts.ACCOUNT_NAME , account.name ) ;
-
builder.withValue ( RawContacts.ACCOUNT_TYPE , account.type ) ;
-
builder.withValue ( RawContacts.SYNC1 , username) ;
-
operationList.add ( builder.build ( ) ) ;
-
-
//Create a Data record of common type 'StructuredName' for our RawContact
-
builder = ContentProviderOperation.newInsert ( ContactsContract.Data .CONTENT_URI ) ;
-
builder.withValueBackReference ( ContactsContract.CommonDataKinds .StructuredName .RAW_CONTACT_ID , 0 ) ;
-
builder.withValue ( ContactsContract.Data .MIMETYPE , ContactsContract.CommonDataKinds .StructuredName .CONTENT_ITEM_TYPE ) ;
-
builder.withValue ( ContactsContract.CommonDataKinds .StructuredName .DISPLAY_NAME , name) ;
-
operationList.add ( builder.build ( ) ) ;
-
-
//Create a Data record of custom type "vnd.android.cursor.item/vnd.fm.last.android.profile" to display a link to the Last.fm profile
-
builder = ContentProviderOperation.newInsert ( ContactsContract.Data .CONTENT_URI ) ;
-
builder.withValueBackReference ( ContactsContract.Data .RAW_CONTACT_ID , 0 ) ;
-
builder.withValue ( ContactsContract.Data .MIMETYPE , "vnd.android.cursor.item/vnd.fm.last.android.profile" ) ;
-
builder.withValue ( ContactsContract.Data .DATA1 , username) ;
-
builder.withValue ( ContactsContract.Data .DATA2 , "Last.fm Profile" ) ;
-
builder.withValue ( ContactsContract.Data .DATA3 , "View profile" ) ;
-
operationList.add ( builder.build ( ) ) ;
-
-
try {
-
mContentResolver.applyBatch ( ContactsContract.AUTHORITY , operationList) ;
-
} catch ( Exception e) {
-
Log.e ( TAG, "Something went wrong during creation! " + e) ;
-
e.printStackTrace ( ) ;
-
}
-
}
Social status updates
Android keeps another table for social networking status updates. Inserting a record into this table will replace any previous status if the timestamp of the insert is newer than the previous timestamp, otherwise the previous record will remain and the new insert will be discarded. A status update record is associated with a Data record, in our implementation we will associate it with our Last.fm profile record. Status records contain the status text, a package name where resources are located, an icon resource, and a label resource. Below is a function that will insert a status update, as well as updating our Last.fm Profile Data record to display the last track the user listened to. Note that for efficiency purposes, we will send all the updates in a single batch, so Android will only run a single aggregation pass at the end.
updateContactStatus method
-
private static void updateContactStatus( ArrayList< ContentProviderOperation> operationList, long rawContactId, Track track) {
-
Uri rawContactUri = ContentUris.withAppendedId ( RawContacts.CONTENT_URI , rawContactId) ;
-
Uri entityUri = Uri.withAppendedPath ( rawContactUri, Entity .CONTENT_DIRECTORY ) ;
-
Cursor c = mContentResolver.query ( entityUri, new String [ ] { RawContacts.SOURCE_ID , Entity .DATA_ID , Entity .MIMETYPE , Entity .DATA1 } , null , null , null ) ;
-
try {
-
while ( c.moveToNext ( ) ) {
-
if ( ! c.isNull ( 1 ) ) {
-
String mimeType = c.getString ( 2 ) ;
-
String status = "" ;
-
if ( track.getNowPlaying ( ) ! = null && track.getNowPlaying ( ) .equals ( "true" ) )
-
status = "Listening to " + track.getName ( ) + " by " + track.getArtist ( ) ;
-
else
-
status = "Listened to " + track.getName ( ) + " by " + track.getArtist ( ) ;
-
-
if ( mimeType.equals ( "vnd.android.cursor.item/vnd.fm.last.android.profile" ) ) {
-
ContentProviderOperation.Builder builder = ContentProviderOperation.newInsert ( ContactsContract.StatusUpdates .CONTENT_URI ) ;
-
builder.withValue ( ContactsContract.StatusUpdates .DATA_ID , c.getLong ( 1 ) ) ;
-
builder.withValue ( ContactsContract.StatusUpdates .STATUS , status) ;
-
builder.withValue ( ContactsContract.StatusUpdates .STATUS_RES_PACKAGE , "fm.last.android" ) ;
-
builder.withValue ( ContactsContract.StatusUpdates .STATUS_LABEL , R.string .app_name ) ;
-
builder.withValue ( ContactsContract.StatusUpdates .STATUS_ICON , R.drawable .icon ) ;
-
if ( track.getDate ( ) ! = null ) {
-
long date = Long .parseLong ( track.getDate ( ) ) * 1000 ;
-
builder.withValue ( ContactsContract.StatusUpdates .STATUS_TIMESTAMP , date) ;
-
}
-
operationList.add ( builder.build ( ) ) ;
-
-
builder = ContentProviderOperation.newUpdate ( Co
发表评论
-
[Android] 为Android安装BusyBox —— 完整的bash shell
2013-12-27 10:19 1490http://www.cnblogs.com/xiaowen ... -
Windows的adb shell中使用vi不乱码方法及AdbPutty
2013-12-27 10:17 7579http://www.veryhuo.com/down/ht ... -
AppMobi推出新XDK,可创建测试PhoneGap项目
2012-09-03 13:39 2637AppMobi今天发布了一个新的工具PhoneGap Mobi ... -
Sencha
2012-09-03 12:59 1186http://www.sencha.com/ Se ... -
jQuery Mobile学习
2012-09-01 12:33 1691使用Jquery Mobile设计Android通讯录 ... -
BackBone
2012-09-01 12:34 1260Backbone.js 是一种重量级javascript M ... -
jQTouch
2012-08-30 15:57 984A Zepto/jQuery plugin for mobil ... -
SwiFTP
2012-08-30 15:43 1307SwiFTP is a FTP server that run ... -
kWS
2012-08-30 15:41 1199kWS is a lightweight and fast W ... -
jQuery Mobile
2012-08-30 15:07 1028http://jquerymobile.com/ -
PhoneGap
2012-08-30 15:07 1046http://phonegap.com/ -
Android Button background image pressed/highlighted and disabled states without
2012-08-06 12:49 1680http://shikii.net/blog/android- ... -
[AndriodTips]Image, saved to sdcard, doesn't appear in Android's Gallery app
2012-08-04 16:15 1159http://stackoverflow.com/questi ... -
Voice detection for Android
2012-07-23 11:39 2348Here it is, my fist JAVA applic ... -
[AndroidTip]local reference table overflow (max=512)的错误解决
2012-07-22 22:56 6050JNI层coding经常会遇到ReferenceTable o ... -
[AndroidTip]EditText如何初始状态不获得焦点?
2012-07-22 15:35 1226最简单的办法是在EditText前面放置一个看不到的Linea ... -
[AndroidTip]android textview滚动条
2012-07-21 14:29 1298本来是想做一个显示文字信息的,当文字很多时View的高度不能超 ... -
Google公布Android 4.1完整功能
2012-07-16 09:48 3185http://www.android.com/about/je ... -
Android开发:使用AudioTrack播放PCM音频数据【附源码】
2012-07-13 15:20 20869http://www.linuxidc.com/Linux/2 ... -
Android上的行车记录仪
2012-07-11 22:31 2010MyCar Recorder DailyRoads


相关推荐
Writing An Interpreter In Go 英文mobi 本资源转载自网络,如有侵权,请联系上传者或csdn删除 本资源转载自网络,如有侵权,请联系上传者或csdn删除
How to build an interpreter for a C-like programming language from scratch What a lexer, a parser and an Abstract Syntax Tree (AST) are and how to build your own What closures are and how and why they...
" Ball - Writing An Interpreter In Go" 本资源主要讲述如何使用 Go 语言编写一个解释器,作者 Thorsten Ball 通过一步步的指导 Teaching 读者如何从头开始创建一个 Monkey 编程语言的解释器。 在本书中,作者...
1. Go语言编程:文档标题提到了“writing an interpreter in go”,这表明本书是关于使用Go语言来编写解释器的教程。Go语言以其简洁、高效和并发处理能力强而著称,它允许开发者快速构建出性能优越的应用程序。解释...
An example of writing an input method for a software keyboard. Spinner A simple application that serves as an application-under-test for the SpinnerTest sample application. SpinnerTest An example ...
《Writing An Interpreter In Go》是一本深入探讨如何使用Go语言编写解释器的书籍。作者通过清晰易懂的方式,引领读者逐步构建一个完整的编程语言解释器。这本书覆盖了编译器构造的基础知识,对于想要理解编程语言...
在《Writing An Interpreter In Go》这本书中,作者Thorsten Ball引领读者一起构建一个名为Monkey的编程语言的解释器。本书采用逐步的方式,从零代码开始,直到构建出一个完全功能的Monkey编程语言解释器。书中的...
Writing An Interpreter In Go 英文azw3 本资源转载自网络,如有侵权,请联系上传者或csdn删除 本资源转载自网络,如有侵权,请联系上传者或csdn删除
Pro_Android_Scripting_with_SL4A__Writing_Android_Native_Apps_Using_Python__Lua__and_Beanshell.epub
Pro_Android_Scripting_with_SL4A__Writing_Android_Native_Apps_Using_Python__Lua__and_Beanshell.mobi
- What a lexer, a parser and an Abstract Syntax Tree (AST) are and how to build your own - What closures are and how and why they work - What the Pratt parsing technique and a recursive descent parser...
在“writing-an-alsa-driver.pdf”文档中,可能详细介绍了编写ALSA驱动的具体步骤、常见问题及解决策略。而“www.pudn.com.txt”可能是从某个论坛或资源网站下载文档的来源信息,可能包含更多相关的资料链接和讨论。...
标题:“writing-an-alsa-driver.pdf” 描述:本文档详细介绍了如何编写ALSA(高级Linux声音架构)驱动程序。 ### 一、ALSA框架概览 ALSA,即Advanced Linux Sound Architecture,是Linux系统中的一个声音子系统...
From Hacking to Report Writing An Introduction to Security and Penetration Testing 英文epub 本资源转载自网络,如有侵权,请联系上传者或csdn删除 本资源转载自网络,如有侵权,请联系上传者或csdn删除
From Hacking to Report Writing An Introduction to Security and Penetration Testing 英文无水印pdf pdf所有页面使用FoxitReader和PDF-XChangeViewer测试都可以打开 本资源转载自网络,如有侵权,请联系上传...
根据提供的文件信息,本文将详细解析与Android平台上实时游戏开发相关的关键知识点,包括技术发展、设备性能、游戏架构设计及市场策略等方面。 ### 如何理解Android实时游戏开发 #### 设备变化与发展 - **时间背景...