近日在海外社交新闻站点Reddit上对青瓷引擎展开了激烈的讨论,起因是海外一个专门介绍各类游戏引擎的网站GameFromScratch发表了一篇名为《走进青瓷引擎》的新手教程和评测。今天将带大家一起来看看这篇文章。(文章为全英文,为了方便大家阅读,对每段大意做了简单翻译。若有任何疑问欢迎交流。)
Welcome to another episode in the “Closer Look at” game engine series. The closer look series is a combination of getting started tutorial and review to help you determine if a game engine is the right fit for you. Today we are looking at the QICI Engine and HTML5 game engine built over top of the Phaser framework which itself uses the Pixi graphics renderer. Normally when I work with a game engine, I have to spend several weeks with it before I can put together one of these guides. With QICI, it took substantially less time, only a couple days, to come to terms with the engine. This isn’t a slight on QICI in the slightest. First, I am a big fan of the Phaser engine it is built on, so this gave me an immediate familiarity. Second, it is just an extremely good, well designed, capable and well documented game engine. Hmmm, bit of a spoiler there I suppose, but I really like the QICI engine. Read on to find out why.
欢迎来到新的一期“走近” 系列,该系列是通过结合的新手教程和评论来帮助你选择最适合的游戏引擎。今天,我们将走进青瓷引擎,一款将使用了PIXI图形渲染的Phaser作为底层框架的HTML5游戏引擎。一般情况下,我在使用一款引擎之前都要花上数周来熟悉各种手册。但是,这次对于青瓷引擎,我仅用了几天便可上手了,这简直太棒了!我是Phaser的铁杆粉丝,因此青瓷引擎给我一种特别的亲近感。另外,无论是界面设计、使用性能以及用户手册方面都非常贴心。这款引擎实在是我的大爱,接下来请随我一起走近这款引擎。
As always, there is an HD video version of this guide available here. (注:该视频需要FQ观看,墙内的同学可点击这里)
按照惯例,此处有视频介绍。
A Tour of the QICI Engine
The engine is available for download here. It is bundled as a zip archive while available on Github (the code is not directly on Github however, but is included within the archive). Simply extract the archive contents then run start-win.bat or start-mac.command depending on platform. The engine is built around NodeJS and Node must be installed before using the QICI engine. The code is released under the MIT license, making QICI both free as in beer and free as in freedom. There are future hooks for paid plugins, but currently all plugins are available for free as well.
这款引擎的下载地址在这,她在Github上提供了压缩文档,简单解压后你可以根据你的操作系统运行 start-win.bat 或 start-mac.command。使用该引擎之前需要下载并安装NodeJS(点击下载)。青瓷引擎是完全免费且开源的,并遵从MIT协议。将来会提供一些付费插件,不过目前所有的插件都是免费的。
Once you run QICI, it loads a browser window and a fairly humble project management screen:
当你运行青瓷引擎时,她会打开一个浏览器界面,并呈现出一个简洁的菜单,如下:

Here you load existing or create new projects. Creating a project is simply a matter of selecting an empty directory and clicking Create.
这个界面下你可以打开以往的工程或创建一个新的工程。选择一个空白目录,并点击“创建”,即可创建一个新工程。
Once you’ve loaded or created a project, you will be brought to the primary editing window:
如果你以前加载或创建过新工程,你将进入到一个编辑主界面:

The editor is pretty typical of modern component based game engines. You’ve got an editing surface for composing screen elements, a hierarchy view containing your current scenes contents, a project view for managing the assets in your project and finally an inspector view that updates dynamically based upon the current selection. For a web based editor, the UI is silky smooth and doesn’t feel clunky. For example, right click context menu support is prevalent and intuitive:
编辑器采用了当下经典并非常流行的通用组件,包括当前场景内容的层次树面板、管理当前项目工程的所有资源的工程项目面板,以及可动态监测激活目标属性的属性监视面板。作为一个基于Web的编辑器,其UI设计非常自然、舒适。比如右键菜单内容就很直观便捷。

The editor supports common features like drag and drop, tool tips, resizes well in the browser and frankly doesn’t feel like a web app most of the time. I encountered the occasional glitch where the cursor got stuck in the wrong mode, but they were uncommon and easily avoided. Frankly, if you weren’t in a web browser, you would have no idea this was a web application.
编辑器支持通用功能,如拖拽、工具提示、浏览器适应等,我曾发生过一次鼠标困顿的问题,不过类似问题发生概率较低,也很容易避免。说实话,如果不是在浏览器中使用的话,你很难相信这是一款基于web的应用。
You can also change the layout to work in Portrait mode, like so:
你可以选择纵向的布局模式,如下:

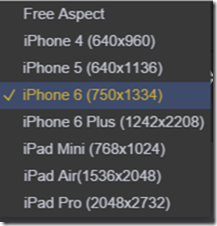
The UI can be switch between English and Chinese via the Language menu. You can also configure the editing window to mirror common iOS device dimensions:
引擎支持中英文两种语言,可直接在语言选项中选取。同时编辑窗口可设置为iOS主流设备分辨率。

Oddly, no Android love. Not really a big deal, as this just sets the dimensions and a Free Aspect option exists
如果是Android系统下请选择与选项中相近的分辨率,或者使用"Free Aspect"选项。
Creating Scenes
创建场景
Your game project is composed of one or more scenes. We can add, reload and save scenes via the project menu.
可以在工程菜单中选择新增、加载或保存场景。

The following settings are configurable on the project by project basis:
在项目基础上,可配置下列设置

Once saved, a Scene appears under states in your assets view:
保存以后,场景会出现在资源视图状态下的state文件下:

Scenes are composed of the following elements
场景中包含以下元素:

To create a new game object, simply select it from the list and position it on screen. Here for example is a sprite:
创建一个新的游戏对象,只需从列表选中即可。以下是创建一个精灵的例子:


There are widgets for placement, free or axis confined, scaling and free scaling, but oddly enough, not rotation. To perform rotation, you need to use the Inspector window:
工具栏中包含了移动场景、移动对象、缩放变形等。(笔者注:拖拽小红点可以旋转)

As you can see, the Inspector has editors for the various components that go into our game object. In this case, a Sprite contains a Transform and Sprite component. You can add additional components via the Add Component button:
如图所示,属性监视面板包含了针对游戏对象的各种元素的编辑器。在这个例子中,精灵包含了变形和精灵组件。你可以通过添加组件按钮增加其他组件。

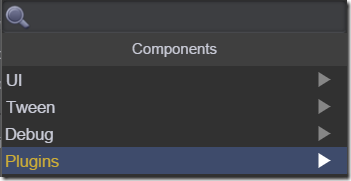
Somewhat confusingly, you can also add components in another manner, as we will see shortly when we attach a script. You can add additional functionality via Plugin, like so:
你还可以通过其他方式增加组件。你可以通过插件增加新的功能,比如:

Let’s add an Arcade Physics controller to our game, and make our sprite a physics object. Select Plugins->Plugin Manager, then in Inspector enable Arcade Physics. Next click Save and Reload:
我们来给游戏添加一个物理组件,赋予精灵物理对象的特性。选择“插件”—>“插件管理”,在属性监视面板中勾选物理组件,然后点击保存并加载。

Now if we click Add Components in the Inspector with our sprite selected, we get:
如果我们点击添加组件按钮,我们将看到:

Select Plugins->Arcade->RigidBody. You will see in Inspector, we now have an additional component to configure.
选择Plugins->Arcade->RigidBody,你将在属性面板中看到刚添加的插件,现在就可以配置新的组件了。

Set the Gravity Y value to 10, and hit the play icon and you should see:
将Y轴引力值设成10,点击播发按钮,效果如下:

As you can see, you can preview the running of the scene directly in the editor.
如图所示,你可以直接在编辑器中预览运行效果。
As you may have noticed from the game objects available, QICI has robust UI support. You can easily use hierarchies of components to form complex UIs, like so:
你可能已经从可用的游戏对象中注意到了,青瓷引擎有着强大的UI支持。你可以轻松地通过对象树来实现复杂的UI界面,比如:

An impressive number of layout properties are exposed to the inspector:
属性监视面板中展示的图层的各种属性:

Assets can be imported into the engine using drag and drop, or by simply copying them into the folder in the underlying file system and click reimport in the UI.
资源可以通过拖拽导入引擎,也可简单的复制到对应目录下,在界面上选择导入。
Coding in QICI Engine
在青瓷引擎中编码
What might not be immediately obvious is how you actually code in QICI and of all the features, this one is probably the least intuitive. You code by attaching behaviors to your game entities.
引擎的编码可能不是那么的直观,你需要通过几个操作来实现编码。
Start by right clicking the Scripts folder in the assets view and select New JavaScript File:
右击资源界面中的脚本文件夹,选择创建新的JavaScript文件:

Name your script and you will see that a stub script has been created for you, you can preview the code in the Inspector:
给你脚本起个名字,你会发现已经生成了一个基础脚本,同时可以在属性窗口中预览它。

At this point you are probably best off firing up your favourite JavaScript editor and opening the generated script. You can jump to the script directly right clicking the script and select Open in Local File Explorer:
你可以使用你习惯的JavaScript编辑器打开刚才生成的脚本。你可以通过邮件菜单选择Open in Local File Explorer在资源管理器中定位这个脚本。

You can however edit using the built in editor if you prefer:
你愿意的话,也可以用内置的代码编辑器编辑:

All scripts are qc.Behaviors. You will notice that this class implements a number of callback methods for various points in the games lifecycle such as awake, onDown, render, onDestroy, etc. By implementing these methods, we add functionality to our script. Consider this simple script, that causes a button to change it’s text to “Clicked” when clicked:
所有的脚本都是qc.Behaviors。你会注意到这个类实现了多个游戏运行时的事件函数,诸如awake, onDown, render, onDestroy等。通过实现这些事件函数,可以添加自己的功能。通过这个简单的脚本,我们可以点击按钮来改变他的文本:
var ButtonHandler = qc.defineBehaviour('qc.engine.ButtonHandler', qc.Behaviour, function() {
    // need this behaviour be scheduled in editor
    //this.runInEditor = true;
}, {
    // fields need to be serialized
});

ButtonHandler.prototype.onClick = function() {

    this.gameObject.find("Text").text = "Clicked";
};
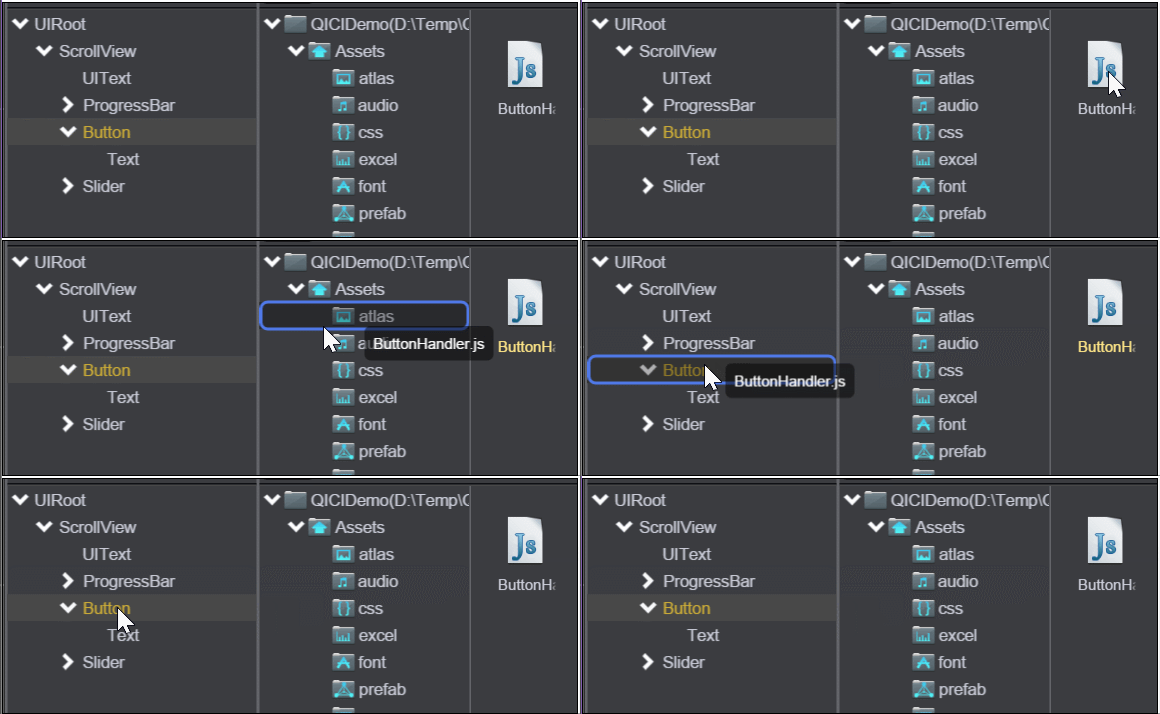
Now attach this script to the component by dragging and dropping, like so:
现在把这个脚本拖拽到他的组件上,如:

And you will see a new component has been added to our Button:
你可以看到一个新的组件已经添加到我们的按钮上了:

Values can easily be exposed to the editor, like so:
变量可以很轻松地展现在编辑器中,如:
var ButtonHandler = qc.defineBehaviour('qc.engine.ButtonHandler', qc.Behaviour, function() {
    this.meaning = 42;
}, {
meaning : qc.Serializer.INT
});

ButtonHandler.prototype.onClick = function() {

    this.gameObject.find("Text").text = "Clicked";
};
Resulting in:
结果如下:

Behind the scenes however, Phaser is always there. You can actually access Phaser directly using gameObject.phaser, like so:
在底层中包含了Phaser,我们可以直接使用gameObject.phaser,如:
ButtonHandler.prototype.onClick = function() {

    this.gameObject.find("Text").text = "Clicked";
    alert(this.gameObject.phaser.game.width);
};
Therefore, if you are familiar with Phaser, you should be immediately comfortable with QICI. For more help with Phaser, I have already created a fairly comprehensive tutorial series.
因此,如果你对Phaser很熟悉,你可以对青瓷引擎很快上手。需要了解更多Phaser的东西,我已经做了一个全面的系列教程。
Documentation and Community
文档和社区
This is a very new project, just shipping the end of last year. There isn’t much of a community per say, but there is a fledgling question forum. Hopefully in time a proper community forms.
青瓷引擎于2015年12月才刚刚发布,因此论坛上还不丰富,不过里面有个问答板块。
In terms of documentation however, QICI Engine is good, shockingly good in fact. There is a complete guide available here walking you through the fundamentals and primary components of QICI. With the exception of a good scripting guide and a document on program flow, I found everything I was looking for in sufficient detail to accomplish what I needed. There is also a very good searchable reference guideavailable here. Between the two, and with prior Phaser experience (which is also remarkably well documented), I had no trouble whatsoever getting up to speed. Additionally there is a pretty good collection of examples available here on Github.
青瓷引擎在文档方面非常出色。有非常详尽的用户手册带你了解引擎的基本功能和相关组件,你能十分方便地实现你的需求。用户手册还提供强大的搜索功能。基于原有的Phaser经验,能相当快地上手,此外还有不少的优秀示例工程
Frankly, for a young open source project, this is hands down the best documentation I have ever seen. Kudo QICI team.
作为一款年轻的开源项目,她的文档和用户手册是我迄今为止见到过最棒的。感谢青瓷引擎项目组。
Summary
综述
This is a game engine that takes one of my favourite HTML5 game engines (Phaser) and adds an incredibly polished layer of tooling on top of it. Additionally a straight forward component system is added, while not getting in the way of the underling libraries. If you are looking for a 2D HTML5 library, especially if you are already familiar or working with Phaser, this is a project you absolutely have to check out. It is robust, straight forward, well documented and well designed. Aside from the lack of community, there really isn’t much more you could ask of this great new engine!
这款游戏引擎在我非常喜欢的HTML5游戏引擎(Phaser)的基础上封装了很多出色的游戏组件。如果你正在寻找一款2D的HTML5游戏引擎,尤其是在你对Phaser熟悉的基础上,青瓷引擎绝对是你的不二之选。她简单易学、文档齐全、设计合理且富有生命力。抛开目前尚不完善的论坛而言,你没有什么理由来拒绝这款优质的游戏引擎。
I enjoyed my time with QICI and will be exploring it more in the future. Let me know if this engine interests you and if you would like to see some tutorials from GameFromScratch.
我非常享受使用青瓷引擎的这一过程,将来还会对其做更深入的研究。
The Video
视频地址:(点击这里)


相关推荐
青瓷引擎是一套开源免费的JavaScript游戏引擎类库,其基于开源免费的Phaser游戏引擎,并提供了一套完全基于浏览器的跨平台集成式HTML5游戏编辑器。 采用青瓷引擎,开发HTML5游戏和传统Web网页开发一样,使用任何...
【PHPWind 青瓷模板】是针对PHPWind论坛系统设计的一款主题模板,它以其独特的青瓷风格,为用户提供了优雅、简洁且富有东方韵味的界面体验。PHPWind是一款广泛应用于社区网站搭建的开源软件,它以其高效、稳定、易用...
《祖传青瓷碗》这篇小说以一个看似简单却内含深意的物件——青瓷碗,为载体,细腻地勾勒出两代人对于时代变迁的不同态度和反应。小说的字里行间透露出作者对于文化传承与时代进步的思考,引人深思。 小说伊始,作者...
传媒行业在近段时间备受关注,根据最新发布的传媒周报,传媒行业有两大重要事件:一是青瓷游戏发布了招股书,计划在港股上市;二是芒果超媒的定增计划获批。青瓷游戏的上市招股说明书揭示了该公司过去几年的经营状况...
【青瓷概述】 青瓷,一种源于中国古代的瓷器品种,以其独特的青绿色调和优雅的工艺闻名于世。尤其以浙江省西南部的龙泉市烧制的青瓷——龙泉水青最为著名。龙泉水青的烧制技艺源远流长,自古以来就深受人们的喜爱与...
- 近20年来,龙泉青瓷产业在政府支持下构建了包括生产、艺术创作、人才培养和产学研一体的体系,产值显著增长。 - 2010年至2017年间,产值增长336.67%,呈现爆发式增长,但2018年和2019年的产值增长放缓,反映出...
### 馆藏高丽青瓷的时间及相关知识点 #### 一、高丽青瓷概述 高丽青瓷作为韩国古代陶瓷艺术的杰出代表之一,以其独特的制作工艺、精美的装饰艺术以及深厚的历史文化内涵闻名于世。根据提供的文档资料,我们可以...
报告概述了2022年中国游戏行业的新变化,特别是聚焦于港股游戏新势力——青瓷游戏的发展情况。报告指出,2021年游戏行业在政策监管日益严格的情况下,面临挑战,但也孕育着新的机遇。短期内,严格的版号审批可能导致...
【初久】青瓷花香用于美化桌面
### 馆藏高丽青瓷的造型纹饰与特点 #### 一、高丽青瓷的历史背景 根据韩国专家郑良谟先生的研究指出:“通过张保皋等人从中国浙江地区引进(以青瓷为主,也有一些黑瓷和白瓷)及其技术,最晚也在9世纪后期左右开始...
这份由中信建投证券股份有限公司提供的研究报告涵盖了2H2021(即2021年下半年)的市场展望,对海外和国内的宏观经济环境进行了分析,并对互联网传媒行业的具体领域提出了投资建议。 市场回顾与展望: 2021年下半年...
在传媒行业周报中,我们关注了两大焦点事件,一个是曾经大受欢迎的儿童网络游戏——摩尔庄园在排行榜上的排名下滑,另一个是青瓷游戏计划在香港上市。这两件事不仅显示出游戏行业竞争的激烈性,也体现了资本市场的新...
青瓷游戏 上市招股说明书
青瓷游戏作为国内知名的游戏开发商,以其独特的游戏设计和良好的市场表现赢得了用户的喜爱。此次拟港股上市,预示着公司可能寻求更大的资金支持以推动业务扩张、产品研发和市场拓展。港股市场对游戏公司的接纳度较高...
其在2020年的显著增长,包括产业应用、游戏客户、手游客户以及国内月活跃用户的大幅增加,和社交媒体关注度的显著提升,均表明了其在中国市场的快速普及和应用。 2. 上市公司动态:包括完美世界、掌趣科技、祖龙...
标题中提到的知识点有“快手全球月活达10亿”,这意味着快手这一短视频平台的用户数量已经达到了一个巨大的规模,反映了其在市场上的普及程度和用户基础。同时,“青瓷游戏港股交表”表明青瓷游戏公司正在寻求在资本...
这不仅将有助于青瓷游戏自身的快速成长,也将激励整个游戏行业更加注重原创内容的开发和用户体验的提升。同时,随着资本市场的关注,投资者将对游戏行业的盈利模式、用户粘性以及知识产权保护等问题产生更高的期待,...
快手的全球用户增长,青瓷游戏的上市计划,以及《梦幻新诛仙》的成功,共同构成了中国乃至全球传媒领域的一个生动写照,预示着在这个数字化、娱乐化的时代,内容创作者和科技公司将继续创新,满足用户不断变化的需求...
青瓷游戏上市招股说明书 港股.pdf