duoerbasilu
- 浏览: 1541295 次
-

文章分类
最新评论
-
sanrenxing_1:
GoEasy 实时推送支持IE6-IE11及大多数主流浏览器的 ...
WindowsPhone消息推送服务 -
yscyfy:
求 其源码 学习 ysc123@yeah.net
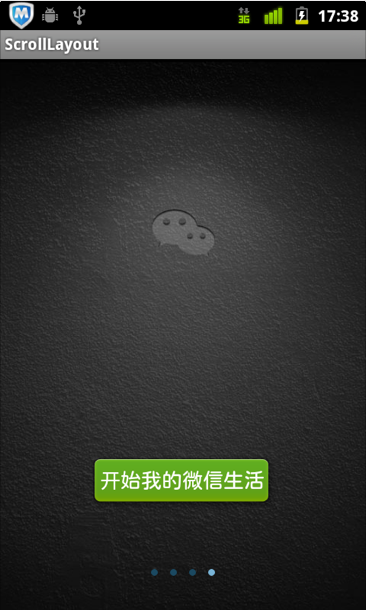
仿微信首次启动滑动界面效果
仿微信首次启动滑动界面效果
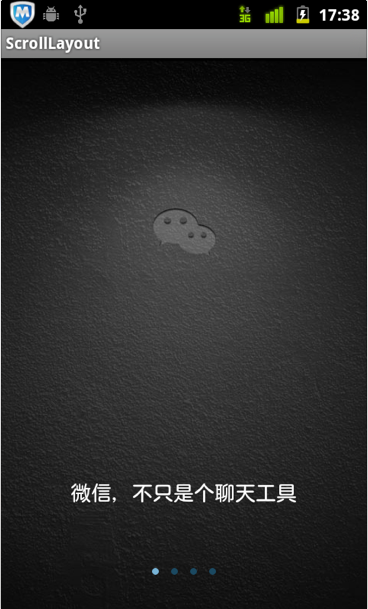
用过微信的都知道,第一次启动时会出现一系列操作说明或功能说明的画面,滑到底然后就进入正式界面,今天我也参考网络资源模仿着做了一个。
首先看下工程结构图:
首先看布局文件main.xml
<?xml version="1.0" encoding="utf-8"?>
<RelativeLayout xmlns:android="http://schemas.android.com/apk/res/android"
android:id="@+id/mainRLayout"
android:layout_width="fill_parent"
android:layout_height="fill_parent"
android:background="#000000" >
<!-- 自定义滑动控件 -->
<com.ericssonlabs.ScrollLayout
xmlns:android="http://schemas.android.com/apk/res/android"
android:id="@+id/ScrollLayout"
android:layout_width="fill_parent"
android:layout_height="fill_parent"
android:visibility="visible" >
<!-- 每一页的布局均以一个RelativeLayout来控制,后面类似,这里一共四个 -->
<RelativeLayout
android:layout_width="fill_parent"
android:layout_height="fill_parent"
android:background="@drawable/w01" >
<TextView
android:layout_width="wrap_content"
android:layout_height="wrap_content"
android:layout_alignParentBottom="true"
android:layout_centerHorizontal="true"
android:layout_marginBottom="90dp"
android:text="微信,不只是个聊天工具"
android:textColor="#FFFFFF"
android:textSize="18sp" />
</RelativeLayout>
<RelativeLayout
android:layout_width="fill_parent"
android:layout_height="fill_parent"
android:background="@drawable/w02" >
<TextView
android:id="@+id/t1"
android:layout_width="wrap_content"
android:layout_height="wrap_content"
android:layout_alignParentTop="true"
android:layout_centerHorizontal="true"
android:layout_marginTop="96dp"
android:gravity="center_horizontal"
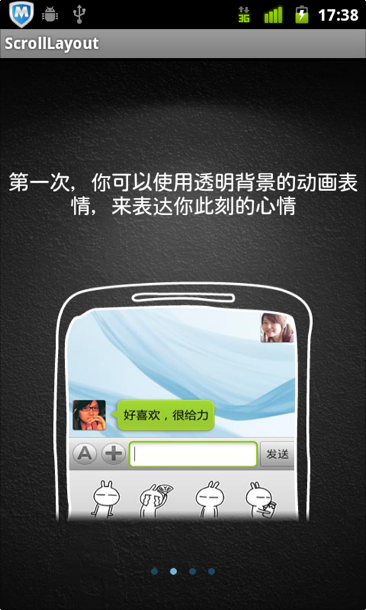
android:text="第一次,你可以使用透明背景的动画表情,来表达你此刻的心情"
android:textColor="#FFFFFF"
android:textSize="18sp" />
</RelativeLayout>
<RelativeLayout
android:layout_width="fill_parent"
android:layout_height="fill_parent"
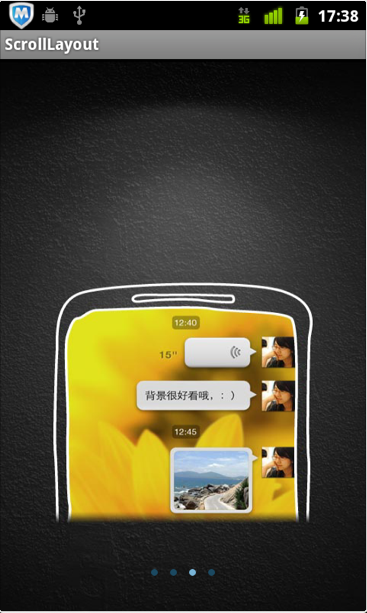
android:background="@drawable/w03" />
<RelativeLayout
android:layout_width="fill_parent"
android:layout_height="fill_parent"
android:background="@drawable/w01" >
<!-- 点击该按钮后就进入OtherActivit了 -->
<Button
android:id="@+id/startBtn"
android:layout_width="wrap_content"
android:layout_height="wrap_content"
android:layout_alignParentBottom="true"
android:layout_centerHorizontal="true"
android:layout_gravity="center_vertical"
android:layout_marginBottom="90dp"
android:layout_marginLeft="8dp"
android:layout_marginRight="8dp"
android:background="@drawable/button_bg"
android:text="开始我的微信生活"
android:textColor="#FFFFFF"
android:textSize="18sp" />
</RelativeLayout>
</com.ericssonlabs.ScrollLayout>
<!-- 这个布局是下面显示的小圆点的布局,其中ImageView的数量要与上面RelativeLayout的数量对应 -->
<LinearLayout
android:id="@+id/llayout"
android:layout_width="wrap_content"
android:layout_height="wrap_content"
android:layout_alignParentBottom="true"
android:layout_centerHorizontal="true"
android:layout_marginBottom="25dp"
android:orientation="horizontal"
android:visibility="visible" >
<ImageView
android:layout_width="wrap_content"
android:layout_height="wrap_content"
android:layout_gravity="center_vertical"
android:clickable="true"
android:padding="5dp"
android:src="@drawable/page_indicator_bg" />
<ImageView
android:layout_width="wrap_content"
android:layout_height="wrap_content"
android:layout_gravity="center_vertical"
android:clickable="true"
android:padding="5dp"
android:src="@drawable/page_indicator_bg" />
<ImageView
android:layout_width="wrap_content"
android:layout_height="wrap_content"
android:layout_gravity="center_vertical"
android:clickable="true"
android:padding="5dp"
android:src="@drawable/page_indicator_bg" />
<ImageView
android:layout_width="wrap_content"
android:layout_height="wrap_content"
android:layout_gravity="center_vertical"
android:clickable="true"
android:padding="5dp"
android:src="@drawable/page_indicator_bg" />
</LinearLayout>
<!-- 这个布局是最后点击按钮后启动新界面的一个动画效果 -->
<LinearLayout
android:id="@+id/animLayout"
android:layout_width="fill_parent"
android:layout_height="fill_parent"
android:visibility="gone" >
<LinearLayout
android:id="@+id/leftLayout"
android:layout_width="wrap_content"
android:layout_height="fill_parent" >
<ImageView
android:layout_width="wrap_content"
android:layout_height="wrap_content"
android:src="@drawable/whatsnew_left" />
<ImageView
android:layout_width="wrap_content"
android:layout_height="wrap_content"
android:src="@drawable/whatsnew_left_m" />
</LinearLayout>
<LinearLayout
android:id="@+id/rightLayout"
android:layout_width="fill_parent"
android:layout_height="fill_parent" >
<ImageView
android:layout_width="wrap_content"
android:layout_height="wrap_content"
android:src="@drawable/whatsnew_right_m" />
<ImageView
android:layout_width="wrap_content"
android:layout_height="wrap_content"
android:src="@drawable/whatsnew_right" />
</LinearLayout>
</LinearLayout>
</RelativeLayout>
接下来是自定义控件ScrollLayout.java,这个是继承了ViewGroup的一个自定义控件,主要实现了左右滑动以及展示内容的功能,源码如下:
public class ScrollLayoutActivity extends Activity implements OnViewChangeListener{

	private ScrollLayout mScrollLayout;
	private ImageView[] imgs;
	private int count;
	private int currentItem;
	private Button startBtn;
	private RelativeLayout mainRLayout;
	private LinearLayout pointLLayout;
	private LinearLayout leftLayout;
	private LinearLayout rightLayout;
	private LinearLayout animLayout;

	@Override
	public void onCreate(Bundle savedInstanceState) {
		super.onCreate(savedInstanceState);
		setContentView(R.layout.main);
		initView();
	}

	private void initView() {
		mScrollLayout = (ScrollLayout) findViewById(R.id.ScrollLayout);
		pointLLayout = (LinearLayout) findViewById(R.id.llayout);
		mainRLayout = (RelativeLayout) findViewById(R.id.mainRLayout);
		startBtn = (Button) findViewById(R.id.startBtn);
		startBtn.setOnClickListener(onClick);
		animLayout = (LinearLayout) findViewById(R.id.animLayout);
		leftLayout = (LinearLayout) findViewById(R.id.leftLayout);
		rightLayout = (LinearLayout) findViewById(R.id.rightLayout);
		count = mScrollLayout.getChildCount();
		imgs = new ImageView[count];
		for (int i = 0; i < count; i++) {
			imgs[i] = (ImageView) pointLLayout.getChildAt(i);
			imgs[i].setEnabled(true);
			imgs[i].setTag(i);
		}
		currentItem = 0;
		imgs[currentItem].setEnabled(false);
		mScrollLayout.SetOnViewChangeListener(this);
	}

	private View.OnClickListener onClick = new View.OnClickListener() {
		@Override
		public void onClick(View v) {
			switch (v.getId()) {
			case R.id.startBtn:
				mScrollLayout.setVisibility(View.GONE);
				pointLLayout.setVisibility(View.GONE);
				animLayout.setVisibility(View.VISIBLE);
				mainRLayout.setBackgroundResource(R.drawable.whatsnew_bg);
				Animation leftOutAnimation = AnimationUtils.loadAnimation(
						getApplicationContext(), R.anim.translate_left);
				Animation rightOutAnimation = AnimationUtils.loadAnimation(
						getApplicationContext(), R.anim.translate_right);
				leftLayout.setAnimation(leftOutAnimation);
				rightLayout.setAnimation(rightOutAnimation);
				leftOutAnimation.setAnimationListener(new AnimationListener() {
					@Override
					public void onAnimationStart(Animation animation) {
						mainRLayout.setBackgroundColor(Color.BLACK);
					}

					@Override
					public void onAnimationRepeat(Animation animation) {
					}

					@Override
					public void onAnimationEnd(Animation animation) {
						leftLayout.setVisibility(View.GONE);
						rightLayout.setVisibility(View.GONE);
						Intent intent = new Intent(
								ScrollLayoutActivity.this,
								OtherActivity.class);
						ScrollLayoutActivity.this.startActivity(intent);
						ScrollLayoutActivity.this.finish();
						//结束老Activity启动新Activity之前的一个过度动画
						overridePendingTransition(R.anim.zoom_out_enter,R.anim.zoom_out_exit);
					}
				});
				break;
			}
		}
	};

	@Override
	public void OnViewChange(int position) {
		setcurrentPoint(position);
	}

	private void setcurrentPoint(int position) {
		if (position < 0 || position > count - 1 || currentItem == position) {
			return;
		}
		imgs[currentItem].setEnabled(true);
		imgs[position].setEnabled(false);
		currentItem = position;
	}
}
然后是定义的一个回调接口,这个接口的主要作用在代码中有注释,源码如下:
package com.ericssonlabs;

public interface OnViewChangeListener {
	//控制底部小圆点的回调方法
	public void OnViewChange(int view);
}
最后是如何使用该自定义控件,在Activity中调用并使用,代码如下:
public class ScrollLayoutActivity extends Activity implements OnViewChangeListener{

	private ScrollLayout mScrollLayout;
	private ImageView[] imgs;
	private int count;
	private int currentItem;
	private Button startBtn;
	private RelativeLayout mainRLayout;
	private LinearLayout pointLLayout;
	private LinearLayout leftLayout;
	private LinearLayout rightLayout;
	private LinearLayout animLayout;

	@Override
	public void onCreate(Bundle savedInstanceState) {
		super.onCreate(savedInstanceState);
		setContentView(R.layout.main);
		initView();
	}

	private void initView() {
		mScrollLayout = (ScrollLayout) findViewById(R.id.ScrollLayout);
		pointLLayout = (LinearLayout) findViewById(R.id.llayout);
		mainRLayout = (RelativeLayout) findViewById(R.id.mainRLayout);
		startBtn = (Button) findViewById(R.id.startBtn);
		startBtn.setOnClickListener(onClick);
		animLayout = (LinearLayout) findViewById(R.id.animLayout);
		leftLayout = (LinearLayout) findViewById(R.id.leftLayout);
		rightLayout = (LinearLayout) findViewById(R.id.rightLayout);
		count = mScrollLayout.getChildCount();
		imgs = new ImageView[count];
		for (int i = 0; i < count; i++) {
			imgs[i] = (ImageView) pointLLayout.getChildAt(i);
			imgs[i].setEnabled(true);
			imgs[i].setTag(i);
		}
		currentItem = 0;
		imgs[currentItem].setEnabled(false);
		mScrollLayout.SetOnViewChangeListener(this);
	}

	private View.OnClickListener onClick = new View.OnClickListener() {
		@Override
		public void onClick(View v) {
			switch (v.getId()) {
			case R.id.startBtn:
				mScrollLayout.setVisibility(View.GONE);
				pointLLayout.setVisibility(View.GONE);
				animLayout.setVisibility(View.VISIBLE);
				mainRLayout.setBackgroundResource(R.drawable.whatsnew_bg);
				Animation leftOutAnimation = AnimationUtils.loadAnimation(
						getApplicationContext(), R.anim.translate_left);
				Animation rightOutAnimation = AnimationUtils.loadAnimation(
						getApplicationContext(), R.anim.translate_right);
				leftLayout.setAnimation(leftOutAnimation);
				rightLayout.setAnimation(rightOutAnimation);
				leftOutAnimation.setAnimationListener(new AnimationListener() {
					@Override
					public void onAnimationStart(Animation animation) {
						mainRLayout.setBackgroundColor(Color.BLACK);
					}

					@Override
					public void onAnimationRepeat(Animation animation) {
					}

					@Override
					public void onAnimationEnd(Animation animation) {
						leftLayout.setVisibility(View.GONE);
						rightLayout.setVisibility(View.GONE);
						Intent intent = new Intent(
								ScrollLayoutActivity.this,
								OtherActivity.class);
						ScrollLayoutActivity.this.startActivity(intent);
						ScrollLayoutActivity.this.finish();
						//结束老Activity启动新Activity之前的一个过度动画
						overridePendingTransition(R.anim.zoom_out_enter,R.anim.zoom_out_exit);
					}
				});
				break;
			}
		}
	};

	@Override
	public void OnViewChange(int position) {
		setcurrentPoint(position);
	}

	private void setcurrentPoint(int position) {
		if (position < 0 || position > count - 1 || currentItem == position) {
			return;
		}
		imgs[currentItem].setEnabled(true);
		imgs[position].setEnabled(false);
		currentItem = position;
	}
}
然后是启动新界面的动画效果:
translate_left.xml
<?xml version="1.0" encoding="UTF-8"?>
<set xmlns:android="http://schemas.android.com/apk/res/android"
    android:fillAfter="false" >
    <translate
        android:duration="2000"
        android:fromXDelta="0.0"
        android:fromYDelta="0.0"
        android:toXDelta="-50.0%p"
        android:toYDelta="0.0" />
</set>
translate_right.xml
<?xml version="1.0" encoding="UTF-8"?>
<set xmlns:android="http://schemas.android.com/apk/res/android"
    android:fillAfter="false" >
    <translate
        android:duration="2000"
        android:fromXDelta="0.0"
        android:fromYDelta="0.0"
        android:toXDelta="50.0%p"
        android:toYDelta="0.0" />
</set>
zone_out_enter.xml
<?xml version="1.0" encoding="UTF-8"?>
<set xmlns:android="http://schemas.android.com/apk/res/android"
    android:interpolator="@android:anim/overshoot_interpolator" >
    <scale
        android:duration="@android:integer/config_shortAnimTime"
        android:fromXScale="0.7"
        android:fromYScale="0.7"
        android:pivotX="50.0%"
        android:pivotY="50.0%"
        android:toXScale="1.0"
        android:toYScale="1.0" />
</set>
zone_out_exit.xml
<?xml version="1.0" encoding="UTF-8"?>
<set xmlns:android="http://schemas.android.com/apk/res/android"
    android:interpolator="@android:anim/accelerate_interpolator" >

    <scale
        android:duration="@android:integer/config_shortAnimTime"
        android:fromXScale="1.0"
        android:fromYScale="1.0"
        android:pivotX="50.0%"
        android:pivotY="50.0%"
        android:toXScale="0.8"
        android:toYScale="0.8" />

    <alpha
        android:duration="@android:integer/config_shortAnimTime"
        android:fromAlpha="1.0"
        android:toAlpha="0.0" />

</set>
关于动画这一块我还不是很熟,这里是直接copy的网上的效果,后续会专门做一个专题来研究动画,毕竟,有动画的世界才是多彩的,嘿嘿
一切就绪后,运行看看效果:
以上就是运行效果了,图片和其他的文件我没有在这里列举,这个效果在大多数项目中都 用的到,学习一下还是比较好的。需要源码的同学可以跟我联系,我的新浪微博:唐韧_Ryan
分享到:


发表评论

相关推荐
访微信首次启动时滑动界面效果,适合应用开发中用户首次启动时对软件的一个简要介绍需求
【微信首次安装欢迎界面Demo详解】 ...通过学习和实践这个“仿微信首次安装欢迎界面Demo”,开发者不仅能掌握创建吸引人的启动屏幕,还能加深对Android组件如ViewPager、Adapter和动画的理解,提升整体开发技能。
在Android应用开发中,"Android 仿微信之启动引导界面"是一个常见的需求,它涉及到启动画面的自定义、数据的本地存储与网络请求等多个技术点。以下是对这些知识点的详细阐述: 1. **启动画面(Splash Screen)**: ...
在Android应用开发中,创建一个吸引用户的首次启动引导界面(也称为欢迎页或引导页)是一种常见的做法。本文将深入探讨如何在Android平台上实现一款仿微信的引导界面,包括其动画效果,基于提供的标签和描述。 首先...
在Android应用开发中,"仿微信滑动欢迎界面"是一种常见的用户体验设计,它通常用于应用程序首次启动时展示品牌信息或引导用户了解主要功能。这种欢迎界面通常包含一系列可滑动的图片或者页面,用户可以通过手势左右...
"仿微信首次启动 软件帮助" 指的是在应用初次安装后打开时,为了引导用户熟悉软件功能和操作流程而设计的一种交互式教程或者提示系统。这个过程通常被称为"新手引导"或"欢迎页"。微信作为中国最流行的即时通讯应用之...
在Android应用开发中,创建一个类似微信启动界面的滑屏动画,尤其是带有底部球球跟随滑动效果和开门动画的实现,需要涉及到多个技术点。下面将详细解释这些知识点。 首先,我们需要理解微信启动界面的基本构成。这...
在Android开发中,微信左右滑动切换界面以及界面裂开的效果是通过自定义ViewGroup来实现的,这种效果常见于许多应用中,如微信、支付宝等,为用户提供了一种直观且富有动态感的交互方式。下面我们将深入探讨如何实现...
总的来说,“微信开始页滑动导航界面”是一个集成了触摸交互、动画效果、数据管理等多个技术环节的设计,它体现了移动应用中高效、直观的导航原则。对于开发者而言,理解和掌握这些知识点有助于构建更加优质、用户...
在本文中,我们将探讨如何利用ViewPager来创建一个仿微信的引导界面,同时实现相应的动画效果。 首先,我们要理解引导界面(Onboarding)的作用。这种界面通常在用户首次启动应用时出现,通过展示一些关键功能或...
本项目聚焦于“仿微信引导界面”,旨在为新用户展示应用的核心功能,增强用户的首印象,并提供一个类似微信的开门效果,为用户提供更为沉浸式的体验。 引导界面,也被称为新手教程或启动教程,通常包含一系列滑动的...
引导界面通常作为一个单独的`Activity`存在,当应用程序启动时首先启动这个`Activity`,然后根据用户是否首次启动或满足其他条件来决定是否显示引导界面。在`onCreate()`方法中加载引导界面资源,在`onStart()`或`...
在这个"安卓欢迎界面引导页面viewpager相关-引导界面仿微信.zip"项目中,开发者旨在创建一个类似微信的引导页体验,利用ViewPager组件来实现页面滑动效果。 ViewPager是Android SDK中的一个强大工具,它允许用户在...
【引导界面仿微信】是一个基于Android平台的源码项目,主要目标是实现一个与微信启动时相似的引导界面。引导界面在移动应用中通常用于初次使用或更新版本时,向用户展示新功能、亮点或者品牌信息,提升用户体验。在...
1. **Android布局设计**:微信的导航效果主要体现在其启动时的引导页和主界面的滑动导航。这通常涉及到Android中的各种布局管理器,如LinearLayout、RelativeLayout、ConstraintLayout等,以及自定义布局的使用,...
本压缩包中的"安卓Android源码——引导界面仿微信",旨在帮助开发者学习如何创建一个类似微信的启动引导页,为用户提供流畅且吸引人的应用启动体验。 首先,我们需要理解引导界面的基本组成部分。通常,它包括一个...
本压缩包"Android应用源码之引导界面仿微信.rar"提供了这样一个引导界面的源代码示例,其设计灵感来源于微信的应用启动画面。下面将详细解析这个引导界面的实现原理和关键知识点。 1. **启动动画与布局设计** 引导...
在安卓Android平台上,创建引导界面有多种方法,本教程以"安卓Android源码——引导界面仿微信"为例,探讨如何实现类似微信启动页的效果。 首先,我们来理解一下源码中的关键部分。`JavaApkԴ��˵��.txt`可能是...
"android应用源码仿微信用户引导页源码"是一个专门为毕业设计学习准备的项目,它模拟了微信启动时的引导页面效果,帮助开发者理解和实现类似的功能。 在Android App移动开发中,用户引导页通常包含以下几个关键知识...