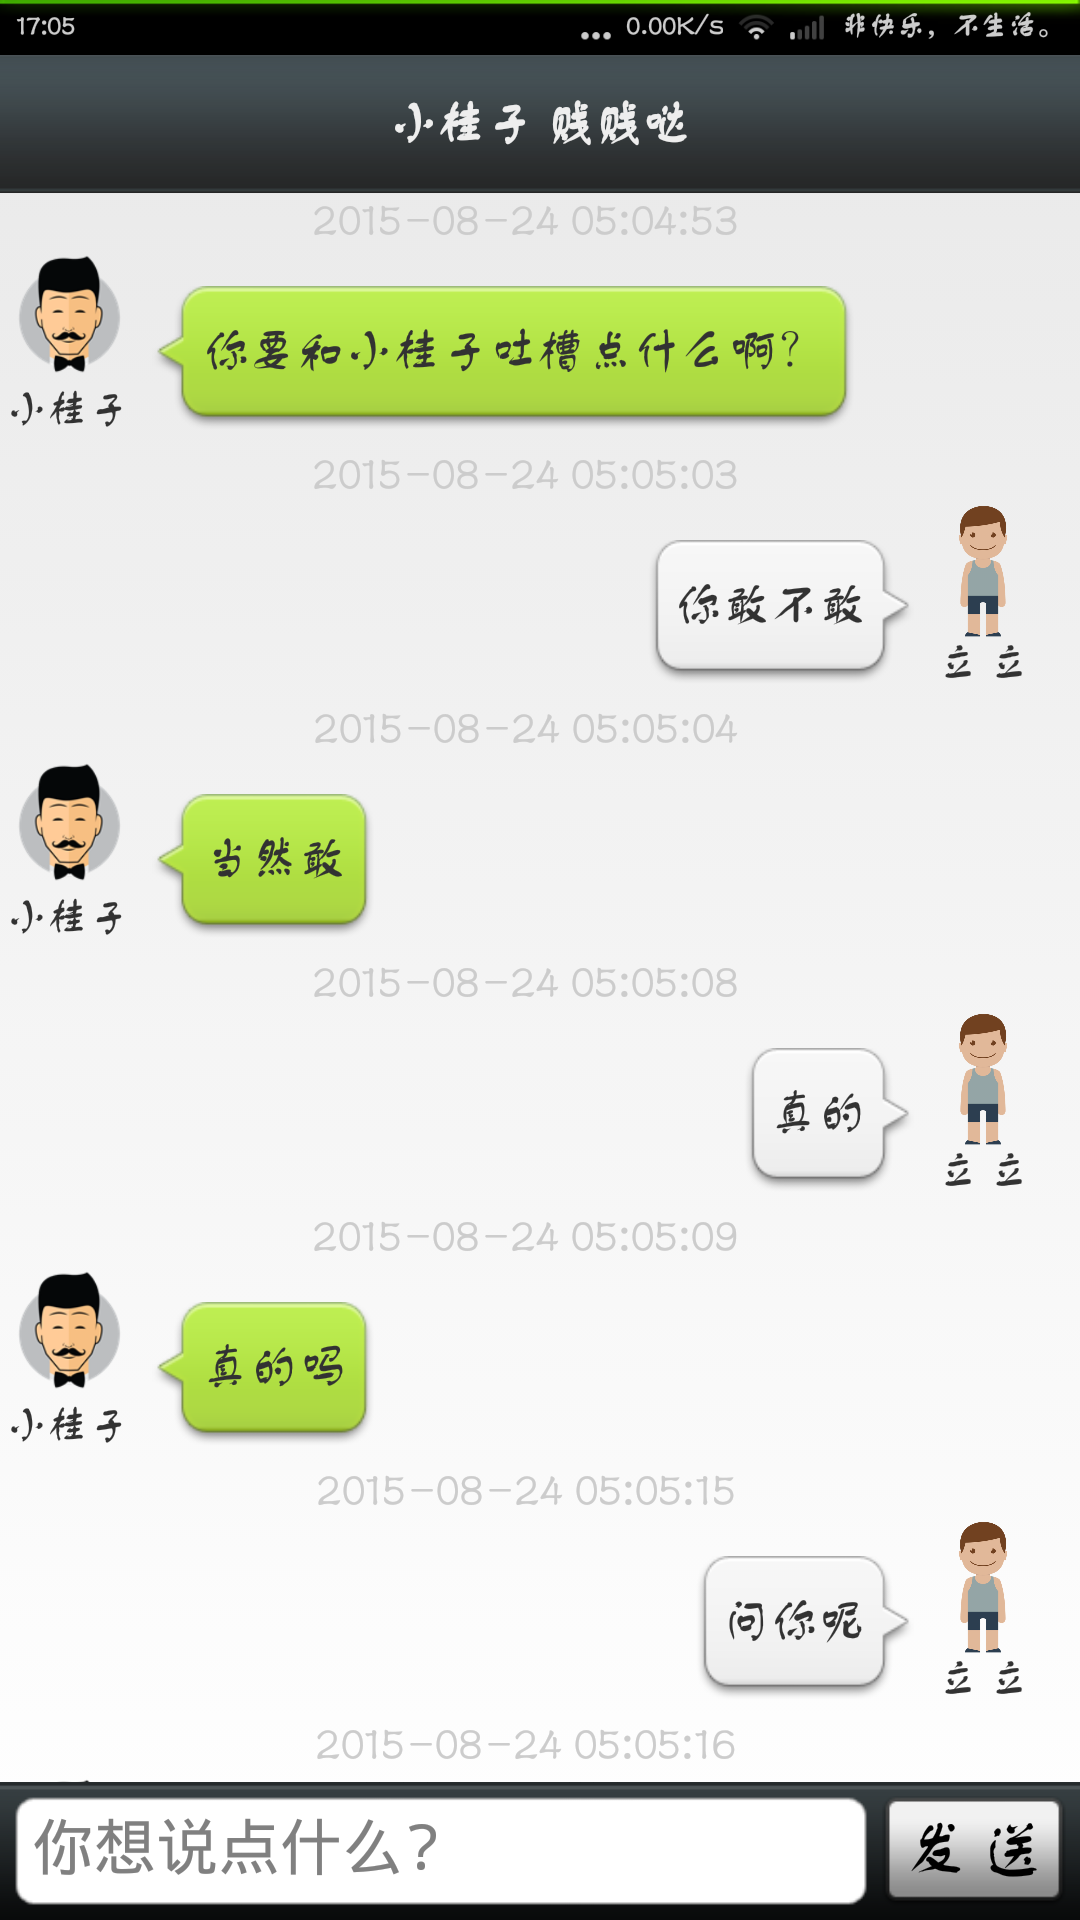
问答机器人API文档:https://www.juhe.cn/docs/api/id/112
先上图:

说下大致实现的步骤:
1、首先使用了聚合数据的sdk,这样免费使用的数目可以多一些
2、使用gson来解析json数据
3、使用ListView来显示数据
那,先将布局贴上来
数据部分 机器人和人布局类似 只粘一个
<?xml version="1.0" encoding="utf-8"?>
<LinearLayout xmlns:android="http://schemas.android.com/apk/res/android"
    android:layout_width="match_parent"
    android:layout_height="match_parent"
    android:orientation="vertical" >

    <TextView
        android:id="@+id/robot_time"
        android:layout_width="wrap_content"
        android:layout_height="wrap_content"
        android:layout_gravity="center"
        android:textColor="#cccccc"
        android:gravity="center_horizontal"
        android:text="2015-8-23 17:37:23" />

    <LinearLayout
        android:layout_width="wrap_content"
        android:layout_height="wrap_content"
        android:orientation="horizontal" >

        <LinearLayout
            android:layout_width="wrap_content"
            android:layout_height="wrap_content"
            android:orientation="vertical" >

            <ImageView
                android:layout_width="50dp"
                android:layout_height="50dp"
                android:src="@drawable/icon" />

            <TextView
                android:layout_width="wrap_content"
                android:layout_height="wrap_content"
                android:layout_gravity="center"
                android:gravity="center_horizontal"
                android:text="小桂子"
                android:textSize="12sp" />
        </LinearLayout>

        <TextView
            android:id="@+id/robot_msg"
            android:layout_width="wrap_content"
            android:layout_height="wrap_content"
            android:layout_marginLeft="5dp"
            android:background="@drawable/chatfrom_bg_normal"
            android:gravity="center"
            android:layout_gravity="bottom"
            android:text="你好,我是小桂子" />
    </LinearLayout>

</LinearLayout>
然后是主布局:
<RelativeLayout xmlns:android="http://schemas.android.com/apk/res/android"
    xmlns:tools="http://schemas.android.com/tools"
    android:layout_width="match_parent"
    android:layout_height="match_parent"
    tools:context="com.example.juheapi.MainActivity" >

    <RelativeLayout
        android:id="@+id/titleBar"
        android:layout_width="fill_parent"
        android:layout_height="50dp"
        android:layout_alignParentTop="true"
        android:background="@drawable/title_bar" >

        <TextView
            android:layout_width="wrap_content"
            android:layout_height="wrap_content"
            android:layout_centerInParent="true"
            android:text="小桂子 贱贱哒"
            android:textColor="#eeeeee"
            android:textStyle="bold" />
    </RelativeLayout>

    <ListView
        android:id="@+id/listView"
        android:layout_width="fill_parent"
        android:layout_height="fill_parent"
        android:layout_above="@+id/buttom"
        android:layout_below="@+id/titleBar"
        android:divider="@null"
        android:dividerHeight="5dp"
        android:fastScrollEnabled="true"
        android:scrollbarStyle="insideInset"
        android:transcriptMode="normal" >
    </ListView>

    <RelativeLayout
        android:id="@+id/buttom"
        android:layout_width="fill_parent"
        android:layout_height="50dp"
        android:layout_alignParentBottom="true"
        android:background="@drawable/bottom_bar" >

        <Button
            android:id="@+id/send_but"
            android:layout_width="wrap_content"
            android:layout_height="40dp"
            android:layout_alignParentRight="true"
            android:layout_centerInParent="true"
            android:layout_marginLeft="5dp"
            android:layout_marginRight="5dp"
            android:background="@drawable/but_send_bg"
            android:text="发 送" />

        <EditText
            android:id="@+id/send_msg"
            android:layout_width="fill_parent"
            android:layout_height="40dp"
            android:layout_centerInParent="true"
            android:layout_marginLeft="5dp"
            android:layout_toLeftOf="@+id/send_but"
            android:background="@drawable/login_edit_normal"
            android:hint="你想说点什么?"
            android:typeface="monospace" />
    </RelativeLayout>

</RelativeLayout>
发送按钮的xml文件:
<?xml version="1.0" encoding="utf-8"?>
<selector xmlns:android="http://schemas.android.com/apk/res/android">

    <item android:drawable="@drawable/send_btn_pressed" android:state_pressed="true"></item>
    <item android:drawable="@drawable/send_btn_normal"></item>

</selector>
这样布局 就算搭建好了
先说说 聚合数据 SDK的使用吧 地址:https://www.juhe.cn/juhesdk
下载完之后 需要导入jar包 新建application初始化sdk 以及manifest的配置, 里面有详细教程
需要注意的的是 ip 的值 并不像教程上说的那样 而是需要加上完整的 URL 、info 和 KEY
Parameters params = new Parameters();
        params.add("ip", URL + msg + KEY);
        params.add("dtype", "json");
下面是访问数据和解析数据的实现
需要用到gson
package com.util;

import java.util.Date;

import android.content.Context;
import android.os.Handler;
import android.os.Message;

import com.bean.GetResult;
import com.bean.SetChatMessage;
import com.bean.SetChatMessage.Type;
import com.google.gson.Gson;
import com.thinkland.sdk.android.DataCallBack;
import com.thinkland.sdk.android.JuheData;
import com.thinkland.sdk.android.Parameters;

public class RequestHttp {
    private static final String URL = "http://op.juhe.cn/robot/index?info=";
    private static final String KEY = "&key=5d0a9e4aad4c9b11f53cc**********";
    private Context context;
    private Handler handle;

    public RequestHttp(Context context, Handler handle) {
        this.context = context;
        this.handle = handle;
    }

    public  void requestHttp(String msg) {
        Parameters params = new Parameters();
        params.add("ip", URL + msg + KEY);
        params.add("dtype", "json");

        JuheData.executeWithAPI(context, 112, URL + msg + KEY, JuheData.GET,
                params, new DataCallBack() {

                    public void onSuccess(int statusCode, String responseString) {
                        // TODO Auto-generated method stub
                        SetChatMessage chat = new SetChatMessage();
                        Gson gson = new Gson();
                        GetResult value = gson.fromJson(responseString,
                                GetResult.class);
                        chat.setMsg(value.getResult().getText());
                        chat.setDate(new Date());
                        chat.setType(Type.INCOME);
                        Message mesg = Message.obtain(handle);
                        mesg.obj = chat;
                        mesg.sendToTarget();
                    }

                    public void onFinish() {
                    }

                    public void onFailure(int statusCode,
                            String responseString, Throwable throwable) {
                        SetChatMessage chat = new SetChatMessage();
                        chat.setMsg("服务器忙,请稍候。。。");
                        chat.setDate(new Date());
                        chat.setType(Type.INCOME);
                        Message mesg = Message.obtain(handle);
                        mesg.obj = chat;
                        mesg.sendToTarget();
                    }

                });

    }
}
上面的gson解析 需要JSON数据映射成一个对象
package com.bean;

public class GetResult {
    private Result result;

    public Result getResult() {
        return result;
    }

    public void setResult(Result result) {
        this.result = result;
    }

    public class Result {
        private int code;
        private String text;

        public int getCode() {
            return code;
        }

        public void setCode(int code) {
            this.code = code;
        }

        public String getText() {
            return text;
        }

        public void setText(String text) {
            this.text = text;
        }
    }
}
上面是两个类嵌套的 因为数据格式是:{ x, y{z,u}}
需要拿到z的值,就必须这样做,注意“text”和“code”的是和数据z、u对应的 不能随意设定
还需要对数据进行封装:
package com.bean;

import java.util.Date;

public class SetChatMessage {
    private String name;
    private String msg;
    private Date date;
    private Type type;

    public enum Type{
        INCOME,OUTCOME
    }

    public SetChatMessage(){}

    public SetChatMessage(String msg,Date date,Type type){
        this.msg=msg;
        this.date=date;
        this.type=type;
    }


    public String getName() {
        return name;
    }

    public void setName(String name) {
        this.name = name;
    }

    public String getMsg() {
        return msg;
    }

    public void setMsg(String msg) {
        this.msg = msg;
    }

    public Date getDate() {
        return date;
    }

    public void setDate(Date date) {
        this.date = date;
    }

    public Type getType() {
        return type;
    }

    public void setType(Type type) {
        this.type = type;
    }


}
还需要给Listview写个适配器:
package com.example.juheapi;

import java.text.SimpleDateFormat;
import java.util.List;
import java.util.Locale;

import com.bean.SetChatMessage;
import com.bean.SetChatMessage.Type;
import com.example.juheapi.R.id;

import android.content.Context;
import android.view.LayoutInflater;
import android.view.View;
import android.view.ViewGroup;
import android.widget.BaseAdapter;
import android.widget.TextView;

public class MyAdapter extends BaseAdapter {
    private List<SetChatMessage> dataList;
    private LayoutInflater mInflater;

    public MyAdapter(Context context, List<SetChatMessage> dataList) {
        this.dataList = dataList;
        mInflater = LayoutInflater.from(context);
    }

    public int getCount() {
        return dataList.size();
    }

    public Object getItem(int position) {
        return dataList.get(position);
    }

    public long getItemId(int position) {
        return position;
    }

    public int getItemViewType(int position) {
        SetChatMessage chatMsg = dataList.get(position);
        if (chatMsg.getType() == Type.INCOME) {
            return 0;
        }
        return 1;
    }

    public int getViewTypeCount() {
        return 2;
    }

    public View getView(int position, View convertView, ViewGroup parent) {
        SetChatMessage chatMsg = dataList.get(position);
        ViewHolder viewHolder;
        if (convertView == null) {
            if (getItemViewType(position) == 0) {
                convertView = mInflater.inflate(R.layout.item_robot_msg,
                        parent, false);
                viewHolder = new ViewHolder();
                viewHolder.msgData = (TextView) convertView
                        .findViewById(id.robot_msg);
                viewHolder.timeData = (TextView) convertView
                        .findViewById(id.robot_time);
            } else {
                convertView = mInflater.inflate(R.layout.item_host_msg, parent,
                        false);
                viewHolder = new ViewHolder();
                viewHolder.msgData = (TextView) convertView
                        .findViewById(id.host_msg);
                viewHolder.timeData = (TextView) convertView
                        .findViewById(id.host_time);
            }
            convertView.setTag(viewHolder);
        } else {

            viewHolder = (ViewHolder) convertView.getTag();

        }
        viewHolder.msgData.setText(chatMsg.getMsg());
        SimpleDateFormat dateFormat=new SimpleDateFormat("yyyy-MM-dd hh:mm:ss",Locale.CHINA);
        viewHolder.timeData.setText(dateFormat.format(chatMsg.getDate()));

        return convertView;
    }

    private class ViewHolder {
        private TextView timeData;
        private TextView msgData;
    }

}
说一下适配器:
1、因为有两种不同的view 所以需要复写 getItemViewType(int position) 和 getViewTypeCount();
2、使用ViewHolder 对性能进行优化,减少一些不必要的重复操作
main:
package com.example.juheapi;

import java.util.ArrayList;
import java.util.Date;
import java.util.List;

import com.bean.SetChatMessage;
import com.bean.SetChatMessage.Type;
import com.example.juheapi.R.id;
import com.util.RequestHttp;

import android.app.Activity;
import android.os.Bundle;
import android.os.Handler;
import android.os.Message;
import android.text.TextUtils;
import android.view.View;
import android.view.View.OnClickListener;
import android.view.Window;
import android.widget.Button;
import android.widget.EditText;
import android.widget.ListView;
import android.widget.Toast;

public class MainActivity extends Activity {
    private List<SetChatMessage> dataList = new ArrayList<SetChatMessage>();
    private MyAdapter myAdapter;
    private ListView listView;

    private Button send_but;
    private EditText send_msg;

    private Handler handle = new Handler() {
        public void handleMessage(Message msg) {
            SetChatMessage chatMsg = (SetChatMessage) msg.obj;
            dataList.add(chatMsg);
            myAdapter.notifyDataSetChanged();
        }
    };

    protected void onCreate(Bundle savedInstanceState) {
        super.onCreate(savedInstanceState);
        requestWindowFeature(Window.FEATURE_NO_TITLE);
        setContentView(R.layout.activity_main);
        initView();
        initData();
        initEvent();

    }

    private void initEvent() {
        send_but.setOnClickListener(new OnClickListener() {
            public void onClick(View v) {
                String msg = send_msg.getText().toString();
                if (TextUtils.isEmpty(msg)) {
                    Toast.makeText(MainActivity.this, "消息不能为空。",
                            Toast.LENGTH_SHORT).show();
                    return;
                }

                // 设置消息源 显示到listview中
                SetChatMessage chatMsg = new SetChatMessage();
                chatMsg.setDate(new Date());
                chatMsg.setMsg(msg);
                chatMsg.setType(Type.OUTCOME);
                dataList.add(chatMsg);
                myAdapter.notifyDataSetChanged();
                // 文本框清空
                send_msg.setText("");
                // 将消息发送至服务端
                RequestHttp an = new RequestHttp(getApplicationContext(),
                        handle);
                an.requestHttp(msg);
            }
        });

    }

    private void initData() {
        dataList.add(new SetChatMessage("你要和小桂子吐槽点什么啊?", new Date(),
                Type.INCOME));

        myAdapter = new MyAdapter(MainActivity.this, dataList);
        listView.setAdapter(myAdapter);
    }

    private void initView() {
        listView = (ListView) findViewById(id.listView);

        send_but = (Button) findViewById(id.send_but);
        send_msg = (EditText) findViewById(id.send_msg);

    }

}
总结一下实现过程:
List数据----adapter处理------ListView显示
1、首先是数据的获得 ,通过对 免费提供的数据接口进行访问 拿到数据
由于是网络访问 并不能立刻拿到数据 通过return是不能将响应的数据立刻返回的,所以使用了message来专递数据,handler进行处理
2、数据是json格式的,通过对数据进行分析 使用gson解析数据 并拿到自己需要的数据
3、对数据进行封装 ,添加数据的类型 时间等
4、数据解决了就需要adapter来处理数据 继承自baseAdapter 使用viewHolder 来提高效率
5、listview的显示 布局的搭建 以及对显示的需求
设置无分隔线 以及分隔高度
android:divider="@null"
android:dividerHeight="5dp"
设置数据向上滚动 以免输入法挡住数据
android:fastScrollEnabled="true"
android:scrollbarStyle="insideInset"
android:transcriptMode="normal"
等等。。。按自己喜好更改


