|
锁定老帖子 主题:Django&JQuery手动剪切个性头像
精华帖 (0) :: 良好帖 (19) :: 新手帖 (0) :: 隐藏帖 (0)
|
|
|---|---|
| 作者 | 正文 |
|
发表时间:2010-03-12
最后修改:2011-01-24
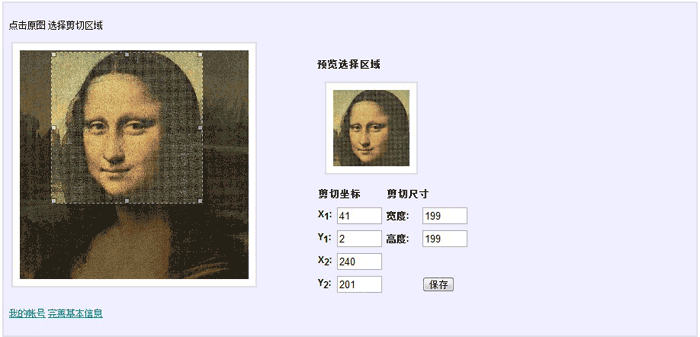
最近看了豆瓣的头像剪切应用,也想自己做一个,但在Django上做这样的功能,怎么入手呢?google了一下,很少相关的材料,还得自己构想一下。理清了思路,大概是这样的:前端使用JQuery,用户选择剪切区域,之后取到图片的宽度和高度,起始点的xy坐标(左上角的xy轴位置)和结束点的xy坐标(右下角的xy轴位置),然后把这六个参数呈现到表单上,提交给django处理;后端用Python的PIL来处理,Python的PIL图形处理类库功能很全,可以在里面找到相关的函数,根据前端提供的六个参数,对原图片进行剪切。 <link rel="stylesheet" type="text/css" href="/media/js/jquery_imgareaselect_0_9_1/css/imgareaselect-default.css" />
<style rel="stylesheet" type="text/css" >
.demo {
background:none repeat scroll 0 0 #EEEEFF;
border:2px solid #DDDDEE;
padding:0.6em;
width:85%;
}
div.frame {
background:none repeat scroll 0 0 #FFFFFF;
border:2px solid #DDDDDD;
padding:0.8em;
}
</style>
<script type="text/javascript" src="/media/js/jquery.js"></script>
<script type="text/javascript" src="/media/js/jquery_imgareaselect_0_9_1/scripts/jquery.imgareaselect.min.js"></script>
<script type="text/javascript">
function preview(img, selection) {
if (!selection.width || !selection.height)
return;
var scaleX = 100 / selection.width;
var scaleY = 100 / selection.height;
$('#preview img').css({
width: Math.round(scaleX * 300),
height: Math.round(scaleY * 300),
marginLeft: -Math.round(scaleX * selection.x1),
marginTop: -Math.round(scaleY * selection.y1)
});
$('#id_x1').val(selection.x1);
$('#id_y1').val(selection.y1);
$('#id_x2').val(selection.x2);
$('#id_y2').val(selection.y2);
$('#id_w').val(selection.width);
$('#id_h').val(selection.height);
}
$(function () {$('#photo').imgAreaSelect({ aspectRatio: '1:1', handles: true,
fadeSpeed: 200, minHeight:100,minWidth:100,onSelectChange: preview });
});
</script>
<div>
<h3>头像剪切 </h3>
<div class="demo">
<div style="float: left; width: 45%;">
<p class="instructions">
点击原图 选择剪切区域
</p>
<div style="margin: 0pt 0.3em; width: 300px; height: 300px;" class="frame">
<img src="{{baseinfo.hathead}}_300_300.jpg" id="photo" alt="30"/>
</div>
</div>
<div style="float: left; width: 40%; padding-top:50px;">
<p style="font-size: 110%; font-weight: bold; padding-left: 0.1em;">
预览选择区域
</p>
<div style="margin: 0pt 1em; width: 100px; height: 100px;" class="frame">
<div style="width: 100px; height: 100px; overflow: hidden;" id="preview">
<img style="width: 244px; height: 244px; margin-left: -71px; margin-top: -54px;" src="{{baseinfo.hathead}}_300_300.jpg" alt="300"/>
</div>
</div>
<form action="" method="POST">
<table style="margin-top: 1em;">
<thead>
<tr>
<th style="font-size: 110%; font-weight: bold; text-align: left; padding-left: 0.1em;" colspan="2">
剪切坐标
</th>
<th style="font-size: 110%; font-weight: bold; text-align: left; padding-left: 0.1em;" colspan="2">
剪切尺寸
</th>
</tr>
</thead>
<tbody>
<tr>
<td style="width: 10%;"><b>X<sub>1</sub>:</b></td>
<td style="width: 30%;">{{form.x1}}</td>
<td style="width: 20%;"><b>宽度:</b></td>
<td>{{form.w}}</td>
</tr>
<tr>
<td><b>Y<sub>1</sub>:</b></td>
<td>{{form.y1}}</td>
<td><b>高度:</b></td>
<td>{{form.h}}</td>
</tr>
<tr>
<td><b>X<sub>2</sub>:</b></td>
<td>{{form.x2}}</td>
<td></td>
<td></td>
</tr>
<tr>
<td><b>Y<sub>2</sub>:</b></td>
<td>{{form.y2}}</td>
<td></td>
<td><input type="submit" value="保存"/></td>
</tr>
</tbody>
</table>
</form>
</div>
class HatHeadCutForm(forms.Form):
    x1=forms.IntegerField(widget=forms.TextInput(attrs={'size': 4,}))
    y1=forms.IntegerField(widget=forms.TextInput(attrs={'size': 4,}))
    x2=forms.IntegerField(widget=forms.TextInput(attrs={'size': 4,}))
    y2=forms.IntegerField(widget=forms.TextInput(attrs={'size': 4,}))
    w=forms.IntegerField(widget=forms.TextInput(attrs={'size': 4,}))
    h=forms.IntegerField(widget=forms.TextInput(attrs={'size': 4,}))
def hathead_cut(request,id):
    template_var={}
    try:
        baseinfo=BaseInfo.objects.get(id=int(id))
    except BaseInfo.DoesNotExist:
        return Http404()

    if not baseinfo.hathead:
        request.user.message_set.create(message=u"请先上传图片!")
        return HttpResponseRedirect(reverse("upload_hathead"))

    template_var["baseinfo"]=baseinfo
    abs_path="%s/%s/"%(MEDIA_ROOT,"hathead")
    file_name="%s_%s"%(request.user.username,"hathead_300_300.jpg")
    form=HatHeadCutForm()
    if request.method=='POST':
        form=HatHeadCutForm(request.POST)
        if form.is_valid():
            try:
                img=Image.open(abs_path+file_name)
            except IOError:
                request.user.message_set.create(message=u"系统错误!")
            data=form.cleaned_data
            img=img.transform((data["w"],data["h"]),EXTENT,(data["x1"],data["y1"],data["x2"],data["y2"]))

            img.thumbnail((100, 100))
            file_name="%s_%s"%(request.user.username,"hathead_100_100.jpg")
            img.save("%s%s"%(abs_path,file_name),"JPEG")

            img.thumbnail((50, 50))
            file_name="%s_%s"%(request.user.username,"hathead_50_50.jpg")
            img.save("%s%s"%(abs_path,file_name),"JPEG")
            request.user.message_set.create(message=u"保存成功!")
            return HttpResponseRedirect(reverse("upload_hathead"))
        else:
            request.user.message_set.create(message=u"请剪切后 再保存!")
    template_var["form"]=form
    return render_to_response("hathead_cut.html",template_var,context_instance=RequestContext(request))
以上的代码,先读取一张300*300的图片,脚本选中100*100的区域,提交给Django剪切,最后把100*100剪切好的图再剪切一张50*50的图。脚本剪切的比列是1:1。脚本jquery imgareaselect的相关文档你可以从官方网找到,可以任意做出自己需要的效果。django的form的作用是渲染出表单(六个输入框。注:图片是直接读取磁盘文件,缩略图效果全是是jquery imgareaselect生成的);django的views的作用是根据表单提交的六个参数,剪切图片,主要代码是:img=img.transform((data["w"],data["h"]),EXTENT,(data["x1"],data["y1"],data["x2"],data["y2"]))。
作者声明:可以转载,需要转载的请注明原地址就可以了, http://2goo.info/blog/panjj/Django/2010/03/12/34 。 声明:ITeye文章版权属于作者,受法律保护。没有作者书面许可不得转载。
推荐链接
|
|
| 返回顶楼 | |
|
发表时间:2010-03-25
推荐用用这个Jcrop 前端的
|
|
| 返回顶楼 | |
|
发表时间:2010-03-26
chpublish1012 写道 推荐用用这个Jcrop 前端的
http://deepliquid.com/projects/Jcrop/demos.php?demo=live_crop Jcrop,没有用过!拓展一下思路,看起来也不错。 |
|
| 返回顶楼 | |
|
发表时间:2010-03-28
panboxian_2008 写道 chpublish1012 写道 推荐用用这个Jcrop 前端的
http://deepliquid.com/projects/Jcrop/demos.php?demo=live_crop Jcrop,没有用过!拓展一下思路,看起来也不错。 个人感觉还是imgareaselect好用,试用时发现Jcrop会随鼠标拖动实时更新所选图片,而imgareaselect会在停止拖动时计算所选区域的坐标及相关数据。不过这两个库的demo所作的剪切图片感觉有些怪,选择区域较小时,显示的剪切图会被放大;较大时,会被缩小。可能是显示剪切的区域设死的缘故。 之前我用java和imgareaselect做了一个,剪切多大就显示多大,看起来舒服点。 |
|
| 返回顶楼 | |
|
发表时间:2010-03-28
felsenlee 写道 panboxian_2008 写道 chpublish1012 写道 推荐用用这个Jcrop 前端的
http://deepliquid.com/projects/Jcrop/demos.php?demo=live_crop Jcrop,没有用过!拓展一下思路,看起来也不错。 个人感觉还是imgareaselect好用,试用时发现Jcrop会随鼠标拖动实时更新所选图片,而imgareaselect会在停止拖动时计算所选区域的坐标及相关数据。不过这两个库的demo所作的剪切图片感觉有些怪,选择区域较小时,显示的剪切图会被放大;较大时,会被缩小。可能是显示剪切的区域设死的缘故。 之前我用java和imgareaselect做了一个,剪切多大就显示多大,看起来舒服点。 若imgareaselect 剪切的原图保证100%的尺寸显示,选取出来的区域就是真实的尺寸,预览图如果能做到按剪切区域的大小显示,我想不会出现你上面所说的问题。我上面随笔实例,原图尺寸是300*300px 显示大小也是300*300px,预览图大小我限制是100,就会出现你说的问题了。因为我选取区域>=100. |
|
| 返回顶楼 | |
|
发表时间:2010-03-30
这个推荐CropZoom,也是基于jquery的插件,能实现图片的缩放和旋转
|
|
| 返回顶楼 | |
|
发表时间:2010-03-31
yye_javaeye 写道 这个推荐CropZoom,也是基于jquery的插件,能实现图片的缩放和旋转
CropZoom so cool ! |
|
| 返回顶楼 | |
浏览 11642 次


