本文来自http://blog.csdn.net/hellogv/ ,引用必须注明出处!
时隔一年,又要准备做Android的开发了,最近复习和整理一下Android的知识。这次要说的是AlertDialog,这种对话框会经常遇到。AlertDialog跟WIN32开发中的Dialog不一样,AlertDialog是非阻塞的,而阻塞的对话框用的是PopupWindow。
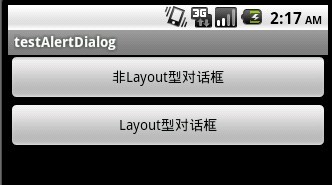
先贴出程序运行的截图:

main.xml的源码:
<?xml version="1.0" encoding="utf-8"?>
<LinearLayout xmlns:android="http://schemas.android.com/apk/res/android"
    android:orientation="vertical"
    android:layout_width="fill_parent"
    android:layout_height="fill_parent"
    >

<Button android:id="@+id/Button01" android:layout_height="wrap_content" android:text="非Layout型对话框" android:layout_width="fill_parent"></Button>
<Button android:id="@+id/Button02" android:layout_height="wrap_content" android:text="Layout型对话框" android:layout_width="fill_parent"></Button><View android:id="@+id/View01" android:layout_width="wrap_content" android:layout_height="wrap_content"></View>

</LinearLayout>
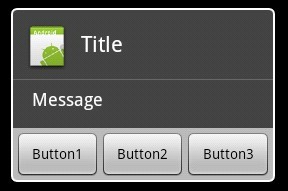
下图是非Layout型对话框,直接使用AlertDialog

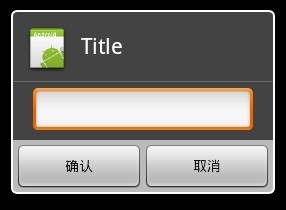
下图是使用了Layout的对话框,可以自定义控件,实现更复杂的对话框

dialoglayout.xml的源码:
<?xml version="1.0" encoding="utf-8"?>

<LinearLayout xmlns:android="http://schemas.android.com/apk/res/android"
    android:layout_width="fill_parent" android:layout_height="wrap_content"
    android:orientation="vertical">
    <EditText android:layout_height="wrap_content"
        android:layout_width="fill_parent" android:layout_marginLeft="20dip"
        android:layout_marginRight="20dip" android:textAppearance="?android:attr/textAppearanceMedium" android:id="@+id/edtInput"/>
</LinearLayout>
程序源码:
package com.testAlertDialog;

import android.app.Activity;
import android.app.AlertDialog;
import android.content.Context;
import android.content.DialogInterface;
import android.os.Bundle;
import android.view.Gravity;
import android.view.LayoutInflater;
import android.view.View;
import android.view.View.OnClickListener;
import android.widget.Button;
import android.widget.EditText;
import android.widget.PopupWindow;


public class testAlertDialog extends Activity {
    Button btnShowDialog;
    Button btnShowDialog_Layout;
    /** Called when the activity is first created. */
    @Override
    public void onCreate(Bundle savedInstanceState) {
        super.onCreate(savedInstanceState);
        setContentView(R.layout.main);
        //定义按钮
        btnShowDialog=(Button)this.findViewById(R.id.Button01);
        btnShowDialog.setOnClickListener(new ClickEvent());
        btnShowDialog_Layout=(Button)this.findViewById(R.id.Button02);
        btnShowDialog_Layout.setOnClickListener(new ClickEvent());
    }


    //统一处理按键事件
    class ClickEvent implements OnClickListener{

        @Override
        public void onClick(View v) {
            // TODO Auto-generated method stub
            if(v==btnShowDialog)
                showDialog(testAlertDialog.this);

            else if(v==btnShowDialog_Layout)
                showDialog_Layout(testAlertDialog.this);

        }

    }

    //显示基本的AlertDialog
    private void showDialog(Context context) {
        AlertDialog.Builder builder = new AlertDialog.Builder(context);
        builder.setIcon(R.drawable.icon);
        builder.setTitle("Title");
        builder.setMessage("Message");
        builder.setPositiveButton("Button1",
                new DialogInterface.OnClickListener() {
                    public void onClick(DialogInterface dialog, int whichButton) {
                        setTitle("点击了对话框上的Button1");
                    }
                });
        builder.setNeutralButton("Button2",
                new DialogInterface.OnClickListener() {
                    public void onClick(DialogInterface dialog, int whichButton) {
                        setTitle("点击了对话框上的Button2");
                    }
                });
        builder.setNegativeButton("Button3",
                new DialogInterface.OnClickListener() {
                    public void onClick(DialogInterface dialog, int whichButton) {
                        setTitle("点击了对话框上的Button3");
                    }
                });
        builder.show();
    }


    //显示基于Layout的AlertDialog
    private void showDialog_Layout(Context context) {
        LayoutInflater inflater = LayoutInflater.from(this);
        final View textEntryView = inflater.inflate(
                R.layout.dialoglayout, null);
        final EditText edtInput=(EditText)textEntryView.findViewById(R.id.edtInput);
        final AlertDialog.Builder builder = new AlertDialog.Builder(context);
        builder.setCancelable(false);
        builder.setIcon(R.drawable.icon);
        builder.setTitle("Title");
        builder.setView(textEntryView);
        builder.setPositiveButton("确认",
                new DialogInterface.OnClickListener() {
                    public void onClick(DialogInterface dialog, int whichButton) {
                        setTitle(edtInput.getText());
                    }
                });
        builder.setNegativeButton("取消",
                new DialogInterface.OnClickListener() {
                    public void onClick(DialogInterface dialog, int whichButton) {
                        setTitle("");
                    }
                });
        builder.show();
    }
}
分享到:


相关推荐
在Android入门第九篇中,讲解了如何使用AlertDialog及其两种基本类型:非Layout型对话框和Layout型对话框。 1. **非Layout型对话框**: 非Layout型对话框通常用于简单的信息提示,例如警告或确认消息。在代码中,...
在Android应用开发中,`AlertDialog`是一个非常重要的组件,它用于显示一个小型的、非模态的对话框,通常用于向用户展示警告信息或者获取用户的简单输入。与`PopupWindow`不同,`AlertDialog`是非阻塞的,意味着它...
### Android开发入门知识点详解 #### 一、核心概念(Part I: Core Concepts) **1.1 大局观(Chapter 1: The Big Picture)** - **知识点:** - Android平台简介 - Android应用架构 - 应用组件(Activity、...
- **第9章:使用基本控件** - 列举Android中常见的用户界面控件。 - 详细解释每个控件的属性和事件处理机制。 - 演示如何在布局文件中添加控件并调整其样式。 - **第10章:容器的使用** - 阐述容器控件(如...
### Android开发入门学习路线知识点详解 #### 一、Java面向对象编程基础 ##### 1. Java基本数据类型与表达式,分支循环 - **基本数据类型**:包括整型(`int`, `short`, `byte`, `long`)、浮点型(`float`, `...
#### 第九讲:用户界面 View(四):Button, TextView, EditText, CheckBox - **Button**: - 用户交互按钮。 - 通常与监听器配合使用,响应用户的点击事件。 - **TextView**: - 显示静态文本。 - 可以设置...
《Android初學特訓班(第八版)》是专为Android初学者设计的一套学习资源,由台湾知名博士教授推荐,旨在帮助新手快速掌握Android应用开发的基础知识和技能。这个压缩包包含了多个PPTX文件,每个文件代表一个特定的...
标题《Android学习新手笔记》所涉及的知识点: 1. Android背景知识 ...这份笔记可以作为学习Android开发的入门教材,它覆盖了从基础到实战应用的许多知识点,为未来深入学习Android打下坚实的基础。
Android 应用开发基础教学大纲.pdf ...4. 《Android 基础教程(第 3 版·修订版)》人民邮电出版社 [美] Ed Burnette 著;卢秀丽 毛倩倩 译 5. 《Android 开发入门与实战体验》机械工业出版社 李佐彬 等 著
Menu是Android应用中常见的控件之一,用于组织各种功能选项。 **简单的代码**: ```java @Override public boolean onCreateOptionsMenu(Menu menu) { MenuInflater inflater = getMenuInflater(); inflater....
- **第9章:使用基本控件(Employing Basic Widgets)** - **主要内容**:讲解常用的用户界面控件,如按钮、文本框等。 - **关键知识点**: - 控件的分类与用途。 - 如何添加事件监听器。 - 控件的样式和主题设置...
9. **demo_androidFile**: 文件操作是Android应用中常见的需求,这部分代码可能演示了如何在Android设备上读写文件,包括外部存储和内部存储。 10. **demo_RadioButton**: RadioButton是单选按钮组件,用于在多个...
- **Genymotion:** Genymotion 是一款第三方 Android 模拟器,相较于官方提供的模拟器(AVD),Genymotion 在性能上更加优秀,支持多种设备类型及系统版本,非常适合测试和调试应用。 **4. 版本控制** - **Git...