To use the Google Maps in your Android application, you need to modify your AndroidManifest.xml file by adding the<uses-library> element together with the INTERNET permission:
<?xml version="1.0" encoding="utf-8"?>
<manifest xmlns:android="http://schemas.android.com/apk/res/android"
      package="net.learn2develop.GoogleMaps"
      android:versionCode="1"
      android:versionName="1.0.0">
    <application android:icon="@drawable/icon" android:label="@string/app_name">

    <uses-library android:name="com.google.android.maps" />

        <activity android:name=".MapsActivity"
                  android:label="@string/app_name">
            <intent-filter>
                <action android:name="android.intent.action.MAIN" />
                <category android:name="android.intent.category.LAUNCHER" />
            </intent-filter>
        </activity>
    </application>

    <uses-permission android:name="android.permission.INTERNET" />

</manifest>
</xml>
Displaying the Map
To display the Google Maps in your Android application, modify the main.xml file located in the res/layout folder. You shall use the <com.google.android.maps.MapView> element to display the Google Maps in your activity. In addition, let's use the <RelativeLayout> element to position the map within the activity:
<?xml version="1.0" encoding="utf-8"?>
<RelativeLayout xmlns:android="http://schemas.android.com/apk/res/android"
    android:layout_width="fill_parent"
    android:layout_height="fill_parent">

    <com.google.android.maps.MapView
        android:id="@+id/mapView"
        android:layout_width="fill_parent"
        android:layout_height="fill_parent"
        android:enabled="true"
        android:clickable="true"
        android:apiKey="0l4sCTTyRmXTNo7k8DREHvEaLar2UmHGwnhZVHQ"
        />

</RelativeLayout>
Notice from above that I have used the Google Maps key that I obtained earlier and put it into the apiKey attribute.
In the MapsActivity.java file, modify the class to extend from the MapActivity class, instead of the normal Activityclass:
package net.learn2develop.GoogleMaps;

import com.google.android.maps.MapActivity;
import com.google.android.maps.MapView;
import android.os.Bundle;

public class MapsActivity extends MapActivity
{
    /** Called when the activity is first created. */
    @Override
    public void onCreate(Bundle savedInstanceState)
    {
        super.onCreate(savedInstanceState);
        setContentView(R.layout.main);
    }

    @Override
    protected boolean isRouteDisplayed() {
        return false;
    }
}
Observe that if your class extends the MapActivity class, you need to override the isRouteDisplayed() method. You can simply do so by setting the method to return false.
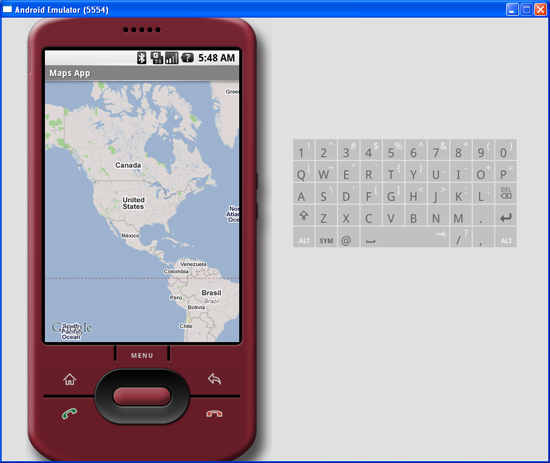
That's it! That's all you need to do to display the Google Maps in your application. Press F11 in Eclipse to deploy the application onto an Android emulator. Figure 3 shows the Google map in all its glory.

Figure 3 Google Maps in your application
At this juncture, take note of a few troubleshooting details. If your program does not run (i.e. it crashes), then it is likely you forgot to put the following statement in your AndroidManifest.xml file:
<uses-library android:name="com.google.android.maps" />
If your application manages to load but you cannot see the map (all you see is a grid), then it is very likely you do not have a valid Map key, or that you did not specify the INTERNET permission:
<uses-permission android:name="android.permission.INTERNET" />
Displaying the Zoom View
The previous section showed how you can display the Google Maps in your Android device. You can drag the map to any desired location and it will be updated on the fly. However, observe that there is no way to zoom in or out from a particular location. Thus, in this section, you will learn how you can let users zoom into or out of the map.
First, add a <LinearLayout> element to the main.xml file as shown below:
<?xml version="1.0" encoding="utf-8"?>
<RelativeLayout xmlns:android="http://schemas.android.com/apk/res/android"
    android:layout_width="fill_parent"
    android:layout_height="fill_parent">

    <com.google.android.maps.MapView
        android:id="@+id/mapView"
        android:layout_width="fill_parent"
        android:layout_height="fill_parent"
        android:enabled="true"
        android:clickable="true"
        android:apiKey="0l4sCTTyRmXTNo7k8DREHvEaLar2UmHGwnhZVHQ"
        />

    <LinearLayout android:id="@+id/zoom"
        android:layout_width="wrap_content"
        android:layout_height="wrap_content"
        android:layout_alignParentBottom="true"
        android:layout_centerHorizontal="true"
        />

</RelativeLayout>
You will use the <LinearLayout> element to hold the two zoom controls in Google Maps (you will see this shortly).
In the MapsActivity.java file, add the following imports:
import com.google.android.maps.MapView.LayoutParams;
import android.view.View;
import android.widget.LinearLayout;
and add the following code after the line setContentView(R.layout.main);
        mapView = (MapView) findViewById(R.id.mapView);
        LinearLayout zoomLayout = (LinearLayout)findViewById(R.id.zoom);
        View zoomView = mapView.getZoomControls();

        zoomLayout.addView(zoomView,
            new LinearLayout.LayoutParams(
                LayoutParams.WRAP_CONTENT,
                LayoutParams.WRAP_CONTENT));
        mapView.displayZoomControls(true);
The complete MapsActivity.java file is given below:
package net.learn2develop.GoogleMaps;

import com.google.android.maps.MapActivity;
import com.google.android.maps.MapView;
import com.google.android.maps.MapView.LayoutParams;

import android.os.Bundle;
import android.view.View;
import android.widget.LinearLayout;

public class MapsActivity extends MapActivity
{
    MapView mapView;

    /** Called when the activity is first created. */
    @Override
    public void onCreate(Bundle savedInstanceState)
    {
        super.onCreate(savedInstanceState);
        setContentView(R.layout.main);


        mapView = (MapView) findViewById(R.id.mapView);
        LinearLayout zoomLayout = (LinearLayout)findViewById(R.id.zoom);
分享到:


相关推荐
**知识点详解:Android Map API 的使用与切换指南** 在移动应用开发领域,地图服务是许多应用的核心功能之一,尤其在导航、地理位置分享、位置搜索等场景下不可或缺。Android Map API 提供了一套全面的工具和资源,...
### Android Map API 使用与开发——定位功能详解 #### 一、概述 在移动应用开发领域,尤其是基于地理位置的服务(LBS)应用中,Android Map API 的使用变得日益重要。通过 Android Map API,开发者可以轻松地将...
《Android NDK与GoogleMap集成应用详解》 在Android开发领域,NDK(Native Development Kit)和Google Map API是两个非常重要的技术。NDK提供了一种方式,让开发者可以使用C/C++原生代码来编写部分应用,以提高性能...
"android"标签表明了这是关于Android平台的开发内容,而"googleMap"则指明了主要涉及Google Maps服务。在Android应用中集成Google Maps,开发者需要在Google Cloud Console创建项目,获取API密钥,然后在...
### Android Google Map 入门详解 #### 一、准备工作 要想成功地开发一款基于Google Maps的应用程序,首先需要确保你的开发环境已经准备妥当。这包括申请必要的API密钥、设置正确的开发环境以及确保所有所需的组件...
### Android Map API 使用详解 #### 一、准备工作 在深入探讨如何使用Android Map API之前,首先需要做一些必要的准备工作。这包括获取API密钥、创建基于Google APIs的Android虚拟设备(AVD)、创建工程项目以及安装...
《Android MAP API 开发详解》 在Android应用开发中,地图功能是不可或缺的一部分,尤其对于导航、定位、地理信息展示等应用来说更是如此。本文档将深入探讨Android平台上的MAP API,帮助开发者理解和掌握如何利用...
### Google API开发详解 #### 背景与概述 随着互联网技术的发展,地理位置服务成为连接线上与线下场景的重要桥梁。Google作为全球领先的互联网企业之一,提供了丰富的API接口,特别是Google Maps API与Google ...
#### TextView的API详解 **1.1 结构** `TextView`是Android中用于展示文本的重要组件。它继承自`View`类,并且是`android.widget`包中的一个核心成员。`TextView`的类结构如下所示: - `java.lang.Object` - `↳...
### Google Map 开发密钥详解 #### 一、Google Map API 概述 Google Map API 是一套由谷歌提供的用于在网站或应用中嵌入交互式地图的服务接口。它支持多种编程语言,包括JavaScript、Android(Java/Kotlin)以及...
**Android LocationMap 示例详解** Android LocationMap demo 是一个专门用于展示如何在Android平台上集成和使用地理位置服务的应用示例。这个项目适用于开发者,尤其是那些希望通过Eclipse或Android Studio进行...
### Android学习每日一例——构建Android平台Google Map应用 #### Google Maps API简介 Google Maps API 是一套强大的工具集合,允许开发者在其Android应用中集成谷歌地图功能。通过使用Google Maps API,开发者...
《Google Map V2在Android中的应用详解》 Google Map V2是Google Maps API的一个重要版本,为Android开发者提供了集成Google地图服务的强大工具。这个API允许开发者在Android应用程序中嵌入实时地图,实现定位、...
【Android-ExtraMapUtils库详解】 在Android应用开发中,Google Maps API是一个强大的工具,它允许开发者在应用程序中集成地图功能,包括定位、导航、路线规划等。然而,当需要在地图上绘制复杂的图形,如多边形和...
### GoogeMap(应为Google Map)的使用详解 #### 一、Google Map API简介 Google Map API 是一组由Google提供的开发工具包,允许开发者在自己的应用中集成地图功能。这些API提供了丰富的功能,包括地图展示、定位...
### Google Maps API Key 的生成与应用详解 #### 一、前言 随着移动互联网的发展,地图服务成为众多应用中不可或缺的一部分。Google Maps API 提供了一种便捷的方式,使得开发者能够轻松地将地图集成到自己的应用...
用,Android实现GPS定位,Android通过JNI调用驱动程序,Android网络开发详解,android写的google map api 应用,android学 习资料大全,Android音视频的编解码,Android应用框架原理与程序设计36技(高焕堂著、简体版),...
用,Android实现GPS定位,Android通过JNI调用驱动程序,Android网络开发详解,android写的google map api 应用,android学 习资料大全,Android音视频的编解码,Android应用框架原理与程序设计36技(高焕堂著、简体版),...
总结,实现Android的LocationMap功能,需要熟练掌握Android的Location服务、Google Maps API的使用,以及处理好用户体验、性能优化和隐私保护等问题。通过不断实践和学习,开发者可以构建出功能强大且用户体验优秀的...
【标题】"WeatherApp"是一个基于Android平台的简单应用程序,它整合了OpenWeatherMap和Google Map API,为用户提供实时天气信息以及地理位置相关的气象展示。这个应用的开发使用了Java编程语言,展示了Android开发者...