原文地址:http://www.hxstrive.com/article/596.htm
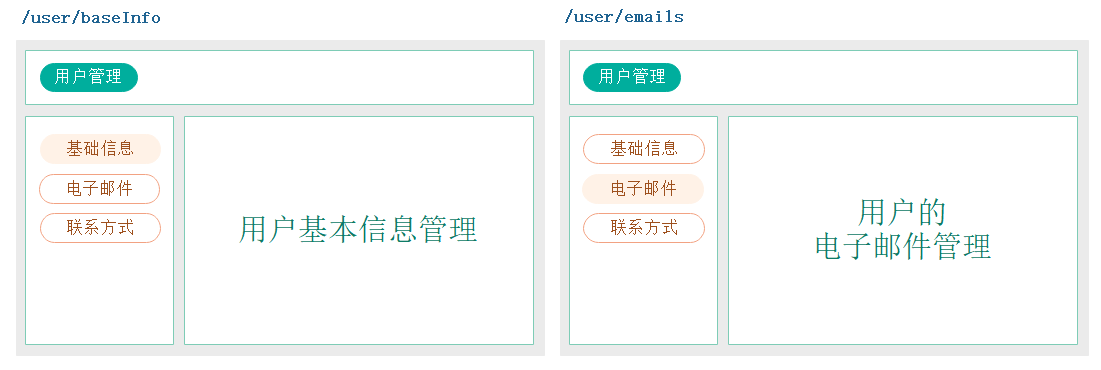
实际生活中的应用界面,通常由多层嵌套的组件组合而成。同样地,URL 中各段动态路径也按某种结构对应嵌套的各层组件,例如:

上图中,用户管理(/user)为一级路由,而基础信息(/user/baseInfo)或电子邮件(/user/emails)为二级路由。下面我们将介绍怎样使用vue-router来实现这个Demo。
在开始之前我们使用 “vue init webpack vue-router-test”创建“vue-router-test”vue项目。在创建过程中,请选择安装 vue-router 组件(如果不会创建,则参考Vue-Router入门文章)。
下图是项目的结构:
其中:Home.vue(主页)、User.vue(用户管理)一级路由,Phones.vue(联系方式)和Emails.vue(电子邮件)二级路由。具体代码如下:
Home.vue
<template>
<div class="home">
<h1>主页 - Home</h1>
</div>
</template>
<script>
export default {
name: 'Home'
}
</script>
<style scoped></style>
User.vue
<template>
<div class="user">
<div class="list-container">
<!-- 二级路由导航 -->
<router-link to="/user/emails">电子邮件</router-link>
<router-link to="/user/phones">联系方式</router-link>
</div>
<div class="content-container">
<!-- 二级路由展示容器 -->
<router-view/>
</div>
</div>
</template>
<script>
export default {
name: 'User'
}
</script>
<style scoped>
.list-container, .content-container {
float: left;
width: 140px;
height: 300px;
background: #F0F0F0;
border: solid 1px #333;
margin-top: 10px;
text-align: left;
}
.list-container a {
display: block;
margin: 3px 0px;
text-decoration: none;
padding-left: 10px;
}
.list-container a.router-link-active {
color: orangered;
font-weight: bold;
}
.content-container {
width: 468px;
height: 300px;
text-align: center;
background: #F0F0F0;
border: solid 1px #333;
margin-left: 10px;
}
</style>
Emails.vue
<template>
<div class="emails">
<h2>用户的电子邮件管理</h2>
</div>
</template>
<script>
export default {
name: 'Emails'
}
</script>
<style scoped></style>
Phones.vue
<template>
<div class="phones">
<h2>用户联系方式管理</h2>
</div>
</template>
<script>
export default {
name: 'Phones'
}
</script>
<style scoped></style>
App.vue
<template>
<div id="app">
<div class="navigator">
<!-- 一级路由导航 -->
<router-link to="/home">主页</router-link>
<router-link to="/user">用户管理</router-link>
</div>
<div class="content">
<!-- 一级路由展示容器 -->
<router-view/>
</div>
</div>
</template>
<script>
export default {
name: 'App'
}
</script>
<style>
#app {
font-family: 'Avenir', Helvetica, Arial, sans-serif;
-webkit-font-smoothing: antialiased;
-moz-osx-font-smoothing: grayscale;
text-align: center;
color: #2c3e50;
}
.navigator {
text-align: left;
padding: 10px;
background: #F0F0F0;
border: solid 1px #333;
width: 600px;
}
.navigator a {
background: lightgreen;
border: solid 1px green;
padding: 4px 8px;
text-decoration: none;
}
.navigator a:hover, .navigator a.router-link-active {
background:orange;
}
</style>
index.js
该文件位于router/index.js,用来配置 vue-router。代码如下:
import Vue from 'vue'
// 导入 vue-router 组件
import Router from 'vue-router'
// 导入自己的组件
import Home from '@/components/Home'
import User from '@/components/User'
import Emails from '@/components/Emails'
import Phones from '@/components/Phones'
// 使用 vue-router 路由组件
Vue.use(Router)
export default new Router({
routes: [
// 一级路由配置
{path: '/home', name: 'Home', component: Home},
// redirect表示进入 /user 路由时,默认路由到 /user/emails
{path: '/user', name: 'User', redirect:'/user/emails', component: User, children: [
// 二级路由配置
{path: '/user/emails', component: Emails},
{path: '/user/phones', component: Phones}
]}
]
})
下图是最终运行效果图:
其中:主页/用户管理是一级路由,电子邮件和联系方式是二级路由。
总结:
嵌套路由是在路由下面的children属性下面添加路由信息。如下:
export default new Router({
routes: [
{path: '/home', name: 'Home', component: Home},
{path: '/user', name: 'User', component: User, children: [
{path: 'emails', component: Emails},
{path: 'phones', component: Phones}
]}
]
})
如果你在访问/user时,不会渲染任何东西。这是因为没有匹配的子路由。如果你想要渲染点什么,可以提供一个 空的 子路由:
export default new Router({
routes: [
{path: '/home', name: 'Home', component: Home},
{path: '/user', name: 'User', component: User, children: [
{path: '', component: Emails},
{path: 'emails', component: Emails},
{path: 'phones', component: Phones}
]}
]
})


相关推荐
接着我继续追问…(省略)…大致明白了情况,原来这位朋友没有理解Vue-Router嵌套的原理,下面整理了一下我对Vue-Router路由嵌套的理解 Vue-Router嵌套路由 首先假设项目中有两个路由Profile和Posts,按写法把他们...
Vue Router 是 Vue.js 官方的路由管理器,版本4.x 对应的是与 Vue3.x 兼容的新版。它负责处理应用的导航和页面间的通信,使得单页应用(SPA)能够根据 URL 进行状态管理和页面切换。 在这个"vue3.x+vite+ts+vue-...
vue-router.js 文件即为Vue Router的实现,它提供了导航、路由配置、动态路由匹配、嵌套路由、回退处理等功能,使得在Vue应用中管理页面间的跳转变得简单易行。 在Vue项目中,Vue Router的使用通常包括以下步骤: ...
这个框架使用了Vue.js的2.0版本,Vue-router进行页面路由管理和ElementUI作为界面组件库,为开发高效、简洁、易维护的Web管理界面提供了便利。 【Vue2.0】:Vue.js 2.0是Vue.js框架的一个主要版本,它在1.x的基础上...
在 Vue-router 中,可以使用 children 配置来定义嵌套路由。例如: ```javascript export default { path: '/scoreplus', name: 'scoreplus', component: { template: '<router-view />' }, redirect: { ...
6. **嵌套路由**:Vue Router 支持子路由,可以在一个路由下定义多个子路由,形成组件的嵌套关系。这对于构建多层导航结构非常有用。 7. **重定向和别名**:可以配置路由重定向,将一个路由的访问跳转到另一个路由...
在基于 VueRouter 的后台管理系统中,路由扮演着至关重要的角色,它负责连接不同的组件和视图,实现页面间的导航和数据传递。下面将详细介绍如何在 Vue 项目中运用 Vue Router 实现后台管理功能。 1. **安装 Vue ...
Vue Router是Vue.js官方推荐的路由管理器,它与Vue.js深度集成,使得在单页面应用(SPA)中管理导航和页面状态变得简单易行。Vue Router 3.0.1是该库的一个版本,提供了许多特性以支持高效且灵活的路由配置。 Vue ...
Vue Router 是 Vue.js 的官方路由库,用于管理单页面应用(SPA)的视图和导航。这个"vue-router-demo"项目是为了演示和学习Vue Router 3.0.1版本的功能和用法。在这个项目中,我们可以看到一系列配置文件,它们在...
安装Vue-router后,开发者可以创建路由实例,并在实例中定义路由规则,包括路径、组件以及嵌套路由、路由参数传递、导航守卫等高级功能。 导航守卫是Vue-router中的一个重要功能,它允许用户在路由发生变化时执行...
const router = new VueRouter({ mode: 'history', routes: [ { path: '/recom', component: Recom, // 假设Recom是父组件 children: [ { path: 'view', name: 'recomView', component: recomView }, { path...
1. **Router 实例**:通过 `new VueRouter(options)` 创建,`options` 包含路由配置数组。 2. **Route构造函数**:表示一个路由对象,包含了当前路由的信息,如 path、params、query、matched 等。 3. **HashHistory...
Vue-router 是 Vue.js 官方的路由管理器,用于构建单页面应用(SPA)。在实际项目中,路由的配置和重定向操作非常常见,尤其是在处理多级路由时,可能会遇到一些问题。本文将详细介绍在使用 vue-router 实现多级路由...
我们已经学习过了Vue模板的另外定义形式,使用<template></template>。 <!-- 模板抽离出来 --> 首页 新闻 然后js里定义路由组件的时候: // 1. 定义(路由)组件。 const Home = { template: ...
如果存在嵌套路由,可以用`<router-view>`嵌套来呈现子路由的组件。 以上就是Vue Router的基本概念和使用方式,从一级路由到二级路由的创建,再到动态路由、导航链接、编程式导航、导航守卫、命名路由、重定向和...
4. 创建VueRouter实例,传入定义好的路由配置。 5. 将创建的VueRouter实例注入到Vue根实例中。 6. 使用`<router-link>`和`<router-view>`组件进行导航和视图展示。 Vue-Router的核心在于它的路由匹配和组件渲染。当...
【uni-app中的路由管理:uni-simple-router】 uni-app 是一个基于 Vue.js 的多端开发...在实际开发中,还可以利用 uni-simple-router 提供的其他功能,如动态路由、嵌套路由、命名视图等,进一步优化应用的路由管理。
4. **路由嵌套**:Vue Router 允许创建嵌套路由,这样可以构建层级结构的组件。在父路由配置中定义子路由,可以创建子组件树。例如,一个 "User" 路由可能有一个 "Profile" 子路由,这样在访问 `/user/1/profile` 时...
随着Vue单页应用(SPA)变得复杂 需要使用路由嵌套 路由嵌套允许更复杂的用户界面以及相互嵌套的组件 如果对Vue的路由不太熟悉 请参看我的另一篇博客:Vue学习之旅Part9:使用vue-router实现前端路由和参数传递 路由...