关于图像处理中的卷积运算,这里有两份简明扼要的介绍:文一,文二。
其中,可能的一种卷积运算代码如下:
- (UIImage*)applyConvolution:(NSArray*)kernel
{
	CGImageRef inImage = self.CGImage;
	CFDataRef m_DataRef = CGDataProviderCopyData(CGImageGetDataProvider(inImage));
	CFDataRef m_OutDataRef = CGDataProviderCopyData(CGImageGetDataProvider(inImage));
	UInt8 * m_PixelBuf = (UInt8 *) CFDataGetBytePtr(m_DataRef);
	UInt8 * m_OutPixelBuf = (UInt8 *) CFDataGetBytePtr(m_OutDataRef);

	int h = CGImageGetHeight(inImage);
	int w = CGImageGetWidth(inImage);

	int kh = [kernel count] / 2;
	int kw = [[kernel objectAtIndex:0] count] / 2;
	int i = 0, j = 0, n = 0, m = 0;

	for (i = 0; i < h; i++) {
		for (j = 0; j < w; j++) {
			int outIndex = (i*w*4) + (j*4);
			double r = 0, g = 0, b = 0;
			for (n = -kh; n <= kh; n++) {
				for (m = -kw; m <= kw; m++) {
					if (i + n >= 0 && i + n < h) {
						if (j + m >= 0 && j + m < w) {
							double f = [[[kernel objectAtIndex:(n + kh)] objectAtIndex:(m + kw)] doubleValue];
							if (f == 0) {continue;}
							int inIndex = ((i+n)*w*4) + ((j+m)*4);
							r += m_PixelBuf[inIndex] * f;
							g += m_PixelBuf[inIndex + 1] * f;
							b += m_PixelBuf[inIndex + 2] * f;
						}
					}
				}
			}
			m_OutPixelBuf[outIndex]     = SAFECOLOR((int)r);
			m_OutPixelBuf[outIndex + 1] = SAFECOLOR((int)g);
			m_OutPixelBuf[outIndex + 2] = SAFECOLOR((int)b);
			m_OutPixelBuf[outIndex + 3] = 255;
		}
	}

	CGContextRef ctx = CGBitmapContextCreate(m_OutPixelBuf,
											 CGImageGetWidth(inImage),
											 CGImageGetHeight(inImage),
											 CGImageGetBitsPerComponent(inImage),
											 CGImageGetBytesPerRow(inImage),
											 CGImageGetColorSpace(inImage),
											 CGImageGetBitmapInfo(inImage)
											 );

	CGImageRef imageRef = CGBitmapContextCreateImage(ctx);
	CGContextRelease(ctx);
	UIImage *finalImage = [UIImage imageWithCGImage:imageRef];
	CGImageRelease(imageRef);
	CFRelease(m_DataRef);
    CFRelease(m_OutDataRef);

	return finalImage;
}
方法的参数kernel是卷积运算中的卷积核,下面是几种滤镜的卷积核:
#pragma mark -
#pragma mark - Basic Convolutions

/* Reference :
 * http://docs.gimp.org/en/plug-in-convmatrix.html
 */

- (UIImage *)sharpen
{
//	double dKernel[5][5] = {
//		{0,  0.0, -1.0,  0.0, 0},
//		{0, -1.0,  5.0, -1.0, 0},
//		{0,  0.0, -1.0,  0.0, 0}
//    };

    double dKernel[5][5] = {
		{0, 0.0, -0.2,  0.0, 0},
		{0, -0.2, 1.8, -0.2, 0},
		{0, 0.0, -0.2,  0.0, 0}
    };

	NSMutableArray *kernel = [[[NSMutableArray alloc] initWithCapacity:5] autorelease];
	for (int i = 0; i < 5; i++) {
		NSMutableArray *row = [[[NSMutableArray alloc] initWithCapacity:5] autorelease];
		for (int j = 0; j < 5; j++) {
			[row addObject:[NSNumber numberWithDouble:dKernel[i][j]]];
		}
		[kernel addObject:row];
	}
	return [self applyConvolution:kernel];
}

- (UIImage *)edgeEnhance
{
	double dKernel[5][5] = {
		{0,  0.0,  0.0,  0.0, 0},
		{0, -1.0,  1.0,  0.0, 0},
		{0,  0.0,  0.0,  0.0, 0}
    };

	NSMutableArray *kernel = [[[NSMutableArray alloc] initWithCapacity:5] autorelease];
	for (int i = 0; i < 5; i++) {
		NSMutableArray *row = [[[NSMutableArray alloc] initWithCapacity:5] autorelease];
		for (int j = 0; j < 5; j++) {
			[row addObject:[NSNumber numberWithDouble:dKernel[i][j]]];
		}
		[kernel addObject:row];
	}

	return [self applyConvolution:kernel];
}

- (UIImage *)edgeDetect
{
	double dKernel[5][5] = {
		{0,  0.0,  1.0,  0.0, 0},
		{0,  1.0, -4.0,  1.0, 0},
		{0,  0.0,  1.0,  0.0, 0}
    };

	NSMutableArray *kernel = [[[NSMutableArray alloc] initWithCapacity:5] autorelease];
	for (int i = 0; i < 5; i++) {
		NSMutableArray *row = [[[NSMutableArray alloc] initWithCapacity:5] autorelease];
		for (int j = 0; j < 5; j++) {
			[row addObject:[NSNumber numberWithDouble:dKernel[i][j]]];
		}
		[kernel addObject:row];
	}

	return [self applyConvolution:kernel];
}

- (UIImage *)emboss
{
	double dKernel[5][5] = {
		{0, -2.0, -1.0,  0.0, 0},
		{0, -1.0,  1.0,  1.0, 0},
		{0,  0.0,  1.0,  2.0, 0}
    };

	NSMutableArray *kernel = [[[NSMutableArray alloc] initWithCapacity:5] autorelease];
	for (int i = 0; i < 5; i++) {
		NSMutableArray *row = [[[NSMutableArray alloc] initWithCapacity:5] autorelease];
		for (int j = 0; j < 5; j++) {
			[row addObject:[NSNumber numberWithDouble:dKernel[i][j]]];
		}
		[kernel addObject:row];
	}

	return [self applyConvolution:kernel];
}
在此基础上,我Google了下Photoshop中对照片进行黑白处理的简单步骤:
- 去色
- 调整对比度
- 高斯模糊
- 浮雕效果
- 边缘检测
- 调整对比度
- 调整亮度
- 反相
我按步骤实现了相应代码:
return [[[[[[[[originImage desaturate]
                          changeContrastByFactor:1.5]
                         gaussianBlur:1.3] emboss]
                       edgeDetect]
                      changeContrastByFactor:1.5]
                     changeBrightnessByFactor:1.5]
                    invert];
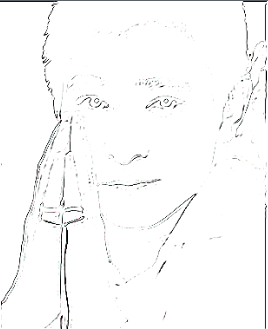
可惜效果有点粗糙,照片仍旧以
上一篇文章中的Andy为例:
更多详细信息请查看
java教程网 http://www.itchm.com/forum-59-1.html
分享到:


相关推荐
iOS 原生地图开发进阶——使用导航和附近兴趣点检索是 iOS 地图开发中两个非常重要的功能。使用 iOS 的 mapKit 框架,可以实现线路导航和附近兴趣点检索这两个功能。 一、线路导航 线路导航是指根据用户的当前位置...
《iOS游戏应用源代码解析——基于XBImageFilters的图像处理技术》 在移动开发领域,iOS游戏应用一直以来都以其丰富的视觉效果和流畅的用户体验受到广大用户的喜爱。在深入探究iOS游戏开发的过程中,图像处理技术是...
本示例项目“iOS中的手势密码——swift纯代码版”是使用Swift编程语言实现的手势密码功能,无需借助任何第三方库,非常适合初学者进行学习和实践。 Swift作为Apple官方推荐的编程语言,具有简洁、类型安全和高性能...
iOS游戏应用源代码——krzysztofzablocki-SFContainerViewController.zip
iOS游戏应用源代码——FlorianMielke-FMMoveTableView.zip
本篇文章将围绕"iOS游戏应用源代码——kastner-fifteen-44a73e4.zip"这一主题,深入探讨该源代码中的关键知识点,帮助开发者们提升对iOS游戏开发的理解。 首先,我们关注的是这个项目的名字“kastner-fifteen”,这...
【标题】"iOS游戏应用源代码——mefistody-FlashToCocos2D.zip" 涉及的关键知识点主要集中在iOS游戏开发和Cocos2D框架的应用上。这个压缩包可能包含了一个使用Cocos2D-iOS引擎将Flash内容移植到iOS平台上的游戏项目...
iOS游戏应用源代码——steveturner-IOS-WhackJob-bak-03c0bdc.zip
"iOS游戏应用源代码——AjComboBox.zip" 提供了一个名为 AjComboBox 的组件,这可能是一个自定义的下拉选择框控件,专为iOS游戏界面设计。在iOS应用,特别是游戏开发中,定制UI元素是提升用户体验和实现独特设计的...
《iOS游戏应用源代码——sqlboy-tiled-games-b6ef16c.zip》是一款基于iOS平台的游戏开发源代码包,主要围绕“sqlboy”这一主题,利用Tiled地图编辑器进行游戏场景设计。该资源对于iOS游戏开发者,尤其是那些对2D游戏...
iOS游戏应用源代码——atreat-TowerDefense-43e3491.zip
《iOS游戏应用开发详解——基于"shenxiangyu-SimpleGame-5473bb8.zip"源代码分析》 在iOS应用开发领域,游戏开发一直是热门话题,尤其是对于那些热爱编程和游戏设计的人来说。本文将深入探讨一个名为"shenxiangyu-...
4. **响应式编程**:iOS中的手势识别和事件处理,例如点击单元格后的动作响应,可能通过Swift的Closure或者Objective-C的Blocks来实现。 5. **性能优化**:在大量数据显示时,如何利用UITableView的缓存机制,以及...
本篇将深度剖析"iOS游戏应用源代码——unixpickle-BoxScreensaver-b87d9d3.zip"中的关键知识点,帮助开发者们增进对iOS游戏开发的理解。 首先,我们要了解的是"unixpickle"这个名字。Unixpickle是一个Python库,...
iOS游戏应用源代码——hborders-CodeRetreat-a3381b8.zip
6. **事件处理与响应链**:iOS中的事件处理涉及触摸事件、手势识别和代理方法。通过查看代码,我们可以学习如何处理用户输入,以及如何通过响应链进行消息传递。 7. **内存管理**:无论是Objective-C的ARC...
iOS游戏应用源代码——joshbuhler-Soap-193ab63.zip
iOS游戏应用源代码——manuelhunziker-active-Game-Controller.zip
iOS游戏应用源代码——boydlee-AntiClaus-e7a0411.zip
iOS游戏应用源代码——jdedona-CarGame-495475e.zip