一个相对简单的例子,对学习对话框很有帮助:
1新建Win32项目,编写代码
2新建资源,添加ICON
如图:
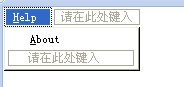
3资源,添加菜单:
如图:
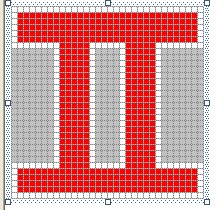
4资源,添加对话框,拖拽控件
如图:
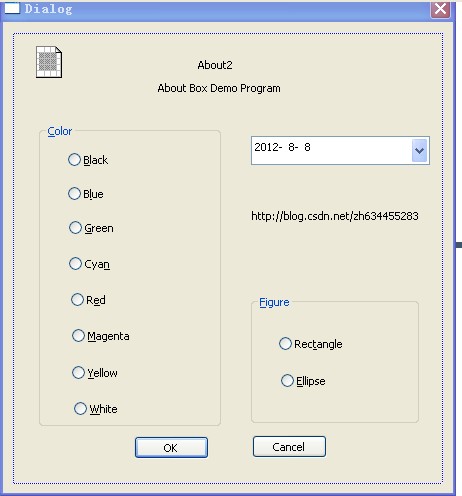
其中左上角的ICON就是刚刚建立的ICON:
即: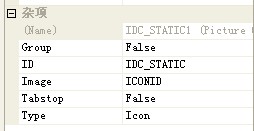
具体代码如下:
#include<windows.h>
#include"resource.h"

void PaintWindow(HWND hwnd,int iColor,int iFigure);//声明一个函数,这个函数主要是改变窗体背景颜色
BOOL CALLBACK DialogProc(HWND hwnd,UINT uMsg,WPARAM wParam,LPARAM lParam);//声明对话框过程函数
LRESULT CALLBACK WindowProc(
  HWND hwnd,      // handle to window
  UINT uMsg,      // message identifier
  WPARAM wParam,  // first message parameter
  LPARAM lParam   // second message parameter
);


int iCurrentColor=ID_BLACK;//声明两个全局变量,其中一个保存当前画刷的颜色
int iCurrentFigure=ID_RECTANGLE;//全局变量,保存当前的选中的图形

int WINAPI WinMain(
  HINSTANCE hInstance,      // handle to current instance
  HINSTANCE hPrevInstance,  // handle to previous instance
  LPSTR lpCmdLine,          // command line
  int nCmdShow              // show state
)
{
	static TCHAR szAppName[]=TEXT("leidemingzi");
	HWND hwnd;
	MSG msg;
	WNDCLASS wndclass;
	HMENU hMenu;

	wndclass.cbClsExtra=0;
	wndclass.cbWndExtra=0;
	wndclass.hbrBackground=(HBRUSH)GetStockObject(WHITE_BRUSH);
	wndclass.hCursor=LoadCursor(NULL,IDC_ARROW);
	wndclass.hIcon=LoadIcon(NULL,IDI_ERROR);
	wndclass.hInstance=hInstance;
	wndclass.lpfnWndProc=WindowProc;
	wndclass.lpszClassName=szAppName;
	wndclass.lpszMenuName=NULL;
	wndclass.style=CS_HREDRAW|CS_VREDRAW;

	if(!RegisterClass(&wndclass))//注册窗口
	{
		MessageBox(NULL,TEXT("the program require the window nt"),TEXT("tips"),MB_ICONERROR);
		return 0;
	}

	hMenu=LoadMenu(hInstance,MAKEINTRESOURCE(MENUID));//加载菜单
	hwnd=CreateWindow(
	  szAppName,  // registered class name
	  TEXT("this is title"), // window name
	  WS_OVERLAPPEDWINDOW,        // window style
	  CW_USEDEFAULT,                // horizontal position of window
	  CW_USEDEFAULT,                // vertical position of window
	  CW_USEDEFAULT,           // window width
	  CW_USEDEFAULT,          // window height
	  NULL,      // handle to parent or owner window
	  hMenu,          // menu handle or child identifier
	  hInstance,  // handle to application instance
	  NULL       // window-creation data
);

	ShowWindow(hwnd,nCmdShow);
	UpdateWindow(hwnd);

	while(GetMessage(&msg,NULL,0,0))
	{
		TranslateMessage(&msg);
		DispatchMessage(&msg);
	}

	return msg.wParam;
}


LRESULT CALLBACK WindowProc(
  HWND hwnd,      // handle to window
  UINT uMsg,      // message identifier
  WPARAM wParam,  // first message parameter
  LPARAM lParam   // second message parameter
)
{
	static HINSTANCE hInst;
	PAINTSTRUCT ps;

	switch(uMsg)
	{
	case WM_CREATE:
		hInst=((LPCREATESTRUCT)lParam)->hInstance;
		return 0;

	case WM_COMMAND:
		switch(LOWORD(wParam))
		{
		case ID_HELP_ABOUT:
			DialogBox(hInst,MAKEINTRESOURCE(DIALOGID),hwnd,DialogProc);//显示对话框
			break;
		}
		return 0;

	case WM_PAINT:
		BeginPaint(hwnd,&ps);

		PaintWindow(hwnd,iCurrentColor,iCurrentFigure);
		MessageBeep(0);
		EndPaint(hwnd,&ps);
		return 0;


	case WM_DESTROY:
		PostQuitMessage(0);
		return 0;
	}
	return DefWindowProc(hwnd,uMsg,wParam,lParam);
}


void PaintWindow(HWND hwnd,int iColor,int iFigure)
{
	static COLORREF color[8]={RGB(0,0,0),RGB(0,0,255),RGB(0,255,0),RGB(0,255,255)//定义颜色数组,8种颜色,刚好对应单选按钮的颜色
					,RGB(255,0,0),RGB(255,0,255),RGB(255,255,0),RGB(255,255,255)};

	HDC hdc;
	RECT rect;
	hdc=GetDC(hwnd);
	GetClientRect(hwnd,&rect);
	HBRUSH hbrush=CreateSolidBrush(color[iColor-ID_BLACK]);//根据传进来的参数,创建画刷
	SelectObject(hdc,hbrush);//把画刷选入环境设备中去

	if(iFigure==ID_RECTANGLE)
	{
		Rectangle(hdc,rect.left,rect.top,rect.right,rect.bottom);//绘画矩形,自动填充颜色
	}else
	{
		Ellipse(hdc,rect.left,rect.top,rect.right,rect.bottom);//绘画椭圆,自动填充颜色
	}

	ReleaseDC(hwnd,hdc);
}

void Flush(HWND hwnd)//这个方法是使客户区失效,从而触发WM_PAINT时间,不能直接在DialogProc使用InvaidateRect
                       //因为DialogProc中的hwnd指的是Dialog的句柄
{
	InvalidateRect(hwnd,NULL,TRUE);
}

BOOL CALLBACK DialogProc(HWND hwnd,UINT uMsg,WPARAM wParam,LPARAM lParam)
{
	//static HWND hCtrlBlock;
	static int iColor,iFigure;


	switch(uMsg)
	{
	case WM_INITDIALOG:
		iColor=ID_WHITE;
		iFigure=ID_RECTANGLE;
		return TRUE;

	case WM_COMMAND:
		switch(LOWORD(wParam))//低位的wParam是ID
		{
		case IDOK:
			iCurrentColor=iColor;
			iCurrentFigure=iFigure;
			//InvalidateRect(hwnd,NULL,TRUE);这是错误的,该hwnd是Dialog的句柄
			Flush(GetParent(hwnd));
			EndDialog(hwnd,0);
			//MessageBeep(0);当时是用来测试用的,这个方法不错。
			return TRUE;

		case IDCANCEL:
			EndDialog(hwnd,0);
			return TRUE;

		case ID_BLACK:
		case ID_BLUE:
		case ID_GREEN:
		case ID_CYAN:
		case ID_RED:
		case ID_MAGENTA:
		case ID_YELLOW:
		case ID_WHITE:
			iColor=LOWORD(wParam);

			CheckRadioButton(hwnd,ID_BLACK,ID_WHITE,LOWORD(wParam));//切换按钮状态
			//MessageBeep(0);

			return TRUE;

		case ID_RECTANGLE:
		case ID_ELLIPSE:
			iFigure=LOWORD(wParam);
			CheckRadioButton(hwnd,ID_RECTANGLE,ID_ELLIPSE,LOWORD(wParam));//切换按钮状态
			//MessageBeep(0);
			return TRUE;


		}
		break;
	}

	return FALSE;
}
看看运行结果如何:


代码中有解释了,其中有一些很有用的函数,自己琢磨琢磨
分享到:


相关推荐
在这个函数中,我们创建一个主窗口`root`,设置其类名、置顶属性以及位置和大小: ```python root = Tk(className=title) root.wm_attributes('-topmost', 1) screenwidth, screenheight = root.maxsize() width = ...
标题为“vc6窗体置前置后例子(代码)”的资源提供了一个实现这一功能的示例。这个例子主要涉及了Windows API中的几个关键函数,包括`SetWindowPos`,`BringWindowToTop`和`SendToBack`。 首先,`SetWindowPos`函数...
在VB(Visual Basic)编程中,开发者有时需要实现一个功能,让自己的应用程序窗口始终显示在其他窗口之上,即置顶功能。这种技术通常用于需要用户持续关注的应用,如弹出提示或浮动小工具。 描述中的“VB之精彩界面...
2. 文件操作:保存和加载便签内容到磁盘,通常使用OpenFileDialog和SaveFileDialog对话框。 3. 用户界面(UI)设计:利用MFC的CDialog类或CWinApp类创建用户界面,并处理用户的输入事件。 4. 窗口管理:创建、显示...
例如,使用`AlertDialog.Builder`创建一个简单的Dialog: ```java AlertDialog.Builder builder = new AlertDialog.Builder(context); builder.setTitle("标题") .setMessage("内容") .setPositiveButton("确定",...
排序:在推荐位列表中排列的位置,并不是一个很重要的选项,在推荐位较多时才有必要设定,对经常维护的推荐位,可以修改排序达到置顶的目的。 4)填写完毕后,点击“提交数据”即可完成推荐位创建。 3、推荐内容的...