分布式环境中大多数服务是允许部分失败,也允许数据不一致,但有些最基础的服务是需要高可靠性,高一致性的,这些服务是其他分布式服务运转的基础,比如naming service、分布式lock等,这些分布式的基础服务有以下要求:
- 高可用性
- 高一致性
- 高性能
对于这种有些挑战CAP原则 的服务该如何设计,是一个挑战,也是一个不错的研究课题,Apache的ZooKeeper也许给了我们一个不错的答案。ZooKeeper是一个分布式的,开放源码的分布式应用程序协调服务, 它暴露了一个简单的原语集,分布式应用程序可以基于它实现同步服务,配置维护和命名服务等。关于ZooKeeper更多信息可以参见 官方文档
ZooKeeper的基本使用
搭一个分布式的ZooKeeper环境比较简单,基本步骤如下:
1)在各服务器安装 ZooKeeper
下载ZooKeeper后在各服务器上进行解压即可
tar -xzf zookeeper-3.2.2.tar.gz
2)配置集群环境
分别各服务器的zookeeper安装目录下创建名为zoo.cfg的配置文件,内容填写如下:
- # The number of milliseconds of each tick
- tickTime=2000
- # The number of ticks that the initial
- # synchronization phase can take
- initLimit=10
- # The number of ticks that can pass between
- # sending a request and getting an acknowledgement
- syncLimit=5
- # the directory where the snapshot is stored.
- dataDir=/home/admin/zookeeper-3.2.2/data
- # the port at which the clients will connect
- clientPort=2181
- server.1=zoo1:2888:3888
- server.2=zoo2:2888:3888
其中zoo1和zoo2分别对应集群中各服务器的机器名或ip,server.1和server.2中1和2分别对应各服务器的zookeeper id,id的设置方法为在dataDir配置的目录下创建名为myid的文件,并把id作为其文件内容即可,在本例中就分为设置为1和2。其他配置具体含义可见官方文档。
3)启动集群环境
分别在各服务器下运行zookeeper启动脚本
/home/admin/zookeeper-3.2.2/bin/zkServer.sh start
4)应用zookeeper
应用zookeeper可以在是shell中执行命令,也可以在java或c中调用程序接口。
在shell中执行命令,可运行以下命令:
bin/zkCli.sh -server 10.20.147.35:2181
其中 10.20.147.35为集群中任一台机器的ip或机器名。执行后可进入zookeeper的操作面板,具体如何操作可见官方文档
在java中通过调用程序接口来应用zookeeper较为复杂一点,需要了解watch和callback等概念,不过试验最简单的CURD倒不需要这些,只需要使用ZooKeeper这个类即可,具体测试代码如下:
- public static void main(String[] args) {
- try {
- ZooKeeper zk = new ZooKeeper("10.20.147.35:2181", 30000, null);
- String name = zk.create("/company", "alibaba".getBytes(),
- Ids.OPEN_ACL_UNSAFE, CreateMode.PERSISTENT_SEQUENTIAL);
- Stat stat = new Stat();
- System.out.println(new String(zk.getData(name, null, stat)));
- zk.setData(name, "taobao".getBytes(), stat.getVersion(), null, null);
- System.out.println(new String(zk.getData(name, null, stat)));
- stat = zk.exists(name, null);
- zk.delete(name, stat.getVersion(), null, null);
- System.out.println(new String(zk.getData(name, null, stat)));
- } catch (Exception e) {
- e.printStackTrace();
- }
- }
以上代码比较简单,查看一下zooKeeper的api doc就知道如何使用了
ZooKeeper的实现机理
ZooKeeper的实现机理是我看过的开源框架中最复杂的,它的解决是分布式环境中的一致性问题,这个场景也决定了其实现的复杂性。看了两三天的源码还是有些摸不着头脑,有些超出了我的能力,不过通过看文档和其他高人写的文章大致清楚它的原理和基本结构。
1)ZooKeeper的基本原理
ZooKeeper是以Fast Paxos算法为基础的,在前一篇 blog 中大致介绍了一下paxos,而没有提到的是paxos存在活锁的问题,也就是当有多个 proposer交错提交时,有可能互相排斥导致没有一个proposer能提交成功,而Fast Paxos作了一些优化,通过选举产生一个leader,只有leader才能提交propose,具体算法可见Fast Paxos 。因此,要想弄得ZooKeeper首先得对Fast Paxos有所了解。
2)ZooKeeper的基本运转流程
ZooKeeper主要存在以下两个流程:
- 选举Leader
- 同步数据
选举Leader过程中算法有很多,但要达到的选举标准是一致的:
- Leader要具有最高的zxid
- 集群中大多数的机器得到响应并follow选出的Leader
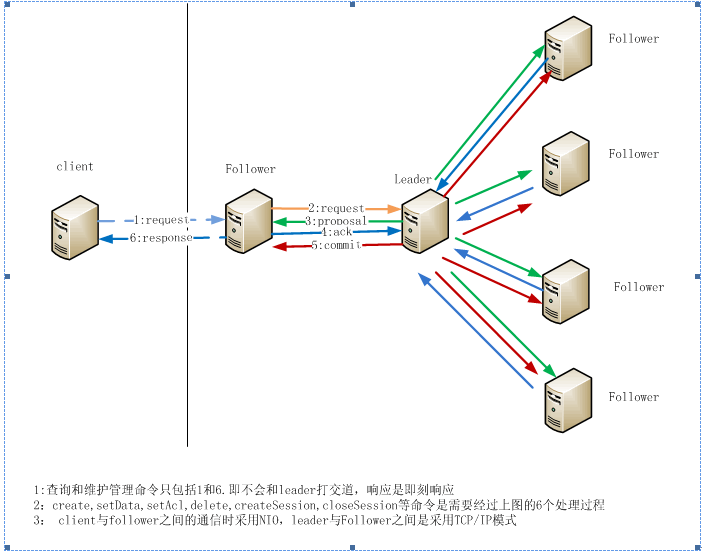
同步数据这个流程是ZooKeeper的精髓所在,并且就是Fast Paxos算法的具体实现。一个牛人画了一个ZooKeeper数据流动图,比较直观地描述了ZooKeeper是如何同步数据的。

以上两个核心流程我暂时还不能悟透其中的精髓,这也和我还没有完全理解Fast Paxos算法有关,有待后续深入学习
ZooKeeper的应用领域
Tim在blog中提到了Paxos所能应用的几个主要场景,包括database replication、naming service、config配置管理、access control list等等,这也是ZooKeeper可以应用的几个主要场景。此外, ZooKeeper官方文档中提到了几个更为基础的分布式应用,这也算是ZooKeeper的妙用吧
1)分布式Barrier
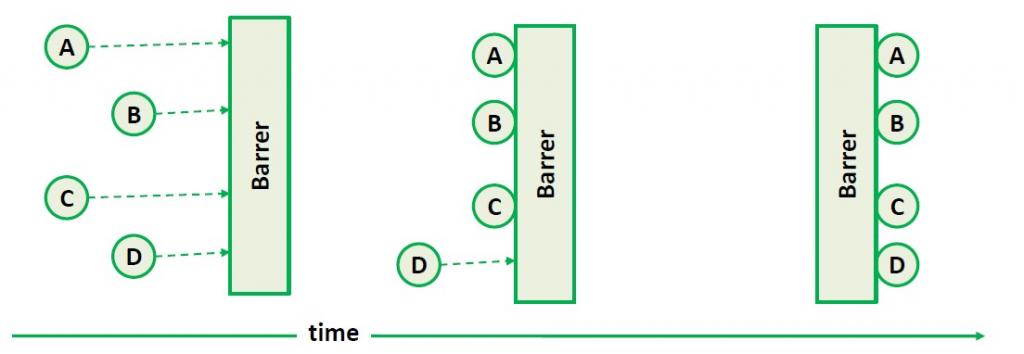
Barrier是一种控制和协调多个任务触发次序的机制,简单说来就是搞个闸门把欲执行的任务给拦住,等所有任务都处于可以执行的状态时,才放开闸门。它的机理可以见下图所示:

在单机上JDK提供了CyclicBarrier这个类来实现这个机制,但在分布式环境中JDK就无能为力了。在分布式里实现Barrer需要高一致性做保障,因此 ZooKeeper可以派上用场,所采取的方案就是用一个Node作为Barrer的实体,需要被Barrer的任务通过调用exists()检测这个Node的存在,当需要打开Barrier的时候,删掉这个Node,ZooKeeper的watch机制会通知到各个任务可以开始执行。
2) 分布式 Queue
与 Barrier类似 分布式环境中 实现Queue也需要高一致性做保障, ZooKeeper提供了一个种简单的方式, ZooKeeper通过一个Node来维护Queue的实体,用其children来存储Queue的内容,并且 ZooKeeper的create方法中提供了顺序递增的模式,会自动地在name后面加上一个递增的数字来插入新元素。可以用其 children来构建一个queue的数据结构,offer的时候使用create,take的时候按照children的顺序删除第一个即可。 ZooKeeper保障了各个server上数据是一致的,因此也就实现了一个 分布式 Queue。take和offer的实例代码如下所示:
- /**
- * Removes the head of the queue and returns it, blocks until it succeeds.
- * @return The former head of the queue
- * @throws NoSuchElementException
- * @throws KeeperException
- * @throws InterruptedException
- */
- public byte[] take() throws KeeperException, InterruptedException {
- TreeMap<Long,String> orderedChildren;
- // Same as for element. Should refactor this.
- while(true){
- LatchChildWatcher childWatcher = new LatchChildWatcher();
- try{
- orderedChildren = orderedChildren(childWatcher);
- }catch(KeeperException.NoNodeException e){
- zookeeper.create(dir, new byte[0], acl, CreateMode.PERSISTENT);
- continue;
- }
- if(orderedChildren.size() == 0){
- childWatcher.await();
- continue;
- }
- for(String headNode : orderedChildren.values()){
- String path = dir +"/"+headNode;
- try{
- byte[] data = zookeeper.getData(path, false, null);
- zookeeper.delete(path, -1);
- return data;
- }catch(KeeperException.NoNodeException e){
- // Another client deleted the node first.
- }
- }
- }
- }
- /**
- * Inserts data into queue.
- * @param data
- * @return true if data was successfully added
- */
- public boolean offer(byte[] data) throws KeeperException, InterruptedException{
- for(;;){
- try{
- zookeeper.create(dir+"/"+prefix, data, acl, CreateMode.PERSISTENT_SEQUENTIAL);
- return true;
- }catch(KeeperException.NoNodeException e){
- zookeeper.create(dir, new byte[0], acl, CreateMode.PERSISTENT);
- }
- }
- }
3)分布式lock
利用 ZooKeeper实现 分布式lock,主要是通过一个Node来代表一个Lock,当一个client去拿锁的时候,会在这个Node下创建一个自增序列的child,然后通过getChildren()方式来check创建的child是不是最靠前的,如果是则拿到锁,否则就调用exist()来check第二靠前的child,并加上watch来监视。当拿到锁的child执行完后归还锁,归还锁仅仅需要删除自己创建的child,这时watch机制会通知到所有没有拿到锁的client,这些child就会根据前面所讲的拿锁规则来竞争锁。


相关推荐
1. 配置管理:集中存储和管理分布式系统的配置信息,所有节点都可以从Zookeeper获取最新配置,确保配置的一致性。 2. 名称服务:为分布式组件提供命名服务,如服务发现,客户端可以通过名称找到服务提供者的地址。 3...
《从Paxos到Zookeeper分布式一致性原理与实践》是一本深入探讨分布式系统一致性问题的著作,其中重点讲解了Paxos算法与Zookeeper在实际应用中的理论与实践。Paxos是分布式计算领域中著名的共识算法,为解决分布式...
通过学习《从Paxos到Zookeeper:分布式一致性原理与实践》,我们不仅了解了Paxos算法的基本思想以及其在解决分布式一致性问题上的重要作用,还深入了解了Zookeeper这一高效可靠的协调服务框架是如何在实际场景中应用...
《Paxos到Zookeeper——分布式一致性原理与实践》是一本深入探讨分布式一致性问题的书籍,对于理解并应用Zookeeper这一关键的分布式协调系统具有重要价值。本书旨在帮助读者掌握分布式环境中的数据一致性原理,并...
分布式设计与开发是现代互联网架构中的重要组成部分,它允许我们将大型复杂系统分解为多个相互协作的独立服务。在这个系列的第一部分,我们将重点关注Zookeeper——一个广泛使用的分布式协调服务。Zookeeper由Apache...
ZooKeeper 的设计目标是简化分布式系统中的数据一致性问题,为分布式应用提供统一的服务目录和配置管理。在 Apache ZooKeeper 3.7.0 版本中,它包含了对先前版本的改进和新功能,以更好地适应现代分布式系统的复杂...
从Paxos到Zookeeper 分布式一致性原理与实践 倪超,完整版
它是一个为分布式应用提供一致性服务的软件,提供的功能包括:配置维护、域名服务、分布式同步、组服务等。 ZooKeeper的目标就是封装好复杂易出错的关键服务,将简单易用的接口和性能高效、功能稳定的系统提供给用户...
Zookeeper是由Apache软件基金会开发的一个开源项目,主要用于解决分布式应用中的数据一致性问题,提供诸如命名服务、配置管理、集群管理等多种功能。在这个最新版的详解中,作者详细介绍了Zookeeper的核心概念、设计...
从Paxos到Zookeeper 分布式一致性原理与实践
它的设计目标是简单、高效且高可用,通过一致性协议保证数据的一致性。 在安装Zookeeper 3.2.2这个稳定版本时,首先可以从官方网站http://hadoop.apache.org/zookeeper/下载最新版本。对于单机模式的安装,只需解压...
Zookeeper是一款开源的分布式协调服务框架,它主要用于解决分布式应用中常见的一致性问题,如命名服务、配置管理、集群管理和分布式锁等。Zookeeper通过提供简单的API,使得开发者能够轻松地利用其强大的功能来构建...
从Paxos到Zookeeper:分布式一致性原理与实践,适合分布式系统各阶段学习,并对分布式架构有深入的理解与提高
ZooKeeper 的设计目标是简化分布式环境中的复杂性,使开发者能够专注于构建分布式应用,而不是关注底层的分布式一致性问题。 在 `apache-zookeeper-3.5.6-bin.tar` 这个压缩包中,包含了 Apache ZooKeeper 3.5.6 ...
同时,它会详细介绍ZOOKEEPER的架构设计、API使用以及在实际项目中的应用案例,帮助读者理解如何利用ZOOKEEPER解决分布式一致性问题。而readme.txt可能是对文档的简单介绍或者阅读指南,帮助用户更好地理解和使用这...
Zookeeper-3.4.13版本的发布,意味着它已经经过了广泛测试和优化,能够处理高并发的请求,提供强一致性和高可用性。这个版本可能包含了性能提升、bug修复以及新的特性和改进,以满足不断发展的分布式系统需求。 ...
Apache ZooKeeper是一个分布式的,开放源码的分布式应用程序协调服务,它是集群的管理者,监视着分布式应用程序,提供了诸如配置维护、命名服务、分布式同步、组服务等这些分布式基础服务。Zookeeper是Apache Hadoop...
- **分布式锁**: 实现分布式环境下的锁服务,确保操作的顺序性和一致性。 - **队列管理**: 实现先进先出(FIFO)的消息队列。 3. **Zookeeper架构** - **集群模式**: 由多个服务器节点组成,每个节点都存有数据...
分布式一致性是现代大规模系统设计中的核心问题,它关乎着数据在多台计算机间的一致性状态,确保在各种网络故障和并发操作下,系统能够提供可靠的服务。Paxos算法和ZooKeeper是解决这一问题的两个关键工具,它们在...