- 浏览: 362713 次
- 性别:

- 来自: 北京
-

文章分类
最新评论
-
977616908:
UITableView每个cell之间的默认分割线如何去掉 -
zhijie_zhang:
,就这么简单。。。 不过还真行,不明白为什么不需要配jaa_ ...
mac下myeclipse做j2ee开发环境到搭建(tomcat) -
lianxianghui:
其实应该是 ableView.separatorStyle = ...
UITableView每个cell之间的默认分割线如何去掉 -
白色蜻蜓:
...
mac下myeclipse做j2ee开发环境到搭建(tomcat) -
jinchishuxue:
armywin 写道http://www.buildapp.n ...
收集的一些corana和Lua的材料
from: http://mobiforge.com/developing/story/programming-apple-push-notification-services
One of the key limitations of the iPhone is its constraint on running applications in the background. Because of this, applications cannot keep running in the background when the user switches to another application. So, applications that require a constant state of connectivity (such as social networking applications) will not be able to receive timely updates.
To remedy this limitation, Apple released the Apple Push Notification Service (APNs). The APNs is a service that allows your device to be constantly connected to Apple's push notification server. When you want to send a push notification to an application installed on the users' devices, you (the provider ) can contact the APNs so that it can deliver a push message to the particular application installed on the intended device.
In this article, you will learn how to perform the various steps needed to create an iPhone application that uses the APNs.
Generating a Certificate Request
The first step to using the APNs is to generate a certificate request file so that you can use it to request for a development SSL certificate later on.
1. Launch the Keychain Access application in your Mac OS X.
2. Select Keychain Access'Certificate Assistant'Request a Certificate From a Certificate Authority (see Figure 1):
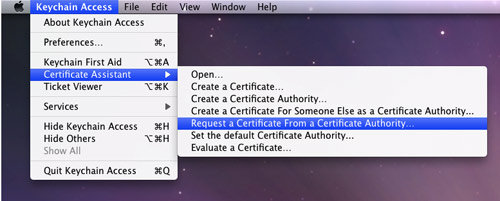
Figure 1
. Generating a certificate request
3. Enter the information required and check the Saved to disk option. Click Continue (see Figure 2).
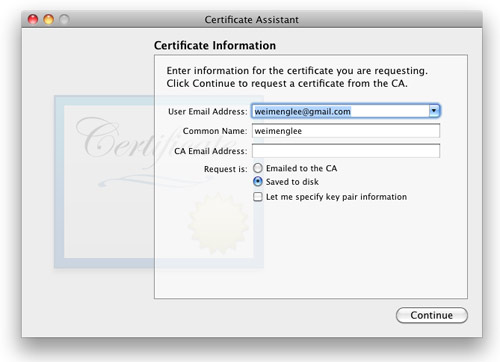
Figure 2
. Saving the certificate request to disk
4. Save the certificate request using the suggested name and click Save (see Figure 3): Click Done in the next screen.

Figure 3
. Naming the certificate request
Creating an App ID
Each iPhone applications that uses the APNs must have a unique application ID that uniquely identifies itself. In this step, you will learn how to create an App ID for push notification.
1. Sign in to the iPhone Developer Program at: http://developer.apple.com/iphone/ . Click on the iPhone Developer Program Portal on the right of the page (see Figure 4).

Figure 4
. Launching the iPhone Developer Program Portal
2. You should see the welcome page (see Figure 5).
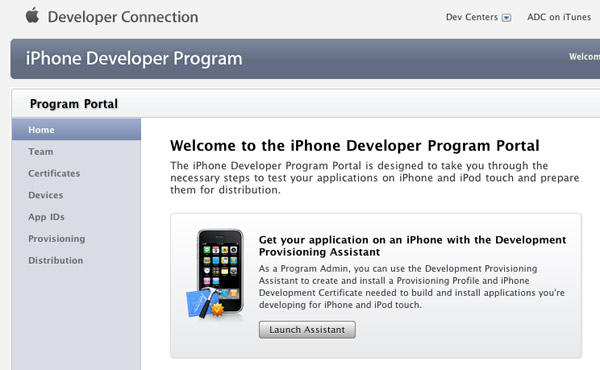
Figure 5
. The welcome screen of the iPhone Developer Program Portal
3. Click on the App IDs tab on the left and then click on the New App ID button (see Figure 6).
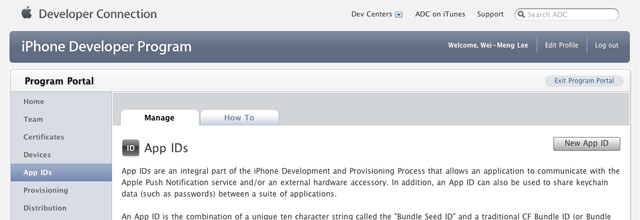
Figure 6
. Clicking on the App ID tab
4.
Enter "PushAppID" for the Description and select Generate New for the Bundle Seed ID. For the Bundle Identifier, enter net.learn2develop.MyPushApp
. Click Submit (see Figure 7).
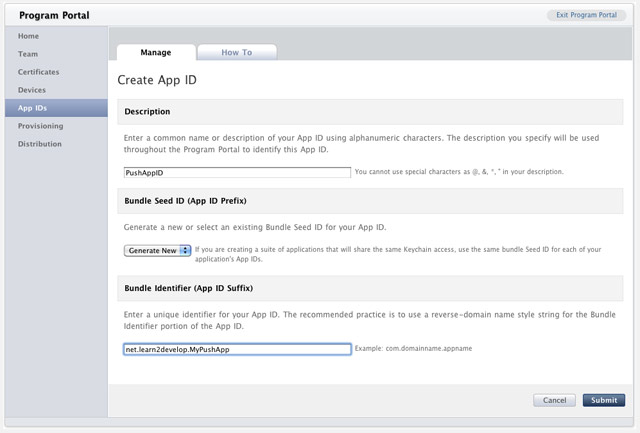
Figure 7
. Creating a new App ID
5. You should now see the App ID that you have created (together with those you have previously created) (see Figure 8).

Figure 8
. Viewing the newly created App ID
Configuring an App ID for Push Notifications
Once an App ID is created, you need to configure it for push notifications.
1. To configure an App ID for push notification, you need to click the Configure link displayed to the right of the App ID. You will now see the option (see Figure 9).
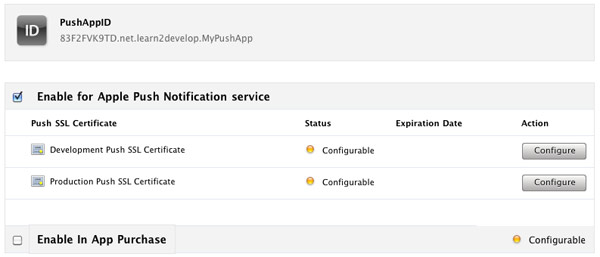
Figure 9
. Configuring an App ID for push notification service
Check the Enable for Apple Push Notification service option and click the Configure button displayed to the right of the Development Push SSL Certificate.
2. You will now see the Apple Push Notification service SSL Certificate Assistant screen. Click Continue (see Figure 10).
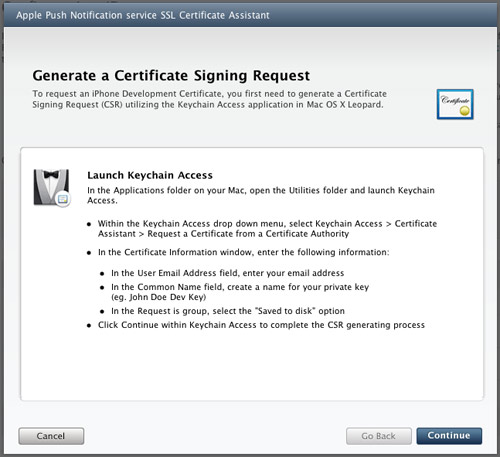
Figure 10
. The Apple Push Notification service SSL Certificate Assistant screen
3. Click the Choose File button to locate the Certificate Request file that you have saved earlier. Click Generate (see Figure 11).
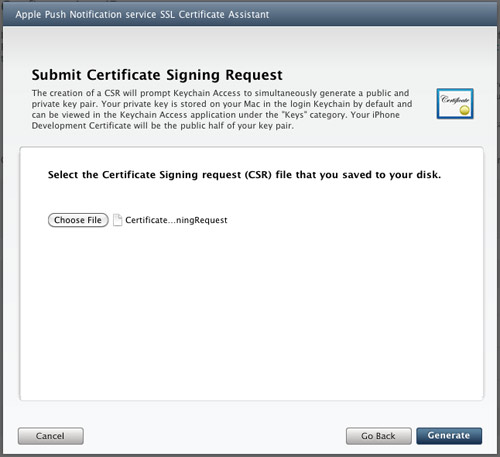
Figure 11
. Generating the SSL certificate
4. Your SSL Certificate will now be generated. Click Continue (see Figure 12).
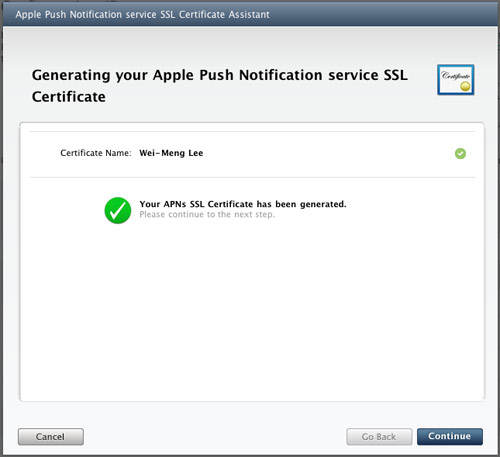
Figure 12
. The APNs SSL certificate that is generated
5. Click the Download Now button to download the SSL Certificate. Click Done (see Figure 13).
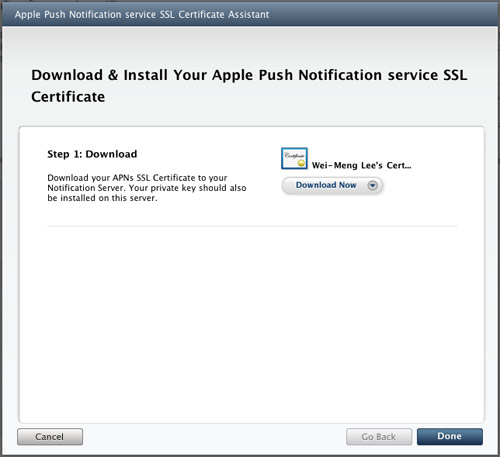
Figure 13
. Downloading the certificate generated
6.
The SSL Certificate that you download is named aps.developer.identity.cer
.
Double-click on it to install it in the Keychain Access application
(see Figure 14). The SSL certificate will be used by your provider
application so that it can contact the APNs to send push notifications
to your applications.
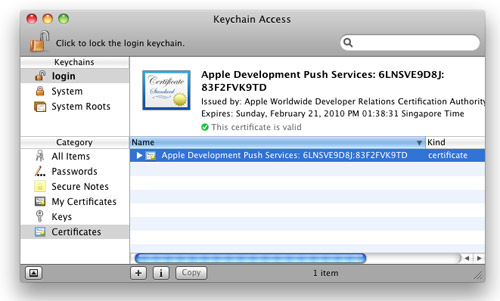
Figure 14
. Installing the generated certificate into the Keychain Access application
Creating a Provisioning Profile
The next step is to create a provisioning profile so that your application can be installed onto a real device.
1. Back in the iPhone Development Program Portal, click on the Provisioning tab and click on the New Profile button (see Figure 15).

Figure 15
. Selecting the Provisioning tab
2.
Type in MyDevicesProfile
as the profile name. Select PushAppID as the App ID. Finally, check all
the devices that you want to provision (you can register these devices
with the iPhone Developer Program Portal through the Devices tab). Click
Submit (see Figure 16).
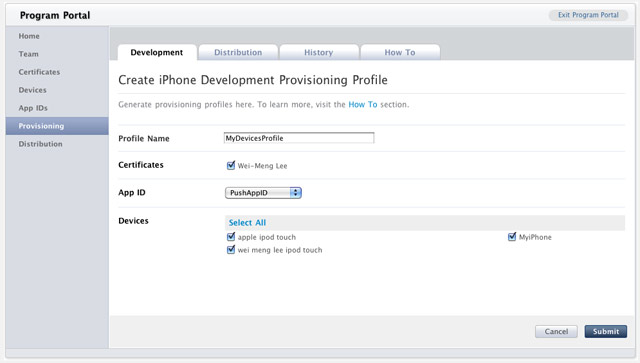
Figure 16
. Creating a new provisioning profile
3. The provisioning profile will now be pending approval. After a while, you will see it appear. Click on the Download button to download the provisioning profile (see Figure 17).

Figure 17
. Pending the approval of the provisioning profile
4. The downloaded provisioning profile is named MyDevicesProfile.mobileprovision.
Provisioning a Device
With the provision profile created, you will now install it onto a real device.
1. Connect your iPhone or iPod Touch to your Mac.
2.
Drag and drop the downloaded MyDevicesProfile.mobileprovision
file onto the Xcode icon on the Dock.
3.
Launch the Organizer application from within Xcode and select the device currently connected to your Mac. You should see the MyDevicesProfile
installed on the device (see Figure 18).
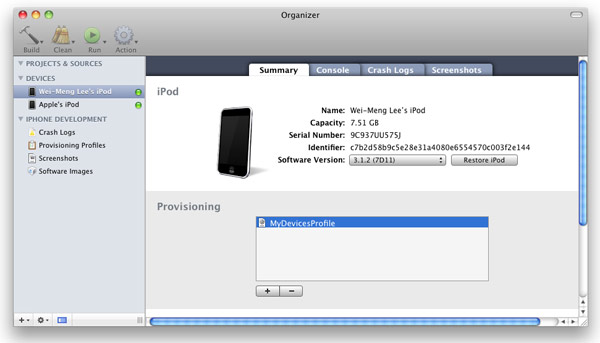
Figure 18
. Viewing the installed provisioning profile
Creating the iPhone Application
1. In Xcode, create a new View-Based Application project and name it as ApplePushNotification.
2.
Drag and drop a WAV file (shown as beep.wav
in this example) onto the Resources folder in Xcode (see Figure 19).
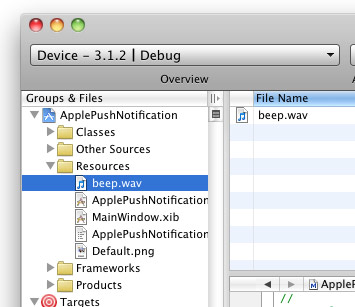
Figure 19
. Adding a WAV file to the project
3. Expand on the Targets item in Xcode and select the ApplePushNotification item. Press Command-I. In the Info window, click the Properties tab (see Figure 20).
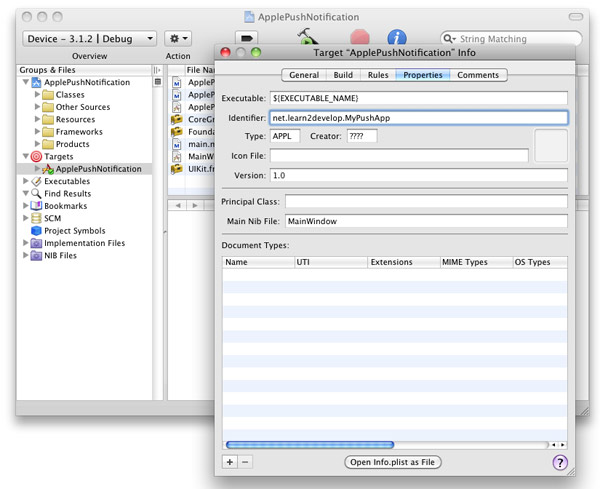
Figure 20
. Entering the App ID for the application
In the Identifier textbox, type <net.learn2develop.MyPushApp
.
4. Click on the Build tab and type "Code Signing" in the search box. In the Any iPhone OS Device item, select the profile as shown in Figure 21:
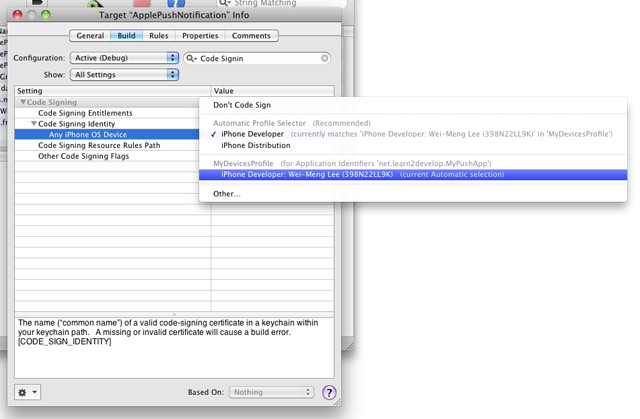
Figure 21
. Selecting the profile for code signing
5.
In the ApplePushNotificationAppDelegate.m
file, type the following code in bold:
#import "ApplePushNotificationAppDelegate.h"

#import "ApplePushNotificationViewController.h"


@implementation
 ApplePushNotificationAppDelegate

@synthesize window;
@synthesize viewController;

-
 (
void
)
applicationDidFinishLaunching:
(
UIApplication *
)
application {

    [
window addSubview:
viewController.view]
;
    [
window makeKeyAndVisible]
;

    NSLog(
@"Registering for push notifications..."
)
;
    [
[
UIApplication sharedApplication]

        registerForRemoteNotificationTypes:

        (
UIRemoteNotificationTypeAlert |
         UIRemoteNotificationTypeBadge |
         UIRemoteNotificationTypeSound)
]
;

}


-
 (
void
)
application:
(
UIApplication *
)
app didRegisterForRemoteNotificationsWithDeviceToken:
(
NSData

 *
)
deviceToken {


    NSString

 *
str =
 [
NSString


        stringWithFormat:
@"Device Token=%@"
,deviceToken]
;
    NSLog(
str)
;

}


-
 (
void
)
application:
(
UIApplication *
)
app didFailToRegisterForRemoteNotificationsWithError:
(
NSError

 *
)
err {


    NSString

 *
str =
 [
NSString

 stringWithFormat:
 @"Error: %@"
, err]
;
    NSLog(
str)
;

}


-
 (
void
)
application:
(
UIApplication *
)
application didReceiveRemoteNotification:
(
NSDictionary

 *
)
userInfo {


    for
 (
id
 key in userInfo)
 {

        NSLog(
@"key: %@, value: %@"
, key, [
userInfo objectForKey:
key]
)
;
    }


}


-
 (
void
)
dealloc {

    [
viewController release]
;
    [
window release]
;
    [
super dealloc]
;
}


@end
6. Press Command-R
to test the application on a real device. Press Shift-Command-R
in Xcode to display the Debugger Console window. Observe carefully the
device token that is printed (see Figure 22). In the figure below, the
token is: 38c866dd bb323b39 ffa73487 5e157ee5 a85e0b7c e90d56e9 fe145bcc 6c2c594b
. Record down this device token (you might want to cut and paste it into a text file).
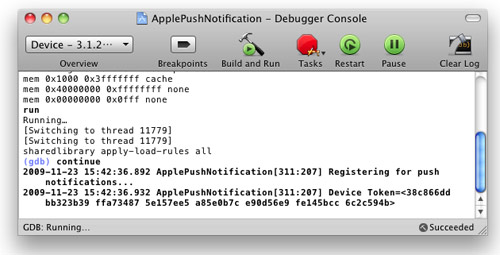
Figure 22
. Viewing the device token for push notification
7. If you go to the Settings application on your iPhone/iPod Touch, you will notice that you now have the Notifications item (see Figure 23).
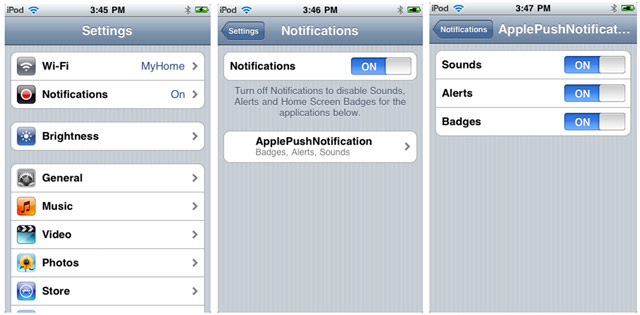
Figure 23
. Viewing the Notifications item in the Settings application
Creating the Push Notification Provider
A Push Notification provider is an application written by the application's developer to send push notifications to the iPhone application through the APNs.
Here are the basic steps to send push notifications to your applications via the Apple Push Notification Service (APNs):
1.
Communicate with the APNs using the SSL certificate you have created earlier.
2.
Construct the payload for the message you want to send.
3.
Send the push notification containing the payload to the APNs.
The APNs is a stream TCP socket that your provider can communicate using a SSL secured communication channel. You send the push notification (containing the payload) as a binary stream. Once connected to the APNs, you should maintain the connection and send as many push notifications as you want within the duration of the connection.
Tip: Refrain from opening and closing the connections to the APNs for each push notification that you want to send. Rapid opening and closing of connections to the APNs will be deemed as a Denial-of-Service (DOS) attack and may prevent your provider from sending push notifications to your applications.
The format of a push notification message looks like Figure 24 (figure from Apple's documentation):

Figure 24
. Format of a push notification message
For more details, please refer to Apple Push Notification Service Programming Guide
.
The payload is a JSON formatted string (maximum 256 bytes) carrying the
information you want to send to your application. An example of a
payload looks like this:
{

    "aps"
: {

        "alert"
 : "You got a new message!"
 ,
        "badge"
 : 5
,
        "sound"
 : "beep.wav"
}
,
     "acme1"
 : "bar"
,
     "acme2"
 : 42

}
To save yourself the trouble in developing a push notification provider from scratch, you can use the PushMeBaby application (for Mac OS X) written by Stefan Hafeneger (Get it here ).
1. Open the PushMeBaby application in Xcode.
2.
Right-click
on the Resources folder in Xcode and select Add Existing Files…. Select the aps.developer.identity.cer
file that you have downloaded earlier (see Figure 25).
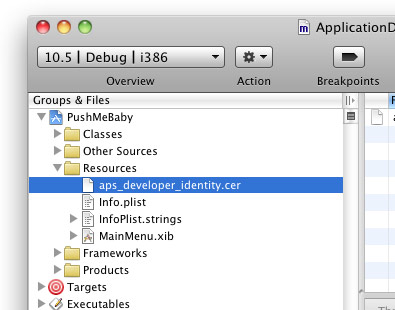
Figure 25
. Adding the SSL certificate to the application
3.
In the ApplicationDelegate.m
file, modify the code as shown in bold below:
-
 (
id
)
init {

    self =
 [
super init]
;
    if
(
self !=
 nil
)
 {

        self.deviceToken =
 @"38c866dd bb323b39 ffa73487 5e157ee5 a85e0b7c e90d56e9 fe145bcc 6c2c594b"
;

        self.payload =
 @"{\"
aps\"
:{\"
alert\"
:\"
You got a new message!\"
,\"
badge\"
:5,\"
sound\"
:\"
beep.wav\"
},\"
acme1\"
:\"
bar\"
,\"
acme2\"
:42}"
;

        self.certificate =
 [
[
NSBundle

 mainBundle]

            pathForResource:
@"aps_developer_identity"
 ofType:
@"cer"
]
;
    }

    return
 self;
}
4. Press Command-R to test the application. You will be asked to grant access to the certificate. Click Always Allow (see Figure 26):
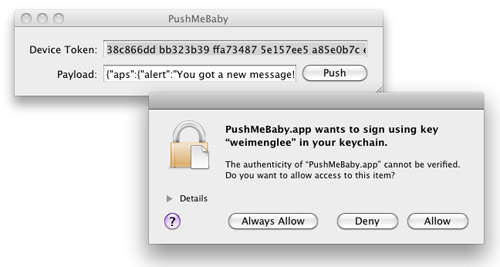
Figure 26
. Granting access to the SSL certificate
On the iPhone/iPod Touch, ensure that the ApplePushNotification application is not running. To send a message to the device, click the Push button. The server essentially sends the following message to the Apple Push Notification server:
{

    "aps"
: {

        "alert"
 : "You got a new message!"
 ,
        "badge"
 : 5
,
        "sound"
 : "beep.wav"
}
,
     "acme1"
 : "bar"
,
     "acme2"
 : 42

}
5. If the message is pushed correctly, you should see the notification as shown in Figure 27.
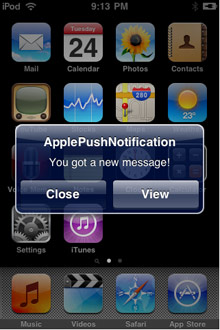
Figure 27
. Receiving a Push Notification message
6.
If you now debug the ApplePushNotification application by pressing Command-R
and send a push message from the PushMeBaby application, the Debugger Console window will display the following outputs:
2009-11-24 21:11:49.182 ApplePushNotification[1461:207] key: acme1, value: bar
2009-11-24 21:11:49.187 ApplePushNotification[1461:207] key: aps, value: {
    alert = "You got a new message!";
    badge = 5;
    sound = "beep.wav";
}
2009-11-24 21:11:49.191 ApplePushNotification[1461:207] key: acme2, value: 42
Summary
In this article, you have seen the various steps required to build an iPhone application that utilizes Apple's Push Notification service. I am interested to know how you are using the APNs for your application. Use the comment feature below to share with us!
发表评论
-
如何隐藏tabbar,在子viewController中。
2011-11-15 20:14 2257很简单,每个UIViewController都有一个 hide ... -
ES轻松加密数据
2011-07-13 13:32 1850看看这个吧.https://github.com/dev5te ... -
iOS录音功能的实现
2011-07-13 13:03 2752http://www.iphoneam.com/blog/in ... -
PhoneGap生成ios app
2011-06-05 14:16 2060具体可以看看这个: http://www.phonegap.c ... -
objective-c 内存管理之 "autorelease"的一个疑问
2011-02-25 01:13 2190autorelease的用法我了解,但是我一直有一个疑问: ... -
关于内存管理,推荐一篇好文章.
2011-02-24 22:35 1099http://www.codeproject.com/KB/i ... -
NSString 将一个NSString表达的url编码为合法的url
2011-02-22 11:52 1883NSString url = @"http://ww ... -
objective-c 私有方法的声明问题
2011-02-17 22:43 2487obj-c,在.h文件声明的方法都为公有方法,那么如何声明私有 ... -
如何查看iphone device上的crash log
2011-02-17 15:36 2932今天同事突然问了我这个问题,,我第一反应是没有办法查看devi ... -
NSString 去掉前后 spaces and tab
2011-02-14 13:51 1518NSString *textStr = [_msgTextFi ... -
基于UINavigationController模板项目中,如何从一个viewcontroller跳到你想去的controller
2011-01-13 22:47 2523昨天碰到如题的问题,,有两个方法可以用,,供大家参考. [s ... -
NSString retainCount的一个非常有意思的问题.
2011-01-10 00:26 3188一直以来发现对copy和retain的区别还是觉得有点糊涂,, ... -
retain和copy的区别
2011-01-10 00:13 2034------------------------------- ... -
navigation程序中实现view的翻转效果
2011-01-05 11:25 1377[UIView beginAnimations:nil co ... -
if(self=[super init]) {} 理解
2010-12-30 00:41 1334这个东东争议很大,,这里有一篇文章大家可以看一下. http ... -
In app purchase 实现
2010-12-28 17:06 1357游戏中要加一个卖游戏币的功能,然后开始研究in app pu ... -
cocoa中 base64 encode一个NSData的方法
2010-12-28 13:58 1930// From: http://www.cocoadev.co ... -
cocoa多线程初级
2010-12-26 23:13 1190文章出处: http://www.xprogress.com ... -
UITableView每个cell之间的默认分割线如何去掉
2010-12-17 18:12 21470刚刚才遇见这个问题,让自己很尴尬. 很简单,只需要 ta ... -
在iphone项目中应用ASIHTTPRequest
2010-12-09 16:13 2258很早就在cocoachina上看到这个框架了,今天终于有机会来 ...


相关推荐
- [Apple Push Notification Programming Guide](https://developer.apple.com/library/archive/documentation/NetworkingInternet/Conceptual/RemoteNotificationsPG/APNSOverview.html) - [为什么需要 Apple 推送...
Introduction. xxv ⊲⊲ Part I G etting Started Chapter 1 Getting Started with iPad Programming. 3 Chapter 2 Write Your ...Chapter 17 Apple Push Notification Services. 419 Chapter 18 Displaying Maps. 441
4. **推送通知**:集成Apple Push Notification Service,实现离线消息推送。 ### 第四部分:实战案例 书中提供了丰富的实战项目,覆盖了日常开发中的各种场景,如社交应用、地图应用、音乐播放器等,旨在帮助...
9. **Push Notifications**: 掌握如何使用Apple Push Notification service(APNs)向用户发送实时消息,是提高用户体验和应用粘性的重要手段。 10. **In-App Purchase**: iOS 11的内购功能允许开发者为应用添加...
使用Apple推送通知服务编程远程通知 (Programming Remote Notifications Using Apple Push Notification Services) 推送通知是提高用户参与度的有效手段之一。本章将介绍如何集成Apple的推送通知服务(APNs),以便...
9. **推送通知**: 为了及时通知用户有关促销活动的信息,应用可能使用推送通知服务,如Firebase Cloud Messaging (FCM) 或Apple Push Notification service (APNs)。 10. **云服务**: 为了支持大规模用户和高并发,...