For POC purpose I need to implement the AJAX functionality in Webclient UI component. The UI component has only one input field:

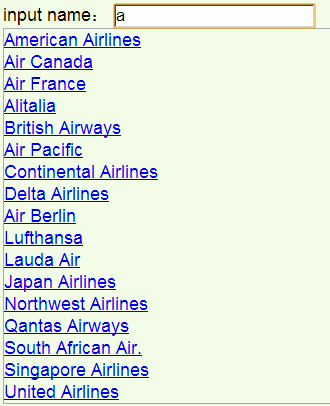
Once type “a” into the input field, it immediately displays all the records in the database table SCARR whose column carrname contains the character “a” ( without any other operation like manual refresh)

change the value in the input field, the page will display the latest matched result automatically:

Here below are the steps how to build this very simple UI component which implement AJAX functionality:
(1) Create a new UI component and a new empty view
In the html view, paste the following code: Part1
<%@page language="abap"%>
<%@extension name="htmlb" prefix="htmlb"%>
<%
data: lv_url TYPE string,
lv_query type string.
lv_query = 'query='.
lv_url = cl_crm_web_utility=>create_url( iv_path = '/sap/crm/zajax'
iv_query = lv_query
iv_in_same_session = 'X' ).
%>
Since we will send asynchronous xml request to ABAP backend to query records from database table. The query must be implemented in ABAP backend. Here I will create a new ICF service node to accomplish such query. The creation of ICF node and its handler class will be discussed later. In this step we just need to pass in the ICF node path ‘/sap/crm/zajax’ to metod create_url. That method will return the url which would be used as prefix of the final url of the asynchronous request to be sent to ABAP backend.
Part2
Here we define the four JavaScript functions:
function GetXmlHttpObject(){
 if (window.XMLHttpRequest) {
    return new XMLHttpRequest();
 }
 if (window.ActiveXObject) {
    return new ActiveXObject("Microsoft.XMLHTTP");
 }
 return null;
}
comment: this function is designed to support different kinds of browsers.
function stateChanged() {
  if (xmlhttp.readyState == 4) {
     document.getElementById("result").innerHTML = xmlhttp.responseText;
     document.getElementById("result").style.border = "1px solid #A5ACB2";
  }
}
comment: this function is callback function which will automatically be called when the backend response returned by our ICF handler class is available to consume ( that means, the result is ready to be displayed in the frontend UI )
function getRequestURL(str) {
  var url = "<%= lv_url %>" + str;
  url = url + "&sid=" + Math.random();
  return url;
}
comment: this function will assemble the final url which is to be sent to ABAP backend. The ABAP variable lv_url contains the full url of our icf node appended with request prefix “query=”. So within this function we just simply concatenate the string which is typed by end user in the input field.
function showResult(str){
 if (str.length == 0 ) {
   document.getElementById("result").innerHTML = "";
   document.getElementById("result").style.border = "0px";
   return;
 }
 xmlhttp = GetXmlHttpObject();
 if (xmlhttp == null ){
   alert ("Your browser does not support XML HTTP Request");
   return;
 }
 var requesturl = getRequestURL(str);
 xmlhttp.onreadystatechange = stateChanged ;
 xmlhttp.open("GET",requesturl,true);
 xmlhttp.send(null);
}
comment: we will bind this function to event onkeyup of input field, so that once we finish the typing in input field, it will be called. Within it, the asynchronous xml request is sent. We bind our callback function “stateChanged” to xmlhttp.onreadystatechange and do not need to care about when to call it – instead the framework will call this callback automatically when it should be called.
Part3
<body>
input name: <input type="text" id="fname" onkeyup="showResult(this.value)" />
<div id = "result" ></div>
</body>comment: just bind the event handler to event “onkeyup”.
for the complete source code which could directly be “Ctrl + C” and “Ctrl + V”, please find it in attachment.
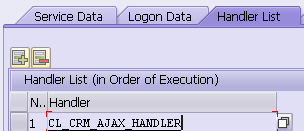
(2) Create a new ICF node and its handler class
Use tcode SICF, create a new ICF node.

The path should be consistent with the hardcode path in the method call in step one:
lv_url = cl_crm_web_utility=>create_url( iv_path = '/sap/crm/zajax'
iv_query = lv_query
iv_in_same_session = 'X' ).Create a new handler class which implement interface IF_HTTP_EXTENSION:

Implement the method HANDLE_REQUEST as below:
method IF_HTTP_EXTENSION~HANDLE_REQUEST.
DATA: lv_input_str TYPE string,
lv_html TYPE string,
lt_scarr TYPE TABLE OF scarr.
FIELD-SYMBOLS: <fs_scarr> TYPE scarr.
lv_input_str = server->request->get_form_field( 'query' ).
SELECT * FROM scarr INTO TABLE lt_scarr.
IF strlen( lv_input_str ) > 0.
LOOP AT lt_scarr ASSIGNING <fs_scarr>.
FIND lv_input_str IN <fs_scarr>-carrname IGNORING CASE.
CHECK sy-subrc = 0.
IF strlen( lv_html ) = 0.
CONCATENATE `<a href=’` <fs_scarr>-url `’ target=’_blank’>`
<fs_scarr>-carrname `</a>` INTO lv_html.
ELSE.
CONCATENATE lv_html `<br />` `<a href=’` <fs_scarr>-url `’ target=’_blank’>`
<fs_scarr>-carrname `</a>` INTO lv_html.
ENDIF.
ENDLOOP.
ENDIF.
IF strlen( lv_html ) = 0.
lv_html = '<no suggestion>'.
ENDIF.
server->response->set_cdata( lv_html ).
endmethod.Monitor AJAX request and response in Chrome
It is very convenient to monitor AJAX behavior via developer tool in Chrome. Launch the U component with Chrome, click F12 to open developer tool. Then mark the checkbox “Any XHR” under “XHR Breakpoints”.

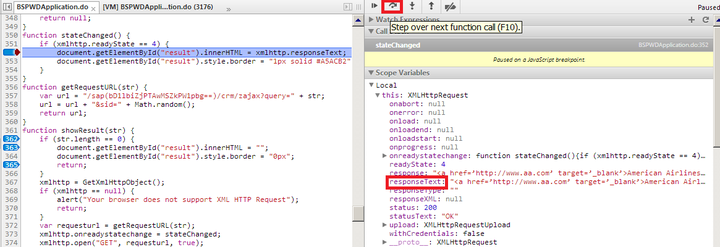
So that once there is a AJAX request sent from your application, the developer tool will automatically stop at the very code in which the XHR ( XML Header Request ) is sent: Switch to debug mode, and then type a character like “a” in the input field, the session will stop – The UI becomes gray and there is a tooltip “Paused in debugger” in the top-right part of the window:

In the left-most part of development tool, you can observe which view the AJAX request is sent from. In our example from prefix “bspwd_cmp_test” we could judge that currently our ui component is launched in test mode ( by clicking the test button in UI Component Workbench); In the middle part we could see the exact line where the request is sent;
In the right most part we could check the detail value of variables used in JavaScript and the function callstack, just the same logic as ABAP debugger. For example we could get the detail of XHR like request url, and what character end user has input.

click F10 to step over until the response is returned from ABAP backend.

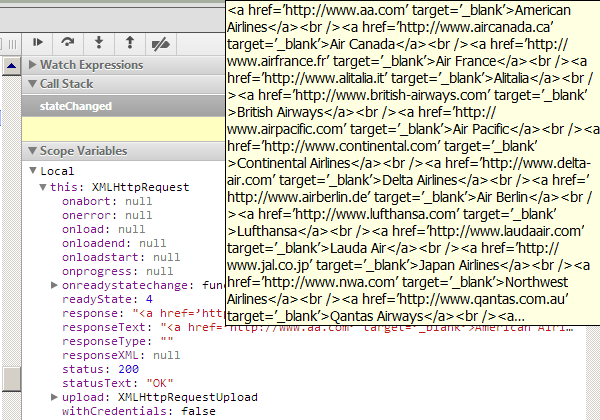
Put the mouse into field “responseText” and it will display the complete content of it:

要获取更多Jerry的原创文章,请关注公众号"汪子熙":


相关推荐
我的第一个C#小程序之简单音乐播放器1731655933.html
练习springboot1 项目 模拟高并发秒杀,实现基本的登录、查看商品列表、秒杀、下单等功能,简单实现了系统缓存、降级和限流。SpringBoot + MyBatis + MySQL+Druid + Redis + RabbitMQ + Bootstrap + jQue….zip
html常规学习.zip资源资料用户手册
【项目资源】:包含前端、后端、移动开发、操作系统、人工智能、物联网、信息化管理、数据库、硬件开发、大数据、课程资源、音视频、网站开发等各种技术项目的源码。包括STM32、ESP8266、PHP、QT、Linux、iOS、C++、Java、python、web、C#、EDA、proteus、RTOS等项目的源码。【项目质量】:所有源码都经过严格测试,可以直接运行。功能在确认正常工作后才上传。【适用人群】:适用于希望学习不同技术领域的小白或进阶学习者。可作为毕设项目、课程设计、大作业、工程实训或初期项目立项。【附加价值】:项目具有较高的学习借鉴价值,也可直接拿来修改复刻。对于有一定基础或热衷于研究的人来说,可以在这些基础代码上进行修改和扩展,实现其他功能。【沟通交流】:有任何使用上的问题,欢迎随时与博主沟通,博主会及时解答。鼓励下载和使用,并欢迎大家互相学习,共同进步。
HTML转PDF py脚本
yolo系列算法目标检测数据集,包含标签,可以直接训练模型和验证测试,数据集已经划分好,包含数据集配置文件data.yaml,适用yolov5,yolov8,yolov9,yolov7,yolov10,yolo11算法; 包含两种标签格:yolo格式(txt文件)和voc格式(xml文件),分别保存在两个文件夹中; yolo格式:<class> <x_center> <y_center> <width> <height>, 其中: <class> 是目标的类别索引(从0开始)。 <x_center> 和 <y_center> 是目标框中心点的x和y坐标,这些坐标是相对于图像宽度和高度的比例值,范围在0到1之间。 <width> 和 <height> 是目标框的宽度和高度,也是相对于图像宽度和高度的比例值
西电通院模电大作业课后题电路设计图24年
本文档主要讲述的是sqlserver内存释放;希望本文档会给有需要的朋友带来帮助;感兴趣的朋友可以过来看看
zw
发动机制造厂技术处安全、消防安全手册.docx
生产现场工艺文件执行检查管理流程说明.docx
Spring Boot集成Spring Security,HTTP请求授权配置:包含匿名访问、允许访问、禁止访问配置
通过设置截止频率和带宽来获取对应的滤波器参数
全国月尺度平均风速数据集(1961-2022, 0.25° × 0.25°)是一个高分辨率的网格化平均风速数据集,覆盖了中国大陆及周边地区。 该数据集通过科学方法整合气象观测和再分析数据,为气候研究、生态模型、农业生产、以及水资源管理等领域提供了重要支持。 数据下载后可显示详细信息。
styles
用VHDL语言设计电梯控制器.doc
管道试压报审验表、管道强度、严密性试验记录表.doc
使用springboot实现的旅游网站
所有库函数和源代码
存储介质信息消除工具应用完善的数据消除算法,严格按照BMB21-2007《涉及国家秘密的载体销毁与信息消除安全保密要求》标准,能够灵活的实现对存储介质中的数据进行完全擦除,不留痕迹,是我国各级政府、军工保密信息化建设以及各企业中不可缺少的工具。 数据一旦执行消除操作,专业的数据恢复工具也无法对其进行恢复,彻底解决用户的后顾之忧。同时不损坏存储介质,是国内先进的非暴力信息消除工具,可以有效降低用户的存储成本。可以对各种硬盘、软盘、U 盘、存储卡等进行数据粉碎,并且支持多种的磁盘分区格式,包括FAT 系列、NTFS 系列等磁盘格式进行数据销毁,确保了存储介质数据信息的安全性。 存储介质信息消除工具适用于机密级即以下涉密计算机存储介质上的信息消除,满足分级保护系统要求。 主要功能: 1. 支持单个或多个文件、目录、磁盘信息的消除。 2. 支持单个或多个磁盘剩余空间中残留信息的消除。 3. 支持搜索深度上网痕迹、文件(夹)删除痕迹、深度USB存储设备接入痕迹来确认系统中是否残留涉密信息 4. 支持清除其他多种违规外联痕迹