
转自:http://www.appcoda.com/uipageviewcontroller-tutorial-intro/
The UIPageViewController class was introduced into the iOS 5 SDK as a mechanism to implement a page turning style of user interface in iOS applications. The UIPageViewController is a highly configurable class that it lets developers to configure:
- the orientation of the page views – vertical or horizontal
- the transition style – page turning style or a dot based style
- the axis (spine) on which the page will turn
In this tutorial we are going to show how to use the UIPageViewController to implement an app that allows users to scroll between multiple screens. You can find examples of this type of page view implementation in games like Angry Birds to show the available levels or in apps that include tutorial/walkthrough screens.

Sample Walkthrough Screens from Path
Prior to iOS 5 we had to use the UIPageControl class and explicitly control the animations, as well as, transitions between pages. This procedure has been highly simplified with the introduction of the UIPageViewController. We’ll keep the demo app very simple and focus to demonstrate the usage of UIPageViewController. However, with the basic understanding of the page view controller, you can easily build the tutorial screens in your app.
A Glance at the Demo App
The application we are going to create is very simple: it consists of five different screens that each page displays a unique screen label. You’re allowed to navigate between pages by swiping through the screen.

Creating the Project
Open Xcode and create a new Project by using the Single View Application template. It might seem a little bit strange to select the Single View Application template as Xcode already comes with a Page-Based Application template, which contains a fully functional app based on the UIPageViewController. However, this template is a little bit complex and it will take us more time to clean-up the code of the template than to start from scratch. Needless to say, we can better grasp the concept behind the UIPageViewController when we start from scratch.

Creating a new project using Single View Application template
Okay, let’s move on. In the next screen enter PageApp as the product name and set com.appcodain the company identifier field. Select the Use Authomatic Reference Counting option, but unselect the Use Storyboard since we’re not going to use storyboards for this project. Press next and create the project. Then, select the APPViewController.xib file and change the background of the view to black color.
Creating the Tutorial Screen
The next step is to implement the view controller class that we use to display our five tutorial screens. Select File -> New -> File … and from the list of available templates, select the “Objective-C class” template. Name the class APPChildViewController and make it a subclass of UIViewController. Also, check the box labeled “With XIB for user interface” in order to create the corresponding user interface.
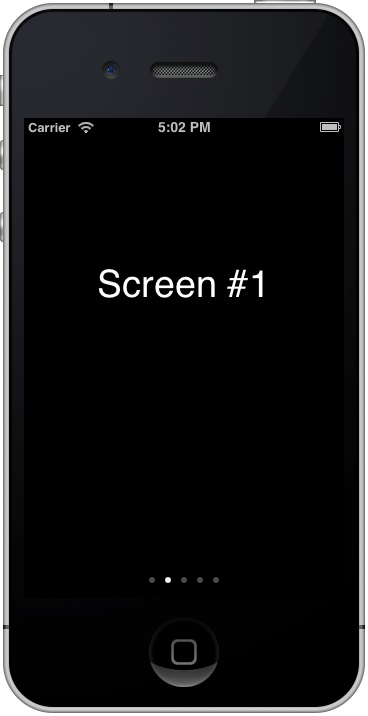
Select the APPChildViewController.xib file just created. Change the background of the view to Black and reduce the vertical size of the view to 512 points to leave some free space for the dots of the page controller (which has a default height of 36 points). Finally add a white UILabel centered on the screen, with a big font size, and change its content to “Screen #n”. The resulting view should look something like:

User Interface for the main screen
Next, we have to create an IBOutlet for that label. In order to do that, change the Editor to the Assistant mode meanwhile the APPChildViewController.xib file is selected. The APPChildViewController.h file should be opened. Control and drag from the UILabel to the APPViewController.h and create an IBOutlet. Set the name as screenNumber. Finally, create a new property of type NSInteger called index. The resulting APPChildViewControl.h file should be something like:
#import <UIKit/UIKit.h>

@interface APPChildViewController : UIViewController

@property (assign, nonatomic) NSInteger index;
@property (strong, nonatomic) IBOutlet UILabel *screenNumber;

@end
The index property allows us to control which screen is currently shown. In order to do that, once we have created a child screen, we have to set up its index through the index property. At the same time, we update the text of the label as well. Add the following line of code to the end of the viewDidAppear: method in the file APPChildViewController.m:
self.screenNumber.text = [NSString stringWithFormat:@"Screen #%d", self.index];
Handling the View Controllers
The UIPageViewController class highlights the distinction between a view controller and a container controller. The container controller is used to contain and manage multiple view controllers shown in the app, as well as, controlling the way one view controller switches to another. Here the UIPageViewController is the container controller that lets the user navigate between pages of content, where each page is managed by its own view controller object.
In order to make UIPageViewController work, our APPViewController has to adopt the UIPageViewControllerDataSource protocol. By implementing the data source protocol, we tell the page view controller what to display for each page.
Open the APPViewController.h file and modify the @interface declaration, and add a new property to hold the UIPageViewController:
#import <UIKit/UIKit.h>

@interface APPViewController : UIViewController <UIPageViewControllerDataSource>

@property (strong, nonatomic) UIPageViewController *pageController;

@end
Next, we have to implement at least two methods of the protocol:
- viewControllerAfterViewController – provides the view controller after the current view controller. In other words, we tell the app what to display for the next screen.
- viewControllerBeforeViewController – provides the view controller before the current view controller. In other words, we tell the app what to display when user switches back to the previous screen.
Add the following lines of code before the end of the APPViewController.c file:
- (UIViewController *)pageViewController:(UIPageViewController *)pageViewController viewControllerBeforeViewController:(UIViewController *)viewController {

    NSUInteger index = [(APPChildViewController *)viewController index];

    if (index == 0) {
        return nil;
    }

    index--;

    return [self viewControllerAtIndex:index];

}

- (UIViewController *)pageViewController:(UIPageViewController *)pageViewController viewControllerAfterViewController:(UIViewController *)viewController {

    NSUInteger index = [(APPChildViewController *)viewController index];


    index++;

    if (index == 5) {
        return nil;
    }

    return [self viewControllerAtIndex:index];

}


相关推荐
(156KB)<END><br>90,Dialog2.zip A step by step tutorial showing how to create your first windows program using MFC(112KB)<END><br>91,MyMDIApp.zip A brief step-by-step tutorial that demonstrates ...
轴类零件加工工艺设计.zip
资源内项目源码是来自个人的毕业设计,代码都测试ok,包含源码、数据集、可视化页面和部署说明,可产生核心指标曲线图、混淆矩阵、F1分数曲线、精确率-召回率曲线、验证集预测结果、标签分布图。都是运行成功后才上传资源,毕设答辩评审绝对信服的保底85分以上,放心下载使用,拿来就能用。包含源码、数据集、可视化页面和部署说明一站式服务,拿来就能用的绝对好资源!!! 项目备注 1、该资源内项目代码都经过测试运行成功,功能ok的情况下才上传的,请放心下载使用! 2、本项目适合计算机相关专业(如计科、人工智能、通信工程、自动化、电子信息等)的在校学生、老师或者企业员工下载学习,也适合小白学习进阶,当然也可作为毕设项目、课程设计、大作业、项目初期立项演示等。 3、如果基础还行,也可在此代码基础上进行修改,以实现其他功能,也可用于毕设、课设、作业等。 下载后请首先打开README.txt文件,仅供学习参考, 切勿用于商业用途。
seaborn基本绘图人力资源数据集
移动机器人(sw三维)
自制html网页源代码查看器
3吨叉车的液压系统设计().zip
1_实验三 扰码、卷积编码及交织.ppt
北京交通大学软件学院自命题科目考试大纲.pdf
雅鲁藏布江流域 shp矢量数据 (范围+DEM).zip
基于RUST的数据结构代码示例,栈、队列、图等
NIFD:2024Q1房地产金融报告
详细介绍及样例数据:https://blog.csdn.net/li514006030/article/details/146916652
【工业机器视觉定位软件Vision-Detect】基于C#的WPF与Halcon开发的工业机器视觉定位软件(整套源码),开箱即用 有用户登录,图片加载,模板创建,通讯工具,抓边抓圆,良率统计,LOG日志,异常管理,九点标定和流程加载保存等模块,功能不是很完善,适合初学者参考学习。 资源介绍请查阅:https://blog.csdn.net/m0_37302966/article/details/146912206 更多视觉框架资源:https://blog.csdn.net/m0_37302966/article/details/146583453
内容概要:本文档详细介绍了Java虚拟机(JVM)的相关知识点,涵盖Java内存模型、垃圾回收机制及算法、垃圾收集器、内存分配策略、虚拟机类加载机制和JVM调优等内容。首先阐述了Java代码的编译和运行过程,以及JVM的基本组成部分及其运行流程。接着深入探讨了JVM的各个运行时数据区,如程序计数器、Java虚拟机栈、本地方法栈、Java堆、方法区等的作用和特点。随后,文档详细解析了垃圾回收机制,包括GC的概念、工作原理、优点和缺点,并介绍了几种常见的垃圾回收算法。此外,文档还讲解了JVM的分代收集策略,新生代和老年代的区别,以及不同垃圾收集器的工作方式。最后,文档介绍了类加载机制、JVM调优的方法和工具,以及常用的JVM调优参数。 适合人群:具备一定Java编程基础的研发人员,尤其是希望深入了解JVM内部机制、优化程序性能的技术人员。 使用场景及目标:①帮助开发人员理解Java代码的编译和执行过程;②掌握JVM内存管理机制,包括内存分配、垃圾回收等;③熟悉类加载机制,了解类加载器的工作原理;④学会使用JVM调优工具,掌握常用调优参数,提升应用程序性能。 其他说明:本文档内容详尽,适合用作面试准备材料和技术学习资料,有助于提高开发人员对JVM的理解和应用能力。
Android项目原生java语言课程设计,包含LW+ppt
戴德梁行&中国房地产协会:2021亚洲房地产投资信托基金研究报告
Android项目原生java语言课程设计,包含LW+ppt
Thinkphp6.0+vue个人虚拟物品发卡网站源码 支持码支付对接 扫码自动发货 源码一共包含两个部分thinkphp6.0后端文件,以及vue前端文件.zip