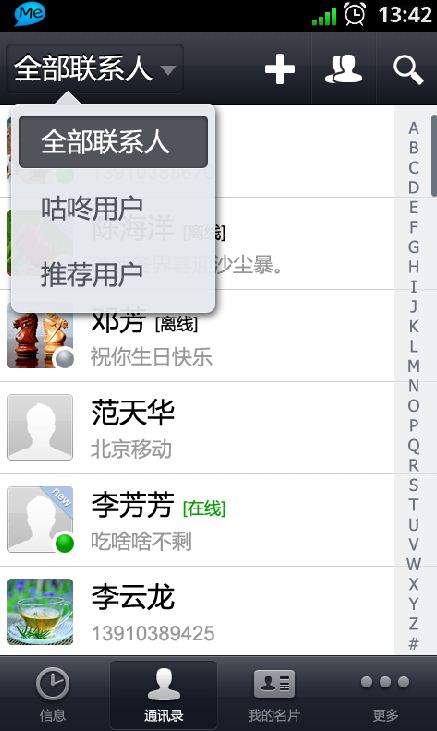
先贴一下显示效果图,仅作参考:

代码如下:
1、自定义Dialog
public class SelectDialog extends AlertDialog{
public SelectDialog(Context context, int theme) {
super(context, theme);
}
public SelectDialog(Context context) {
super(context);
}
@Override
protected void onCreate(Bundle savedInstanceState) {
super.onCreate(savedInstanceState);
setContentView(R.layout.slt_cnt_type);
}
}
public SelectDialog(Context context, int theme) {
super(context, theme);
}
public SelectDialog(Context context) {
super(context);
}
@Override
protected void onCreate(Bundle savedInstanceState) {
super.onCreate(savedInstanceState);
setContentView(R.layout.slt_cnt_type);
}
}
2、布局文件slt_cnt_type.xml代码
<?xml version="1.0" encoding="utf-8"?>
<LinearLayout
xmlns:android="http://schemas.android.com/apk/res/android"
android:orientation="vertical"
android:padding="10dp" android:layout_width="115dp" android:layout_height="wrap_content" android:background="@color/blue">
<Button android:layout_height="wrap_content" android:background="#00000000" android:layout_width="fill_parent" android:text="全部联系人" android:paddingTop="5dp" android:paddingBottom="5dp" android:paddingLeft="10dp" android:gravity="left|center_vertical" android:id="@+id/btnSltCntAll"></Button>
<Button android:layout_height="wrap_content" android:background="#00000000" style="@drawable/greenhand_button" android:text="咕咚用户" android:gravity="left|center_vertical" android:paddingBottom="5dp" android:paddingTop="5dp" android:paddingLeft="10dp" android:paddingRight="10dp" android:layout_width="fill_parent" android:id="@+id/btnSltGudongUser"></Button>
<Button style="@drawable/greenhand_button" android:background="#00000000" android:layout_height="wrap_content" android:layout_width="fill_parent" android:text="推荐用户" android:gravity="left|center_vertical" android:paddingTop="5dp" android:paddingBottom="5dp" android:paddingLeft="10dp" android:id="@+id/btnSltRecommend"></Button>
</LinearLayout>
3、颜色color.xml代码
<?xml version="1.0" encoding="utf-8"?>
<resources>
<color name="transparent">#00000000</color>
</resources>
<resources>
<color name="transparent">#00000000</color>
</resources>
4、样式style.xml代码
<?xml version="1.0" encoding="utf-8"?>
<resources>
<style name="dialog" parent="@android:style/Theme.Dialog">
<item name="android:windowFrame">@null</item><!--边框-->
<item name="android:windowIsFloating">true</item><!--是否浮现在activity之上-->
<item name="android:windowIsTranslucent">false</item><!--半透明-->
<item name="android:windowNoTitle">true</item><!--无标题-->
<item name="android:windowBackground">@color/transparent</item><!--背景透明-->
<item name="android:backgroundDimEnabled">false</item><!--模糊-->
</style>
</resources>
4、显示Dialog
SelectDialog selectDialog = new SelectDialog(this,R.style.dialog);//创建Dialog并设置样式主题
Window win = selectDialog.getWindow();
LayoutParams params = new LayoutParams();
params.x = -80;//设置x坐标
params.y = -60;//设置y坐标
win.setAttributes(params);
selectDialog.setCanceledOnTouchOutside(true);//设置点击Dialog外部任意区域关闭Dialog
selectDialog.show();
Window win = selectDialog.getWindow();
LayoutParams params = new LayoutParams();
params.x = -80;//设置x坐标
params.y = -60;//设置y坐标
win.setAttributes(params);
selectDialog.setCanceledOnTouchOutside(true);//设置点击Dialog外部任意区域关闭Dialog
selectDialog.show();


相关推荐
- 当Dialog背景透明时,注意避免内容与底层视图重叠,可能导致用户交互问题。 - 在处理Dialog位置时,考虑到不同设备的屏幕尺寸差异,最好采用相对单位而非绝对像素值。 - 使用`TYPE_APPLICATION_OVERLAY`权限...
PopupWindow允许我们在任意位置显示自定义内容,并且可以设置背景透明,使其看起来像一个悬浮的对话框。创建自定义PopupWindow的步骤包括: 1. 创建PopupWindow对象,指定宽度、高度和视图。 2. 设置PopupWindow的...
在Android开发中,自定义Dialog是一种常见的需求,它允许开发者根据应用的UI风格和功能需求进行个性化设计。本文将深入探讨如何实现一个带有动画效果的自定义Dialog,并以"android 自定义Dialog提示+动画效果"为主题...
Android 自定义 Dialog 内部透明、外部遮罩效果 Android 自定义 Dialog 内部透明、外部遮罩效果是一种常见的 UI 设计效果,在 Android 开发中非常重要。下面我们来详细介绍 Android 自定义 Dialog 内部透明、外部...
在Android开发中,自定义Dialog是一种常见的需求,用于提供一种用户交互的方式,通常用来显示一些临时的通知或进行一些简短的操作。在这个主题中,我们主要关注如何创建一个自定义的加载等待Dialog,它包括透明和...
然后,在自定义Dialog类中加载这个布局,并设置必要的属性,如背景颜色、边距等。 以下是一个简单的自定义Dialog的创建步骤: 1. 创建布局资源文件:在`res/layout`目录下创建一个新的XML布局文件,比如`custom_...
本文将详细讲解如何在Android中实现一个可动画显示的自定义Dialog,以及如何处理基本的需求设置。 首先,理解Dialog的基础。Dialog是Android系统提供的一种轻量级窗口,通常用于向用户展示一些临时信息或者进行简单...
在Android开发中,自定义Dialog是一种常见的需求,它允许开发者根据应用的设计风格或者特定功能来创建具有...在学习和实践中,多参考官方文档和社区资源,如CSDN博客,能帮助你更好地掌握Android自定义Dialog的技巧。
在Android开发中,自定义Dialog是一种常见的需求,它允许开发者根据应用的设计风格和功能需求创建具有独特外观和交互的对话框。这篇博客“android 自定义dialog Demo”将深入探讨如何在Android应用程序中实现自定义...
接下来,我们需要在代码中创建并显示这个自定义Dialog。在Activity或Fragment中,我们可以使用`AlertDialog.Builder`来构建Dialog,并设置我们的自定义布局。以下是一个简单的示例: ```java // 加载自定义布局 ...
在`res/values/styles.xml`文件中创建一个新的主题,例如`Theme.Translucent.Dialog`,并设置其背景透明: ```xml <style name="Theme.Translucent.Dialog" parent="Theme.AppCompat.Light.Dialog"> ...
在Android开发中,自定义Dialog是一种常见的需求,它允许开发者创建具有独特设计和功能的对话框,以符合应用的品牌风格或提供更丰富的用户体验。本文将深入探讨如何在Android中实现一个仿iOS风格的Dialog,并根据...
在Android开发中,自定义Dialog和Activity的跳转样式是提升用户体验和应用独特性的重要手段。自定义Dialog可以使应用程序在提示用户信息或者进行选择时,展现出更符合应用风格的界面,而自定义Activity跳转样式则能...
本项目“android自定义透明对话框,透明提示框,自定义Dialog.zip”旨在实现一个具有透明背景效果的自定义对话框。下面将详细介绍这个主题涉及的关键知识点。 1. **自定义布局**: 在Android中,对话框默认的样式...
在Android开发中,自定义对话框(Dialog)是一种常见的需求,它可以提供更加个性化的用户体验。本文将详细讲解如何实现一个自定义...记住,自定义Dialog是提高用户体验的重要手段,可以根据项目需求进一步扩展和优化。
Android 自定义 Dialog 弹框和背景阴影显示效果 Android 自定义 Dialog 弹框和背景阴影显示效果是 Android 开发中非常重要的一部分。 Dialog 弹框可以用来提示用户一些重要的信息或让用户选择某些选项,而背景阴影...
总结来说,要实现一个带有磨砂透明效果并且点击Dialog外部自动退出的功能,你需要创建自定义布局,设置背景透明度和模糊效果,自定义Dialog类并处理触摸事件。这个过程涉及到Android UI设计、自定义组件以及事件监听...
5. 创建并显示:在需要使用的地方,创建自定义Dialog的实例,并调用`show()`方法。 界面美化是提升用户体验的关键。在Android中,可以通过以下方式优化Dialog的外观: 1. 使用主题(Theme):在AndroidManifest....