- 浏览: 1567040 次
- 性别:

- 来自: 杭州
-

文章分类
- 全部博客 (525)
- SEO (16)
- JAVA-EE-Hibernate (6)
- JAVA-EE-Struts (29)
- JAVA-EE-Spring (15)
- Linux (37)
- JAVA-SE (29)
- NetWork (1)
- CMS (14)
- Semantic Research (3)
- RIA-Flex (0)
- Ajax-Extjs (4)
- Ajax-Jquery (1)
- www.godaddy.com (0)
- SSH (34)
- JavaScript (6)
- SoftwareEngineer (9)
- CMMI (0)
- IDE-Myeclipse (3)
- PHP (1)
- Algorithm (3)
- C/C++ (18)
- Concept&Items (2)
- Useful WebSite (1)
- ApacheServer (2)
- CodeReading (1)
- Socket (2)
- UML (10)
- PowerDesigner (1)
- Repository (19)
- MySQL (3)
- SqlServer (0)
- Society (1)
- Tomcat (7)
- WebService (5)
- JBoss (1)
- FCKeditor (1)
- PS/DW/CD/FW (0)
- DesignPattern (11)
- WebSite_Security (1)
- WordPress (5)
- WebConstruction (3)
- XML|XSD (7)
- Android (0)
- Project-In-Action (9)
- DatabaseDesign (3)
- taglib (7)
- DIV+CSS (10)
- Silverlight (52)
- JSON (7)
- VC++ (8)
- C# (8)
- LINQ (1)
- WCF&SOA (5)
- .NET (20)
- SOA (1)
- Mashup (2)
- RegEx (6)
- Psychology (5)
- Stock (1)
- Google (2)
- Interview (4)
- HTML5 (1)
- Marketing (4)
- Vaadin (2)
- Agile (2)
- Apache-common (6)
- ANTLR (0)
- REST (1)
- HtmlAnalysis (18)
- csv-export (3)
- Nucth (3)
- Xpath (1)
- Velocity (6)
- ASP.NET (9)
- Product (2)
- CSS (1)
最新评论
-
lt26w:
理解成门面模式应该比较容易明白吧
FacadePattern-Java代码实例讲解 -
lt26w:
看下面的例子比较明白.
FacadePattern-Java代码实例讲解 -
javaloverkehui:
这也叫文档,别逗我行吗,也就自己看看。
HtmlCleaner API -
SE_XiaoFeng:
至少也应该写个注释吧。
HtmlCleaner API -
jfzshandong:
...
org.springframework.web.filter.CharacterEncodingFilter 配置
http://www.codeproject.com/KB/macros/Lexware_AssemblyReference.aspx
Introduction
Visual Studio 2005 / 2008 both lack a good way to define assembly references per solution configuration (‘Debug’ or ‘Release’).
Background
There are some ways to define assembly references which change if the solution configuration changes, but they are not sufficient for larger projects. The following features of Visual Studio 2005 / 2008 are fine for small projects:
- Set a Project reference from one project to another. The projects must be all in one solution. This is not always possible in projects where a lot of developers are working on multiple projects lying in different solutions.
- Set a reference to an assembly lying in the output path of the project. Visual Studio 2005 searches for assembly references first in the output path of the project. A way to define assembly references per solution configuration is to put all assemblies in a common output directory (MSDN Article ). This is inflexible.
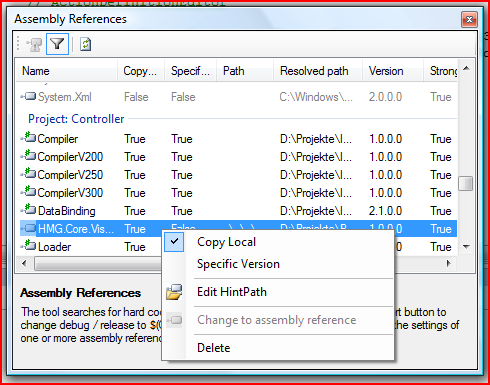
The Lexware Assembly Reference Tool fills this gap, by providing a
new tool window in Visual Studio 2005 / 2008, which allows you to
change ‘hard-coded’ assembly reference paths to flexible reference
paths which change depending on the solution configuration. The tool
detects ‘Debug’ or ‘Release’ in the assembly reference path and marks
the assembly in red to show you the potential problem you have, when
you build the project in another configuration. You only need to press
a button and all these paths will be converted to paths which depend on
the configuration of the project. 
Additionally the tool provides the following features:
- Change the ‘Copy Local’ property
- Manipulate the ‘Special Version’ property
- Edit the assembly reference path (‘HintPath’)
- Convert a project reference into an assembly references
- Delete an assembly reference

After installing and starting the Add-In you can open the assembly reference tool via the Visual Studio 2005 / 2008 tools menu. 
How it works
The general idea behind it
The tool allows flexible assembly reference paths by replacing
“\Debug\” or “\Release\” in the reference path against
“\$Configuration\”, which is a placeholder for the solution
configuration in Visual Studio 2005 / 2008. Visual Basic and CSharp
projects are able to replace the placeholder back to “\Debug\” or
“\Relase\” when trying to resolve an assembly path.
Since the
Visual Studio 2005 / 2008 object model doesn’t allow any change to a
reference path, the tool changes the path in the underlying project
file. It manipulates the tag , the path to the assembly, which is referenced.

When the tool saves the project file, Visual Studio notices that change and asks you to reload the project.
For
some features the tool holds a reference to the internal Visual Studio
representation of an assembly reference (VSLangProj80.Reference3),
which allows a manipulation of properties like ‘CopyLocal’,
‘SpecificVersion’ or deleting a reference. Changes to these properties
are directly reflected by the original property window of the assembly
reference in Visual Studio.
The Tool solution itself
The solution contains a CSharp and a setup project. The setup project was created with the Setup Project template. The CSharp project is originally created with a Visual Studio Add-In project template of Visual Studio 2005.

Visual Studio automatically creates a ‘Tool’ menu item for the add-in, if you choose so in the project wizard. If you select ‘I would like my Add-In to load, …’ Visual Studio loads your Add-In directly when it starts.

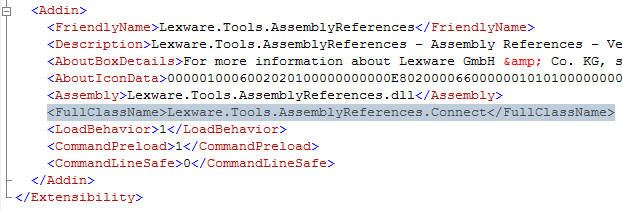
In the new project Visual Studio creates two files with the extension ‘AddIn’. One is lying in the project folder (e.g. ‘Lexware.Tools.AssemblyReferences.AddIn’) and this is used when the Add-In is deployed. The other one (e.g. ‘Lexware.Tools.AssemblyReferences - For Testing.AddIn’) is placed in the Visual Studio Add-In folder. This is the one which is used while debugging the Add-In. The Visual Studio Add-In folder is contained in your documents folder. For Windows Vista it should be found here: C:\Users\’Your User Name’\Documents\Visual Studio 2005\Addins. An Add-In file contains a full description of the Add-In. It provides a friendly name, the load behavior and other information, necessary for Visual Studio to display the Add-In in the ‘Add-in Manager’.


The Add-In
The Add-In project contains the file ‘connect.cs’, which contains the code connecting to Visual Studio. The class ‘Connect’ is called, when the Add-In starts. In fact it is defined in the ‘FullClassName’ tag of the ‘.Addin’ file described below.
The class Connect
The class Connect
implements the Visual Studio interface IDTExtensibility2
, which defines the Method OnConnection
.
This method is called, when Visual Studio loads the Add-In into its
memory. This is the place where you can add menu items and in this case
create a tool window.
public
 void
 OnConnection(object
 application, ext_ConnectMode connectMode,
    object
 addInInst, ref
 Array custom)
{
    _applicationObject = (DTE2)application;
    _addInInstance = (AddIn)addInInst;

    CreateToolWindow();

    if
(connectMode == ext_ConnectMode.ext_cm_UISetup)
    {
        object
[] contextGUIDS = new
 object
[] {};
        Commands2 commands = (Commands2)_applicationObject.Commands;
        string
 toolsMenuName;

        try

        {
            //
If you would like to move the command to a different menu, change the

            //
word "Tools" to the English version of the menu. This code will take

            //
 the culture, append on the name of the menu then add the command to

            //
 that menu. You can find a list of all the top-level menus in the file

            //
  CommandBar.resx.

            ResourceManager resourceManager = new
 ResourceManager(
                "
Lexware.Tools.AssemblyReferences.CommandBar"
,
                Assembly.GetExecutingAssembly());
            CultureInfo cultureInfo = new
 CultureInfo(_applicationObject.LocaleID);
            string
 resourceName = String
.Concat(cultureInfo.TwoLetterISOLanguageName,
                LocalResources.ToolbarName);
            toolsMenuName = resourceManager.GetString(resourceName);
        }
        catch

        {
            //
We tried to find a localized version of the word Tools, but one was

            //
 not found.

            //
  Default to the en-US word, which may work for the current culture.

            toolsMenuName = LocalResources.ToolbarName;
        }

        //
Place the command on the tools menu.

        //
Find the MenuBar command bar, which is the top-level command bar holding

        //
all the main menu items:

        Microsoft.VisualStudio.CommandBars.CommandBar menuBarCommandBar = (
            (CommandBars)_applicationObject.CommandBars)["
MenuBar"
];

        //
Find the Tools command bar on the MenuBar command bar:

        CommandBarControl toolsControl = menuBarCommandBar.Controls[toolsMenuName];
        CommandBarPopup toolsPopup = (CommandBarPopup)toolsControl;

        //
This try/catch block can be duplicated if you wish to add multiple commands

        //
 to be handled by your Add-in,

        //
  just make sure you also update the QueryStatus/Exec method to include

        //
  the new command names.

        try

        {
            //
Add a command to the Commands collection:

            Command command = commands.AddNamedCommand2(_addInInstance,
                "
AssemblyReferences"
, "
Assembly Reference Tool"
,
"
Checks and fixes assembly references. Uses placeholder for debug and release directory."
,
                 true
, 0
, ref
 contextGUIDS,
                 (int
)vsCommandStatus.vsCommandStatusSupported +
                 (int
)vsCommandStatus.vsCommandStatusEnabled,
                 (int
)vsCommandStyle.vsCommandStyleText,
                 vsCommandControlType.vsCommandControlTypeButton);

            //
Add a control for the command to the tools menu:

            if
((command != null
) && (toolsPopup != null
))
            {
                command.AddControl(toolsPopup.CommandBar, 1
);
            }
        }
        catch
(ArgumentException)
        {
            //
If we are here, then the exception is probably because a

            //
 command with that name

            //
  already exists. If so there is no need to recreate the command and we can

            //
  safely ignore the exception.

        }
    }
}
When the user clicks your menu item, the method Exec
in the same class will be called. You can filter the commandName
, to know whether the called menu item was yours.
public
 void
 Exec(string
 commandName, vsCommandExecOption executeOption,
    ref
 object
 varIn, ref
 object
 varOut, ref
 bool
 handled)
{
    handled = false
;
    if
(executeOption == vsCommandExecOption.vsCommandExecOptionDoDefault)
    {
        if
(commandName == "
Lexware.Tools.AssemblyReferences.Connect.AssemblyReferences"
)
        {
            //
 Open Toolwindow

            CreateToolWindow();

            handled = true
;
            return
;
        }
    }
}
The tool window, which contains all the important code in this Add-In, is a UserControl. To create it, you can call CreateToolWindow2
. This method creates a new Visual Studio tool window and hosts a user control in it.
private
 void
 CreateToolWindow()
{
    if
(_toolWindow != null
)
    {
        _toolWindow.Activate();
    }
    else

    {
        //
This guid must be unique for each different tool window,

        //
 but you may use the same guid for the same tool window.

        //
This guid can be used for indexing the windows collection,

        //
 for example: applicationObject.Windows.Item(guidstr)

        Windows2 windows2 = (Windows2)_applicationObject.Windows;
        Assembly asm = Assembly.GetExecutingAssembly();

        object
 customControl = null
;
        string
 className = "
Lexware.Tools.AssemblyReferences.ToolWindowControl"
;
        string
 caption = "
Assembly References"
;
        _toolWindow = windows2.CreateToolWindow2(_addInInstance, asm.Location, className,
                                                 caption, _toolWindowGuid,
                                                 ref
 customControl);

        //
Set the picture displayed when the window is tab docked (this causes

        //
problems in Visual Studio 2008)

        try

        {
            _toolWindow.SetTabPicture(LocalResources.LexwareBmp.GetHbitmap());
        }
        catch

        {
        }

        //
When using the hosting control, you must set visible to true before calling

        //
 HostUserControl, otherwise the UserControl cannot be hosted properly.

        _toolWindow.Visible = true
;

        if
 (customControl != null
)
        {
            _toolWindowControl = (ToolWindowControl)customControl;
            _toolWindowControl.ApplicationObject = _applicationObject;
            _toolWindowControl.ParentToolWindow = _toolWindow;
        }
    }
}
The ToolWindow
The tool window registers some events of the Visual Studio solution, document and the command object, so that changes in the solution will be noticed by the Add-In.
private
 void
 RegisterEvents()
{
    if
 (_solutionEvents != null
)
    {
        UnregisterEvents();
    }
    _solutionEvents = _applicationObject.Events.SolutionEvents;

    //
 register new events

    _solutionEvents.Opened += new
 _dispSolutionEvents_OpenedEventHandler(
         _solutionEvents_Opened);
    _solutionEvents.ProjectAdded += new
 _dispSolutionEvents_ProjectAddedEventHandler(
         _solutionEvents_ProjectAdded);
    _solutionEvents.ProjectRemoved += new
 _dispSolutionEvents_ProjectRemovedEventHandler(
         _solutionEvents_ProjectRemoved);
    _solutionEvents.ProjectRenamed += new
 _dispSolutionEvents_ProjectRenamedEventHandler(
         _solutionEvents_ProjectRenamed);
    _solutionEvents.AfterClosing += new
 _dispSolutionEvents_AfterClosingEventHandler(
         _solutionEvents_AfterClosing);
    _documentEvents.DocumentSaved += new
 _dispDocumentEvents_DocumentSavedEventHandler(
         _documentEvents_DocumentSaved);

    _commandEvents.AfterExecute += new
 _dispCommandEvents_AfterExecuteEventHandler(
         _commandEvents_AfterExecute);
}


private
 void
 _commandEvents_AfterExecute(string
 Guid, int
 ID, object
 CustomIn,
    object
 CustomOut)
{
    //
Command name: File.SaveSelectedItems

    //
Command GUID/ID: {5EFC7975-14BC-11CF-9B2B-00AA00573819}, 331


    //
Command name: File.SaveAll

    //
Command GUID/ID: {5EFC7975-14BC-11CF-9B2B-00AA00573819}, 224


    //
Command name: File.SaveSelectedItemsAs

    //
Command GUID/ID: {5EFC7975-14BC-11CF-9B2B-00AA00573819}, 226


    //
Command name: Build.SolutionConfigurations

    //
Command GUID/ID: {5EFC7975-14BC-11CF-9B2B-00AA00573819}, 684


    //
Command name: Project.Addreference

    //
Command GUID/ID: {1496A755-94DE-11D0-8C3F-00C04FC2AAE2}, 1113

    if
 (((Guid == "
{5EFC7975-14BC-11CF-9B2B-00AA00573819}"
) && (ID == 331
)) ||
        ((Guid == "
{5EFC7975-14BC-11CF-9B2B-00AA00573819}"
) && (ID == 224
)) ||
        ((Guid == "
{5EFC7975-14BC-11CF-9B2B-00AA00573819}"
) && (ID == 226
)))
    {
        ReadAllReferences();
    }
    else
 if
 ((Guid == "
{1496A755-94DE-11D0-8C3F-00C04FC2AAE2}"
) && (ID == 1113
))
    {
        ParentToolWindow.Activate();
    }
}
When the solution changes, the Add-In iterates the projects
contained in the solution and reads in the references of each project.
It adds each reference to the list view and puts an instance of the
class AssemblyReferenceInformation
at the tag of the ListViewItem
. This instance contains information about the project file (.csproj or .vbproj) and the assembly reference (VSLangProj80.Reference3
), which will be used when manipulating the reference.
private
 void
 ReadAllReferences()
{
    ClearHintLists();

    if
 ((_applicationObject != null
) && (_applicationObject.Solution != null
))
    {
        //
 Walk through the projects of the solution and search for assembly references

        foreach
 (Project currentProject in
 _applicationObject.Solution.Projects)
        {
            ReadProjectReferences(currentProject);
        }
    }
}

private
 void
 ReadProjectReferences(Project currentProject)
{
    try

    {
        if
 (currentProject != null
)
        {
            VSProject2 visualStudioProject = currentProject.Object
 as
 VSProject2;

            //
 The current project can be a 'real' project, but it can also be a

            //
 folder (see else if)

            if
 (visualStudioProject != null
)
            {
                string
 projectFullName = currentProject.FullName;

                if
 (!string.IsNullOrEmpty(projectFullName))
                {
                    FileInfo projectFileInfo = new
 FileInfo(projectFullName);

                    //
 If it is a csproj or a vbproj, add it the the list view

                    if
 (projectFileInfo.Exists &&
                        ((projectFileInfo.Extension == _csProjectFileExtension) ||
                            (projectFileInfo.Extension == _vbProjectFileExtension)))
                    {
                        //
 Add a group for this project

                        ListViewGroup projectGroup = GetProjectGroup(currentProject);

                        AddAssemblyHintsToListView(currentProject, projectFullName,
                            projectGroup, visualStudioProject);
                    }
                }
            }
            else
 if
 ((currentProject.ProjectItems != null
) && (
                currentProject.ProjectItems.Count > 0
))
            {
                //
 Project Item Type       GUID

                //
 Physical File         {6BB5F8EE-4483-11D3-8BCF-00C04F8EC28C}

                //
 Physical Folder       {6BB5F8EF-4483-11D3-8BCF-00C04F8EC28C}

                //
 Virtual Folder        {6BB5F8F0-4483-11D3-8BCF-00C04F8EC28C}

                //
 Subproject            {EA6618E8-6E24-4528-94BE-6889FE16485C}


                //
 The projects contains a sub folder -> search for projects in

                //
 these folders

                foreach
 (ProjectItem currentProjectItem in
 currentProject.ProjectItems)
                {
                    if
 (currentProjectItem.SubProject != null
)
                    {
                        ReadProjectReferences(currentProjectItem.SubProject);
                    }
                }
            }
        }
        //
 Enable fixit button, if there is something to fix

        toolStripButtonFixIt.Enabled = (_needsToBeSaved.Count > 0
);
    }
    catch
 (Exception ex)
    {
        ShowMessage(ex);
    }
}
When the user hits the 'FixIt' button, the tool changes the underlying project file. It save all projects which needs to be saved, due to an incorrect assembly path.

private
 void
 SaveDirtyProjects()
{
    try

    {
        foreach
 (KeyValuePair project in
 _needsToBeSaved)
        {
            XmlDocumentHolder documentHolder = project.Value;

            SaveProject(documentHolder);
        }
    }
    catch
 (Exception ex)
    {
        ShowMessage(ex);
    }
}

private
 void
 SaveProject(XmlDocumentHolder documentHolder)
{
    string
 projectName = documentHolder.Project.FullName;

    if
 (!documentHolder.Project.Saved)
    {
        MessageBox.Show("
Please save all projects before you fix the problems."
);
        return
;
    }

    //
 Check out the project

    if
 ((_sourceControl != null
) && (_sourceControl.IsItemUnderSCC(projectName)) &&
        (!_sourceControl.IsItemCheckedOut(projectName)))
    {
        _sourceControl.CheckOutItem(projectName);
    }

    using
 (XmlTextWriter writer = new
 XmlTextWriter(documentHolder.ProjectFileName,
        Encoding.UTF8))
    {
        writer.Formatting = Formatting.Indented;
        documentHolder.XmlDocument.Save(writer);
    }
}
Visual Studio notices that the tool changed the project file and asks you to reload the project.

The setup project
The setup project deploys the Add-In to the AddIns folders of Visual Studio 2005 and Visual Studio 2008.
It
automatically detects newer and older version, older versions will be
removed before installing a new version. To create a new setup version
for the Add-In, only change the version of the setup. Visual Studio
will generate a new ProductCode for you, but it will not touch the
UpgradeCode. With the combination of codes, Windows Installer is able
to detect and update older or newer versions of the Add-In.

Requirements to build the solution
To build the solution, you need Visual Studio 2008. The Add-In is tested on Visual Studio 2005 and 2008 Team Developer and Team Suite.
History
no changes
<!-- Main Page Contents End -->License
This article, along with any associated source code and files, is licensed under The Code Project Open License (CPOL)
About the Author
|
Thomas Dörr
Member |
Thomas has been programming in C, C++, VB and C# since many years.
He works as a Senior Software Architect for Lexware GmbH & Co.KG in
Freiburg, Germany.
|
 Germany
Other popular Macros and Add-ins articles:
-
Undocumented Visual C++
Spelunking in the Badlands of MSDEV
-
CodePlotter 1.6 - Add and edit diagrams in your code with this 'Visio-like' tool
A Visual Studio addin for creating and editing ASCII diagrams in source files
-
Versioning Controlled Build
A Visual Studio add-in and command-line utility that automates versioning of .NET and VC++ projects
-
Useful enhancements for Visual Studio .NET
Several tools packed into one addin for Visual Studio .NET
-
WTL Helper
Add-in for Microsoft VC++.NET 2003 that helps to insert message handlers for WTL.


发表评论

-
WPF/Silverlight深度解决方案:(六)HLSL自定义渲染特效之完美攻略(上)
2010-01-13 16:40 2397Shader Effect 中文名称为“渲染特效”或“滤镜” ... -
Silverlight Image Source URI : 一个反斜杠引发的血案
2010-01-12 13:10 3612Silverlight Image Source U ... -
SilverLight跨域访问及其常用的几种解决方法
2010-01-06 16:59 5449SilverLight 出于对安全性的考虑默认情况下对UR ... -
有关silverlight中调用webservice的问题!!
2010-01-06 15:07 3379System.InvalidOperationExceptio ... -
Server.UrlEncode、HttpUtility.UrlDecode不同编码
2010-01-06 12:39 3301Server.UrlEncode、HttpUtility.U ... -
LINQ to XML一些基本查询
2010-01-06 12:34 2062/**/ /// /根据元素的名称进行筛选(有命名空 ... -
使用LINQ to XML来查询XML
2010-01-06 12:16 2776使用LINQ to XML来查询XML ... -
给弟弟起步学习软件开发(.Net 方向)的指导,博友们帮助看看,提些意见给他。
2010-01-06 11:15 997在我学习的时候走了至少3年的弯路,那个时候没有人告诉我该如 ... -
LINQ to XML 用 LINQ 查询 XML
2010-01-06 11:15 1533LINQ to XML 用 LINQ 查询 XML ... -
一个实例掌握linq to XML增查删改
2010-01-06 11:10 2263最近忽然想把过去写的I ... -
使用XML LINQ查询和转换XML
2010-01-06 10:37 1514本章包括 n XML LI ... -
XML LINQ简介
2010-01-06 10:32 1603本章包括 n XML LINQ ... -
.Net 中string与byte[]相互转换
2010-01-05 16:43 2462public static byt ... -
正则表达式收集(持久更新)
2010-01-04 15:56 1149正则表达式收集(� ... -
网上搜集的webbrower的资料,很有借鉴价值
2010-01-04 15:54 1914http://hi.baidu.com/lovemoe/ ... -
Visual Studio的 诡异bug(mscorlib无法引用)
2010-01-04 09:27 2537这个需要手动修改项目的配置文件 添加 <Re ... -
[C#实战]Google Map开发实战参考
2010-01-03 16:48 5793[C# 实战] ... -
复习一下 .Net: delegate(委托)、event(事件) 的基础知识,从头到尾实现事件!
2010-01-02 23:33 2596有这样一道 .Net/C# 面试题:请以事件的概念实现 ... -
ADO.NET Entity Framework简介
2009-12-21 18:46 2722下一代的ADO.NET的目标是要解决关系数据模型和实际应用程序 ...
相关推荐
这些类的特殊之处在于您具有对Lexware数据库的完全访问权限(包括写入),并且-与已知的ODBC解决方案相反-不必打开Lexware! 执照 该库受。 NuGet软件包 描述 徽章 基础库 Lexware基本组件 NHibernate组件 全球...
网络上的 Lexware 信息和工具 有关 Web 文档和在线工具,请参阅 。 在这个存储库中: ├── lw2xml : Validator and dictionary formatter ├── analysis : Xquery extraction from xhtml ├── pages_md : ...
"cteward-sa-meckerfritze"项目似乎是一个针对"Mtefritze"(可能是 Lexware 公司的一个产品)的自动化脚本集,由用户"cteward"创建。"Lexware"是一家知名的德国软件公司,其产品主要面向小型和中型企业,提供财务、...
这是在簿记框架内完成的,为此还需要一个簿记程序——一个接口被内置到簿记程序中(例如“Lexware Buchhalter”)。 捐款可以通过会计部门作为俱乐部捐款(非物质领域)或作为参与者费用(需缴纳销售税!)在发票上...
内容概要:本文详细介绍了永磁同步电机(PMSM)三闭环控制系统的仿真建模方法及其参数优化技巧。首先阐述了三闭环控制的整体架构,即位置环、速度环和电流环的层级关系,并解释了每个环节的作用。接着展示了各环的具体实现代码,如电流环的PI控制器、速度环的前馈控制以及位置环的限幅处理。文中强调了调参的重要性和注意事项,提供了具体的参数选择依据和调试建议。最后分享了一些实用的仿真技巧,如死区补偿、故障注入等,确保模型能够应对实际工况。 适合人群:从事电机控制研究的技术人员、研究生及以上水平的学生,特别是对永磁同步电机三闭环控制感兴趣的读者。 使用场景及目标:适用于需要深入了解PMSM三闭环控制原理并进行仿真实验的研究人员和技术开发者。目标是帮助读者掌握如何构建高效的三闭环控制系统,提高电机性能,降低能耗,增强系统的鲁棒性和可靠性。 其他说明:文中提供的代码片段和参数配置均基于MATLAB/Simulink平台,建议读者在实践中结合实际情况调整参数,以获得最佳效果。同时,附带的参考资料也为进一步学习提供了指导。
光电材料仿真,电子仿真等;从入门到精通教程;含代码案例解析。
内容概要:本文详细介绍了利用PFC3D5.0进行滑坡致灾与建筑物易损性分析的完整代码实现。首先,通过Python和Fish语言构建了滑坡体和建筑物的模型,设置了关键参数如密度、刚度、摩擦系数等,确保滑坡体能够真实模拟滑坡行为。其次,针对建筑物的不同部位(楼板、墙体、支柱),采用不同的材料特性进行建模,并加入了实时监测系统,用于记录滑坡过程中各部件的应力、应变以及冲击力的变化情况。此外,还实现了冲击力监测、损伤评估等功能,能够自动触发应急分析并在模拟结束后生成详细的损伤报告。最后,通过对多次模拟结果的数据处理,生成了建筑物的易损性曲线,验证了模型的有效性和准确性。 适合人群:从事地质灾害研究、土木工程、结构安全评估的研究人员和技术人员。 使用场景及目标:适用于滑坡灾害预测、建筑设计优化、抗震防灾等领域。通过模拟不同条件下滑坡对建筑物的影响,帮助研究人员更好地理解滑坡致灾机理,为制定有效的防护措施提供科学依据。 其他说明:文中提供了大量实用的小技巧,如调整参数以获得更好的模拟效果、优化计算效率等。同时强调了模型验证的重要性,确保研究成果具有较高的可信度。
编译httpserver 通过后记录的
光电材料仿真,电子仿真等;从入门到精通教程;含代码案例解析。
内容概要:本文详细探讨了在Android平台上进行图像模板匹配的技术挑战和解决方案,特别是在处理不同尺寸和旋转角度的目标物时的方法。文中介绍了使用OpenCV构建图像金字塔、处理旋转模板以及利用NEON指令集优化性能的具体实现。此外,文章还讨论了在armeabi-v7a和arm64-v8a这两种主要ARM架构下的优化技巧,如内存对齐、SIMD指令优化、RenderScript并行处理等。作者分享了许多实践经验,包括如何避免常见的性能瓶颈和兼容性问题。 适合人群:有一定Android开发经验,尤其是熟悉OpenCV和NDK编程的中级及以上开发者。 使用场景及目标:适用于需要在移动设备上进行高效图像识别的应用开发,如实时视频流中的物体检测、游戏内的道具识别等。目标是提高模板匹配的速度和准确性,同时确保在不同硬件配置下的稳定性和兼容性。 其他说明:文章提供了丰富的代码片段和实际案例,帮助读者更好地理解和应用所介绍的技术。特别强调了在不同ARM架构下的优化策略,为开发者提供了宝贵的参考资料。
光电材料仿真,电子仿真等;从入门到精通教程;含代码案例解析。
内容概要:本文详细介绍了利用COMSOL软件模拟电晕放电离子风的过程。首先解释了电晕放电的基本概念,即在高压电场下电极周围空气被电离形成离子风。接着阐述了如何在COMSOL中建立针-板电极结构的三维模型,涉及静电、层流和稀物质传递三个物理场的设置。文中提供了具体的MATLAB代码片段用于初始化模型、定义几何体、设置边界条件、配置物理参数、进行网格划分以及求解模型。此外,还讨论了求解过程中可能出现的问题及解决方法,如收敛技巧、网格划分策略等。最后强调了通过模拟获得的电场分布、气流速度和离子浓度等结果对于理解和优化电晕放电离子风设备的重要性。 适用人群:对电晕放电现象感兴趣的科研人员和技术开发者,尤其是那些希望深入了解多物理场耦合仿真技术的人群。 使用场景及目标:适用于需要研究电晕放电离子风特性的场合,如空气净化装置、散热设备等领域的产品设计与性能评估。目标是帮助用户掌握如何使用COMSOL软件构建并求解电晕放电离子风模型,从而更好地理解相关物理机制。 其他说明:文中提到的实际操作细节和遇到的技术挑战有助于新手避免常见错误,提高建模效率。同时,提供的具体参数设置和代码示例也为进一步深入研究奠定了基础。
内容概要:本文详细介绍了多模态属性级情感分析的技术原理及其应用场景。首先解释了多模态属性级情感分析的意义,即通过结合文本和图像信息来更全面地理解用户情感。接着阐述了数据预处理方法,如使用BERT进行文本编码和ResNet处理图像。然后深入探讨了模型架构,包括双流网络结构和特征融合策略,以及如何通过跨模态注意力机制实现更好的特征对齐。此外,文中还分享了多个实战案例,如电商广告投放系统中如何利用该技术提高转化率,以及在处理用户评价时遇到的问题和解决办法。最后讨论了一些常见的技术挑战,如模态间权重调整、背景干扰物处理等。 适合人群:从事自然语言处理、计算机视觉研究的专业人士,尤其是希望将这两种技术结合起来进行情感分析的研究者和技术开发者。 使用场景及目标:适用于电商平台、社交媒体平台等需要分析用户反馈的场景,旨在帮助企业更好地理解消费者的真实想法,从而优化产品和服务。通过这种方式,企业可以发现潜在的市场机会并改进营销策略。 其他说明:文章不仅提供了理论指导,还包括具体的代码实现示例,有助于读者快速上手实践。同时强调了实际应用中的注意事项,如数据清洗、模型调优等方面的经验教训。
内容概要:本文详细介绍了5MW海上永磁风电直驱系统的Simulink仿真过程,涵盖矢量控制、混合储能系统以及并网逆变器的设计与调试。首先,文章解释了系统架构,包括永磁电机、两电平并网变流器和混合储能模块。接着,深入探讨了矢量控制中的坐标变换、PI参数设置及其对电网波动的影响。对于混合储能系统,文章讨论了滑动平均滤波用于功率分配的方法,确保超级电容和锂电池的有效协同工作。此外,文章还涉及并网逆变器的控制策略,特别是变参数PI控制和死区时间补偿,以应对复杂的电网环境。最后,通过仿真结果展示了系统的高效性和稳定性。 适合人群:从事电力电子工程、风电系统设计与仿真的工程师和技术研究人员。 使用场景及目标:适用于希望深入了解海上风电系统仿真技术的专业人士,旨在提高对矢量控制、混合储能和并网逆变器的理解,从而优化实际应用中的系统性能。 其他说明:文中提供了多个MATLAB代码片段,帮助读者更好地理解和复现相关控制算法。同时,强调了仿真过程中遇到的实际问题及解决方案,如风速突变、电网电压跌落等情况下的系统响应。
光电材料仿真,电子仿真等;从入门到精通教程;含代码案例解析。
该资源为natsort-5.4.0-py2.py3-none-any.whl,欢迎下载使用哦!
内容概要:本文详细介绍了双馈风力发电机(DFIG)的矢量控制仿真模型,特别是定子侧和转子侧的控制策略。定子侧采用电压定向矢量控制,通过双闭环结构(外环控制直流侧电压,内环控制电流),确保功率因数为1。转子侧采用磁链定向矢量控制,同样基于双闭环结构(外环控制功率,内环控制电流),并引入前馈电压补偿提高响应速度。文中提供了具体的PI控制器代码实现,并讨论了仿真模型的搭建方法,如使用Python的scipy库进行动态响应模拟。此外,文章还提到了一些常见的仿真问题及解决方案,如crowbar保护电路、最大功率跟踪算法和低电压穿越模块等。 适合人群:从事风电系统设计、控制算法开发的研究人员和技术人员,以及对电力电子控制系统感兴趣的工程师。 使用场景及目标:适用于希望深入了解DFIG矢量控制原理和实现细节的专业人士,帮助他们掌握定子侧和转子侧的具体控制策略,优化仿真模型,解决实际工程中的问题。 其他说明:文章不仅提供了理论分析,还包括了大量的代码片段和实践经验,有助于读者更好地理解和应用相关技术。
内容概要:本文详细介绍了利用Python进行煤矿瓦斯气驱过程中二氧化碳和氮气的应用方法和技术细节。首先展示了如何通过Python脚本处理气驱压力监测数据并绘制对比图,接着讲解了注气速率控制的PID算法实现及其注意事项。文中还涉及裂隙气体扩散模拟、湿度对氮气驱替的影响以及基于状态机的注气控制系统设计。此外,提供了实时气体浓度监控、数据滤波、阈值报警等功能的具体实现方式,并强调了数据可视化的应用价值。最后讨论了注气孔布置优化和注气压力控制的实际操作要点。 适合人群:从事煤矿开采及相关领域的技术人员、工程师,尤其是具有一定编程基础并对自动化控制感兴趣的从业者。 使用场景及目标:适用于煤矿瓦斯气驱项目的规划、实施与维护阶段,旨在提高瓦斯抽采效率,确保安全生产,同时减少人为因素导致的操作失误。通过学习本文提供的代码示例和技术方案,读者能够掌握如何运用Python解决实际工程问题的方法。 其他说明:文中提到的所有代码均为简化版本,用于解释相关概念和技术原理,在实际项目中可能需要进一步完善和优化。对于希望深入了解该领域的读者而言,本文不仅提供了实用的技术指导,也为后续研究奠定了良好的基础。
光电材料仿真,电子仿真等;从入门到精通教程;含代码案例解析。
街道级行政区划边界,wgs84坐标系,shp数据,直接分析使用。