- жµПиІИ: 1564363 жђ°
- жАІеИЂ:

- жЭ•иЗ™: жЭ≠еЈЮ
-

жЦЗзЂ†еИЖз±ї
- еЕ®йГ®еНЪеЃҐ (525)
- SEO (16)
- JAVA-EE-Hibernate (6)
- JAVA-EE-Struts (29)
- JAVA-EE-Spring (15)
- Linux (37)
- JAVA-SE (29)
- NetWork (1)
- CMS (14)
- Semantic Research (3)
- RIA-Flex (0)
- Ajax-Extjs (4)
- Ajax-Jquery (1)
- www.godaddy.com (0)
- SSH (34)
- JavaScript (6)
- SoftwareEngineer (9)
- CMMI (0)
- IDE-Myeclipse (3)
- PHP (1)
- Algorithm (3)
- C/C++ (18)
- Concept&Items (2)
- Useful WebSite (1)
- ApacheServer (2)
- CodeReading (1)
- Socket (2)
- UML (10)
- PowerDesigner (1)
- Repository (19)
- MySQL (3)
- SqlServer (0)
- Society (1)
- Tomcat (7)
- WebService (5)
- JBoss (1)
- FCKeditor (1)
- PS/DW/CD/FW (0)
- DesignPattern (11)
- WebSite_Security (1)
- WordPress (5)
- WebConstruction (3)
- XML|XSD (7)
- Android (0)
- Project-In-Action (9)
- DatabaseDesign (3)
- taglib (7)
- DIV+CSS (10)
- Silverlight (52)
- JSON (7)
- VC++ (8)
- C# (8)
- LINQ (1)
- WCF&SOA (5)
- .NET (20)
- SOA (1)
- Mashup (2)
- RegEx (6)
- Psychology (5)
- Stock (1)
- Google (2)
- Interview (4)
- HTML5 (1)
- Marketing (4)
- Vaadin (2)
- Agile (2)
- Apache-common (6)
- ANTLR (0)
- REST (1)
- HtmlAnalysis (18)
- csv-export (3)
- Nucth (3)
- Xpath (1)
- Velocity (6)
- ASP.NET (9)
- Product (2)
- CSS (1)
з§ЊеМЇзЙИеЭЧ
- жИСзЪДиµДиЃѓ ( 0)
- жИСзЪДиЃЇеЭЫ ( 83)
- жИСзЪДйЧЃз≠Ф ( 3)
е≠Шж°£еИЖз±ї
- 2012-06 ( 4)
- 2011-01 ( 1)
- 2010-10 ( 2)
- жЫіе§Ъе≠Шж°£...
жЬАжЦ∞иѓДиЃЇ
-
lt26wпЉЪ
зРЖиІ£жИРйЧ®йЭҐж®°еЉПеЇФиѓ•жѓФиЊГеЃєжШУжШОзЩљеРІ
FacadePattern-Javaдї£з†БеЃЮдЊЛиЃ≤иІ£ -
lt26wпЉЪ
зЬЛдЄЛйЭҐзЪДдЊЛе≠РжѓФиЊГжШОзЩљ.
FacadePattern-Javaдї£з†БеЃЮдЊЛиЃ≤иІ£ -
javaloverkehuiпЉЪ
ињЩдєЯеПЂжЦЗж°£пЉМеИЂйАЧжИСи°МеРЧпЉМдєЯе∞±иЗ™еЈ±зЬЛзЬЛгАВ
HtmlCleaner API -
SE_XiaoFengпЉЪ
иЗ≥е∞СдєЯеЇФиѓ•еЖЩдЄ™ж≥®йЗКеРІгАВ
HtmlCleaner API -
jfzshandongпЉЪ
...
org.springframework.web.filter.CharacterEncodingFilter йЕНзљЃ
Create a Silverlight Europe weather map
- еНЪеЃҐеИЖз±їпЉЪ
- Silverlight
 
I donвАЩt generally fi
![]()
nd
the fall or winter an appropriate time to track weather conditions, but
this is an exception. Microsoft recently released the Bing Maps
Silverlight Control SDK, which ties Silverlight and Bing Maps closely
together, allowing developers to create some very powerful mapping
applications. In this article, IвАЩll walk the reader through the process
of creating an Europe weather map
application in Silverlight by using the Bing Maps Silverlight Control.
Getting started
To use the control in Silverlight projects, you have to download the Bing Maps Silverlight Control SDK and install it. If not already done so, youвАЩll have to create a Bing Maps Developer Account at https://www.bingmapsportal.com (youвАЩll need a Windows Live ID). After your account has been created, youвАЩll have to create at least one Bing Maps key for accessing the Bing Maps services (max 5 keys are allowed). With the key created, youвАЩre ready to create your first Bing Maps Application. One last thing. After creating a Silverlight project in Visual Studio or Blend, make sure you include (Add ReferenceвА¶) the following libraries in the project:
Microsoft.Maps.MapControl.dll
and
Microsoft.Maps.MapControl.Common.dll.
Getting the data
In order to create a weather map, we need information about the current weather condition. I used XML feeds that our National Environmental Agency provides as a service . There are currently four feeds to choose from вАУ I used the feeds for EuropeвАЩs capital and other larger cities.
Each feed provides a bunch of metadata about the feed itself (such as credits, suggested pickup time and period, etc.), as well as a collection of items, describing the weather conditions for included locations. This is an example of an item definition in one of the feeds (short excerpt):
<nn_icon>modCloudy</nn_icon> <nn_shortText>moderately cloudy</nn_shortText> <nn_decodeText>5/8 .. 6/8</nn_decodeText> <wwsyn_icon /> <wwsyn_shortText>Rain</wwsyn_shortText> <wwsyn_longText>Rain (not freezing)</wwsyn_longText> <nn_icon-wwsyn_icon>modCloudy</nn_icon-wwsyn_icon> <t_var_desc>Temperature</t_var_desc> <t_var_unit>°C</t_var_unit> <t>8</t> <t_degreesC>8</t_degreesC> <windchill /> <vis_value>45</vis_value> <vis_unit>km</vis_unit> 
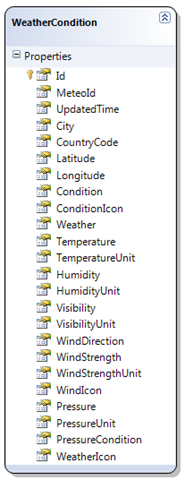
This XML elements have to be parsed into a valid structure and stored in the database. LINQ2XML query will be used to parse the XMLвА¶


var data =


    from item in document.Root.Elements("metData")

    select new WeatherCondition

    {

        MeteoId = item.Element("domain_meteosiId").Value,

        UpdatedTime = item.Element("tsUpdated_UTC").Value,

        City = item.Element("domain_longTitle").Value,

        CountryCode = item.Element("domain_countryIsoCode2").Value,

        Latitude = decimal.Parse(item.Element("domain_lat").Value,

            System.Globalization.CultureInfo.GetCultureInfo("en-us")),

        Longitude = decimal.Parse(item.Element("domain_lon").Value,

            System.Globalization.CultureInfo.GetCultureInfo("en-us")),

        Condition = item.Element("nn_shortText").Value,

        ConditionIcon = item.Element("nn_icon").Value,

        Weather = item.Element("wwsyn_shortText").Value,

        Temperature = int.Parse(item.Element("t").Value),

        TemperatureUnit = item.Element("t_var_unit").Value,

        Humidity = item.Element("rh").Value.Length == 0 ?

            default(int?) : int.Parse(item.Element("rh").Value),

        HumidityUnit = item.Element("rh_var_unit").Value,

        ...

    };
¬†вА¶ and LINQ2SQL will help us store it into the databaseвА¶
 
List<WeatherCondition> items = Collect();

WeatherDataContext context = new WeatherDataContext();

context.ExecuteCommand("delete dbo.WeatherCondition");

context.WeatherConditions.InsertAllOnSubmit(items);

context.SubmitChanges();
 
 
Of course, this part was done on the server side. We need to expose this data as a service:
 
[ServiceContract(Namespace = "")]

[AspNetCompatibilityRequirements(RequirementsMode=AspNetCompatibilityRequirementsMode.Allowed)]

public class WeatherService

{

    [OperationContract]

    public IEnumerable<WeatherCondition> GetWeatherConditions()

    {

        return from wc in new WeatherDataContext().WeatherConditions select wc;

    }

}
 
With weather data captured and exposed as a WeatherService , weвАЩre ready to move on to the client part .
 
 
Setting up the Map control
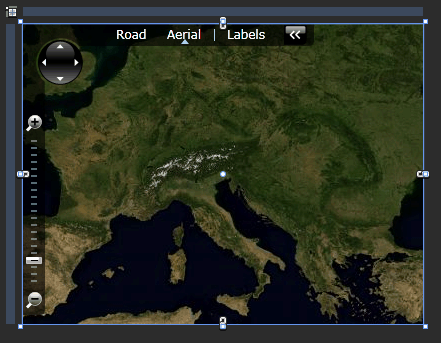
The first thing to do after putting a Bing Maps control on a Silverlight page is setting the Bing Maps key you created previously. All the controlвАЩs properties can be found under the Miscellaneous section. You set the key by pasting it into the CredentialsProvider field. DonвАЩt worry if the text changes to something else when focusing out of the field; itвАЩs just the name of the ApplicationIdCredentialsProvider object, holding a reference to your key.


<map:Map.CredentialsProvider>

    <map:ApplicationIdCredentialsProvider ApplicationId="Your-Key"/>

</map:Map.CredentialsProvider>
 
There are additional options for controlling what is displayed on the map and how: you can set the Mode
property to either Road
or Aerial
, hide logo, copyright, navigation and scale overlays, set zoom level and initial center point, etc.
Putting data into the context
The map control gets the weather data from the ViewModel, which is responsible for calling the WeatherService to collect the data, whenever required. The MainPageViewModel exposes weather conditions as a collection property to be easily consumed by the control (a common MVVM pattern scenario). The MapItemsControl object adds ItemsControl-like features to the map control,  making it bindable to a collection of items, while enabling visual appearance changes to either control itself, and/or bound items.
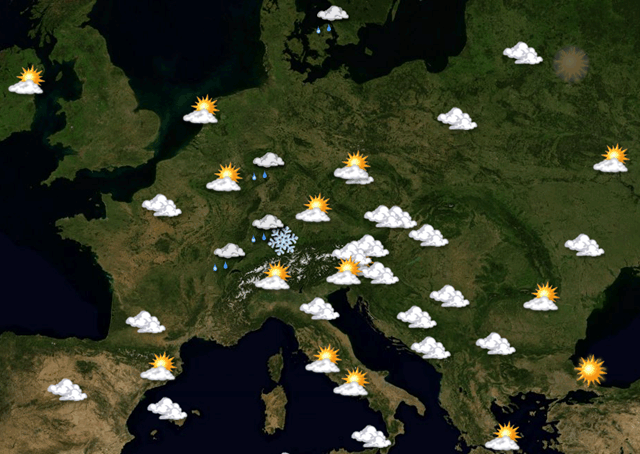
Each weather condition should be represented by its own icon. ThereвАЩs another class in the SDK called Pushpin вАУ this one is used to put custom objects on the map. Using it in the MapItemsControlвАЩs ItemTemplate will get all the bound items pinned to the bound location.
PushpinвАЩs location property can be bound to the underlying objectвАЩs location of type Location. Because the Location type is proprietary to the Map control itвАЩs not very likely to be defined and exposed on the server side object. We can, however, extend the client proxy item class to expose the Location property:
namespace WeatherMap.WeatherServiceProxy

{

    public partial class WeatherCondition

    {

        public Location Location

        {

            get { return new Location((double)Latitude, (double)Longitude) ;}

        }

    }

}
 
 
Displaying weather icons
Each Pushpin should have a look that would correspond to the current weather condition for that place. This could easily be achieved by putting an Image control into the Pushpin template and setting its source to point to an appropriate icon file, possibly through a kind of value converter. Finding this approach being somehow limiting, I went with a bit more flexible way вАУ using a custom template selector, I was able to define how weather would be represented for each condition. The template selector is bound to the CurrentCondtion property, which is a derivate of two parts: the sky cloud coverage (cloudiness) and precipitation (rain, snow, fog, вА¶). Because a lot of different combinations are possible, I simplified the logic by reducing them to the following mapping table:
 
<local:TemplateSelector x:Name="templateSelector" DataType="{Binding CurrentCondition}">

    <local:TemplateSelector.DataTemplates>

        <local:TemplateSelectorDataTemplate DataType="clear">

            <local:Clear />

        </local:TemplateSelectorDataTemplate>

        <local:TemplateSelectorDataTemplate DataType="Clear">

            <local:Overcast />

        </local:TemplateSelectorDataTemplate>

        <local:TemplateSelectorDataTemplate DataType="overcast">

            <local:Overcast />

        </local:TemplateSelectorDataTemplate>

        <local:TemplateSelectorDataTemplate DataType="Cloudy">

            <local:Cloudy />

        </local:TemplateSelectorDataTemplate>

        <local:TemplateSelectorDataTemplate DataType="FG">

            <local:Fog />

        </local:TemplateSelectorDataTemplate>


        <local:TemplateSelectorDataTemplate DataType="RA">

            <local:Rain />

        </local:TemplateSelectorDataTemplate>

        <local:TemplateSelectorDataTemplate DataType="SN">

            <local:Snow />

        </local:TemplateSelectorDataTemplate>

        <local:TemplateSelectorDataTemplate DataType="TH">

            <local:Thunder />

        </local:TemplateSelectorDataTemplate>

        <local:TemplateSelectorDataTemplate>

            <TextBlock Text="{Binding CurrentCondition}" />

        </local:TemplateSelectorDataTemplate>

    </local:TemplateSelector.DataTemplates>

</local:TemplateSelector>


Each template contains a single user control, graphically representing a weather condition. And by graphically, I donвАЩt mean just a static icon (we could have used a simple bitmap icon for that); by using XAML, we can put the icon in motion through various animations.
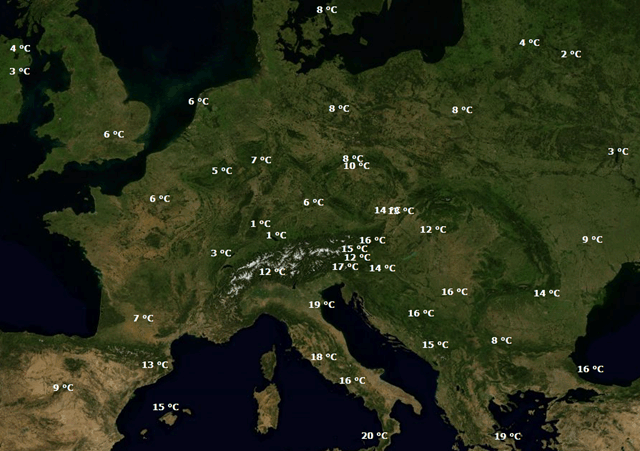
Lastly, we can create вАШlayersвАЩ of presenting different conditions. Using a very simple animation for switching the opacity of two controls, we can transition from an graphics conditions view to the temperature view. The ControlStoryboardAction behavior was used for starting this continuous transition when the page first loaded.
Showing full weather details
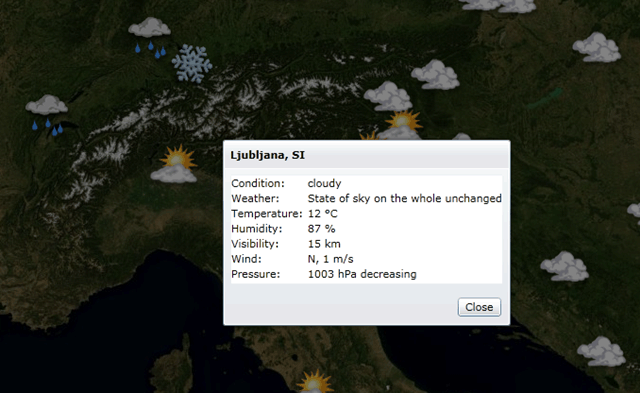
Users, wanting to know more information about current conditions, will be able to click on any weather symbol on the map to get the details. A customized ChildWindow control will be used to display the data, and a special ShowWindowAction behavior will be used to show it:
 
 
[DefaultTrigger(typeof(UIElement), typeof(System.Windows.Interactivity.EventTrigger),

    new object[] { "MouseLeftButtonDown" })]

public class ShowChildWindowAction : TriggerAction<FrameworkElement>

{

    public string ChildWindowType { get; set; }


    protected override void Invoke(object parameter)

    {

        ChildWindow window = Activator.CreateInstance(

            Type.GetType(ChildWindowType, false, true)) as ChildWindow;

        if (window == null)

        {

            return;

        }

        if (AssociatedObject != null)

        {

            window.DataContext = AssociatedObject.DataContext;

        }

        window.Show();

    }

}
 
This behavior simply takes the name of the ChildWindow , and in case of successfully creating a new instance, sets its DataContext to whatever context the associated object had. The ChildWindowType property should be set to a fully qualified object name. This is because Silverlight doesnвАЩt support binding to types.
 
Summary
Bing Maps Silverlight control is a very powerful, yet simple to use Silverlight control for creating virtually any kind of online location-based visualization application. Its data binding abilities make it вАЬblendableвАЭ plus you can use Bing Maps Web Services to (reverse) geocode locations and even calculate a travel route.
This tutorial covered the very basics of creating a Silverlight weather map. Many improvements to the application is in the works, including better graphics (current icons were taken from the Weather Sniffer and animated), more accurate information, ability to play back recorded history, etc.
Many additional mapping samples are provided to explore through Bing Maps Silverlight Control Interactive SDK .
Run the Europe weather map application online .
- 2009-12-21 22:55
- жµПиІИ 1629
- иѓДиЃЇ(0)
- еИЖз±ї:зЉЦз®Лиѓ≠и®А
- жЯ•зЬЛжЫіе§Ъ
еПСи°®иѓДиЃЇ
-
SilverLightеЉВж≠•и∞ГзФ®WebServiceеЗЇйФЩпЉБ
2010-01-19 12:58 5415SilverLightеЉВж≠•и∞ГзФ®WebServiceеЗЇйФЩпЉБ ... -
SilverlightжТ≠жФЊеЩ® C#иѓ≠и®А
2010-01-13 13:30 3322ињЩжЃµжЧґйЧіз†Фз©ґSilverlightдЄ≠зЪДMediaElement ... -
дљњзФ®SilverlightпЉМеИґдљЬзЃАеНХжТ≠жФЊеЩ®зЪДдЄАзВєзВєењГеЊЧгАВ
2010-01-13 13:28 3682й¶ЦеЕИдїЛзїНдїАдєИжШѓSilverligh ... -
еИЭжОҐsilverlight--зЃАжШУжТ≠жФЊеЩ®
2010-01-13 13:28 1539<UserControl xmlns=" ... -
жЦ∞еЉАеПСзЪДsilverlightиІЖйҐСжТ≠жФЊеЩ®,
2010-01-13 13:21 4504http://www.chenjiliang.com/Arti ... -
SilverlightжХЩз®ЛзђђеЫЫйГ®еИЖпЉЪдљњзФ® Style еЕГзі†жЫіе•љеЬ∞е∞Би£ЕиІВжДЯ
2010-01-12 22:11 1287SilverlightжХЩз®ЛзђђеЫЫйГ®еИЖпЉ ... -
Silverlight Carousel: Creating a Silverlight Control Displays Picture in an Inte
2010-01-12 18:18 1926http://www.codeproject.com/KB/s ... -
Using projection to build a 3D carousel in Silverlight 3
2010-01-12 18:14 2359http://ww ... -
CoverFlow вАУ built using Silverlight 3's 'Projection' feature
2010-01-12 18:11 1908CoverFlow вАУ built using Silver ... -
silverlightеК®зФїжТ≠жФЊеБЬж≠ҐйЗНжТ≠з≠ЙжОІеИґ
2010-01-06 12:38 1407ani.begin() ani.stop(); ani. ... -
silverlightйАЯе≠¶иМГдЊЛ100
2010-01-06 12:37 1287silverlightйАЯе≠¶иМГдЊЛ100 ... -
Silverlight дЄ≠зЪД HTTP йАЪдњ°еТМеЃЙеЕ®
2010-01-04 23:43 2025Silverlight дЄ≠зЪД HTTP йАЪдњ°еТМеЃЙеЕ® < ... -
Visual StudioзЪД иѓ°еЉВbug(mscorlibжЧ†ж≥ХеЉХзФ®)еЉХеПСзЪДеѓєиѓЭ and Silverlight XAML жЮДйА†еЗЇйФЩ
2010-01-04 09:25 4144            ... -
SilverlightеЄЄиІБйЧЃйҐШеПКиІ£еЖ≥жЦєж≥Х
2009-12-22 14:06 1310SilverlightеЄЄиІБйЧЃйҐШеПКиІ£еЖ≥жЦєж≥Х ... -
зљСдЄКеЄЄзФ®еЕНиієwebservice жߕ胥
2009-12-22 12:47 4612зљСдЄКеЄЄзФ®еЕНиієwebservice жߕ胥 ¬† 2008-11 ... -
ењЕеЇФ Bing жЦ∞зЙєжАІдєЛжЬАжЦ∞жЦЗзЂ†, Wolfram|Alpha жХіеРИ, 姩ж∞ФжРЬ糥з≠ЙеЈ≤жО®еЗЇ
2009-12-21 23:33 1572ењЕеЇФ Bing еҐЮеК†дЇЖдЄАй°євАЬжЬАжЦ∞жЦЗзЂ†вАЭзЪДжРЬ糥зїУжЮЬзЙєжАІпЉМдЊЛе¶ВдЄЛеЫЊ ... -
дЄЛиљљsilverlightеЃШзљСзЪДеЕ®йГ®иІЖйҐСжХЩз®Л
2009-12-21 23:30 14874SilverlightеЃШзљСжПРдЊЫдЇЖиЃЄе§ ... -
SilverlightеЃҐжИЈзЂѓеТМWCFжЬНеК°еЩ®зЂѓеЕ±дЇЂз±їеЇУ
2009-12-21 23:21 1854еЬ®SilverlightдЉБдЄЪзЇІй°єзЫЃеЉАеПСдЄ≠пЉМиЃњйЧЃжХ∞жНЃеЇУжШѓеЊИеЄЄиІБзЪД ... -
ењЕеЇФеЬ∞еЫЊеЫЊзЙЗз≥їзїЯпЉИTile SystemпЉЙдєЛдЇМ
2009-12-21 22:53 2346гАРеЭРж†Зз≥їеТМеЬ∞еЫЊеЫЊзЙЗзЉЦз ... -
ењЕеЇФеЬ∞еЫЊSilverLightжОІдїґеЕ•йЧ®иЃ≤еЇІдєЛеЕ≠пЉЪжШЊз§Їи°ЧжЩѓпЉИStreetsideпЉЙ
2009-12-21 22:51 4907ењЕеЇФеЬ∞еЫЊSilverLightжОІдїґеЕ•йЧ®иЃ≤еЇІдєЛеЕ≠пЉЪжШЊз§Їи°ЧжЩѓпЉИSt ...






зЫЄеЕ≥жО®иНР
create__a_map_by_R_REmap
ж†ЗйҐШ"map create_MAPmatlab_"и°®жШОжИСдїђе∞ЖиЃ®иЃЇе¶ВдљХеИ©зФ®MATLABжЭ•жЮДеїЇињЩж†ЈзЪДеЬ∞еЫЊгАВжППињ∞дЄ≠зЪД"random height map create code"ињЫдЄАж≠•з°ЃиЃ§дЇЖжИСдїђеЕ≥ж≥®зЪДжШѓзФЯжИРйЪПжЬЇйЂШеЇ¶жХ∞жНЃзЪДз®ЛеЇПгАВ й¶ЦеЕИпЉМжИСдїђйЬАи¶БдЇЖиІ£еЯЇжЬђзЪДMATLABзЉЦз®Лж¶Вењµ...
At the end, youвАЩll put everything you have learned together to create a sample Silverlight 4 website. Whether youвАЩre an experienced .NET or web developer, or youвАЩre just starting out, this book ...
еЄ¶иѓ¶зїЖиІ£еЖ≥жЦєж°ИиѓіжШОжЦЗж°£пЉМжПРдЊЫдЄЙзІНиІ£еЖ≥жЦєеЉПпЉМеП¶е§ЦеМЕеРЂstax2-api.jarпЉМstax2-api-source.jarпЉМwoodstox-core-asl-4.4.1.jarпЉМstax-ex.jarпЉМwstx-asl-3.2.9.jarз≠ЙjarжЦЗдїґпЉМдЇ≤жµЛжЬЙжХИгАВ
жђІеІЖеМЕ owm еЃЮзО∞дЇЖ Open Weather Map API зЪДеМЕи£ЕеЩ®гАВ еЬ®ж≠§е§ДйШЕиѓїжЬЙеЕ≥еОЯеІЛ API зЪДжЫіе§Ъдњ°жБѓпЉЪ : гАВ... NewClient ( "YOUR_OPEN_WEATHER_MAP_API_KEY" )// Decode the current weather of a location given the cit
* 2257пЉЪAG_E_PARSER_CREATE_OBJECT_FAILED * 2258пЉЪAG_E_PARSER_PROPERTY_NOT_FOUND * 2259пЉЪAG_E_PARSER_BAD_PRO ињЩдЇЫйФЩиѓѓдї£з†БжШѓ Silverlight еЉАеПСдЄ≠еЄЄиІБзЪДйФЩиѓѓпЉМзРЖиІ£еТМиІ£еЖ≥ињЩдЇЫйФЩиѓѓеѓєдЇО Silverlight еЇФзФ®з®ЛеЇПзЪД...
create a Rich Internet Application. In general, I will not be covering in great detail how to develop in Silverlight or the related ASP.NET technology that is required for all Silverlight-based ...
cordova-icreate-amap-location жППињ∞ жЬђжПТдїґжЭ•жЇРдЇО:https://github.com/ergoli/cordova-amap-location,дљЬиАЕдЄЇergoliгАВ зФ±дЇОеОЯжПТдїґдЄНйАВйЕНcordova-android7.0дї•дЄКпЉМжЬђдЇЇдљЬдЇЖйГ®еИЖдї£з†БзЪДдњЃжФєгАВ йЂШеЊЈ(amap)еЃЪдљНcordova...
Enviro includes a very powerfull weather system. You can create your own weather types and drive light, sky, fog and clouds. Enviro supports all kind of unity shuriken particle effects to give you the...
Lining Up Data in ArcGIS: A Guide to Map Projections is an easy-to-navigate troubleshooting reference for any GIS user with the common problem of data misalignment. Complete with full-color maps and ...
How to Create a Database in Python using SQL Lite 3 иЛ±жЦЗepub жЬђиµДжЇРиљђиљљиЗ™зљСзїЬпЉМе¶ВжЬЙдЊµжЭГпЉМиѓЈиБФз≥їдЄКдЉ†иАЕжИЦcsdnеИ†йЩ§ жЯ•зЬЛж≠§дє¶иѓ¶зїЖдњ°жБѓиѓЈеЬ®зЊОеЫљдЇЪй©ђйАКеЃШзљСжРЬ糥ж≠§дє¶
The second is at a discrete level, in which graph theory is used to create a data model with the goal of implementation in computer systems. Finally, maps are examined at an implementation level, in ...
Create a fully functional application using Silverlight 4 Silverlight 4 boasts long-awaited features that conquer writing a Rich Internet Application. Using new line-of-business features in this book...
create_map(1).m
Enviro includes a very powerfull weather system. You can create your own weather types and drive light, sky, fog and clouds. Enviro supports all kind of unity shuriken particle effects to give you the...
CREATE PROCEDURE [dbo].[Login] (@UserName Varchar(30)) AS BEGIN SELECT cUserName, cPassword FROM Users WHERE cUserName = @UserName; RETURN; END; ``` ##### 2. Silverlightй°єзЫЃжР≠еїЇ еЬ®Visual StudioдЄ≠...
MVVM (Model View View Model) is a Microsoft best practices pattern for working in WPF and Silverlight that is highly recommended by both Microsoft and industry experts alike. This book will look at ...