- 浏览: 469338 次
- 性别:

- 来自: 北京
-

文章分类
- 全部博客 (111)
- 数据库 (8)
- java (24)
- BI (1)
- tomcat (3)
- javascript/css (8)
- 服务架构 (1)
- mule (6)
- cas (4)
- mondrian (4)
- webservice (1)
- SOA (3)
- Lucene/HibernateSearch (2)
- Linux (15)
- 操作系统 (3)
- hibernate (2)
- jbpm (1)
- apache (1)
- phpstudy (1)
- hadoop (27)
- hive (7)
- hbase (8)
- svn (1)
- eclipse (3)
- mahout (1)
- mail (1)
- oracle (1)
- mysql (4)
- axis2 (1)
- python (2)
- kafka (1)
- lucene (1)
- nutch (1)
- spark (2)
- idea (2)
- flume (0)
- ubuntu (1)
- pheonix (2)
- drill (2)
- tez (4)
- pig (1)
- tensorflow (1)
最新评论
-
zhangyou1010:
zhangyou1010 写道请教,我执行mount -t n ...
NFS挂载hdfs到本地 -
zhangyou1010:
请教,我执行mount -t nfs -o vers=3,pr ...
NFS挂载hdfs到本地 -
hengfengyiyingdong:
为什么我查出来的hbase数据都是base64编码的? 我保存 ...
apache drill 0.8.0 单机/分布式安装测试 -
107x:
不错,谢谢!
Hive metastore三种存储方式 -
duguyiren3476:
确实不怎么快,httpfs的上传你可以理解为普通的httpup ...
hadoop2.5.2配置httpfs服务
This article will show you how to download a Tuscany distribution, add the distribution as a user library in Eclipse, create the Store sample as a Java project, and then run the Store and use it from a web browser.
| Although this guide show some images based on the Java SCA 1.3.2 release, you should be able to use latest Java SCA release while going to the necessary steps for this guide. |
![]() "Get Started with Store Demo in Eclipse video"
"Get Started with Store Demo in Eclipse video"
Install the Tuscany Distribution
The first thing you do is to create a file system folder into which you will download the TUSCANY distribution.
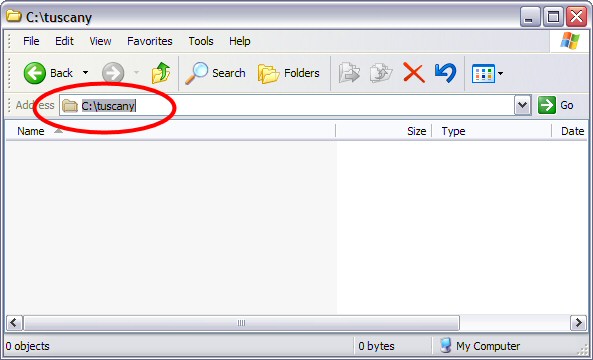
Next you download the latest release distribution. Launch your browser and enter the following URL.
Latest Release - http://cwiki.apache.org/TUSCANY/sca-java-releases.html
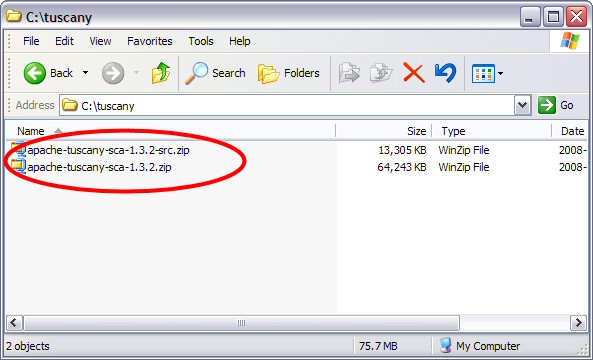
Download both the bin zip
as well as the src zip
to the folder that you created on your disk. Once you completed the download you should see the following on your disk.
Next you unzip the bin zip
in place, you should see the following folder file structure on your disk after unzip is complete.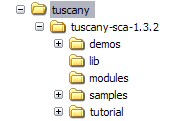
Setup Eclipse for Tuscany
Start Eclipse and create a User Library to contain the TUSCANY runtime jar's as well as their
depending jar's.
From the menu bar select Window
and then Preferences...
. The Preferences dialog will appear,
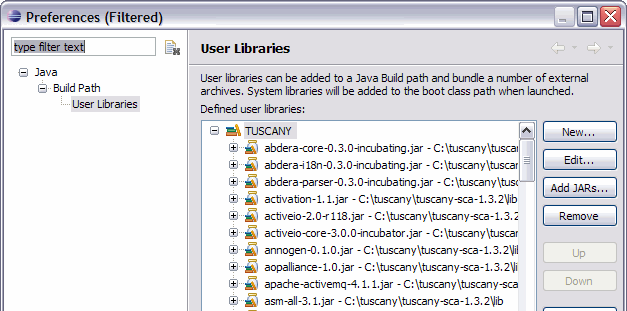
in its left navigation tree select Java
, followed by Build Path
, and followed by User Libraries
.
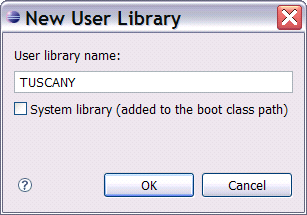
Select the New...
pushbutton on the right of the New Libraries dialog to create a new user library.
The user library created is empty, select the Add JARs...
pushbutton on the right to add all the
jar's from your Tuscany installation lib folder
. When completed all the jar's will appear under the
TUSCANY user library.
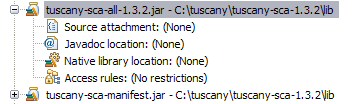
Since some of you maybe interested in debugging
also the Tuscany runtime code we will attach
the Tuscany source to the Tuscany runtime jar in the following step. In the User Libraies dialog
scroll down until you see the Tuscany runtime jar
and select its Source attachment.
Select the Edit...
pushbutton on the right and in the Edit dialog use the External File...
pushbutton
to the select the Tuscany src zip
that we downloaded earlier.
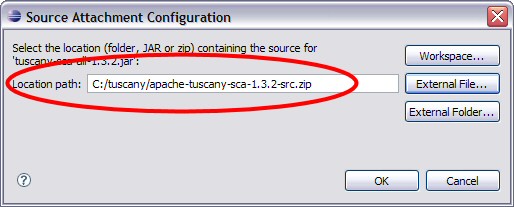
Select OK
to complete this and the Preferences dialog, and you are done with the Tuscany setup
for Eclipse.
Create your 1st Composite Service Application
The following shows the composition diagram for the composite service application you are about
to create.
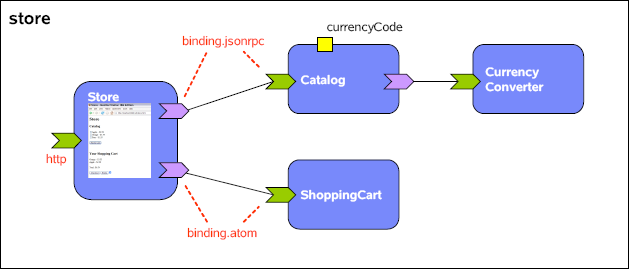
The composite service application you will create is a composition of four services. The composed
service provided is that of an on-line store.
There is a Catalog service which you can ask for catalog items, and depending on its currency
code property configuration it will provide the item prices in USD or EUR. The Catalog service is not
doing the currency conversion itself it references a CurrencyConverter service to do that task. Then
there is the ShoppingCart service into which items chosen from the catalog can be added, it is
implemented as a REST service. The Catalog is bound using the JSONRPC binding, and the
ShoppingCart service is bound using the ATOM binding. Finally there is the Store user facing
service that provides the browser based user interface of the store. The Store service makes use of
the Catalog and ShoppingCart service using the JSONRPC, and ATOM binding respectively.
Create a Java Project
In this step you create a Java Project in Eclipse to hold the composite service application.
Click on the New Java Project
button  in the toolbar to launch the project creation dialog.
Next you enter "store" as the Project name
, and for Project Layout
select Create separate
folders for sources and class files.
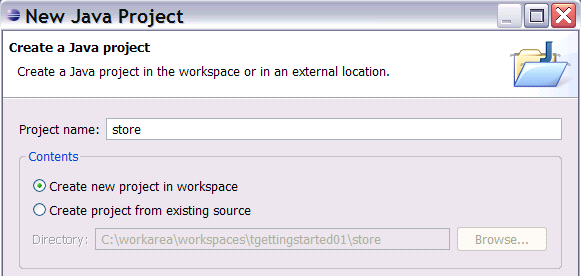

Hit the Next
button, and on the following page go to the Libraries
tab. Use the Add Library...
button on the right to add the TUSCANY user library to the project.
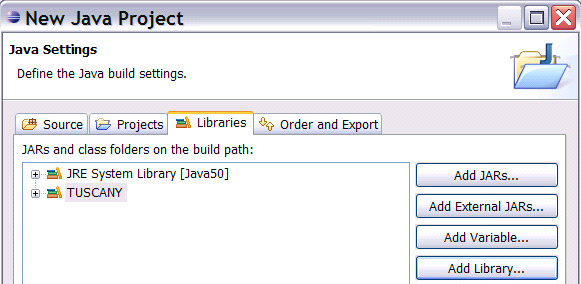
Hit the Finish
button to complete the New Java Project
dialog to create the "store" java project.
Construct Services
First you create two package folders into which later in this step you place service implementations.
Select the "store" project and click on the New Java Package
button  in the toolbar to launch
the package creation dialog.
Next you enter "services" as the package Name
, and press the Finish
button to complete the
dialog.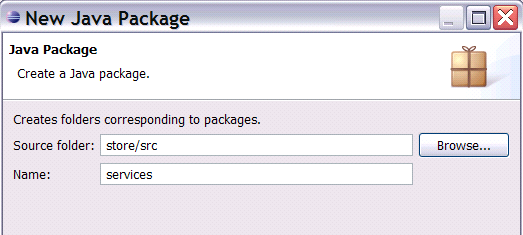
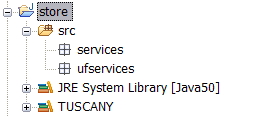
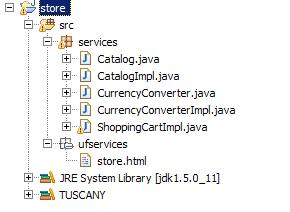
Repeat the previous step to create another package named "ufservices". The store project now
should look as follows.
In the following you will place in the "services" package the regular services, and in the "ufservices"
package the user facing services of the composite service application you create.
Catalog
In this step you create the Catalog service interface and implementation.
Select the "services" package. Next you click on the dropdown arrow next to the New Java Class
button  and select the New Java Interface
 option from the dropdown list. In the dialog
enter "Catalog" as the Name
of the interface and select the Finish button to complete the dialog.
The Java editor will open on the new created Java interface. Replace the content of the editor by
copy-paste
of the following Java interface code snippet.
package
 services;

import
 org.osoa.sca.annotations.Remotable;

@Remotable
public
 interface
 Catalog {
	Item[] get();
}
Select the "services" package again. Select the New Java Class
button
. In the dialog enter
"CatalogImpl" as the Name
of the class, add "Catalog" as the interface this class implements, and
then select Finish
to complete the dialog.
The Java editor will open on the new created Java class. Replace the content of the editor by
copy-paste
of the following Java class code snippet.
package
 services;

import
 java.util.ArrayList;
import
 java.util.List;

import
 org.osoa.sca.annotations.Init;
import
 org.osoa.sca.annotations.Property;
import
 org.osoa.sca.annotations.Reference;

public
 class CatalogImpl implements
 Catalog {
	@Property
	public
 String
 currencyCode = "USD"
;
	@Reference
	public
 CurrencyConverter currencyConverter;

	private
 List<Item> catalog = new
 ArrayList<Item>();

	@Init
	public
 void init() {
		String
 currencySymbol = currencyConverter
				.getCurrencySymbol(currencyCode);
		catalog.add(new
 Item("Apple"
, currencySymbol
				+ currencyConverter.getConversion("USD"
, currencyCode, 2.99)));
		catalog.add(new
 Item("Orange"
, currencySymbol
				+ currencyConverter.getConversion("USD"
, currencyCode, 3.55)));
		catalog.add(new
 Item("Pear"
, currencySymbol
				+ currencyConverter.getConversion("USD"
, currencyCode, 1.55)));
	}

	public
 Item[] get() {
		Item[] catalogArray = new
 Item[catalog.size()];
		catalog.toArray(catalogArray);
		return
 catalogArray;
	}
}
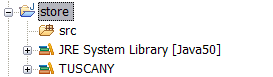
After completing these steps the content of the "store" project will look as follows.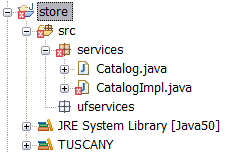
Note:
CatalogImpl is red x'ed because it makes use of the CurrencyConverter interface that we
have not implemented yet.
CurrencyConverter
In this step you create the CurrencyConverter service interface and implementation.
You follow the same steps that you learned previously to create the interface and implementation.
First create a Java interface in the "services" package named "CurrencyConverter" and copy-paste
the following Java interface code snippet into it.
package
 services;

import
 org.osoa.sca.annotations.Remotable;

@Remotable
public
 interface
 CurrencyConverter {
    public
 double
 getConversion(String
 fromCurrenycCode, String
 toCurrencyCode, double
 amount);

    public
 String
 getCurrencySymbol(String
 currencyCode);
}
Next create a Java class in the "services" package named "CurrencyConverterImpl" and copy-paste
the following Java class code snippet into it.
package
 services;

public
 class CurrencyConverterImpl implements
 CurrencyConverter {
    public
 double
 getConversion(String
 fromCurrencyCode, String
 toCurrencyCode, double
 amount) {
        if
 (toCurrencyCode.equals("USD"
))
            return
 amount;
        else
 if
 (toCurrencyCode.equals("EUR"
))
            return
 ((double
)Math
.round(amount * 0.7256 * 100)) /100;
        return
 0;
    }

    public
 String
 getCurrencySymbol(String
 currencyCode) {
        if
 (currencyCode.equals("USD"
))
            return
 "$"
;
        else
 if
 (currencyCode.equals("EUR"
))
            return
 "E"
; //"€"
;

        return
 "?"
;
    }
}
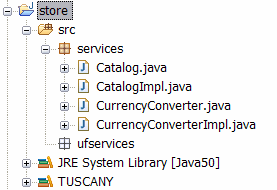
After completing these steps the content of the "store" project will look as follows.
ShoppingCart
In this step you create the Item model object, the Cart and Total
service interfaces and the ShoppingCart service implementation.
You follow the same steps that you learned previously to create the interface and implementation.
Create a Java class in the "services" package named "Item" and copy-paste
the
following code snippet into it.
package
 services;

public
 class Item {
	private
 String
 name;
	private
 String
 price;

	public
 Item() {
	}

	public
 Item(String
 name, String
 price) {
		this
.name = name;
		this
.price = price;
	}

	public
 String
 getName() {
		return
 name;
	}

	public
 void setName(String
 name) {
		this
.name = name;
	}

	public
 String
 getPrice() {
		return
 price;
	}

	public
 void setPrice(String
 price) {
		this
.price = price;
	}
}
Create a Java interface in the "services" package named "Cart" and copy-paste
the
following code snippet into it.
package
 services;

import
 org.apache.tuscany.sca.data.collection.Collection;
import
 org.osoa.sca.annotations.Remotable;

@Remotable
public
 interface
 Cart extends
 Collection<String
, Item> {

}
Create a Java interface in the "services" package named "Total" and copy-paste
the
following code snippet into it.
package
 services;

import
 org.osoa.sca.annotations.Remotable;

@Remotable
public
 interface
 Total {
	String
 getTotal();
}
Create a Java class in the "services" package named "ShoppingCartImpl" and copy-paste
the
following Java class code snippet into it.
package
 services;

import
 java.util.ArrayList;
import
 java.util.HashMap;
import
 java.util.List;
import
 java.util.Map;
import
 java.util.UUID;

import
 org.apache.tuscany.sca.data.collection.Entry;
import
 org.apache.tuscany.sca.data.collection.NotFoundException;
import
 org.osoa.sca.annotations.Init;
import
 org.osoa.sca.annotations.Scope;

@Scope("COMPOSITE"
)
public
 class ShoppingCartImpl implements
 Cart, Total {

	private
 Map<String
, Item> cart;

	@Init
	public
 void init() {
		cart = new
 HashMap<String
, Item>();
	}

	public
 Entry<String
, Item>[] getAll() {
		Entry<String
, Item>[] entries = new
 Entry[cart.size()];
		int
 i = 0;
		for
 (Map.Entry<String
, Item> e : cart.entrySet()) {
			entries[i++] = new
 Entry<String
, Item>(e.getKey(), e.getValue());
		}
		return
 entries;
	}

	public
 Item get(String
 key) throws
 NotFoundException {
		Item item = cart.get(key);
		if
 (item == null
) {
			throw
 new
 NotFoundException(key);
		} else
 {
			return
 item;
		}
	}

	public
 String
 post(String
 key, Item item) {
		if
 (key == null
) {
			key = "cart-"
 + UUID.randomUUID().toString();
		}
		cart.put(key, item);
		return
 key;
	}

	public
 void put(String
 key, Item item) throws
 NotFoundException {
		if
 (!cart.containsKey(key)) {
			throw
 new
 NotFoundException(key);
		}
		cart.put(key, item);
	}

	public
 void delete(String
 key) throws
 NotFoundException {
		if
 (key == null
 || key.equals("")) {
			cart.clear();
		} else
 {
			Item item = cart.remove(key);
			if
 (item == null
)
				throw
 new
 NotFoundException(key);
		}
	}

	public
 Entry<String
, Item>[] query(String
 queryString) {
		List<Entry<String
, Item>> entries = new
 ArrayList<Entry<String
, Item>>();
		if
 (queryString.startsWith("name="
)) {
			String
 name = queryString.substring(5);
			for
 (Map.Entry<String
, Item> e : cart.entrySet()) {
				Item item = e.getValue();
				if
 (item.getName().equals(name)) {
					entries.add(new
 Entry<String
, Item>(e.getKey(), e
							.getValue()));
				}
			}
		}
		return
 entries.toArray(new
 Entry[entries.size()]);
	}

	public
 String
 getTotal() {
		double
 total = 0;
		String
 currencySymbol = "";
		if
 (!cart.isEmpty()) {
			Item item = cart.values().iterator().next();
			currencySymbol = item.getPrice().substring(0, 1);
		}
		for
 (Item item : cart.values()) {
			total += Double
.valueOf(item.getPrice().substring(1));
		}
		return
 currencySymbol + String
.valueOf(total);
	}
}
Note:
Since the Tuscany conversational support is not ready yet the cart is realized through a hack.
The cart field is defined as static.
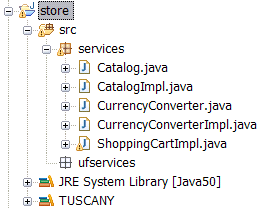
After completing these steps the content of the "store" project will look as follows.
Store
In this step you create the user facing Store service that will run in a Web browser and provide the
user interface to the other services you created.
Select the "ufservices" package. Right click
to get the context menu, select New
, and then File
. In
the New File
dialog enter "store.html" for the File name
, and then select Finish
to complete the
dialog.
The Text editor will open on the new created html file. Replace the content of the editor by copy-paste
of the following html snippet.
<html>
<head>
<title>Store</title>

<script type="text/javascript"
 src="store.js"
></script>

<script language="JavaScript"
>

	//@Reference

	var
 catalog = new
 tuscany.sca.Reference("catalog"
);

	//@Reference

	var
 shoppingCart = new
 tuscany.sca.Reference("shoppingCart"
);

	//@Reference

	var
 shoppingTotal = new
 tuscany.sca.Reference("shoppingTotal"
);

	var
 catalogItems;

	function catalog_getResponse(items) {
		var
 catalog = "";
		for
 (var
 i=0; i<items.length; i++) {
			var
 item = items[i].name + ' - ' + items[i].price;
			catalog += '<input name="items"
 type="checkbox"
 value="' +
						item + '">' + item + ' <br>';
		}
		document.getElementById('catalog').innerHTML=catalog;
		catalogItems = items;
	}

	function shoppingCart_getResponse(feed) {
		if
 (feed != null
) {
			var
 entries = feed.getElementsByTagName("entry"
);
			var
 list = "";
			for
 (var
 i=0; i<entries.length; i++) {
				var
 content = entries[i].getElementsByTagName("content"
)[0];
				var
 name = content.getElementsByTagName("name"
)[0].firstChild.nodeValue;
				var
 price = content.getElementsByTagName("price"
)[0].firstChild.nodeValue;
				list += name + ' - ' + price + ' <br>';
			}
			document.getElementById("shoppingCart"
).innerHTML = list;

			if
 (entries.length != 0) {
				shoppingTotal.getTotal(shoppingTotal_getTotalResponse);
			}
		}
	}

	function shoppingTotal_getTotalResponse(total) {
		document.getElementById('total').innerHTML = total;
	}

	function shoppingCart_postResponse(entry) {
		shoppingCart.get("", shoppingCart_getResponse);
	}

	function addToCart() {
		var
 items  = document.catalogForm.items;
		var
 j = 0;
		for
 (var
 i=0; i<items.length; i++)
			if
 (items[i].checked) {
				var
 entry = '<entry xmlns="http://www.w3.org/2005/Atom"
><title>item</title><content type="text/xml"
>' +

                	'<Item xmlns="http://services/"
>' +

                	'<name xmlns="">' + catalogItems[i].name + '</name>' + '<price xmlns="
">' + catalogItems[i].price + '</price>' +
                 	'</Item>' + '</content></entry>';
				shoppingCart.post(entry, shoppingCart_postResponse);
				items[i].checked = false
;
			}
	}
	function checkoutCart() {
		document.getElementById('store').innerHTML='<h2>' +
				'Thanks for
 Shopping With Us!</h2>'+
				'<h2>Your Order</h2>'+
				'<form name="orderForm"
>'+
					document.getElementById('shoppingCart').innerHTML+
					'<br>'+
					document.getElementById('total').innerHTML+
					'<br>'+

					'<br>'+
					'<input type="submit"
 value="Continue Shopping"
>'+
				'</form>';
		shoppingCart.del("", null
);
	}
	function deleteCart() {
		shoppingCart.del("", null
);
		document.getElementById('shoppingCart').innerHTML = "";
		document.getElementById('total').innerHTML = "";
	}

	function init() {
		catalog.get(catalog_getResponse);
		shoppingCart.get("", shoppingCart_getResponse);
	}

</script>

</head>

<body onload="init()"
>
<h1>Store</h1>
  <div id="store"
>
   	<h2>Catalog</h2>
   	<form name="catalogForm"
>
		<div id="catalog"
 ></div>
		<br>
		<input type="button"
 onClick="addToCart()"
  value="Add to Cart"
>
   	</form>

 	<br>

   	<h2>Your Shopping Cart</h2>
   	<form name="shoppingCartForm"
>
		<div id="shoppingCart"
></div>
		<br>
		<div id="total"
></div>
		<br>
		<input type="button"
 onClick="checkoutCart()"
 value="Checkout"
>
		<input type="button"
 onClick="deleteCart()"
 value="Empty"
>
	   	<a href="../ShoppingCart/Cart/"
>(feed)</a>
	</form>
  </div>
</body>
</html>
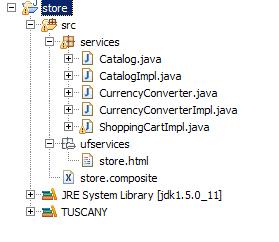
After completing these steps the content of the "store" project will look as follows.
Compose Services
Now that you have all the required service implementations you compose them together to provide
the store composite service. The composition is stored in a .composite file.
Select the "src" folder of the "store" project. Right click
to get the context menu, select New
, and
then File
. In the New File
dialog enter "store.composite" for the File name
, and then select Finish
to complete the dialog.
The Text editor will open on the new created composite file. Replace the content of the editor by
copy-paste
of the following composite snippet.
<?xml version="1.0"
 encoding="UTF-8"
?>
<composite xmlns="http://www.osoa.org/xmlns/sca/1.0"


	xmlns:t="http://tuscany.apache.org/xmlns/sca/1.0"


	xmlns:s="http://store"


	targetNamespace="http://store"


	name="store"
>

	<component name="store"
>
		<t:implementation.widget location="ufservices/store.html"
 />
		<service name="Widget"
>
			<t:binding.http uri="http://localhost:8080/store"
 />

		</service>
		<reference name="catalog"
 target="Catalog"
>
			<t:binding.jsonrpc />
		</reference>
		<reference name="shoppingCart"
 target="ShoppingCart/Cart"
>
			<t:binding.atom />
		</reference>
		<reference name="shoppingTotal"
 target="ShoppingCart/Total"
>
			<t:binding.jsonrpc />
		</reference>
	</component>

	<component name="Catalog"
>
		<implementation.java class="services.CatalogImpl"
 />
		<property name="currencyCode"
>USD</property>
		<service name="Catalog"
>
			<t:binding.jsonrpc uri="http://localhost:8080/Catalog"
/>

		</service>
		<reference name="currencyConverter"
 target="CurrencyConverter"
 />
	</component>

	<component name="ShoppingCart"
>
		<implementation.java class="services.ShoppingCartImpl"
 />
		<service name="Cart"
>
			<t:binding.atom uri="http://localhost:8080/ShoppingCart/Cart"
 />

		</service>
		<service name="Total"
>
			<t:binding.jsonrpc uri="http://localhost:8080/Total"
/>

		</service>
	</component>

	<component name="CurrencyConverter"
>
		<implementation.java class="services.CurrencyConverterImpl"
 />
	</component>
</composite>
After completing these steps the content of the "store" project will look as follows.
Launch Services
In this step you create the code to launch the Tuscany runtime with the new store composite service you created.
Select the "store" project and click on the New Java Package
button
in the toolbar to start the package creation dialog. Use the dialog to create a new package named "launch".
Select the "launch" package. Select the New Java Class
button
.
In the dialog enter "Launch" as the Name of the class, check the
checkbox for creating a main method stub, and then select Finish to
complete the dialog.
The Java editor will open on the new created Java class. Replace the content of the editor by copy-paste of the following Java class code snippet.
package
 launch;

import
 org.apache.tuscany.sca.host.embedded.SCADomain;

public
 class Launch {
    public
 static
 void main(String
[] args) throws
 Exception {
        System
.out.println("Starting ..."
);
        SCADomain scaDomain = SCADomain.newInstance("store.composite"
);
        System
.out.println("store.composite ready for
 big business !!!"
);
        System
.in.read();
        System
.out.println("Stopping ..."
);
        scaDomain.close();
        System
.out.println();
    }
}
Congratulations you completed your 1st composite service applications, now its time to take it into
action.
Use Services
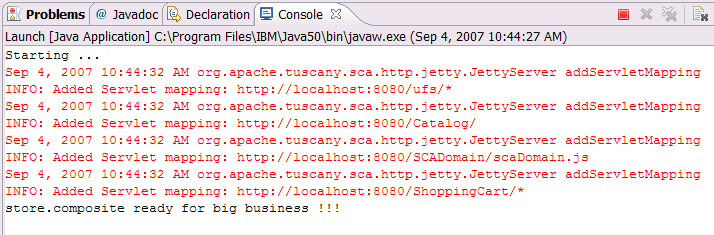
In this step you launch and use the store composite service application you created.
First select the "Launch" class in the "launch" package of your "store" project. Right click
to get the
context menu, select Run As
, and then Java application
. The Tuscany runtime will start up adding
the store composition to its domain.
The Eclipse console will show the following messages.
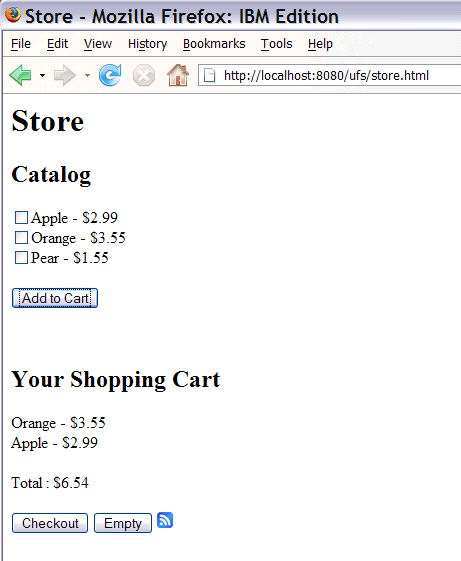
Next Launch your Web browser and enter the following address:
http://localhost:8080/store/store.html
You get to the Store user facing service of the composite service application.
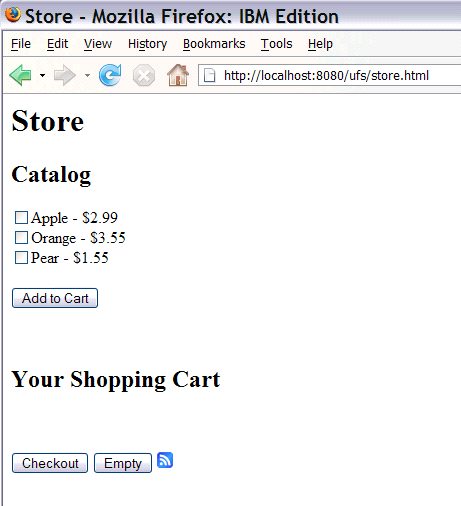
You can select items from the Catalog and add them to your Shopping Cart.
Note:
When adding items for the first time you will be asked for userid and password
by the
browser. Enter "admin" for both.
Since the ShoppingCart service is bound using the ATOM binding, you can also look at the
shopping card content in ATOM feed form by clicking on the feed icon  . You get the browsers default rendering for ATOM feeds.
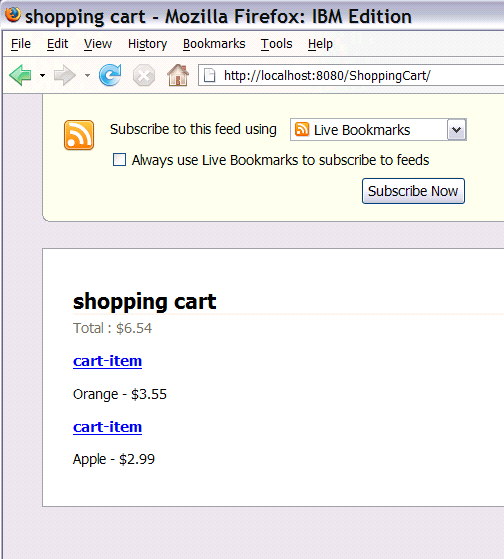
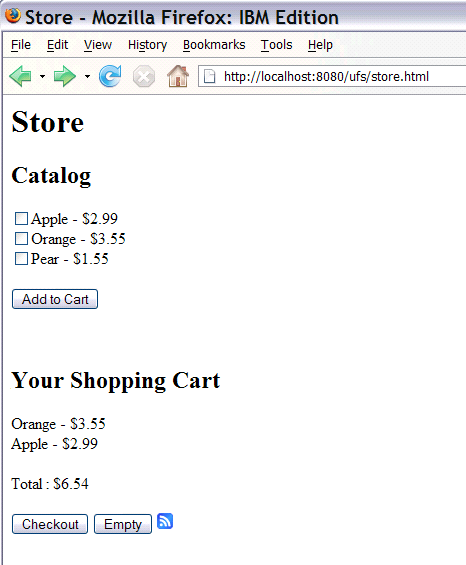
Use the browser back button to get back to the Store page.
And then you can Checkout to complete your order.
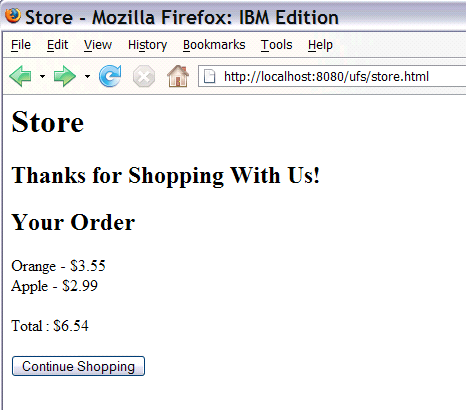
Congratulations, you have created an accessible, flexible, reusable Store application using Tuscany SCA technology.
来自官网


发表评论

相关推荐
这个实例可能是关于如何使用Apache Tuscany来开发、部署和管理SCA组件的一个教程或者案例研究。 在SCA中,应用程序被分解为可重用的服务组件,这些组件可以通过不同的通信机制相互交互,如HTTP、JMS或CORBA。SCA的...
Apache Tuscany SCA(Service Component Architecture)是Apache软件基金会开发的一个开源项目,它提供了一个用于构建、部署和管理服务的框架。SCA是一种服务导向架构(SOA)标准,旨在简化不同技术间的互操作性,使...
Apache Tuscany是Apache软件基金会开发的一个开源实现SCA的项目,它提供了一个全面的SOA平台,用于构建、部署和管理分布式应用程序。 **1. 使用命令行构建计算器应用** 在Apache Tuscany中,构建计算器应用通常...
Apache Tuscany SCA(Service Component Architecture)是一个开源项目,由Apache软件基金会维护,它提供了一个框架和中间件,用于构建、部署和管理分布式应用程序。SCA是一种标准,旨在简化服务导向架构(SOA)的...
Apache Tuscany SCA(Service Component Architecture)是一个开源框架,由Apache软件基金会开发,用于构建分布式应用程序和服务。SCA是一种标准,它定义了一种模型来组合、管理和部署服务及组件,使得开发人员能够...
【标题】"tuscany1.6.2" 指的是Apache Tuscany项目的一个特定版本,即1.6.2版。Apache Tuscany是开源软件联盟Apache软件基金会下的一个项目,它是一个服务组件架构(Service Component Architecture, SCA)实现,...
Apache Tuscany是Apache软件基金会的一个开源项目,它专注于服务组件架构(Service Component Architecture, SCA)的实现。SCA是一种用于构建和部署分布式应用程序的规范,它允许开发者使用多种编程语言和数据格式来...
总结来说,“Tuscany发布Web服务实例”是一个实践性的教程,旨在教会开发者如何使用Apache Tuscany来快速搭建和发布Web服务。通过这个实例,你可以掌握SOA的基本概念,以及如何利用Tuscany的特性来实现服务的创建、...
Apache Tuscany是一个开源的服务组件架构(Service Component Architecture,简称SCA),它提供了一种用于构建和部署分布式应用程序和服务的标准化模型。SCA的核心目标是简化服务的开发、组装和管理,允许开发人员...
Apache Tuscany是SCA规范的一个开源实现,提供了强大的工具链和运行时环境,使得开发者能够轻松构建、测试和部署基于SCA的服务组件。 ### 服务组件架构(SCA)简介 SCA定义了一种标准化的方式,用于描述和组合服务...
Apache Tuscany是一个在Apache软件基金会孵化器中的开源项目,致力于简化面向服务架构(Service-Oriented Architecture, SOA)中复合应用的开发、组装、部署和管理。该项目实现了由OASIS OpenCSA定义的服务组件架构...
Tuscany项目的核心目标是简化服务组件的创建、组合和部署。它支持多种编程语言,如Java、Python、Ruby等,并且能够与多种标准接口(如SOAP、REST、JMS等)进行交互。通过Tuscany,开发者可以将业务逻辑抽象为服务...
**SCA(Service Component Architecture)服务组件架构**是Apache Tuscany项目的一部分,它是一种用于构建分布式应用程序和服务的开源框架。Tuscany SCA提供了一种声明式的方式来组合和管理服务,使得开发者能够关注...
通过这个教程,你将获得实际操作经验,加深对Eclipse STP和Apache Tuscany SCA的理解,能够熟练地在SOA环境中开发和部署应用程序。记得按照步骤实践,遇到问题时查阅文档或在线资源,以深化理解和提高技能。
安装完STP后,我们还需要安装Tuscany,这是一个开源的SCA实现。你可以从Apache Tuscany的官方网站(http://tuscany.apache.org/sca-java-releases.html)下载1.x版本的bin包,解压缩到本地目录,例如E:\tuscany-sca-...
总结起来,Apache Tuscany SCA是一个强大的工具,它简化了SOA的实现,通过SCA规范提供了一种统一的方式来构建、管理和部署服务。其多语言支持、模型驱动的开发以及对多种绑定和运行时管理的特性,使得它成为开发者...
Tuscany SCA(Service Component Architecture)是由Apache软件基金会所提供的一个开源框架,用于实现服务组件架构。它支持SCA规范,能够简化服务的部署、管理和交互。Tuscany SCA框架可以帮助开发者快速构建和部署...
Tuscany SCA是Apache软件基金会下的一个项目,专注于构建可移植、可互操作的服务组件。它基于Service Component Architecture(SCA)规范,提供了一种统一的方式来定义和组合服务,使开发者能够利用现有的服务以及...