- 浏览: 77328 次
- 性别:

- 来自: 北京
-

最近访客 更多访客>>
文章分类
- 全部博客 (86)
- Java_Develop (6)
- Develop about Android (11)
- Develop about C (3)
- Develop about C++ (13)
- Develop about Objective-C (8)
- Develop about XML&DOM4J (6)
- Develop about JSP (7)
- Develop about Servlet (14)
- develop about MySql (4)
- Develop about Java_Socket (1)
- Develop about Java_Thread (4)
- Develop about IOS (8)
最新评论
-
eric_weitm:
在效率本身上而言,引用也有优势。另外,在编译器实现时,指针的传 ...
C++中的 引用和指针区别
Android开发——布局详解(上)
在昨天的学习中,我们动手实现了第一个Android程序:手机拨号程序。今天学习的是关于布局(Layout),让我想起了之前学过的HTML布局和在JFrame中学习的布局方式(GUI):BorderLayout、FloowLayout、GridbagLayout等等。
Android的布局方式和以前学习的布局方式如出一辙。Android的布局方式分为四种:
1.LinearLayout(线性布局)
2.RelativeLayout(相对布局)
3.TableLayout(表格布局)
4.AbsoluteLayout(绝对布局)【暂时没讲】
下面分别介绍一下各种布局方式:
线性布局,就是在该标签下的所有子元素会根据其orientation属性的值来决定是按行还是按列逐个显示。
小总结:orientation有两个属性值:一个是按列的“vertical”,一个是按行布局的“horizontal”;
写一个线性布局的实例:
Main.xml
<?xml version="1.0"encoding="utf-8"?>
<LinearLayoutxmlns:android="http://schemas.android.com/apk/res/android"
android:layout_width="fill_parent"
android:layout_height="fill_parent"
android:orientation="vertical" >
<TextView
android:layout_width="fill_parent"
android:layout_height="wrap_content"
android:text="@string/name_text" />
<EditView
android:layout_width="fill_parent"
android:layout_height="wrap_content"
android:id="@+id/EditView"
/>
<Button
android:layout_width="wrap_content"
android:layout_height="wrap_content"
android:text="@string/ok_text"
android:layout_aglin/>
</LinearLayout>
如上是整个LinearLayout布局文件,我们可以看到布局文件是XML格式的,命名空间:Android指向网络上的一个文件,意味着书写所有属性的时候都需要以“Android”开头;
Android:layout_width和Android:layout_height这两个属性是用来设置组件元素的宽和高,无论用哪种布局方式,这些属性都是通用的;这两个属性有三个值:
a)值一:Fill_parent,代表填满元素,对于顶级元素来说,父级元素就是手机屏幕了。
b)值二:wrap_content,代表元素的大小仅包裹自身内容,数字代表占用相应的px值。
c)值三:match_parent,也就是我们以前设置的数字大小,自定义组建的宽高,单位是dp(最好使用dp,当然也可以使用px【查的资料上这么说】)
然后说一下实例中的三种常见组建:<TextView>,就是标签组件,我觉得就是类似于HTML中的表单属性一样,只不过Android中把组件中的属性都写在了自己的元素集合中,例如:

在这里文本组件中,我们定义了组建的宽高和属性值,定义了静态内部类id中名为EditView的唯一标识符,属性值的定义后面再复习。
第二种组件是:<EditView>,文本组件,相当于HTML写表单的<input type=”text”>一样,用来输入内容的组件。
第三种组件是:<Button>,按钮组件。
线性布局文件的根元素是:<LinearLayout>
接着说一下string.xml文件内容的读取
当我们在string.xml文件中写好了所有的文本和数值内容后,我们需要在使用组件的时候把这些值赋给组件的属性,例如:
<TextView
Android:text=”@string/name”
/>
如上代码所示,赋值的格式为这样的,”@”是固定格式,后面是值所在的文件名,“/”后面是string.xml文件中对应的“name”的值。
最后简单写一个表单实例:
String.xml文件:
<?xml version="1.0"encoding="utf-8"?>
<resources>
<stringname="system">页面布局作业</string>
<stringname="user">用户名:</string>
<stringname="pass">密码:</string>
<stringname="ok">登录</string>
<stringname="cancle">取消</string>
</resources>
<!—一共是五条文本属性-->
布局文件main.xml:
<?xml version="1.0"encoding="utf-8"?>
<LinearLayoutxmlns:android="http://schemas.android.com/apk/res/android"
android:layout_width="fill_parent"
android:layout_height="wrap_content"
android:orientation="vertical" >
<TextView
android:layout_width="fill_parent"
android:layout_height="wrap_content"
android:layout_gravity="center"
android:text="@string/system"
/>
<TextView
android:layout_width="wrap_content"
android:layout_height="wrap_content"
android:text="@string/user"
android:id="@+id/user_text"
android:layout_alignParentLeft="true"
/>
<EditText
android:layout_width="fill_parent"
android:layout_height="wrap_content"
android:id="@+id/text1"
android:layout_toRightOf="@id/user_text"
/>
<TextView
android:layout_width="wrap_content"
android:layout_height="wrap_content"
android:text="@string/pass"
android:id="@+id/pass_text2"
android:layout_alignParentLeft="true"
/>
<EditText
android:layout_width="fill_parent"
android:layout_height="wrap_content"
android:id="@+id/text2"
android:layout_toRightOf="@id/pass_text2"
/>
<Button
android:id="@+id/cancle_button"
android:layout_width="wrap_content"
android:layout_height="wrap_content"
android:text="@string/cancle"
android:layout_alignParentRight="true"
/>
<Button
android:id="@+id/ok_button"
android:layout_width="wrap_content"
android:layout_height="wrap_content"
android:text="@string/ok"
android:layout_toLeftOf="@id/cancle_button"
/>
</LinearLayout>
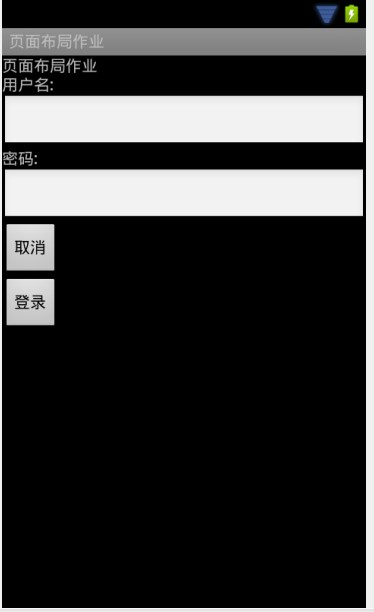
在布局文件中,我写了一个登录的表单,实现后的效果如图:
================================================================

线性布局就说这么多,下面说一下相对布局方式。
相对布局中的视图组件是按相互之间的相对位置来确定的,并不是线性布局中的必须按行或按列单个显示。我觉得相对布局比线性布局唯一好的一点是:能够在一行内显示多个组件,不像线性布局只能按行或列排列不同组件且每行都只能有一个组件。
相对布局方式的根元素为:<RelativeLayout>,同线性布局一样,也是XML文件,命名空间也是:Android;在不同组件排列的时候,提供了多种方式,比如:
Android:layout_below=”@id/text”:将该元素放到id为text的元素的下面
Android:layout_toLeftOf=”@id/ok”:放到id为ok的元素左边
android:layout_alignParentRight="true"把该元素放到最右端
在写今天作业的时候,要求“登录”和“取消”这两个Button按钮居中排列,我就是使用:
<Button
Android:layout_alignParentRight=”true”
Android:id=”@+id/cancle”/>
<Button
Android:layout_toLeftOf=”@id/cancle/>
通过如上代码,先把“取消”这个按钮放到最右边,再让“登录”按钮排列到“取消”按钮的左边,实现它们的正确排列。
Android:gravity="center"设置文本的对齐方式(图中为居中)
Android:layout_alignTop=”@id/ok”:对齐id为ok的元素的顶部 android:layout_alignBaseline="@+id/cancel_button"该元素文本值对准基线
padding属性指定视图与视图内容之间的内边距——今天遇到<TextView>元素的值与<EditView>元素的边框之间有很大的距离无法紧靠,现在指出是因为padding的边距不为0px导致的。
=============================================
相对布局提供了很多对齐方式,详细的可以查一下API。常用的方式是线性布局和相对布局的嵌套,只要正确添加根标签就可以实现。
下面用线性布局方式中的实例通过嵌套实现登录表单:
<?xmlversion="1.0" encoding="utf-8"?>
<LinearLayoutxmlns:android="http://schemas.android.com/apk/res/android"
android:layout_width="fill_parent"
android:layout_height="wrap_content"
android:orientation="vertical" >
<TextView
android:layout_width="fill_parent"
android:layout_height="wrap_content"
android:layout_gravity="center"
android:text="@string/system"
/>
<!-- 使用绝对定位对齐用户框 -->
<RelativeLayout
android:layout_width="wrap_content"
android:layout_height="wrap_content"
>
<TextView
android:layout_width="wrap_content"
android:layout_height="wrap_content"
android:text="@string/user"
android:id="@+id/user_text"
android:layout_alignParentLeft="true"
/>
<EditText
android:layout_width="fill_parent"
android:layout_height="wrap_content"
android:id="@+id/text1"
android:layout_toRightOf="@id/user_text"
/>
</RelativeLayout>
<!-- 使用绝对定位对齐密码框 -->
<RelativeLayout
android:layout_width="wrap_content"
android:layout_height="wrap_content"
>
<TextView
android:layout_width="wrap_content"
android:layout_height="wrap_content"
android:text="@string/pass"
android:id="@+id/pass_text2"
android:layout_alignParentLeft="true"
/>
<EditText
android:layout_width="fill_parent"
android:layout_height="wrap_content"
android:id="@+id/text2"
android:layout_toRightOf="@id/pass_text2"
/>
</RelativeLayout>
<!-- 使用绝对定位对齐Button按钮 -->
<RelativeLayout
android:layout_width="wrap_content"
android:layout_height="wrap_content"
>
<Button
android:id="@+id/cancle_button"
android:layout_width="wrap_content"
android:layout_height="wrap_content"
android:text="@string/cancle"
android:layout_alignParentRight="true"
/>
<Button
android:id="@+id/ok_button"
android:layout_width="wrap_content"
android:layout_height="wrap_content"
android:text="@string/ok"
android:layout_toLeftOf="@id/cancle_button"
/>
</RelativeLayout>
</LinearLayout>
接着讲一下今天学的最后一个布局方式<TableLayout>表格布局
我觉得表格布局可以较好的实现多数常见的布局方式,今天在用表格布局方式写登录表单的时候发现,同一列的组件宽高都是统一的,不能更改,也就是说同一列的组件不能有大小不等的组件(个人意见可能不实),这是表格布局的一个缺陷吧,不过我觉得可以利用多种布局方式进行嵌套解决这个问题,比如表格布局中的一个单元格里嵌套相对布局或者其他的布局方式。
说一下表格布局方式的格式:根元素为:<TableLayout>,行元素标签为<TableRow>,没有列标签,也就是说在一行中可以添加不同的组件,有几个组件就是几列。
用表格布局方式实现登录表单的实例:
<?xml version="1.0"encoding="utf-8"?>
<TableLayoutxmlns:android="http://schemas.android.com/apk/res/android"
android:layout_width="match_parent"
android:layout_height="match_parent" >
<TableRow>
<TextView
android:layout_width="fill_parent"
android:layout_height="wrap_content"
android:text="@string/system"
android:gravity="center"
android:textSize="20dip"/>
</TableRow>
<TableRow>
<TextView
android:id="@+id/user_text1"
android:layout_width="50dp"
android:layout_height="fill_parent"
android:text="@string/user"
android:textSize="20dp" />
<EditText
android:layout_width="130dp"
android:layout_height="40dp"
android:id="@+id/text1"
/>
</TableRow>
<TableRow>
<TextView
android:id="@+id/pass_text2"
android:layout_width="50dp"
android:layout_height="fill_parent"
android:text="@string/pass"
android:textSize="20dp" />
<EditText
android:layout_width="130dp"
android:layout_height="40dp"
android:id="@+id/text2"
/>
</TableRow>
<TableRow
android:gravity="center">
<Button
android:id="@+id/ok_button"
android:layout_width="wrap_content"
android:layout_height="wrap_content"
android:text="@string/ok"
android:textSize="15dp"
/>
<Button
android:id="@+id/cancle_button"
android:layout_width="wrap_content"
android:layout_height="wrap_content"
android:text="@string/cancle"
android:textSize="15dp"
/>
</TableRow>
</TableLayout>
上述代码的宽高有的用了尺寸定义的。一共是写了一个四行两列的表格,其中第一行是项目名,第二、三行由<TextView><EditView>这两个元素组件组成,实现用户名和密码的输入;最后一行放了两个<Button>元素组件。
表单根目录有一个Android:stretchColumns=“0,1,2,3”属性,这个属性
指定每行都由第“0,1,2,3”列占满空白空间。
最后一种布局方式是:绝对布局,今天没有讲,所以留到明天总结。
发表评论
-
Android开发——概述及环境搭建
2011-12-05 21:25 672今天开始学习安卓手机软件开发,首先介绍一下Android: ... -
Android开发之:第一个应用程序及工程文件及结构详解
2011-12-06 17:10 821Android开发之:第一个应用程序及工程文件及结构详解 ... -
Android开发——手机拨号程序实现
2011-12-06 19:50 969在上一篇文章中,我们实现了第一个程序:helloWorld,并 ... -
Android开发——关于onCreate的解读
2011-12-06 20:34 866当我们创建好一个Android项目后,打开src下的java ... -
多种方式实现Android页面布局的切换
2011-12-08 18:07 1477多种方式实现页面切换 今天老师留的作业如题,要求用三种方 ... -
Android开发——Android生命周期
2011-12-10 20:11 655Activity的三种状态: ... -
Android开发——菜单小问题解决
2011-12-12 20:47 847在写菜单项的时候发现一个不知道的知识点,问题是这样产生的。写好 ... -
Android开发——UI组件详解及注册提交表单实现
2011-12-13 21:44 853今天讲解的内容是UI组件的TextView组件和EditVie ... -
Android开发——跟随手指的小球实现
2012-01-11 14:13 894今天要实现的是一个跟随手指的小球,说白了就是让小球按着手指滑动 ... -
Android开发——实现点击图片切换效果
2012-01-11 14:15 985在资源中添加5张图片,重命名为a-e。 实现java代码如下 ...


相关推荐
Android布局详解实例,包含:线性布局(LinearLayout)、相对布局(RelativeLayout)、帧布局(FrameLayout)、表格布局(TableLayout)四大布局方式的demo
从文件描述中可以看出,手册包含了大部分Android开发中会用到的函数,而这里特别提到的是“Android——TextView一节”,它是一个用于显示文本的视图组件,非常基础和常用。 在给出的部分内容中,我们看到了TextView...
这份"Android开发手册——API函数详解.zip_安卓API"资料深入浅出地阐述了Android API的各种函数用法,是Android应用开发者的宝贵资源。 首先,Android API分为多个层次,最基础的是Linux内核,提供了操作系统核心...
在Android开发中,ProgressDialog是一个非常常用的组件,它用于在用户执行长时间操作时显示一个带有进度条的对话框,提供一种良好的用户体验,让用户知道系统正在后台处理任务。在本篇文章中,我们将深入探讨...
1. **Android开发环境**:在Android平台上开发应用,需要安装Android Studio,它提供了集成开发环境(IDE),支持编写、调试和构建Android应用。 2. **自定义控件**:android-times-square 是一个自定义的日历视图...
《Android底层开发技术实战详解——内核、移植和驱动》这本书深入探讨了Android系统的底层机制,包括内核、系统移植和驱动程序开发等关键领域。这些主题对于理解Android系统的运行原理,以及进行定制化开发和优化...
在Android应用开发中,布局(Layout)是构建用户界面的核心元素。它们决定了应用程序中各个组件的排列方式和交互逻辑。本篇文章将详细讲解四大布局——LinearLayout、RelativeLayout、TableLayout和FrameLayout,...
《安卓Android源码——AnjoyoSinaWeibo详解》 在深入探讨AnjoyoSinaWeibo这个项目之前,我们先来了解一下安卓Android平台的基础。Android是Google开发的开源移动操作系统,它基于Linux内核,主要应用于智能手机、...
在Android开发中,`RelativeLayout`是一种常用的布局管理器,它允许开发者通过定义各个视图(View)相对于其他视图的位置来组织用户界面。本项目"Android源码——RelativeLayoutSample"显然是一个示例代码,用于演示...
《安卓Android源码——Contacts详解》 在深入探讨安卓Android源码中的Contacts部分之前,我们需要先理解Contacts在安卓系统中的重要地位。Contacts是用户管理个人联系人信息的主要应用,它负责存储、显示和操作联系...
《Android应用开发详解》是郭宏志先生撰写的一本深入探讨Android应用开发的专业书籍,它为初学者和有经验的开发者提供了丰富的知识和实践经验。这本书不仅涵盖了基础理论,还包含了实际项目的源码,使得读者能够通过...
【标题】"安卓Android源码——FloatWindowDemo....总的来说,"安卓Android源码——FloatWindowDemo.zip" 是一个实用的学习资源,可以帮助开发者掌握Android浮动窗口的实现方法,增强其在Android应用开发中的实践能力。
【Android Widget小组件开发详解】 在安卓应用开发中,Widget是Android系统提供的一种可以在用户桌面展示小型应用程序组件的功能。它们不需打开应用就能提供实时信息更新,如天气、时钟、音乐播放控制等,极大地...
《Android应用开发详解》 作者:郭宏志 编著 内容简介 本书分为三个部分,包括基础篇、技术篇和应用篇。由浅入深地讲述了Android应用开发的方方面面。 第一篇 基础篇 第1章 Android概述 Android概述,讲述了...
【标题】:“安卓Android源码——屏保源码.zip”是指提供了一套用于开发和理解Android操作系统屏保程序的源代码。这个压缩包包含了实现屏保功能的核心代码,旨在帮助开发者深入学习Android系统的屏幕保护机制。 ...
"Android源码——365手机秘书源码.zip" 是一个与Android应用程序开发相关的资源,其中包含了365手机秘书这款应用的完整源代码。这个标题暗示了我们将深入研究Android操作系统下的软件开发,特别是针对移动设备的个人...
《安卓Android源码——MonitorPhone详解》 在深入探讨安卓Android源码——MonitorPhone之前,首先需要理解Android系统的基本架构。Android是一个开源的操作系统,基于Linux内核,为移动设备如智能手机和平板电脑...
"Android源码——小米便签源码.zip" 这个标题表明了我们正在探讨的是关于Android操作系统的源代码,具体是小米公司开发的便签应用的源代码。这通常对Android开发者、尤其是对移动应用开发感兴趣的人员来说具有很高的...
3. **布局设计**:XML布局文件描述了屏幕上的UI元素和它们的交互方式,包括线性布局、相对布局、约束布局等。 4. **Java/Kotlin编程**:Android应用主要使用Java或Kotlin编程,学习这两者的语法、面向对象特性以及...
通过对"安卓Android源码——oschina-android-app(开源中国).zip"的深入研究,开发者不仅可以提升Android编程技能,还能了解开源社区的开发模式和最佳实践,这对于个人成长和团队协作都有极大的帮助。