`
comeonbabye
  • 浏览: 442379 次
  • 性别: Icon_minigender_1
  • 来自: 北京
社区版块
存档分类
最新评论

目前发现的最好最快的直接在ECLIPSE中JETTY调试方式

阅读更多

最近项目用到maven,所以找到了这篇文章,正好实用挺不错的。


适用于6.1.3以上,包括6.1.5的JETTY。

它主要是利用了JDK的代码自动更换性能(code hot replace),可以不用重启JETTY就调试、更换资源文件。注意:一定是DEBUG方式运行才有这项功能。

所以应该说这篇文章的方法更好:

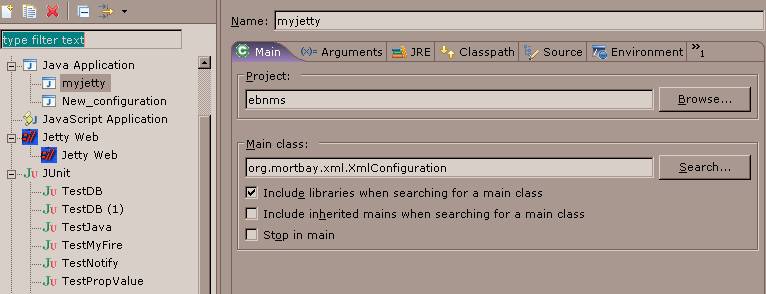
在Run->Debug中,New一个Java Application的配置,填入:

org.mortbay.xml.XmlConfiguration

参数填入一个自己的JETTY配置文件:


完成的myjetty.xml配置文件,请将其中的相应目录修改成自己项目的目录:

<? xml version="1.0" ?>
<! DOCTYPE Configure PUBLIC "-//Mort Bay Consulting//DTD Configure//EN" "http://jetty.mortbay.org/configure.dtd" >

<!--  ===============================================================  -->
<!--  Configure the Jetty Server                                       -->
<!--                                                                   -->
<!--  Documentation of this file format can be found at:               -->
<!--  http://docs.codehaus.org/display/JETTY/jetty.xml                 -->
<!--                                                                   -->
<!--  ===============================================================  -->


< Configure  id ="Server"  class ="org.mortbay.jetty.Server" >

    
<!--  ===========================================================  -->
    
<!--  Server Thread Pool                                           -->
    
<!--  ===========================================================  -->
    
< Set  name ="ThreadPool" >
      
<!--  Default bounded blocking threadpool 
      
-->
      
< New  class ="org.mortbay.thread.BoundedThreadPool" >
        
< Set  name ="minThreads" > 10 </ Set >
        
< Set  name ="maxThreads" > 250 </ Set >
        
< Set  name ="lowThreads" > 25 </ Set >
      
</ New >

      
<!--  Optional Java 5 bounded threadpool with job queue 
      <New class="org.mortbay.thread.concurrent.ThreadPool">
        <Set name="corePoolSize">250</Set>
        <Set name="maximumPoolSize">250</Set>
      </New>
      
-->
    
</ Set >


<!--  ===========================================================  -->
    
<!--  Set connectors                                               -->
    
<!--  ===========================================================  -->
    
<!--  One of each type!                                            -->
    
<!--  ===========================================================  -->

    
<!--  Use this connector for many frequently idle connections
         and for threadless continuations.
    
-->     
    
< Call  name ="addConnector" >
      
< Arg >
          
< New  class ="org.mortbay.jetty.nio.SelectChannelConnector" >
            
< Set  name ="port" >< SystemProperty  name ="jetty.port"  default ="8080" /></ Set >
            
< Set  name ="maxIdleTime" > 30000 </ Set >
            
< Set  name ="Acceptors" > 2 </ Set >
            
< Set  name ="statsOn" > false </ Set >
            
< Set  name ="confidentialPort" > 8443 </ Set >
        
< Set  name ="lowResourcesConnections" > 5000 </ Set >
        
< Set  name ="lowResourcesMaxIdleTime" > 5000 </ Set >
          
</ New >
      
</ Arg >
    
</ Call >

    
<!--  Use this connector if NIO is not available.
    <Call name="addConnector">
      <Arg>
          <New class="org.mortbay.jetty.bio.SocketConnector">
            <Set name="port">8081</Set>
            <Set name="maxIdleTime">50000</Set>
            <Set name="lowResourceMaxIdleTime">1500</Set>
          </New>
      </Arg>
    </Call>
    
-->

    
<!--  - - - - - - - - - - - - - - - - - - - - - - - - - - - - - - - -  -->
    
<!--  To add a HTTPS SSL listener                                      -->
    
<!--  see jetty-ssl.xml to add an ssl connector. use                   -->
    
<!--  java -jar start.jar etc/jetty.xml etc/jetty-ssl.xml              -->
    
<!--  - - - - - - - - - - - - - - - - - - - - - - - - - - - - - - - -  -->
    
    
<!--  ===========================================================  -->
    
<!--  Set up global session ID manager                             -->
    
<!--  ===========================================================  -->
    
<!--
    <Set name="sessionIdManager">
      <New class="org.mortbay.jetty.servlet.HashSessionIdManager">
        <Set name="workerName">node1</Set>
      </New>
    </Set>
    
-->

    
<!--  ===========================================================  -->
    
<!--  Set handler Collection Structure                             -->  
    
<!--  ===========================================================  -->
    
< Set  name ="handler" >
      
< New  id ="Handlers"  class ="org.mortbay.jetty.handler.HandlerCollection" >
        
< Set  name ="handlers" >
         
< Array  type ="org.mortbay.jetty.Handler" >
           
< Item >
             
< New  id ="Contexts"  class ="org.mortbay.jetty.handler.ContextHandlerCollection" />
           
</ Item >
           
< Item >
             
< New  id ="DefaultHandler"  class ="org.mortbay.jetty.handler.DefaultHandler" />
           
</ Item >
           
< Item >
             
< New  id ="RequestLog"  class ="org.mortbay.jetty.handler.RequestLogHandler" />
           
</ Item >
         
</ Array >
        
</ Set >
      
</ New >
    
</ Set >
    
< Set  name ="handler" >    
  
< New  id ="Handlers"  class ="org.mortbay.jetty.handler.HandlerCollection" >    
    
< Set  name ="handlers" >    
      
< Array  type ="org.mortbay.jetty.Handler" >    
        
<!-- Item>   
          <New id="RequestLog" class="org.mortbay.jetty.handler.RequestLogHandler"/>   
        </Item
-->    
        
< Item >    
          
< New  class ="org.mortbay.jetty.webapp.WebAppContext" >    
            
< Set  name ="contextPath" > /ebnms </ Set >    
            
< Set  name ="resourceBase" > E:/Prj2/ForMe/Src/flower/src/main/webapp </ Set >    
            
< Call  name ="addServlet" >    
              
< Arg > org.mortbay.jetty.servlet.DefaultServlet </ Arg >    
              
< Arg > / </ Arg >    
            
</ Call >    
          
</ New >    
    
</ Item >    
      
</ Array >    
    
</ Set >    
  
</ New >    
</ Set >    


<!--  ===========================================================  -->
    
<!--  Configure Authentication Realms                              -->
    
<!--  Realms may be configured for the entire server here, or      -->
    
<!--  they can be configured for a specific web app in a context   -->
    
<!--  configuration (see $(jetty.home)/contexts/test.xml for an    -->
    
<!--  example).                                                    -->
    
<!--  ===========================================================  -->
    
< Set  name ="UserRealms" >
      
< Array  type ="org.mortbay.jetty.security.UserRealm" >
        
<!--
        <Item>
          <New class="org.mortbay.jetty.security.HashUserRealm">
            <Set name="name">Test Realm</Set>
            <Set name="config"><SystemProperty name="jetty.home" default="."/>/etc/realm.properties</Set>
          </New>
        </Item>
    
-->
      
</ Array >
    
</ Set >

    
<!--  ===========================================================  -->
    
<!--  Configure Request Log                                        -->
    
<!--  Request logs  may be configured for the entire server here,  -->
    
<!--  or they can be configured for a specific web app in a        -->
    
<!--  contexts configuration (see $(jetty.home)/contexts/test.xml  -->
    
<!--  for an example).                                             -->
    
<!--  ===========================================================  -->
    
<!-- Ref id="RequestLog">
      <Set name="requestLog">
        <New id="RequestLogImpl" class="org.mortbay.jetty.NCSARequestLog">
          <Set name="filename"><SystemProperty name="jetty.logs" default="./logs"/>/yyyy_mm_dd.request.log</Set>
          <Set name="filenameDateFormat">yyyy_MM_dd</Set>
          <Set name="retainDays">90</Set>
          <Set name="append">true</Set>
          <Set name="extended">true</Set>
          <Set name="logCookies">false</Set>
          <Set name="LogTimeZone">GMT</Set>
        </New>
      </Set>
    </Ref
-->

    
<!--  ===========================================================  -->
    
<!--  extra options                                                -->
    
<!--  ===========================================================  -->
    
< Set  name ="stopAtShutdown" > true </ Set >
    
< Set  name ="sendServerVersion" > true </ Set >
    
<!-- Set name="sendDateHeader">true</Set -->
    
<!-- Set name="gracefulShutdown">1000</Set -->
</ Configure >

分享到:
评论

相关推荐

    eclipse中配置使用jetty调试web项目

    在Eclipse这个强大的Java开发环境中,配置Jetty服务器来调试Web项目是一项常用的任务。Jetty是一个轻量级、高性能的开源HTTP服务器和Servlet容器,它允许开发者在本地环境快速部署和测试Web应用。本文将详细介绍如何...

    Jetty For Eclipse 插件快速安装.rar

    为了在Eclipse中方便地调试和运行基于Jetty的Web应用,可以安装Jetty For Eclipse插件。这个压缩包"Jetty For Eclipse 插件快速安装.rar"包含了必要的文件,帮助用户快捷地在Eclipse环境中集成Jetty。 1. **插件...

    run-jetty-run eclipse 离线安装包

    Run-Jetty-Run是一款在Eclipse集成开发环境中用于便捷部署和调试Jetty服务器的插件。这个离线安装包提供了一种无需联网就能为Eclipse添加Jetty支持的方法,尤其适用于那些网络环境不稳定或者需要在隔离环境工作的...

    jetty调试插件

    Jetty调试插件是专为Eclipse开发的一款实用工具,旨在简化Web应用程序的部署和调试过程。Jetty是一个轻量级、高性能的Java Web服务器和Servlet容器,它提供了对HTTP协议的支持,允许开发者在本地环境快速搭建服务器...

    Maven+jetty+jrebel+m2eclipse+eclipse搭建struts2开发环境

    8. **运行和调试**:在Eclipse中运行Maven的jetty:run目标,启动Jetty服务器,然后在浏览器中访问应用。借助JRebel,代码更改会立即反映在运行的应用中,无需手动刷新或重启。 通过这样的配置,开发者可以在Eclipse...

    jetty的安装与使用

    对于初学者来说,了解如何在Eclipse中集成Maven和Jetty进行开发是非常重要的一步。本文将详细介绍这一过程,并提供一些基本的命令用法。 ##### 2.1 Maven2集成Eclipse在线安装 1. **打开Eclipse**: - 启动...

    Jetty权威指南.pdf

    静态部署是指直接将Web应用部署到Jetty的`webapps`目录下,Jetty会在启动时自动扫描该目录并加载Web应用。 **5.3 动态热部署** 除了静态部署外,Jetty还支持动态热部署,即在不重启服务器的情况下更新Web应用。这...

    eclipse中常用配置

    本文将详细介绍在Eclipse中的一些常用配置,这些配置对于初学者来说尤其重要,能够提升开发效率和舒适度。 首先,Eclipse的编码设置是开发过程中非常关键的一环。在`window-&gt;preferences-&gt;general-&gt;Content Types`...

    run-jetty-run

    【run-jetty-run】是一款专为Eclipse集成开发环境设计的插件,它极大地简化了在Eclipse中启动和调试Jetty服务器的过程。Jetty是一个轻量级、高性能的Java Web服务器和Servlet容器,广泛应用于各种规模的Web应用。...

    main方法启动jetty

    在Java环境中,我们通常使用主(Main)方法来启动Jetty服务器,这样可以方便地在命令行或者集成开发环境中快速运行Web应用。 标题"main方法启动jetty"指的就是通过编写一个包含main方法的Java类,调用Jetty的相关...

    jetty指导书

    在开发环境中使用Jetty时,通常需要配置调试模式、热部署等功能。 #### 十八、安全 **18.1 安全配置** Jetty提供了多种安全机制,如认证、授权等,可以通过配置文件来设置安全策略。 #### 十九、FAQ **19.1 ...

    struts2+maven+jetty 示例

    在开发阶段,使用Jetty可以实现快速的迭代和调试,因为它可以直接运行在开发环境中,无需部署到专门的服务器上。 **Struts2 + Maven + Jetty 实例** 在Java Webapp开发中,结合Struts2、Maven和Jetty,可以实现高效...

    jetty 容器

    `maven-jetty-plugin`允许在Maven构建过程中直接运行和部署应用。 ### 总结 Jetty容器因其轻量级、高效和灵活的特性,在Java Web开发领域得到了广泛应用。了解和掌握Jetty的使用方法和配置技巧,对于提升开发效率...

    eclipse-mars2绿色解压直接用

    6. **构建工具**:Maven或Ant的集成使得构建和管理Java项目变得更加简单,用户可以直接在Eclipse中配置和执行构建过程。 7. **性能优化**:Mars 2版本在性能上进行了优化,启动更快,内存占用更低,提升了整体开发...

    run-jetty-updatesite1.zip

    《Jetty插件及其在Eclipse中的热部署实践》 Jetty是一款轻量级的Java Web服务器和Servlet容器,以其高效、小巧、易用而深受开发者喜爱。与Tomcat相比,Jetty同样支持热部署功能,允许开发者在不重启服务器的情况下...

    jetty-run插件下载

    总的来说,Jetty Run插件提供了一种便捷的方式,使开发者能够迅速启动和调试基于Jetty的Web应用,而无需深入了解服务器的复杂配置。通过下载和使用这个插件,可以极大地提高开发效率,特别是对于频繁进行迭代和测试...

    eclipse-inst-win64安装包

    在下载的压缩包中,"eclipse-inst-win64.exe" 是Eclipse的安装程序。双击运行此文件,将会启动Eclipse的安装向导,引导用户完成安装过程。向导会询问安装路径、选择要安装的组件以及设置Eclipse的默认配置。用户可以...

    eclipse-oxygen64(1).zip

    5. **CDT(C/C++ Development Tooling)增强**:对于C和C++开发者,CDT在Oxygen中进行了性能优化,提供了更快的索引和更强大的调试功能。 6. **PyDev(Python开发插件)改进**:对于Python开发者,PyDev在Eclipse ...

    eclipse安装文件

    在部署到web服务器的过程中,Eclipse的Java EE透视图(Java EE Perspective)提供了集成的服务器视图(Server View),可以添加和管理各种web服务器,如Tomcat、Jetty等。开发者可以直接在Eclipse内启动、停止服务器...

    精通Eclipse(使用手册)

    同时,Eclipse支持多种应用服务器的连接,如Tomcat、Jetty等,方便进行应用的部署和调试。 对于插件扩展,Eclipse的一大优势就是其丰富的插件生态系统。书中会介绍如何查找、安装和使用各种插件,以满足不同开发...

Global site tag (gtag.js) - Google Analytics