This tutorial I will show you how to slice up the menu design (step by step) and put them together with CSS. Most of you probably know how to code a horizontal or vertical CSS list menu. Now let’s take it to the next level — code an advanced (un-typical) list menu utilizing the CSS position property.
View Demo CSS menu Download Demo ZIP
Overview
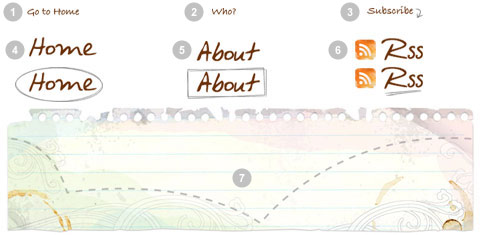
Here are the required graphics to assembe the menu (you can download from the zip).

1. Main background
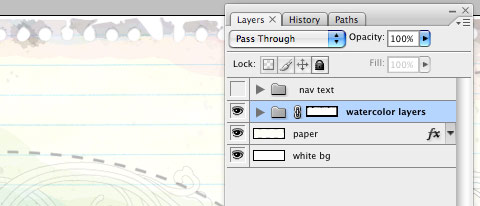
Open the Photoshop file. Turn off the menu text Layer Group and save the main background as menu-bg.jpg.

2. Button graphics
Turn off the background Layer Group and leave only the menu text layers visible. Make a rectangle selection cover the "home" item, go to menu Edit > Copy Merged (Cmd + Shift + C).

Create a new file and take note of the file dimension (w x h), in my case the "home" graphic is 144 x 58px. Paste the "home" graphic in the new file. Go to menu Image > Canvas Size, adjust the image height x 2 (58 + 58 = 116px). Duplicate the home graphic layer and align it to the bottom. Erase the highlight strokes in the upper layer.

Here is how the hover effect will work. We will set the link button to 144 x 58px, when mouseover, we will shift the background image from top to bottom.

Repeat this step for the other buttons. You should have the follow graphics:

3. HTML source
When you are done with the graphics, let’s start coding. Start with an un-ordered list <ul>.
- note there is an id="menu" assigned to the
<ul> tag
- an unique class name assigned to each link
<a>
- an empty
<span> tag (the purpose of this is to make the mouseover effect)
<ul id="menu">
  <li><a href="#" class="home">Home <span></span></a></li>
  <li><a href="#" class="about">About <span></span></a></li>
  <li><a href="#" class="rss">RSS <span></span></a></li>
</ul>
#menu
Reset the menu to no padding, no margin, and no list-style. Specify the width and height same dimension as the menu-bg.jpg. Then attach the menu background image. The key point to remember here is set the position property to relative.
#menu {
  list-style: none;
  padding: 0;
  margin: 0;
  width: 774px;
  height: 210px;
  background: url(images/menu-bg.jpg) no-repeat;
  position: relative;
}
#menu span
Specify the span element to display:none (so they will be invisible by default). Specify position:absolute, so we can place the mouseover GIF image on exact position.
#menu span {
  display: none;
  position: absolute;
}
#menu a
The key point here is the text-indent property. We specify the text-indent property with a negative value (-900%), so the text will be hidden.
#menu a {
  display: block;
  text-indent: -900%;
  position: absolute;
  outline: none;
}
#menu a:hover
When mouseover the link, we want to shift the background image from top to bottom
#menu a:hover {
  background-position: left bottom;
}
#menu a:hover span
When mouseover the link, we want the span element to display:block.
#menu a:hover span {
  display: block;
}
#menu .home
Specify the width, height, and background image. Since we already specified all <a> element postition:absolute in previous step, now just say where the .home button should be by specifying the left and top property.
#menu .home {
  width: 144px;
  height: 58px;
  background: url(images/home.gif) no-repeat;
  left: 96px;
  top: 73px;
}
#menu .home span
Here we are specifying the width, height, background, and position of the span element of .home (mouseover GIF image)
#menu .home span {
  width: 86px;
  height: 14px;
  background: url(images/home-over.gif) no-repeat;
  left: 28px;
  top: -20px;
}
#menu .about
Copy the .home rules and rename them to .about. Now just change the width, height, background, left, and top property.
#menu .about {
  width: 131px;
  height: 51px;
  background: url(images/about.gif) no-repeat;
  left: 338px;
  top: 97px;
}
#menu .about span {
  width: 40px;
  height: 12px;
  background: url(images/about-over.gif) no-repeat;
  left: 44px;
  top: 54px;
}
#menu .rss
Repeat this step for .rss
#menu .rss {
  width: 112px;
  height: 47px;
  background: url(images/rss.gif) no-repeat;
  left: 588px;
  top: 94px;
}
#menu .rss span {
  width: 92px;
  height: 20px;
  background: url(images/rss-over.gif) no-repeat;
  left: 26px;
  top: -20px;
}
All in one:
#menu {
  list-style: none;
  padding: 0;
  margin: 0;
  width: 774px;
  height: 210px;
  background: url(images/menu-bg.jpg) no-repeat;
  position: relative;
}
#menu span {
  display: none;
  position: absolute;
}
#menu a {
  display: block;
  text-indent: -900%;
  position: absolute;
  outline: none;
}
#menu a:hover {
  background-position: left bottom;
}
#menu a:hover span {
  display: block;
}

#menu .home {
  width: 144px;
  height: 58px;
  background: url(images/home.gif) no-repeat;
  left: 96px;
  top: 73px;
}
#menu .home span {
  width: 86px;
  height: 14px;
  background: url(images/home-over.gif) no-repeat;
  left: 28px;
  top: -20px;
}

#menu .about {
  width: 131px;
  height: 51px;
  background: url(images/about.gif) no-repeat;
  left: 338px;
  top: 97px;
}
#menu .about span {
  width: 40px;
  height: 12px;
  background: url(images/about-over.gif) no-repeat;
  left: 44px;
  top: 54px;
}

#menu .rss {
  width: 112px;
  height: 47px;
  background: url(images/rss.gif) no-repeat;
  left: 588px;
  top: 94px;
}
#menu .rss span {
  width: 92px;
  height: 20px;
  background: url(images/rss-over.gif) no-repeat;
  left: 26px;
  top: -20px;
}
分享到:


相关推荐
2: Click the 'Advanced' tab. 3: Check the 2nd option under 'Security' in the tree (Allow active content to run in files on my computer.) ---Menus and Flash Objects--- Overview- Flash ...
6. Advanced CSS File Include V1.0.0 For Adobe Dreamweaver 7. Advanced Manage Workspace Layouts V1.1.1 For Adobe Dreamweaver 8. Advanced Random Images V4.3.8 For Adobe Dreamweaver 9. ASP Random Images ...
6. Advanced CSS File Include V1.0.0 For Adobe Dreamweaver 7. Advanced Manage Workspace Layouts V1.1.1 For Adobe Dreamweaver 8. Advanced Random Images V4.3.8 For Adobe Dreamweaver 9. ASP Random Images ...
6. Advanced CSS File Include V1.0.0 For Adobe Dreamweaver 7. Advanced Manage Workspace Layouts V1.1.1 For Adobe Dreamweaver 8. Advanced Random Images V4.3.8 For Adobe Dreamweaver 9. ASP Random Images ...
6. Advanced CSS File Include V1.0.0 For Adobe Dreamweaver 7. Advanced Manage Workspace Layouts V1.1.1 For Adobe Dreamweaver 8. Advanced Random Images V4.3.8 For Adobe Dreamweaver 9. ASP Random Images ...
6. Advanced CSS File Include V1.0.0 For Adobe Dreamweaver 7. Advanced Manage Workspace Layouts V1.1.1 For Adobe Dreamweaver 8. Advanced Random Images V4.3.8 For Adobe Dreamweaver 9. ASP Random Images ...
6. Advanced CSS File Include V1.0.0 For Adobe Dreamweaver 7. Advanced Manage Workspace Layouts V1.1.1 For Adobe Dreamweaver 8. Advanced Random Images V4.3.8 For Adobe Dreamweaver 9. ASP Random Images ...
6. Advanced CSS File Include V1.0.0 For Adobe Dreamweaver 7. Advanced Manage Workspace Layouts V1.1.1 For Adobe Dreamweaver 8. Advanced Random Images V4.3.8 For Adobe Dreamweaver 9. ASP Random Images ...
6. Advanced CSS File Include V1.0.0 For Adobe Dreamweaver 7. Advanced Manage Workspace Layouts V1.1.1 For Adobe Dreamweaver 8. Advanced Random Images V4.3.8 For Adobe Dreamweaver 9. ASP Random Images ...
Using some advanced CSS 220 Filling the main content 221 Rounding the charts 223 Creating a quick statistical card 226 Getting a spider chart 229 Overhead loading 232 Fixing the toggle button for ...
Set necessary values for the following options in Preferences menu (Tools-->Preferences-->Debugger): Virtual folder - path to a virtual project folder Virtual host URL - url of a virtual ...
Set necessary values for the following options in Preferences menu (Tools-->Preferences-->Debugger): Virtual folder - path to a virtual project folder Virtual host URL - url of a virtual ...
Set necessary values for the following options in Preferences menu (Tools-->Preferences-->Debugger): Virtual folder - path to a virtual project folder Virtual host URL - url of a virtual ...
Menu Editor Multiple Master/Detail pages Various PHP options. Charset, locale, default date formats, etc . (See PHP Settings) Saving and restoring project from Project File Synchronize project ...
Set necessary values for the following options in Preferences menu (Tools-->Preferences-->Debugger): Virtual folder - path to a virtual project folder Virtual host URL - url of a virtual folder Path ...
在描述中提到的“advanced Vert Menu”是指该组件提供了一个高级的垂直布局菜单,这种菜单设计通常用于网站和Web应用的导航,能够清晰地展示多级菜单项,用户可以通过鼠标悬停或点击来展开和选择不同的功能模块。...
- **Appendix A: Java Perspective Menu Reference**: Detailed reference for the Java perspective menu, including common actions and shortcuts. - **Appendix B: CVS Installation Procedures**: Detailed ...
2. **Advanced Features**:高级特性演示,如数据网格的分页、排序、过滤,以及对话框的嵌套和拖动等。 3. **Combination**:组件组合使用,如在对话框中嵌入表格,或者菜单与按钮的联动效果。 4. **Responsive ...
The first true controls to fully exploit the most advanced AJAX framework available. Comprehensive Documentation and Support: Featuring complete product documentation online and all-inclusive ...