今天搜索到这个帖子,赶紧收藏了~~
http://delphi.ktop.com.tw/board.php?cid=169&fid=1220&tid=101360
NET 的 Panel 控件非常陽春, 本以為升級到 VS2010 會不會增強一些屬性, 結果看起來跟 VS2003 的 Panel 完全一樣, 沒有改進 , 我還是用我習慣的 VS2003 就好了
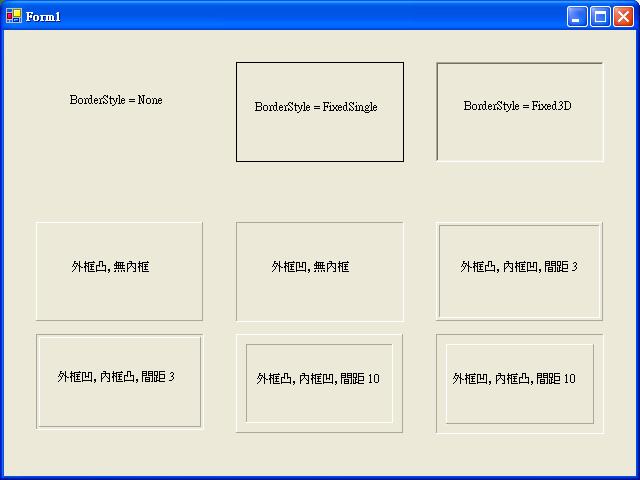
.NET 的 Panel 控件外觀只有三種樣式選擇 : BorderStyle = None (無外框) , FixedSingle (單線外框), Fixed3D (立體) , 而立體也只有凹下去的 Style, 沒有凸出來的 Style ; 圖中最上面三種樣式即為標準的 .NET Panel 控件樣式
我們今天來實作可以像 Delphi / C++Builder 中的 Panel 有更多的外觀 , 也就是圖中下面六種樣式, 看起來是否更活潑呢 ?

■ 實作方法
在 Panel 控件的 OnPaint (重繪事件) 中畫出我們要的外框, 為了要讓各個 Panel 都可任意設定自己的外框, 又不想在每個 Panel 控件的 OnPaint (重繪事件) 寫一大堆 CODE , 所以我把共用的 CODE 包成一獨立函式 Custmer_PanelPaint() , 透過傳入參數的不同, 決定外框式樣, 以後有時間再把它包成控件
■ 重繪函式
傳入參數
BevelOuter 1:Panel外框為凸起 2:Panel外框為凹下
BevelInner 1:Panel內框為凸起 2:Panel內框為凹下 0:無內框
BorderWidth Panel 外框與內框之間距寬度
例 : 於 Panel 之 OnPaint 事件中 呼叫 Custmer_PanelPaint(sender, e, 2, 1, 1);
表 外框為凹下, 內框為凸起, 內外框間距為 1
- private void Custmer_PanelPaint(object sender, System.Windows.Forms.PaintEventArgs e, int BevelOuter, int BevelInner, int BorderWidth)
- {
- Panel pnl=(Panel)sender;
-
- switch (BevelOuter*10+BevelInner)
- {
- case 10 :
-
-
- e.Graphics.DrawLine(new Pen(SystemColors.ControlLightLight),0,0,0,pnl.Height-2);
- e.Graphics.DrawLine(new Pen(SystemColors.ControlLightLight),0,0,pnl.Width-2,0);
- e.Graphics.DrawLine(new Pen(SystemColors.ControlDark),pnl.Width-2,pnl.Height-2,0,pnl.Height-2);
- e.Graphics.DrawLine(new Pen(SystemColors.ControlDark),pnl.Width-2,pnl.Height-2,pnl.Width-2,0);
-
- break;
- case 11 :
-
-
- e.Graphics.DrawLine(new Pen(SystemColors.ControlLightLight),0,0,0,pnl.Height-2);
- e.Graphics.DrawLine(new Pen(SystemColors.ControlLightLight),0,0,pnl.Width-2,0);
- e.Graphics.DrawLine(new Pen(SystemColors.ControlDark),pnl.Width-2,pnl.Height-2,0,pnl.Height-2);
- e.Graphics.DrawLine(new Pen(SystemColors.ControlDark),pnl.Width-2,pnl.Height-2,pnl.Width-2,0);
-
- if (BorderWidth>0)
- {
-
- e.Graphics.DrawLine(new Pen(SystemColors.ControlLightLight),BorderWidth+1,BorderWidth+1,BorderWidth+1,pnl.Height-(BorderWidth+3));
- e.Graphics.DrawLine(new Pen(SystemColors.ControlLightLight),BorderWidth+1,BorderWidth+1,pnl.Width-(BorderWidth+3),BorderWidth+1);
- e.Graphics.DrawLine(new Pen(SystemColors.ControlDark),pnl.Width-(BorderWidth+3),pnl.Height-(BorderWidth+3),BorderWidth+1,pnl.Height-(BorderWidth+3));
- e.Graphics.DrawLine(new Pen(SystemColors.ControlDark),pnl.Width-(BorderWidth+3),pnl.Height-(BorderWidth+3),pnl.Width-(BorderWidth+3),BorderWidth+1);
- }
-
- break;
-
- case 12 :
-
-
- e.Graphics.DrawLine(new Pen(SystemColors.ControlLightLight),0,0,0,pnl.Height-2);
- e.Graphics.DrawLine(new Pen(SystemColors.ControlLightLight),0,0,pnl.Width-2,0);
- e.Graphics.DrawLine(new Pen(SystemColors.ControlDark),pnl.Width-2,pnl.Height-2,0,pnl.Height-2);
- e.Graphics.DrawLine(new Pen(SystemColors.ControlDark),pnl.Width-2,pnl.Height-2,pnl.Width-2,0);
-
- if (BorderWidth>0)
- {
-
- e.Graphics.DrawLine(new Pen(SystemColors.ControlDark),BorderWidth,BorderWidth,BorderWidth,pnl.Height-(BorderWidth*1+2));
- e.Graphics.DrawLine(new Pen(SystemColors.ControlDark),BorderWidth,BorderWidth,pnl.Width-(BorderWidth*1+2),BorderWidth);
- e.Graphics.DrawLine(new Pen(SystemColors.ControlLightLight),pnl.Width-(BorderWidth+2),pnl.Height-(BorderWidth+2),BorderWidth,pnl.Height-(BorderWidth+2));
- e.Graphics.DrawLine(new Pen(SystemColors.ControlLightLight),pnl.Width-(BorderWidth+2),pnl.Height-(BorderWidth+2),pnl.Width-(BorderWidth+2),BorderWidth);
- }
-
-
- break;
- case 20 :
-
- e.Graphics.DrawLine(new Pen(SystemColors.ControlDark),0,0,0,pnl.Height-0);
- e.Graphics.DrawLine(new Pen(SystemColors.ControlDark),0,0,pnl.Width-0,0);
- e.Graphics.DrawLine(new Pen(SystemColors.ControlLightLight),pnl.Width-1,pnl.Height-1,0,pnl.Height-1);
- e.Graphics.DrawLine(new Pen(SystemColors.ControlLightLight),pnl.Width-1,pnl.Height-1,pnl.Width-1,0);
-
- break;
- case 21 :
-
-
- e.Graphics.DrawLine(new Pen(SystemColors.ControlDark),0,0,0,pnl.Height-0);
- e.Graphics.DrawLine(new Pen(SystemColors.ControlDark),0,0,pnl.Width-0,0);
- e.Graphics.DrawLine(new Pen(SystemColors.ControlLightLight),pnl.Width-1,pnl.Height-1,0,pnl.Height-1);
- e.Graphics.DrawLine(new Pen(SystemColors.ControlLightLight),pnl.Width-1,pnl.Height-1,pnl.Width-1,0);
-
- if (BorderWidth>0)
- {
-
- e.Graphics.DrawLine(new Pen(SystemColors.ControlLightLight),BorderWidth,BorderWidth,BorderWidth,pnl.Height-BorderWidth);
- e.Graphics.DrawLine(new Pen(SystemColors.ControlLightLight),BorderWidth,BorderWidth,pnl.Width-BorderWidth,BorderWidth);
- e.Graphics.DrawLine(new Pen(SystemColors.ControlDark),pnl.Width-(BorderWidth+1),pnl.Height-(BorderWidth+1),BorderWidth,pnl.Height-(BorderWidth+1));
- e.Graphics.DrawLine(new Pen(SystemColors.ControlDark),pnl.Width-(BorderWidth+1),pnl.Height-(BorderWidth+1),pnl.Width-(BorderWidth+1),BorderWidth);
- }
-
- break;
-
- case 22 :
-
-
- e.Graphics.DrawLine(new Pen(SystemColors.ControlDark),0,0,0,pnl.Height-0);
- e.Graphics.DrawLine(new Pen(SystemColors.ControlDark),0,0,pnl.Width-0,0);
- e.Graphics.DrawLine(new Pen(SystemColors.ControlLightLight),pnl.Width-1,pnl.Height-1,0,pnl.Height-1);
- e.Graphics.DrawLine(new Pen(SystemColors.ControlLightLight),pnl.Width-1,pnl.Height-1,pnl.Width-1,0);
-
- if (BorderWidth>0)
- {
-
- e.Graphics.DrawLine(new Pen(SystemColors.ControlDark),BorderWidth+1,BorderWidth+1,BorderWidth+1,pnl.Height-(BorderWidth*1+2));
- e.Graphics.DrawLine(new Pen(SystemColors.ControlDark),BorderWidth+1,BorderWidth+1,pnl.Width-(BorderWidth*1+2),BorderWidth+1);
- e.Graphics.DrawLine(new Pen(SystemColors.ControlLightLight),pnl.Width-(BorderWidth+2),pnl.Height-(BorderWidth+2),BorderWidth,pnl.Height-(BorderWidth+2));
- e.Graphics.DrawLine(new Pen(SystemColors.ControlLightLight),pnl.Width-(BorderWidth+2),pnl.Height-(BorderWidth+2),pnl.Width-(BorderWidth+2),BorderWidth);
- }
-
- break;
- }
- }
分享到:


相关推荐
要修改Panel的边框颜色,我们无法直接通过内置属性来实现,但可以通过重绘控件来达到目的。创建一个自定义的Panel类,继承自System.Windows.Forms.Panel,并重写OnPaint方法。在这个方法中,我们可以使用Graphics...
- **Panel控件**:Panel控件是一个可以包含其他控件的容器,它提供了一种将一组相关的控件分组的方法,通常用于创建用户界面的区域。 - **阴影效果**:阴影是一种视觉效果,通过在物体边缘创建一种颜色渐变,模拟...
主要介绍了C#通过重写Panel改变边框颜色与宽度的方法,涉及C#针对Panel控件的重写与属性设置技巧,具有一定参考借鉴价值,需要的朋友可以参考下
因项目需求,要实现简单的绘制矢量图形,因此自已写了几个自定义的Panel控件,有矩形,圆形,三角形,弧形,原则上可以实现各类形状的各类可视控件,并实现了拖拽和拉伸功能。代码在VS2010环境上生成。共享出来希望...
在移动过程中,使用Control.Invalidate()方法触发控件的重绘,显示移动的效果。 最后,别忘了在窗体的Load事件中,初始化一次图片添加,以便界面启动时就有至少一张图片展示。 通过以上步骤,你就可以创建一个C# ...
Me.Invalidate() ' 强制重绘 End If End Set End Property Protected Overrides Sub OnPaint(ByVal e As PaintEventArgs) MyBase.OnPaint(e) Dim g As Graphics = e.Graphics Select Case BorderType ...
步骤3:重绘控件 为了实现背景色和边框颜色的自定义,我们需要覆盖TPanel的Paint方法。在这个方法中,我们可以使用Canvas对象来绘制面板的背景和边框。 ```delphi procedure TFillPanel.Paint; var R: TRect; ...
首先,实现弧形圆角的Panel并非内置功能,需要通过重绘(Redraw)机制来实现。这涉及到对控件的Paint事件的处理,通过Graphics类提供的方法如DrawRectangle和GraphicsPath等来绘制具有圆角的矩形。你可以设置四个角...
这涉及到面向对象编程的概念,如继承、属性和事件处理,以及图形渲染的知识,比如重绘控件的边框。对于任何希望深入了解WinForm控件自定义或者希望优化用户界面设计的开发者来说,这是一个有价值的实例。
Me.Invalidate() ' 触发重绘 End Set End Property Private _cornerRadius As Integer = 5 ' 默认圆角半径 ``` 在`RoundCornerPanel`类中,我们重写`OnPaint`方法,使用`Graphics`对象和`Pen`来绘制具有圆角的...
关键在于覆盖窗体的OnPaint事件,这是一个当窗体需要重绘时被触发的事件。 在OnPaint事件处理函数中,我们可以使用Canvas对象进行绘图。Canvas是窗体的画布,我们可以用它来绘制任何图形,包括我们的红色边框。首先...
在Demo中,开发者可能已经为垂直滚动条实现了这样的重绘逻辑,使得滚动条看起来更加美观,符合现代UI的设计趋势。 为了实现自定义滚动条,开发者还需要关注以下几个关键点: 1. **Scroll事件处理**:滚动条的滚动...
Panel控件是一种容器控件,可以用来包含其他控件,并且可以自定义背景色、边框样式等。在这个场景下,Panel将作为我们的画布,用于绘制坐标系。 1. **创建坐标轴** - 使用GDI+(Graphics Device Interface Plus)...
合理使用VCL缓存机制,避免不必要的重绘,以及优化事件处理逻辑,可以有效提高应用程序的运行效率。 9. **测试和调试** - 使用Delphi的调试工具,如Form Inspector和Object Inspector,可以方便地检查和修改Panel...
2. **自定义组件**:既然称为“自己制作”的Panel,那么很可能开发者对原生的Panel进行了扩展或重绘,以实现独特的视觉效果。这可能涉及到重写绘制方法,使用Graphics对象进行低级绘图操作。 3. **事件处理**:面板...
在新创建的类中,我们需要重写OnPaint方法,以便在控件需要重绘时调用自己的绘制逻辑。在这里,我们可以使用Graphics对象来绘制背景色。 ```csharp protected override void OnPaint(PaintEventArgs e) { // 使用...
8. **重绘策略**:当Panel之间的连接改变时,需要重新计算并绘制所有线条,这涉及到控件的重绘策略和更新区域的管理。 9. **线型和箭头**:除了简单的直线,可能还需要实现虚线、点线或其他线型,甚至在线段两端...
为了避免这个问题,可以考虑使用`Invalidate()`方法只重绘更新的部分,而不是整个控件。 总的来说,创建C#个人小画板项目是一个很好的实践,可以帮助开发者巩固对C#事件处理、图形绘制以及用户交互的理解。通过不断...
本文实例为大家分享了wxpython绘制圆角窗体的具体代码,供大家参考,具体内容如下 # -*- coding:gbk -*- import wx class RCDialog(wx.Dialog): def __init__(self,parent=None,size=wx.DefaultSize): ...
自定义Panel可能需要覆盖`OnPaint`方法来实现自定义的绘制逻辑,比如在Panel的边框上显示特殊的视觉指示,如深蓝色的布局块。在调整大小时,控件需要重绘以反映新的尺寸,这可以通过调用`Invalidate`方法实现。 5....