- ŠÁĆŔžł: 860514 ŠČí
- ŠÇžňłź:

- ŠŁąŔç¬: ňîŚń║Č
-

Šľçšźáňłćš▒╗
- ňůĘÚâĘňŹÜň«ó (398)
- Ŕ┤čŔŻŻňŁçŔííńŞôÚóś (0)
- bash (1)
- mysql/postgresql (45)
- mail/postfix/extmail/iredmail/tmail (8)
- ŠŚąň┐Śš«íšÉć (5)
- š│╗š╗čš«íšÉć (178)
- ńŞşňî╗ňů╗šöč (3)
- šöčŠ┤╗ (22)
- Úč│ń╣É/šöÁňŻ▒ (3)
- ň║öšöĘš╝ľšĘő/java (73)
- ŠÁőŔ»Ľ (8)
- Š×Š×äŔ«żŔ«í/š╝ľšĘőŠÇŁŠâ│ (17)
- php (9)
- webň돚ź»/HTML/CSS/JS (17)
- š│╗š╗čš╝ľšĘő/C/C++ (2)
šĄżňî║šëłňŁŚ
- ŠłĹšÜäŔÁäŔ«» ( 1)
- ŠłĹšÜäŔ«║ňŁŤ ( 25)
- ŠłĹšÜäÚŚ«šşö ( 0)
ňşśŠíúňłćš▒╗
- 2011-08 ( 1)
- 2011-07 ( 1)
- 2011-06 ( 1)
- ŠŤ┤ňĄÜňşśŠíú...
ŠťÇŠľ░Ŕ»äŔ«║
-
zjhzwx1212´╝Ü
ńŞ║ń╗Çń╣łšöĘthreadLocalňÉÄ´╝îŔżôňç║ňÇ╝Šś»ń╗Ä20ň╝ÇňžőšÜä,ŔÇîň«Üń╣ë ...
j2eešÜäš║┐šĘőň«ëňůĘ--threadlocal -
aeoluspu´╝Ü
ńŞŹÚöÖ mysql ŠÁőŔ»ĽÚâĘňłćŠäčŔžëńŞŹŔ»Žš╗ć
šöĘsysbench(ŠłľŔÇůsuper-smack´╝ëŠÁőŔ»ĽmysqlŠÇžŔ⯠-
nanPrivate´╝Ü
ŠťëŠ▓튝ëńżőňşÉ´╝îňƬšÉćŔ«║´╝îň«×ŔĚÁŔÁĚŠŁąŔ┐śŠś»ńŞŹń╝ÜňĽŐ
JMSňƻڣáŠÂłŠü»ń╝áÚÇü -
lwclover´╝Ü
ńŞÇńެšŻĹš╗ťňĚąšĘőňŞł Ŕúůń╗Çń╣łb
postfix ňŽéńŻĽňłáÚÖĄÚśčňłŚńŞşšÜäÚé«ń╗ -
maimode´╝Ü
ŠłĹń╣čŠČáš╝║ńŞŹň░ĹňĽŐ
šÉćŠâ│šÜäŔ«íš«ŚŠť║šžĹňşŽščąŔ»ćńŻôš│╗
Install Windows XP using USB Flash Disk/ Flash Drive - Step by Step Guide
- ňŹÜň«óňłćš▒╗´╝Ü
- š│╗š╗čš«íšÉć
http://komku.blogspot.com/2008/11/install-windows-xp-using-usb-flash-disk.html
 
Someone in this post (Acer
Aspire One Specifications and Windows XP Drivers
) ask me to write a
tutorial about how to install
Windows XP using USB flash disk/flash drive.
If you want to install
Windows XP
, but your notebook (or PC) has no CDROM, you should
install Windows XP using USB Flash disk/Flash Drive/Thumb drive...
just
follow this guide :
step 1
:
Buy an USB
Flash Drive
(at least 2GB).
When you do this tutorial, please
make sure your computer/laptop/PC has a CD-ROM (or DVD).
so, now you
have 2 computers, with CD-ROM support and without
CD-ROM support (e.g Acer
Aspire One
, Asus EEE-PC).
step 2
:
Download this software pack
(Komku-SP-usb.exe - Download
)
1.47MB
UPDATE 1
:
Anonymous saidÔÇŽ
your download at mediafire keeps timing out,
any other hosts available?
Mirror Depositfiles
Mirror
Rapidshare
Mirror
Easy-Share
Mirror
Megaupload

this
software pack contains 3 application :
-BootSect.exe (Boot
Sector Manipulation Tool)
-PeToUSB (http://GoCoding.Com
)
-usb_prep8
(Prepares Windows XP Setup LocalSource for Copy to USB-Drive)
step 3
:
Double click Komku-SP-usb.exe

a
window will appear... and click Install
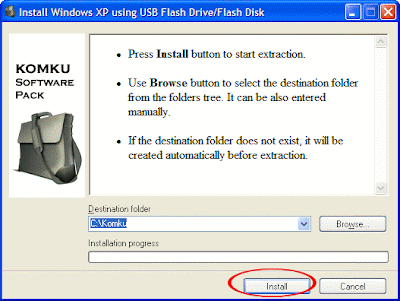
step 4
:
Insert your USB Flash
Drive.
When I made this tutorial, I was using 4GB Transcend USB
FlashDrive...
Locate
folder C:\Komku\PeToUSB\
double
click PeToUSB.exe

a
window will appear like this...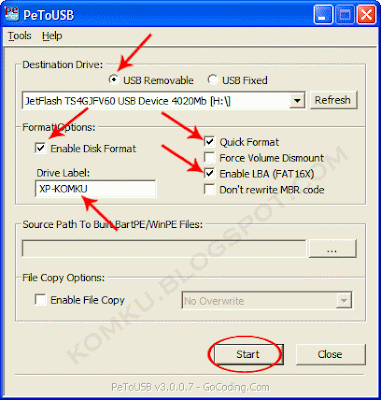
Destination
Drive : select USB Removable
check
on Enable Disk Format
check
on Quick Format
check on Enable LBA (FAT 16x)
Drive Label :
XP-KOMKU
(or whatever you want)
then
click Start
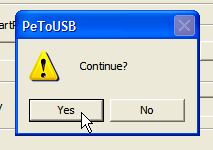 Click Yes
to continue....
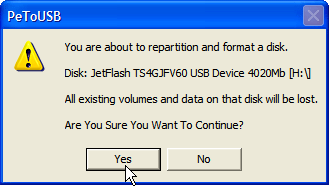
"You are about to repartition and format a
disk.
Disk: ....
All existing volumes and data on that disk
will be lost.
Are You Sure You
Want To Continue?"
click Yes
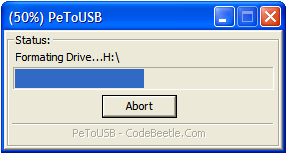
Wait
a few seconds...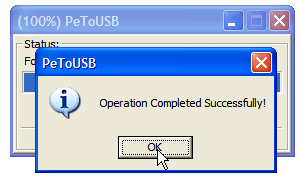
Click
OK
, and you can close PeToUSB
window.
step 5
:
Open
Command Prompt
...
Click
Start > Run > type cmd
> click OK

On
Command Prompt window, go to directory C:\Komku\bootsect\
how
to do this?
first type this cd\
and
press Enter

then
type cd komku\bootsect
and
press Enter
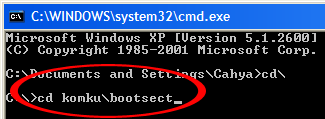
the
result...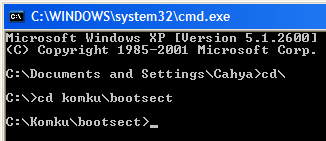
Don't
close Command Prompt window, and go to step 6...
step 6:
on command prompt window,
type bootsect /nt52 H:

H:
is drive letter for my USB
Flash Drive, it may be different with yours...
 and
press Enter
the result... "Successfully
updated filesystem bootcode. Bootcode was succesfully updated on all
targeted volumes."
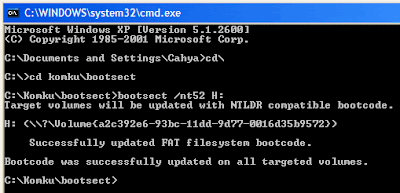
don't
close Command Prompt window, and go to step 7...
step 7:
now type this cd..
and
press
Enter

then
type cd usb_prep8
and press
Enter
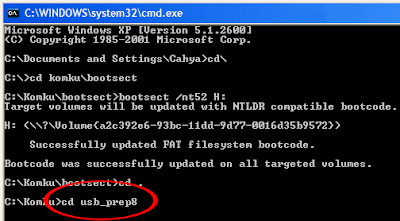
type
usb_prep8
again... and pres
Enter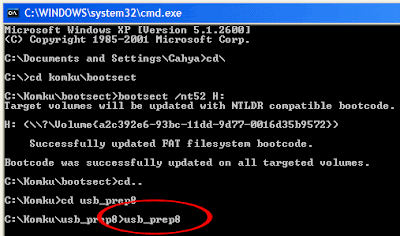
step 8:
Your
command
prompt window will look like this

Press
any key to continue...
usb_prep8 welcome screen will appear
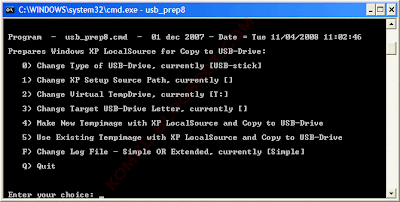
Prepares
Windows XP LocalSource for Copy to USB-Drive:
0) Change Type of
USB-Drive, currently [USB-stick]
1) Change XP Setup Source Path,
currently []
2) Change Virtual TempDrive, currently [T:]
3) Change
Target USB-Drive Letter, currently []
4) Make New Tempimage with XP
LocalSource and Copy to USB-Drive
5) Use Existing Tempimage with XP
LocalSource and Copy to USB-Drive
F) Change Log File - Simple OR
Extended, currently [Simple]
Q) Quit
Enter your choice:_
now,
insert your original Windows XP CD, or Windows
XP with sata ahci driver
to your CD/DVD ROM
and back to Command
Prompt window
type 1
then
press Enter...
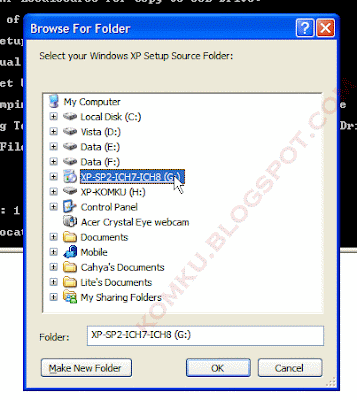
"Browse For Folder" window will appear, select your
CD/DVD drive and click OK
the
result... "XP Setup Source Path" changed to G:\
(yours may be
different)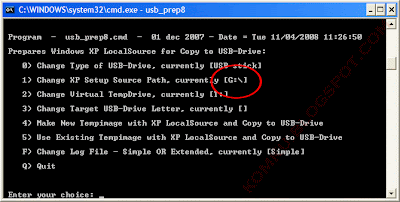
now
for point 2, if letter T
is
currently assigned to a drive in your computer, you must change it....
if not, leave it
as it is
how
to change it?
type 2
and
press Enter... "Enter Available Virtual DriveLetter"
for
example you doesn't have drive S
so
you type S
and press Enter
back
to usb_prep8 welcome screen...
now type 3
and press Enter...
 "Please give Target USB-Drive Letter e.g
type U"
Enter Target USB-Drive
Letter:
because my Flash drive letter is H
 so,
type H
and press Enter...
after
back to usb_prep8 welcome screen...
now type 4
and press Enter to make new
temporary image with XP LocalSource and copy it to USB Flash Drive
please
wait a few seconds..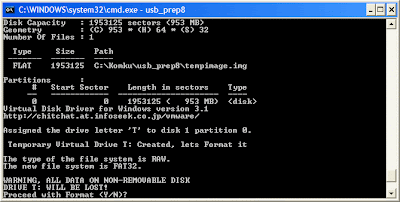
"WARNING, ALL DATA ON NON-REMOVABLE DISK
DRIVE T: WILL BE LOST!
Proceed with Format (Y/N)?"
type Y
and press Enter
please wait....
when
format virtual disk complete, press any key to continue...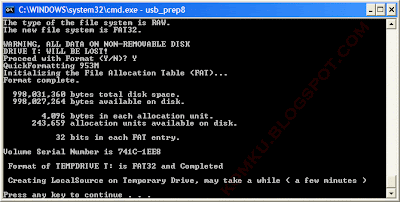
please
wait... making of LocalSource folder is in progress...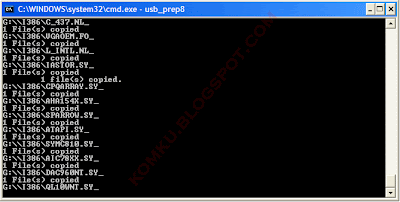
when "Making of LocalSource folder $WIN_NT$.~LS
Ready"
Press any key to continue...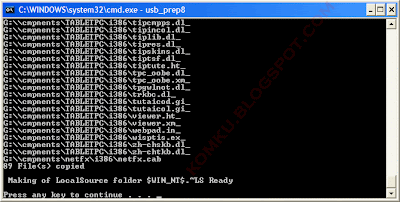
"Copy TempDrive Files to USB-Drive in about
15 minutes = Yes
OR STOP = End
Program = No"
Click Yes
,
and wait...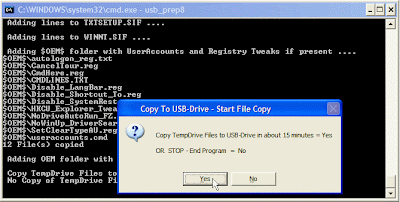
"Would you like USB-stick to be preferred
Boot Drive U:
bla... bla..."
Click
Yes
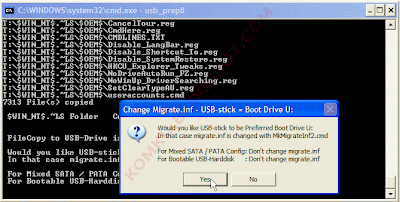
"Would you like to unmount the Virtual
Drive ?"
Click Yes
,
wait a few seconds, and press any key....
press any key again to
close usb_prep8...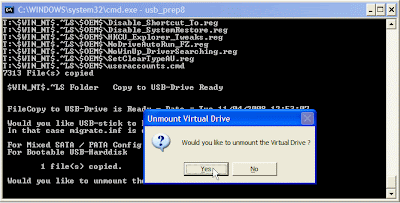
Now,
your USB Flash Drive is ready... 
step 9
:
Now, insert your USB Flash
Drive/Flash Disk/Thumb Drive to your notebook (e.g Acer
Aspire One
)
go to BIOS and make USB
HDD
(or USB ZIP
in some
other machine) as primary boot device....
then boot form your USB
Flash Drive....
and select "TXT
Mode Setup Windows XP, Never unplug USB-Drive Until After Logon"

After
Hard Disk
detected, delete all partition
, create single partition...
and install
Windows XP
on that partition...
and wait...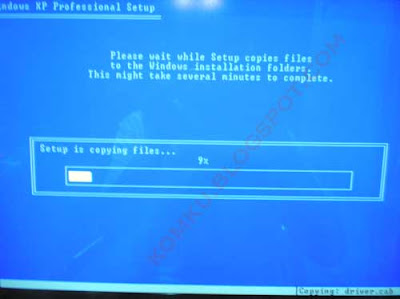
once
text mode setup is complete, computer will restart....
this time
select "GUI Mode setup Windows XP,
Continue Setup + Start XP
"
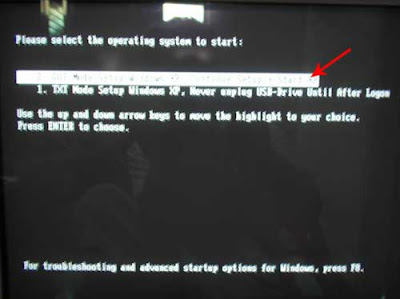
Continue
Windows XP setup.... and Done! 
Windows XP Installed....
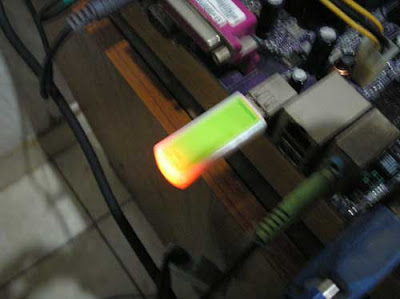
Remember, you can use this tutorial to install
Windows XP on all other computers.. not just Aspire One and Asus
EEE-PC.... good luck!
UPDATE 2
:
FAQ
Anonymous
saidÔÇŽ
what if i use a 1GB flash drive
? will it still work?
Yes
it is.. :)
Anonymous saidÔÇŽ
hi all
can somebody tell me how to install
xp with this method in SATA HD?
i finished the tutorial,but when
boot up,the hdd is not showed.
help me plz
Follow this
guide (Slipstreaming
driver using nLite
)
FYI, you can burn it as image, then use
virtual drive as Daemon Tools (Download
) to mount it
Anonymous saidÔÇŽ
Trying to
restore XPSP3 on Medion akoya
MD96910 netbook. Worked fine until 99% of files copied then got: Setup
cannot copy the file: iaahci.cat - giving 3 options (retry, skip, quit).
Retry didn't work so skipped. Similar message for iaahci.inf iaStor.cat
iaStor.inf iaStor.sys. Subsequent XP Boot then failed. I do not
understand why the intelSATA drivers (these files) won't load. Will try
again with Netbook Bios AHCI mode set to Disable but not confident that
will make any difference. Help!
Ref: MD96910
netbook restore. With AHCI mode disabled it works without loading the
intelSATA files. I assume these will have to be loaded, just got to
figure how to do that now! Thanks for great install guide - brilliant. If you could
put a comment about
intelSATA it would be great, I cannot be the only person who doesn't
understand it.
Allen saidÔÇŽ
PeToUSB didn't
find any removable flash drive. Please
help me
.
by the way, I'm using Windows Vista.
Try
use XP... or
use another USB port... My friend tried it on his
Lenovo... when he plug in his USB flashdrive on left side of his
notebook... PeToUSB didn't find any removable flashdrive... he change it
to the right side then it works (XP) :)
read this :
Anonymous saidÔÇŽ
Easy and well written.. thanks for making
our lives easier. Although I should mention that I've tried it inder
Windows Vista at first and the USB Flash Driver wasn't readable at all.
The whole process must be under Windows XP. Again thanks, and wish you
all the best.
Anonymous
saidÔÇŽ
I was having the "No
USB Disks" error with PeToUSB as well with by Samsung U3 (2G) and my
microSD + Reader (4G) on 32-bit Vista. The USBs were all formatted to
FAT.
Then I switched to XP,
and the USB was detected
I want do this is Vista...
Ali
Jaffer saidÔÇŽ
If you're on Windows Vista, try using the "Run as
Administrator" function for both formatting the drive and command prompt.
Anonymous saidÔÇŽ
thanks for the
instructions works like a charm everytime :D
got one question
though, can you use partition manager
to make partitions after XP has been installed successfully
using
this method?
Like Obama said... Yes We Can!
For
more FAQ read comments.....
Anonymous saidÔÇŽ
Hi Guys this is greate blog
Guess what i sued the same
instruction to install the Server 2003 sr2 and works well for my Home
server
Thanks to you all the Contributor
UPDATE 3
:
Everyone please read
this WinToFlash
Guide - Install Windows XP from USB Flash drive
UPDATE 4
:
NOTE TO ANYBODY WHO'S FLASH DRIVE CANNOT BE
DETECTED... If you are in Vista or Windows 7 (Like Me) you have to
Right-Click PeToUSB.exe, go to Properties, Compatibility Tab, and in
Windows 7, choose RUN IN COMPATIBILITY MODE, and select Windows XP
(Service Pack 3).
In Vista, just do some kind of "xp" mode. Also, in
Windows 7, Command Prompt will probably give you a "denied" message on
one of the "CMD" commands. Before going into Command Prompt, Right Click
it (When typing into the search box in start menu) and click "Run as
Administrator".
-Jason
"The 11 Year Old Tech Wiz"
UPDATE 5
:
Install
Windows 7
from USB Flash drive
guide
 
 
- 2010-07-16 12:00
- ŠÁĆŔžł 2745
- Ŕ»äŔ«║(0)
- ňłćš▒╗:ŠôŹńŻťš│╗š╗č
- ŠčąšťőŠŤ┤ňĄÜ
ňĆĹŔíĘŔ»äŔ«║
-
sysctl.conf
2011-07-06 14:54 1788fs.file-max=51200 net.core.net ... -
topšÜ䊍┐ń╗úňĚąňůĚ
2011-06-28 15:06 1511dstat -cgilpymn collectl and ... -
ŠťëšöĘšÜäň░ĆňĚąňůĚ
2010-12-23 11:51 1381pv stream nessus Nikto ski ... -
Ŕ░âń╝ślinux i/o ŔíîńŞ║
2010-11-25 11:27 2947http://www.westnet.com/~gsmith/ ... -
ŠťŹňŐíňÖĘÚâĘšŻ▓ňĚąňůĚ
2010-11-12 16:32 2095http://www.linuxlinks.com/artic ... -
ň╝ÇŠ║ÉšÜäÚůŹšŻ«š«íšÉćňĚąňůĚ
2010-11-12 16:24 1517ŠťÇńŻ│ň╝ÇŠ║ÉÚůŹšŻ«š«íšÉćňĚąňůĚ´╝Ü Puppet / ŠĆÉňÉŹ´╝ÜOpenQ ... -
ń╝śňîľext3šÜämountÚÇëÚí╣
2010-11-12 10:24 1390defaults,commit=600,noatime,nod ... -
ŠüóňĄŹr710biso ňç║ňÄéŔ«żšŻ«
2010-11-10 10:30 1255ALT+E/F/B  -
Š»ĆŔ┐ŤšĘőiošŤĹŠÄžňĚąňůĚ
2010-11-02 14:14 1689iodump iotop iopp pidstat b ... -
Intel Xeon 5500/5600š│╗ňłŚ CPUŠťŹňŐíňÖĘňćůňşśŔ«żšŻ«
2010-11-01 21:29 4904http://www.xasun.com/article/2a ... -
zabbixščşń┐íŠŐąŔşŽŔäÜŠťČŠľçń╗Â
2010-10-21 14:28 2818ÚÖäń╗ -
ňĄęňĄľÚú×ń╗Öš║žňłźšÜäLinux ShellňĹŻń╗Ą
2010-10-16 09:59 1493ŠťČŠľçš╝ľŔ»ĹŔç¬commandlinefu.com ( ň║öŔ»ąŠś» Ca ... -
lenny+r710+lvm ÚçŹňɻڌ«ÚóśŔžúňć│Šľ╣Šíł
2010-10-15 14:22 1153ro rootdelay=10 quiet -
fai´╝îdebian Ŕç¬ňŐĘň«ëŔúůňĚąňůĚ
2010-10-15 13:36 1138http://sys.firnow.com/linux/x80 ... -
ňŹüńެŠťŹňŐíňÖĘšŤĹŠÄžňĚąňůĚ
2010-09-26 11:44 1867ńŞÇńŻŹňŤŻňĄľšÜäŠŐÇŠť»ňŹÜńŞ╗ňťĘň ... -
restrict authorized_keys
2010-09-06 09:45 1293command="/home/someuser/rs ... -
sysctlń╝śňîľŔ«żšŻ«
2010-09-05 11:25 1202sysctl Šś»ńŞÇńެšöĘŠŁąňťĘš│╗š╗čŔ┐ÉńŻťńŞşŠčąšťőňĆŐŔ░⊼┤š│╗š╗čňĆ銼░šÜäňĚą ... -
procŠľçń╗š│╗š╗č
2010-09-05 11:22 1308ń╗Çń╣łŠś»procŠľçń╗š│╗š╗č´╝č ┬á procŠľçń╗š│╗š╗芜»ńŞÇńެń╝¬ ... -
nfsńŻ┐šöĘ
2010-09-02 17:01 1177http://www.linuxhomenetworking. ... -
lsof example
2010-08-23 12:40 13001ŃÇüŠčąšťőŠľçń╗š│╗š╗čÚś╗ňí× Ń ...


šŤŞňů│ŠÄĘŔŹÉ
Ŕžúňć│mtk6572ň╣│ňĆ░modemš╝ľŔ»ĹÚöÖŔ»»´╝ü Please install the GCC Cross-Compiler on correct path: tools/GCC/4.6.2/linux/bin/arm-none-eabi-gcc
basic-configdrive -hcreate-basic-configdrive -H myhostname -S ~/.ssh/mykey.pub -t TOKENńŻ┐šöĘvirtualboxŠÁőŔ»Ľconfigdrive ň«ëŔúůvirtualbox go get github.com/fivethreeo/create-coreos-vdigo install github....
windows 10š│╗š╗čńŞŐ´╝îobs-studioš╝ľŔ»ĹŔ┐çšĘőŃÇé ńŞÇŃÇü š╝ľŔ»ĹňëŹňĆéŔÇâ ňżłÚçŹŔŽü´╝îŔŽüńŞŹŠťëňżłňĄÜňŁĹšşëšŁÇńŻáŃÇé https://github.com/obsproject/obs-studio/wiki/Install-Instructions#windows
apt-get install vim apt-get install tar ň«ëŔúůjdk: vi /etc/profile export JAVA_HOME=/opt/jdk export PATH=$PATH:$JAVA_HOME docker run -d -p 8989:8080 -v /home/tomcat/webapps/:/opt/tomcat/apache-...
Drupal 8 Explained: Your Step-by-Step Guide to Drupal 8 (The Explained Series) by Stephen Burge English | 3 Apr. 2017 | ASIN: B06Y1VN2D7 | 283 Pages | AZW3 | 13.66 MB We're delighted to present the ...
#### Note on Python 3 : if you are using python3 then you need to install python3-dev using the following command : `sudo apt-get install python3-dev` # debian / Ubuntu `sudo yum install python3-...
mkdir -p _install/bin _install/include _install/lib _install/man/man1 make && make install root@ubuntu:/home/disk2/PP1938-V2.4.1/bmp2jpg# arm-linux-gcc -v Using built-in specs. Target: arm-...
If you do not have Composer, you may install it by following the instructions at getcomposer.org. Install First   Extract the archive file downloaded from CloudXNS-API-SDK-PHP.zip to your...
SuperVivi-USB-Transfer-Tool win7 64ńŻŹŠÁőŔ»ĽňĆ»šöĘŃÇé his tool has some prerequisites. ----- 1: Libusbdotnet Installer: LibUsbDotNet_Setup.2.2.7.exe (or grab the latest versions on ...
rate-limit-redis redisńŞşÚŚ┤ń╗šÜäňşśňéĘ ŃÇé...ň«ëŔúůŠŁąŔç¬ npm Š│ĘňćîŔíĘ# Using npm> npm install rate-limit-redis# Using yarn or pnpm> yarn/pnpm add rate-limit-redisŠŁąŔç¬ Github ňĆĹňŞâ# Using npm> npm install ...
If you were on -7YZ before, you should now install -4YZ. Looks like -8YZ builds are for Android TV. Examples: -014 for Android -438 for Android 5.0+ armeabi-v7a CPU 480 DPI device -876 for Android ...
'pip install requirements.txt' Ŕ«şš╗âńŞÄŠÁőŔ»Ľ Ŕ«şš╗â ''' CUDA_VISIBLE_DEVICES=0 python ./src/train.py --dataset=KITTI --pretrained_model_path=./data/SqueezeNet/squeezenet_v1.1.pkl --data_path=./data/ --...
Based on the given information from the file, we ...- **Enabling Hyper-V on Windows 10**: [https://blogs.technet.microsoft.com/canitpro/2015/09/08/step-by-step-enabling-hyper-v-for-use-on-windows-10/]...
6. š╝ľŔ»Ĺňĺîň«ëŔúů´╝ÜŠëžŔíî`make`ňĺî`make install`ňĹŻń╗ĄŠŁąš╝ľŔ»Ĺňĺîň«ëŔúůNginxŃÇéň»╣ń║ÄWindows´╝îńŻáňĆ»ŔâŻÚťÇŔŽüńŻ┐šöĘVisual StudioŠłľňůÂń╗ľWindowsňů╝ň«╣šÜäš╝ľŔ»ĹňĚąňůĚŃÇé 7. ŠÁőŔ»ĽňĺîňÉ»ňŐĘ´╝Üš╝ľŔ»Ĺň«îŠłÉňÉÄ´╝îńŻáňĆ»ń╗ąÚÇÜŔ┐ç`./objs/nginx -t`ŠÁőŔ»ĽÚůŹšŻ«...
sudo apt-get install sun-java6-bin sun-java6-jdk sun-java6-jre ``` **Step 4. ńŞőŔŻŻň╣Âň«ëŔúůHadoop** ňťĘÔÇťńŞ╗Šť║ńŞÇÔÇŁńŞŐńŞőŔŻŻň╣ÂŔžúňÄőHadoopŔŻ»ń╗ÂňîůŃÇéńżőňŽé´╝Ü ```bash cd /opt sudo wget ...
ňťĘxpńŞşšŤ┤ŠÄąŔ«┐ÚŚ«ňĄÜňłćňî║UšŤśšÜäš«ÇňŹĽŠľ╣Š│Ľ. This process will essentially ...Note: Simply rollback the driver if you ever want or need to make your USB flash drive detected by Windows as removable media again.
#./configure --prefix=/root/bluez/openobex --host=arm-linux CC="arm-linux-gcc -I/root/bluez/bluez-libs/include -L/root/bluez/bluez-libs/lib" --enable-bluetooth --disable-usb --enable-apps #make #...
sudo php install-pear-nozlib.phar -d /usr/local/lib/php -b /usr/local/bin (credit) Step 2: Download zip extension source I tried installing zip with pecl, but that failed because the ...
'pip install requirements.txt' Ŕ«şš╗âńŞÄŠÁőŔ»Ľ Ŕ«şš╗â ''' CUDA_VISIBLE_DEVICES=0 python ./src/train.py --dataset=KITTI --pretrained_model_path=./data/SqueezeNet/squeezenet_v1.1.pkl --data_path=./data/ --...
flashplayer11.3 šÜ䊝NJľ░šëł