`
冷静
  • 浏览: 144437 次
  • 性别: Icon_minigender_1
  • 来自: 佛山
社区版块
存档分类
最新评论

Struts 2的基石——拦截器(Interceptor)

阅读更多
首先,要跟大家道个歉,前一阵子为给客户个一个DEMO,忙得不可开交,所以很久没有更新Blog。提到这个DEMO我想顺便跟大家分享一下心得——如果大家希望快速开发,一个类似Struts 2这样的简单方便的WEB框架必不可少。我们在开发DEMO使用的还是Struts 1.2.8,而且没有不使用任何EL(表达式语言),导致页面出现无数类似“<%= ((Integer) request.getAttribute("xx")).intValue()%6 %>”的代码。Struts 1.x的Form Bean的麻烦使得有部分同事直接使用request.getParameter(String arg),继而引入另一种麻烦。诸如此类的问题,在DEMO这样时间紧迫的项目凸显了Struts 1.x对快速开发的无能为力。不过没办法,由于我们项目中的几个资深员工除了Struts 1.x外,对其它的WEB框架似乎不大感兴趣。
言归正传,Interceptor(以下译为拦截器)是Struts 2的一个强有力的工具,有许多功能(feature)都是构建于它之上,如国际化转换器校验等。

什么是拦截器

拦截器,在AOP(Aspect-Oriented Programming)中用于在某个方法或字段被访问之前,进行拦截然后在之前或之后加入某些操作。拦截是AOP的一种实现策略。
在Webwork的中文文档的解释为——拦截器是动态拦截Action调用的对象。它提供了一种机制可以使开发者可以定义在一个action执行的前后执行的代码,也可以在一个action执行前阻止其执行。同时也是提供了一种可以提取action中可重用的部分的方式。
谈到拦截器,还有一个词大家应该知道——拦截器链(Interceptor Chain,在Struts 2中称为拦截器栈Interceptor Stack)。拦截器链就是将拦截器按一定的顺序联结成一条链。在访问被拦截的方法或字段时,拦截器链中的拦截器就会按其之前定义的顺序被调用。

实现原理

Struts 2的拦截器实现相对简单。当请求到达Struts 2的ServletDispatcher时,Struts 2会查找配置文件,并根据其配置实例化相对的拦截器对象,然后串成一个列表(list),最后一个一个地调用列表中的拦截器,如图1所示。
图1 拦截器调用序列图
图1 拦截器调用序列图

已有的拦截器

Struts 2已经为您提供丰富多样的,功能齐全的拦截器实现。大家可以到struts2-all-2.0.1.jar或struts2-core-2.0.1.jar包的struts-default.xml查看关于默认的拦截器与拦截器链的配置。
在本文使用是Struts 2的最新发布版本2.0.1。需要下载的朋友请点击以下链接:
[url]http://apache.justdn.org/struts/binaries/struts-2.0.1-all.zip[/url]
以下部分就是从struts-default.xml文件摘取的内容:
< interceptor name ="alias" class ="com.opensymphony.xwork2.interceptor.AliasInterceptor" />
< interceptor name ="autowiring" class ="com.opensymphony.xwork2.spring.interceptor.ActionAutowiringInterceptor" />
< interceptor name ="chain" class ="com.opensymphony.xwork2.interceptor.ChainingInterceptor" />
< interceptor name ="conversionError" class ="org.apache.struts2.interceptor.StrutsConversionErrorInterceptor" />
< interceptor name ="createSession" class ="org.apache.struts2.interceptor.CreateSessionInterceptor" />
< interceptor name ="debugging" class ="org.apache.struts2.interceptor.debugging.DebuggingInterceptor" />
< interceptor name ="external-ref" class ="com.opensymphony.xwork2.interceptor.ExternalReferencesInterceptor" />
< interceptor name ="execAndWait" class ="org.apache.struts2.interceptor.ExecuteAndWaitInterceptor" />
< interceptor name ="exception" class ="com.opensymphony.xwork2.interceptor.ExceptionMappingInterceptor" />
< interceptor name ="fileUpload" class ="org.apache.struts2.interceptor.FileUploadInterceptor" />
< interceptor name ="i18n" class ="com.opensymphony.xwork2.interceptor.I18nInterceptor" />
< interceptor name ="logger" class ="com.opensymphony.xwork2.interceptor.LoggingInterceptor" />
< interceptor name ="model-driven" class ="com.opensymphony.xwork2.interceptor.ModelDrivenInterceptor" />
< interceptor name ="scoped-model-driven" class ="com.opensymphony.xwork2.interceptor.ScopedModelDrivenInterceptor" />
< interceptor name ="params" class ="com.opensymphony.xwork2.interceptor.ParametersInterceptor" />
< interceptor name ="prepare" class ="com.opensymphony.xwork2.interceptor.PrepareInterceptor" />
< interceptor name ="static-params" class ="com.opensymphony.xwork2.interceptor.StaticParametersInterceptor" />
< interceptor name ="scope" class ="org.apache.struts2.interceptor.ScopeInterceptor" />
< interceptor name ="servlet-config" class ="org.apache.struts2.interceptor.ServletConfigInterceptor" />
< interceptor name ="sessionAutowiring" class ="org.apache.struts2.spring.interceptor.SessionContextAutowiringInterceptor" />
< interceptor name ="timer" class ="com.opensymphony.xwork2.interceptor.TimerInterceptor" />
< interceptor name ="token" class ="org.apache.struts2.interceptor.TokenInterceptor" />
< interceptor name ="token-session" class ="org.apache.struts2.interceptor.TokenSessionStoreInterceptor" />
< interceptor name ="validation" class ="com.opensymphony.xwork2.validator.ValidationInterceptor" />
< interceptor name ="workflow" class ="com.opensymphony.xwork2.interceptor.DefaultWorkflowInterceptor" />
< interceptor name ="store" class ="org.apache.struts2.interceptor.MessageStoreInterceptor" />
< interceptor name ="checkbox" class ="org.apache.struts2.interceptor.CheckboxInterceptor" />
< interceptor name ="profiling" class ="org.apache.struts2.interceptor.ProfilingActivationInterceptor" />

配置和使用拦截器

在struts-default.xml中已经配置了以上的拦截器。如果您想要使用上述拦截器,只需要在应用程序struts.xml文件中通过“<include file="struts-default.xml" />”将struts-default.xml文件包含进来,并继承其中的struts-default包(package),最后在定义Action时,使用“<interceptor-ref name="xx" />”引用拦截器或拦截器栈(interceptor stack)。一旦您继承了struts-default包(package),所有Action都会调用拦截器栈 ——defaultStack。当然,在Action配置中加入“<interceptor-ref name="xx" />”可以覆盖defaultStack。
下面是关于拦截器timer使用的例子。首先,新建Action类tuotrial/TimerInterceptorAction.java,内容如下:
package tutorial;

import com.opensymphony.xwork2.ActionSupport;

public class TimerInterceptorAction extends ActionSupport {
   @Override
   
public String execute() {
       
try {
           
// 模拟耗时的操作
           Thread.sleep( 500 );
       }
catch (Exception e) {
           e.printStackTrace();
       }

       
return SUCCESS;
   }

}
配置Action,名为Timer,配置文件如下:
<! DOCTYPE struts PUBLIC
        "-//Apache Software Foundation//DTD Struts Configuration 2.0//EN"
        "http://struts.apache.org/dtds/struts-2.0.dtd"
>
< struts >
   
< include file ="struts-default.xml" />    
   
< package name ="InterceptorDemo" extends ="struts-default" >
       
< action name ="Timer" class ="tutorial.TimerInterceptorAction" >
           
< interceptor-ref name ="timer" />
           
< result > /Timer.jsp </ result >
       
</ action >
   
</ package >
</ struts >
至于Timer.jsp可以随意写些什么到里面。发布运行应用程序,在浏览器的地址栏键入[url]http://localhost:8080/Struts2_Interceptor/Timer.action[/url],在出现Timer.jsp页面后,查看服务器的后台输出。
2006 - 12 - 6 14 : 27 : 32 com.opensymphony.xwork2.interceptor.TimerInterceptor doLog
信息: Executed action
[ //Timer!execute ] took 2859 ms.
在您的环境中执行Timer!execute的耗时,可能上述的时间有些不同,这取决于您PC的性能。但是无论如何,2859 ms与500 ms还是相差太远了。这是什么原因呢?其实原因是第一次加载Timer时,需要进行一定的初始工作。当你重新请求Timer.action时,以上输出会变为:
2006 - 12 - 6 14 : 29 : 18 com.opensymphony.xwork2.interceptor.TimerInterceptor doLog
信息: Executed action
[ //Timer!execute ] took 500 ms.
OK,这正是我们期待的结果。上述例子演示了拦截器timer的用途——用于显示执行某个action方法的耗时,在我们做一个粗略的性能调试时,这相当有用。

自定义拦截器

作为“框架(framework)”,可扩展性是不可或缺的,因为世上没有放之四海而皆准的东西。虽然,Struts 2为我们提供如此丰富的拦截器实现,但是这并不意味我们失去创建自定义拦截器的能力,恰恰相反,在Struts 2自定义拦截器是相当容易的一件事。
 
大家在开始着手创建自定义拦截器前,切记以下原则:
拦截器必须是无状态的,不要使用在API提供的ActionInvocation之外的任何东西。
要求拦截器是无状态的原因是Struts 2不能保证为每一个请求或者action创建一个实例,所以如果拦截器带有状态,会引发并发问题。
所有的Struts 2的拦截器都直接或间接实现接口com.opensymphony.xwork2.interceptor.Interceptor。除此之外,大家可能更喜欢继承类com.opensymphony.xwork2.interceptor.AbstractInterceptor。
以下例子演示通过继承AbstractInterceptor,实现授权拦截器。
首先,创建授权拦截器类tutorial.AuthorizationInterceptor,代码如下:
package tutorial;

import java.util.Map;

import com.opensymphony.xwork2.Action;
import com.opensymphony.xwork2.ActionInvocation;
import com.opensymphony.xwork2.interceptor.AbstractInterceptor;

public class AuthorizationInterceptor extends AbstractInterceptor {

   @Override
   
public String intercept(ActionInvocation ai) throws Exception {
       Map session
= ai.getInvocationContext().getSession();
       String role
= (String) session.get( " ROLE " );
       
if ( null != role) {
           Object o
= ai.getAction();
           
if (o instanceof RoleAware) {
               RoleAware action
= (RoleAware) o;
               action.setRole(role);
           }

           
return ai.invoke();
       }
else {
           
return Action.LOGIN;
       }
       
   }


}
以上代码相当简单,我们通过检查session是否存在键为“ROLE”的字符串,判断用户是否登陆。如果用户已经登陆,将角色放到Action中,调用Action;否则,拦截直接返回Action.LOGIN字段。为了方便将角色放入Action,我定义了接口tutorial.RoleAware,代码如下:
package tutorial;

public interface RoleAware {
   
void setRole(String role);
}
接着,创建Action类tutorial.AuthorizatedAccess模拟访问受限资源,它作用就是通过实现RoleAware获取角色,并将其显示到ShowUser.jsp中,代码如下:
package tutorial;

import com.opensymphony.xwork2.ActionSupport;

public class AuthorizatedAccess extends ActionSupport implements RoleAware {
   
private String role;
   
   
public void setRole(String role) {
       
this .role = role;
   }


public String getRole() {
       
return role;
   }


   @Override
   
public String execute() {
       
return SUCCESS;
   }

}
以下是ShowUser.jsp的代码:
<% @ page  contentType = " text/html; charset=UTF-8 " %>
<% @taglib prefix = " s " uri = " /struts-tags " %>
< html >
< head >
   
< title > Authorizated User </ title >
</ head >
< body >
   
< h1 > Your role is: < s:property value ="role" /></ h1 >
</ body >
</ html >
然后,创建tutorial.Roles初始化角色列表,代码如下:
package tutorial;

import java.util.Hashtable;
import java.util.Map;


public class Roles {
   
public Map < String, String > getRoles() {
       Map
< String, String > roles = new Hashtable < String, String > ( 2 );
       roles.put(
" EMPLOYEE " , " Employee " );
       roles.put(
" MANAGER " , " Manager " );
       
return roles;
   }

}
接下来,新建Login.jsp实例化tutorial.Roles,并将其roles属性赋予<s:radio>标志,代码如下:
<% @ page  contentType = " text/html; charset=UTF-8 " %>
<% @taglib prefix = " s " uri = " /struts-tags " %>
< html >
< head >
   
< title > Login </ title >
</ head >
< body >
   
< h1 > Login </ h1 >
    Please select a role below:
   
< s:bean id ="roles" name ="tutorial.Roles" />
   
< s:form action ="Login" >
       
< s:radio list ="#roles.roles" value ="'EMPLOYEE'" name ="role" label ="Role" />
       
< s:submit />
   
</ s:form >
</ body >
</ html >
创建Action类tutorial.Login将role放到session中,并转到Action类tutorial.AuthorizatedAccess,代码如下:
package tutorial;

import java.util.Map;

import org.apache.struts2.interceptor.SessionAware;

import com.opensymphony.xwork2.ActionSupport;

public class Login extends ActionSupport implements SessionAware {
   
private String role;    
   
private Map session;

   
public String getRole() {
       
return role;
   }


public void setRole(String role) {
       
this .role = role;
   }


public void setSession(Map session) {
       
this .session = session;
   }


   @Override
   
public String execute() {
       session.put(
" ROLE " , role);
       
return SUCCESS;
   }
   
http://www.blogjava.net/Images/OutliningIndicators/Exp
分享到:
评论

相关推荐

    个人认为目前最完备的Struts2教程

    07 Struts 2的基石——拦截器(Interceptor) 08 在Struts 2中实现IoC 09 在Struts 2中实现文件上传 10 在Struts 2中实现CRUD 11 Struts 2中的OGNL 12 Struts 2的新表单标志的使用 13 Struts 2与AJAX

    struts2.0中文教程

    07 Struts 2的基石——拦截器(Interceptor) 08 在Struts 2中实现IoC 09 在Struts 2中实现文件上传 10 在Struts 2中实现CRUD 11 Struts 2中的OGNL 12 trus 2的新表单标志的使用 13 Struts 2与AJAX

    Struts 2.0系列(MAX)

    Struts 2.0系列(MAX),pdf格式,全...Struts 2的基石——拦截器(Interceptor) 在Struts 2中实现IoC 在Struts 2中实现文件上传 在Struts 2中实现CRUD Struts 2中的OGNL Strus 2的新表单标志的使用 Struts 2与AJAX

    Struts2.0中文教程权威版

    07 Struts 2的基石——拦截器(Interceptor) 08 在Struts 2中实现IoC 09 在Struts 2中实现文件上传 10 在Struts 2中实现CRUD 11 Struts 2中的OGNL 12 trus 2的新表单标志的使用 13 Struts 2与AJAX Struts2中用...

    详解Struts2拦截器

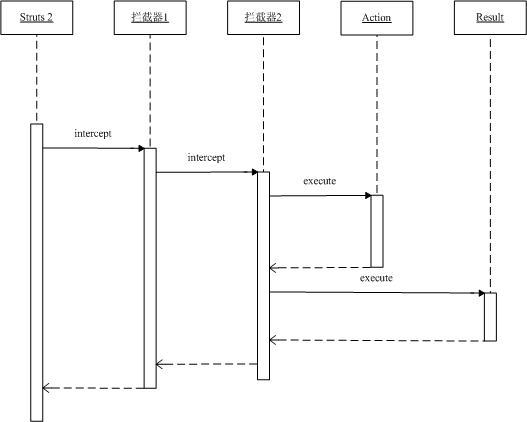
    拦截器不仅在Struts2中扮演着重要角色,更是整个框架灵活性与扩展性的基石。本文将深入探讨Struts2拦截器的基本概念、工作原理以及其实现机制,并结合实际应用场景来展示如何利用拦截器提高代码的复用性与可维护性。...

    struts2[1].0标签详解

    Struts 2的基石——拦截器(Interceptor);在Struts 2_0中国际化(i18n)您的应用程序;在Struts 2_0中实现表单数据校验(Validation);Struts 2与AJAX;在Struts 2中实现IoC......

    Strut2 源码API +TagAPI +示例

    Strut2 源码API +TagAPI +示例 在Struts 2中实现文件上传 - Max On Java - BlogJava.files Struts 2的基石——拦截器(Interceptor) - Max On Java - BlogJava.htm Struts 2中的OGNL - Max On Java - BlogJava.htm

    struts2的各种jar包

    3. **拦截器库**:`struts2-convention-plugin.jar`和`struts2-interceptor-plugin.jar`提供了多种内置拦截器,如Params拦截器处理参数绑定,Validation拦截器负责验证,以及Tiles拦截器用于页面布局。 4. **结果...

    Struts2例子10

    拦截器是Struts2框架的基石,它允许开发者在动作执行前后插入自定义逻辑,提供了丰富的功能扩展和行为增强。 首先,我们来理解一下什么是拦截器。在Struts2中,拦截器是基于Java的动态AOP(面向切面编程)实现的。...

    Struts2-API+Struts2中文帮助文档

    此外,`Interceptor`接口是拦截器的基石,它们在动作执行前后进行拦截,实现如权限检查、日志记录等功能。 Struts2中文帮助文档则针对这些API提供了更直观易懂的中文解释,涵盖了从基础知识到高级特性的各种主题。...

    struts2 配置JSP时需要的jar

    它提供了请求处理、拦截器链、插件架构等功能,是Struts2框架的基石。 2. **JSP和Struts2的集成**:在JSP页面中,我们可以通过`&lt;s:form&gt;`、`&lt;s:textfield&gt;`等Struts2标签库来创建表单和输入字段,实现与Action的...

    struts2课件----传智博客张孝祥老师最新讲解PPT

    学习Struts2,不仅要掌握基础的配置和Action设计,还要理解Interceptor(拦截器)的概念,它们可以插入到Action调用流程中,实现事务管理、权限控制等功能。另外,Struts2的国际化、异常处理、主题和模板等功能也是...

    struts2基本lib架包

    8. **javassist.jar**:这是一个代码生成库,Struts2使用它来实现运行时动态代理,创建拦截器。 9. **slf4j-api.jar** 和 **log4j.jar**:日志框架接口和实现,Struts2使用它们进行日志记录,方便调试和问题定位。 ...

    struts2 依赖包

    1. **Struts2 Core**:这是Struts2框架的基础,包含了处理HTTP请求、动作调度、结果渲染、拦截器、标签库等核心组件。其中,`Action`是业务逻辑的载体,`Interceptor`用于扩展和拦截请求处理,而`Result`则负责控制...

    spring+struts2图书管理系统

    Struts2框架则是基于Action和Result的MVC设计模式,它通过拦截器(Interceptor)实现了业务逻辑和视图的解耦。它的核心组件包括Action类、配置文件(struts.xml)、拦截器栈以及结果映射。Struts2允许开发者使用OGNL...

    struts2开发包

    开发者可以通过阅读文档了解如何配置Struts2的XML文件(如struts.xml和web.xml),如何定义Action,如何使用拦截器,以及如何创建自定义结果类型等。 总之,Struts2开发包是一个完整的开发环境,它集成了处理请求、...

    struts2基本(最小)jar包

    5. **.javassist.jar**:Javaassist库用于动态地修改类结构,Struts2使用它来处理Action类的动态代理,实现拦截器的功能。 6. **.commons-logging.jar**:这是一个通用的日志接口,提供日志抽象层,使得Struts2可以...

Global site tag (gtag.js) - Google Analytics