- 浏览: 19857 次
-

文章分类
最新评论
通向架构师的道路(第十二天)之Axis2 Web Service(三)
一、SOAPIn Axis2
在前两天的教程中,我们学习到了用Axis2如何进行复杂数据、简单数据进行传输。
正如我在前一天教程中所说,在web service的世界里,一切都是基于SOAP的,因此在今天我们将学习Axis2中的SOAP特性。
今天的课程将用3个例子来完成即:
1)客户端与服务端使用SOAP进行通讯
2)服务端将Exception以SOAPFault的形式抛给客户端
3)使用SWA(Soap With Attachment)来进行附件传送
二、客户端与服务端使用SOAP进行通讯
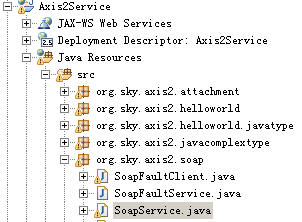
来看下面这个Web Service:

下面是Service端的源码
org.sky.axis2.soap.SoapService
|
package org.sky.axis2.soap; import org.apache.axiom.om.OMAbstractFactory; import org.apache.axiom.om.OMElement; import org.apache.axiom.om.OMFactory; import org.apache.axiom.om.OMNamespace; import java.util.*; public class SoapService { public static OMElement requestSoap = null; public OMElement request(OMElement soapBody) { requestSoap = soapBody; Iterator it = requestSoap.getChildElements(); OMElement issuerElement = (OMElement) it.next(); OMElement serialElement = (OMElement) it.next(); OMElement revocationDateElement = (OMElement) it.next(); String issuer = issuerElement.getText(); String serial = serialElement.getText(); String revocationDate = revocationDateElement.getText(); System.out.println("issuer=====" + issuer); System.out.println("serial=====" + serial); System.out.println("revocationDate=====" + revocationDate); OMFactory soapFactory = OMAbstractFactory.getOMFactory(); OMNamespace omNs = soapFactory.createOMNamespace( "http://soap.axis2.sky.org", ""); OMElement soapResponse = soapFactory.createOMElement("SoapResponse", omNs); OMElement soapIssuer = soapFactory.createOMElement("Issuer", omNs); soapIssuer.setText("issuer: " + issuer); soapResponse.addChild(soapIssuer);
OMElement soapSerial = soapFactory.createOMElement("Serial", omNs); soapSerial.setText("serial: " + serial); soapResponse.addChild(soapSerial);
OMElement soapRevokeDate = soapFactory.createOMElement("RevokeDate", omNs); soapRevokeDate.setText("RevocationDate: " + revocationDate); soapResponse.addChild(soapRevokeDate); soapResponse.build(); return soapResponse; } } |
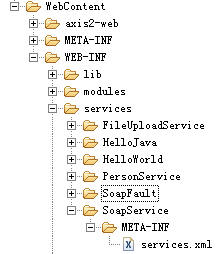
来看它的service.xml的描述

|
<service name="SoapService"> <description> This is the service for revoking certificate. </description> <parameter name="ServiceClass" locked="false"> org.sky.axis2.soap.SoapService </parameter> <operation name="request"> <messageReceiver class="org.apache.axis2.receivers.RawXMLINOutMessageReceiver" /> <actionMapping>urn:request</actionMapping> </operation> </service> |
该Web Service接受一个Soap请求,该请求为如下格式:
|
<soapenv:Envelope xmlns:soapenv="http://schemas.xmlsoap.org/soap/envelope/" xmlns:soap="http://soap.axis2.sky.org"> <soapenv:Header/> <soapenv:Body> <soap:request> <soap:request>?</soap:request> </soap:request> </soapenv:Body> </soapenv:Envelope> |
其中<soap:request></soap:request>中间的内容,应该如下所示:
|
<Request xmlns="http://10.225.104.122"> <Issuer>1234567890</Issuer> <Serial>11111111</Serial> <RevokeDate>2007-01-01</RevokeDate> </ Response > |
我们假设它是一个购买图书的定单,服务端收到这个请求后会返回一个定单信息给调用它的客户端,服务端将返回如下内容(此处不做任何业务处理,只是很简单的传值回客户端)。
|
<SoapResponse xmlns="http://soap.axis2.sky.org"> <Issuer>issuer: Wrox</Issuer> <Serial>serial: 1111111111ISBN</Serial> <RevokeDate>RevocationDate: 2012-07-29</RevokeDate> </SoapResponse> |
为生成上述这个SoapResponse我们在Service端的核心代码如上面加粗部分的代码所示,由其注意这个“soapResponse.build();”。
下面我们来看这个客户端是怎么写的,我们这边用的是非阻塞式客户端
org.sky.axis2.soap.SoapServiceClient
|
package org.sky.axis2.soap; import org.apache.axiom.om.OMAbstractFactory; import org.apache.axiom.om.OMElement; import org.apache.axiom.om.OMFactory; import org.apache.axiom.om.OMNamespace; import org.apache.axis2.AxisFault; import org.apache.axis2.Constants; import org.apache.axis2.addressing.EndpointReference; import org.apache.axis2.client.Options; import org.apache.axis2.client.ServiceClient; import org.apache.axis2.client.async.AxisCallback; import org.apache.axis2.context.MessageContext; import javax.xml.namespace.QName; public class SoapServiceClient { private static EndpointReference targetEPR = new EndpointReference( "http://localhost:8080/Axis2Service/services/SoapService"); public static boolean finish = false; public static void orderRequest() { OMFactory factory = OMAbstractFactory.getOMFactory(); OMNamespace omNs = factory.createOMNamespace( "http://soap.axis2.sky.org", ""); OMElement issuer = factory.createOMElement("Issuer", omNs); OMElement serial = factory.createOMElement("Serial", omNs); OMElement revocationDate = factory.createOMElement("RevocationDate", omNs); issuer.setText("Wrox"); serial.setText("1111111111ISBN"); revocationDate.setText("2012-07-29"); OMElement requestSoapMessage = factory.createOMElement("request", omNs); requestSoapMessage.addChild(issuer); requestSoapMessage.addChild(serial); requestSoapMessage.addChild(revocationDate); requestSoapMessage.build(); Options options = new Options(); options.setTo(targetEPR); ServiceClient sender = null; try { AxisCallback callback = new AxisCallback() { public void onMessage(MessageContext msgContext) { OMElement result = msgContext.getEnvelope().getBody() .getFirstElement(); // System.out.println(msgContext.toString()); // System.out.println(msgContext.getEnvelope().toString()); System.out.println(msgContext.getEnvelope().getBody() .getFirstElement()); finish = true; } public void onFault(MessageContext msgContext) { System.out.println(msgContext.getEnvelope().getBody() .getFault().toString()); } public void onError(Exception e) { } public void onComplete() { System.out.println("Completed!!!"); } }; sender = new ServiceClient(); sender.setOptions(options); System.out.println("-------Invoke the service---------"); sender.sendReceiveNonBlocking(requestSoapMessage, callback); synchronized (callback) { if (!finish) { try { callback.wait(1000); } catch (Exception e) { } } if (!finish) { throw new AxisFault( "Server was shutdown as the async response take too long to complete"); } } } catch (AxisFault e) { e.printStackTrace(); } finally { if (sender != null) try { sender.cleanup(); } catch (Exception e) { } } } public static void main(String[] args) { orderRequest(); } } |
上述代码和前两天的客户端代码没啥区别,我已经把核心代码用红色给标粗了。
运行后行得到输出
客户端运行后的输出:

服务端的输出:

三、服务端将Exception以SOAPFault的形式抛给客户端
上面这个例子很简单,它展示了一个客户端向服务端发送一个request,服务端接收到客户端的Request(OMElement类型)后解析并根据相应的业务逻辑向客户端再返回一个response(OMElement类型)的完整过程。
下面我们要来看的是,如果客户端在调用服务器时发生任何错误,服务端如何把这个错误经过包装后再返回给客户端的例子。
还记得我们在非阻塞式客户端中有如下这样的触发器吗?
|
public void onMessage(MessageContext msgContext) { } public void onFault(MessageContext msgContext) { } public void onError(Exception e) { } public void onComplete() { } |
此处的onFault就是用于接受从服务端抛过来的Exception的,我们把它称为SOAPFault。
下面来看一个例子,先来看Service端
org.sky.axis2.soap.SoapFaultService
|
package org.sky.axis2.soap; import org.apache.axiom.om.OMAbstractFactory; import org.apache.axiom.om.OMElement; import org.apache.axiom.om.OMFactory; import org.apache.axiom.om.OMNamespace; import org.apache.axiom.soap.SOAPFactory; import org.apache.axiom.soap.SOAPFault; import org.apache.axiom.soap.SOAPFaultCode; import org.apache.axiom.soap.SOAPFaultReason; import org.apache.axis2.AxisFault; import org.apache.axis2.context.MessageContext; public class SoapFaultService { private int i = 0; public OMElement getPrice(OMElement request) throws AxisFault { if (request == null) { SOAPFault fault = getSOAPFault(); return fault; } OMFactory factory = OMAbstractFactory.getOMFactory(); OMNamespace ns = factory.createOMNamespace("", ""); OMElement response = factory.createOMElement("Price", ns); response.setText(String.valueOf(i++)); return response; } private SOAPFault getSOAPFault() { MessageContext context = MessageContext.getCurrentMessageContext(); SOAPFactory factory = null; if (context.isSOAP11()) { factory = OMAbstractFactory.getSOAP11Factory(); } else { factory = OMAbstractFactory.getSOAP12Factory(); } SOAPFault fault = factory.createSOAPFault(); SOAPFaultCode faultCode = factory.createSOAPFaultCode(fault); faultCode.setText("13"); factory.createSOAPFaultValue(faultCode); SOAPFaultReason faultReason = factory.createSOAPFaultReason(fault); faultReason.setText("request can not be null"); factory.createSOAPFaultText(faultReason); factory.createSOAPFaultDetail(fault); return fault; } } |
注意加粗部分的代码,由其是标成红色的代码为核心代码。
来看Service描述:
|
<service name="SoapFaultService"> <Description> Please Type your service description here </Description> <parameter name="ServiceClass" locked="false">org.sky.axis2.soap.SoapFaultService </parameter> <operation name="getPrice"> <messageReceiver class="org.apache.axis2.receivers.RawXMLINOutMessageReceiver" /> <actionMapping>urn:getPrice</actionMapping> </operation> </service> |
上述这个WebService接受一个输入的参数,如果输入的内容为空,则返回一个SoapFault,即键值为13,内容为” request can not be null”。
我们来看客户端的代码
org.sky.axis2.soap.SoapFaultClient
|
package org.sky.axis2.soap; import java.util.Iterator; import javax.xml.namespace.QName; import org.apache.axiom.om.OMAbstractFactory; import org.apache.axiom.om.OMElement; import org.apache.axiom.om.OMFactory; import org.apache.axiom.om.OMNamespace; import org.apache.axis2.AxisFault; import org.apache.axis2.Constants; import org.apache.axis2.addressing.EndpointReference; import org.apache.axis2.client.Options; import org.apache.axis2.client.ServiceClient; import org.apache.axis2.client.async.AxisCallback; import org.apache.axis2.context.MessageContext; public class SoapFaultClient { static boolean finish = false; public static void main(String[] args) { EndpointReference epr = new EndpointReference( "http://localhost:8080/Axis2Service/services/SoapFaultService"); ServiceClient sender = null; try { OMFactory factory = OMAbstractFactory.getOMFactory(); OMNamespace ns = factory.createOMNamespace( "http://soap.axis2.sky.org", ""); OMElement request = factory.createOMElement("Price", ns); Options options = new Options(); options.setAction("urn:getPrice"); options.setTo(epr); options.setTransportInProtocol(Constants.TRANSPORT_HTTP); options.setUseSeparateListener(true); AxisCallback callback = new AxisCallback() { public void onMessage(MessageContext msgContext) { OMElement result = msgContext.getEnvelope().getBody() .getFirstElement(); OMElement priceElement = result; System.out.println("price====" + priceElement.getText()); finish = true; } public void onFault(MessageContext msgContext) { QName errorCode = new QName("faultcode"); QName reason = new QName("faultstring"); // System.out.println("on // fault:"+msgContext.getEnvelope().getBody().getFault().toString()); OMElement fault = msgContext.getEnvelope().getBody() .getFault(); System.out.println("ErrorCode[" + fault.getFirstChildWithName(errorCode).getText() + "] caused by: " + fault.getFirstChildWithName(reason).getText()); } public void onError(Exception e) { } public void onComplete() { System.out.println("OnComplete!!!"); } }; sender = new ServiceClient(); sender.setOptions(options); sender.engageModule("addressing"); try { // sender.sendReceiveNonBlocking(request, callback); sender.sendReceiveNonBlocking(null, callback); } catch (AxisFault e) { System.out.println("Exception occur!"); System.out.println(e.getMessage()); } synchronized (callback) { if (!finish) { try { callback.wait(1000); } catch (Exception e) { } } } } catch (AxisFault e) { e.printStackTrace(); System.out.println(e.getMessage()); } finally { try { sender.cleanup(); } catch (Exception e) { } } } } |
注意红色并加粗部分的代码,为了抓到服务端抛过来的SoapFault我们必须使用非阻塞式,因此我们在onFault处,进行接受服务端错误的处理。
注意:
我们调用Service端时没有传入Service端所需要的request的参数:
// sender.sendReceiveNonBlocking(request,callback);
sender.sendReceiveNonBlocking(null,callback);
这将构成Service端抛出SoapFault。
来看运行效果:

四、使用SWA(Soap WithAttachment)来进行附件传送
有了上面两个例子的基础后,我们将使用这个例子来结束Axis2中的Soap特性的教学。
在Axis2中传输附件有两种形式,一种叫MTOM,一种就是SWA。
SWAP即Soap With Attachment,这是业界的标准。
所谓的SWA传输,即客户端把需要上传的文件,编译成两进制代码凌晨随着soap的request一起推送到服务端,该两进制代码以AttachmentId的形式来表示,即如下这样的一个soap body:
|
<soapenv:Body> <uploadFile xmlns="http://attachment.axis2.sky.org"> <name>test.jpg</name> <attchmentID>urn:uuid:8B43A26FEE1492F85A1343628038693</attchmentID> </uploadFile> </soapenv:Body> |
服务端收到该soap的request可以直接使用如下的语句将这个AttachmentId还原成输出流:
|
DataHandler dataHandler = attachment.getDataHandler(attchmentID); File file = new File(uploadFilePath.toString()); fileOutputStream = new FileOutputStream(file); dataHandler.writeTo(fileOutputStream); fileOutputStream.flush(); |
在我们这个例子内,我们将使用客户端上传一个jpg文件,服务端收到该jpg文件(可以是任何的两进制文件)后解析后存入服务端的一个目录。
先来看服务端代码
org.sky.axis2.attachment.FileUploadService
|
package org.sky.axis2.attachment; import java.io.File; import java.io.FileOutputStream; import java.io.IOException; import javax.activation.DataHandler; import org.apache.axiom.attachments.Attachments; import org.apache.axis2.context.MessageContext; import org.sky.axis2.util.UUID; public class FileUploadService { public String uploadFile(String name, String attchmentID) throws Exception { FileOutputStream fileOutputStream = null; StringBuffer uploadFilePath = new StringBuffer(); String fileNamePrefix = ""; String fileName = ""; try { MessageContext msgCtx = MessageContext.getCurrentMessageContext(); Attachments attachment = msgCtx.getAttachmentMap(); DataHandler dataHandler = attachment.getDataHandler(attchmentID); fileNamePrefix = name.substring(name.indexOf("."), name.length()); fileName = UUID.getUUID(); System.out.println("fileName=====" + fileName); System.out.println("fileNamePrefix====" + fileNamePrefix); uploadFilePath.append("D:/upload/axis2/"); uploadFilePath.append(fileName); uploadFilePath.append(fileNamePrefix); System.out .println("uploadFilePath====" + uploadFilePath.toString()); File file = new File(uploadFilePath.toString()); fileOutputStream = new FileOutputStream(file); dataHandler.writeTo(fileOutputStream); fileOutputStream.flush(); } catch (Exception e) { throw new Exception(e); } finally { try { if (fileOutputStream != null) { fileOutputStream.close(); fileOutputStream = null; } } catch (Exception e) { } } return "File saved succesfully."; } } |
下面是服务端的描述

service.xml文件的内容为:
|
<service name="AttachmentService"> <parameter name="ServiceClass">org.sky.axis2.attachment.FileUploadService </parameter> <operation name="uploadFile"> <actionMapping>urn:uploadFile</actionMapping> <messageReceiver class="org.apache.axis2.rpc.receivers.RPCMessageReceiver" /> </operation> </service> |
该服务端接受客户端上传的附件后使用UUID重新命名上传的文件名,并将其存入服务端的” D:/upload/axis2/”目录中。
来看客户端代码
org.sky.axis2.attachment.FileUploadClient
|
package org.sky.axis2.attachment; import java.io.File; import javax.activation.DataHandler; import javax.activation.FileDataSource; import javax.xml.namespace.QName; import org.apache.axiom.om.OMAbstractFactory; import org.apache.axiom.om.OMElement; import org.apache.axiom.om.OMNamespace; import org.apache.axiom.soap.SOAP11Constants; import org.apache.axiom.soap.SOAPBody; import org.apache.axiom.soap.SOAPEnvelope; import org.apache.axiom.soap.SOAPFactory; import org.apache.axis2.Constants; import org.apache.axis2.addressing.EndpointReference; import org.apache.axis2.client.OperationClient; import org.apache.axis2.client.Options; import org.apache.axis2.client.ServiceClient; import org.apache.axis2.context.ConfigurationContext; import org.apache.axis2.context.ConfigurationContextFactory; import org.apache.axis2.context.MessageContext; import org.apache.axis2.wsdl.WSDLConstants; public class FileUploadClient { private static EndpointReference targetEPR = new EndpointReference( "http://localhost:8080/Axis2Service/services/AttachmentService"); public static void main(String[] args) throws Exception { new FileUploadClient().transferFile(); } public void transferFile() throws Exception { String filePath = "D:/deployment/test.jpg"; String destFile = "test.jpg"; Options options = new Options(); options.setTo(targetEPR); options.setProperty(Constants.Configuration.ENABLE_SWA, Constants.VALUE_TRUE); options.setSoapVersionURI(SOAP11Constants.SOAP_ENVELOPE_NAMESPACE_URI); options.setTimeOutInMilliSeconds(10000); options.setTo(targetEPR); options.setAction("urn:uploadFile"); ConfigurationContext configContext = ConfigurationContextFactory .createConfigurationContextFromFileSystem( "D:/wspace/Axis2Service/WebContent/WEB-INF/modules", null); ServiceClient sender = new ServiceClient(configContext, null); sender.setOptions(options); OperationClient mepClient = sender .createClient(ServiceClient.ANON_OUT_IN_OP);
MessageContext mc = new MessageContext(); FileDataSource fileDataSource = new FileDataSource(new File(filePath)); // Create a dataHandler using the fileDataSource. Any implementation of // javax.activation.DataSource interface can fit here. DataHandler dataHandler = new DataHandler(fileDataSource); String attachmentID = mc.addAttachment(dataHandler); SOAPFactory fac = OMAbstractFactory.getSOAP11Factory(); SOAPEnvelope env = fac.getDefaultEnvelope(); OMNamespace omNs = fac.createOMNamespace( "http://attachment.axis2.sky.org", ""); OMElement uploadFile = fac.createOMElement("uploadFile", omNs); OMElement nameEle = fac.createOMElement("name", omNs); nameEle.setText(destFile); OMElement idEle = fac.createOMElement("attchmentID", omNs); idEle.setText(attachmentID); uploadFile.addChild(nameEle); uploadFile.addChild(idEle); env.getBody().addChild(uploadFile); System.out.println("message====" + env); mc.setEnvelope(env); mepClient.addMessageContext(mc); mepClient.execute(true); MessageContext response = mepClient .getMessageContext(WSDLConstants.MESSAGE_LABEL_IN_VALUE); SOAPBody body = response.getEnvelope().getBody(); OMElement element = body.getFirstElement().getFirstChildWithName( new QName("http://attachment.axis2.sky.org", "return")); System.out.println(element.getText()); } } |
注意红色加粗部分的代码,由其是:
|
FileDataSource fileDataSource = new FileDataSource(new File(filePath)); String attachmentID = mc.addAttachment(dataHandler); |
这两句就是把客户端需要上传的附件转成AttachmentId的语句,然后把这个AttachementId作为一个OMElement的类型加入到客户端的soap request中去即可:
|
OMElement idEle = fac.createOMElement("attchmentID", omNs); idEle.setText(attachmentID); uploadFile.addChild(nameEle); uploadFile.addChild(idEle); env.getBody().addChild(uploadFile); |
来看运行效果。
客户端:
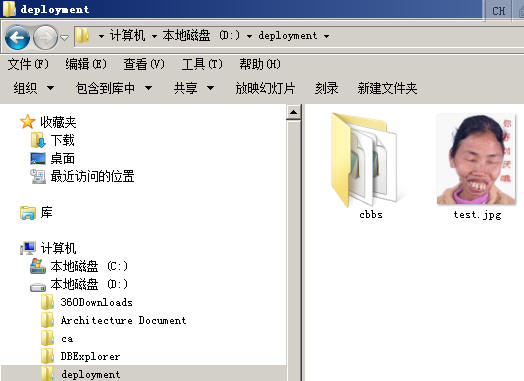
上传d:/deployment/test.jpg文件


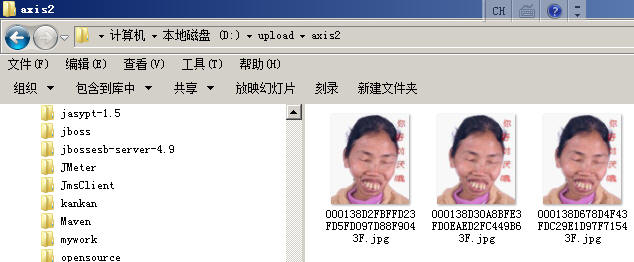
客户端收到服务端返回的”File saved successfully”即可在服务端的” D:/upload/axis2”目录中查询是否成功上传了该文件了

可以看到,由于我们使用的是UUID因此每次上传,服务端的文件名都不会重复。
附录 UUID.java
|
package org.sky.axis2.util; public class UUID { protected static int count = 0; public static synchronized String getUUID() { count++; long time = System.currentTimeMillis(); String timePattern = Long.toHexString(time); int leftBit = 14 - timePattern.length(); if (leftBit > 0) { timePattern = "0000000000".substring(0, leftBit) + timePattern; } String uuid = timePattern + Long.toHexString(Double.doubleToLongBits(Math.random())) + Long.toHexString(Double.doubleToLongBits(Math.random())) + "000000000000000000"; uuid = uuid.substring(0, 32).toUpperCase(); return uuid; } } |


相关推荐
【标题】:“通向架构师的道路(第十二天)之Axis2 Web Service(三)” 【描述】:本文档是通往架构师学习路径的一部分,主要关注Axis2框架下的Web Service开发,尤其是关于SOAP特性的应用。 【标签】:Axis2 ...
通向架构师的道路(第十三天)Axis2 Web Service安全初步 Axis2 Web Service安全是Web服务成功的必要保证。由于Web服务使用XML进行数据交换,而XML在默认情况下是明文编码的,同时,大部分Web服务使用HTTP协议作为...
在“通向架构师的道路(第十一天)之Axis2 Web Service(二)”的主题中,我们主要探讨了如何使用Axis2框架创建和部署Web服务,并且使用简单Java类型来定义服务接口。以下是关于这个主题的详细知识讲解: 1. **Axis2 ...
【标题】:“通向架构师的道路(第十二天)之Axis2_Web_Service(三)” 【描述】:本教程是“通向架构师的道路”系列的第十二天,主要聚焦于Axis2中的Web Service应用,特别是SOAP特性的深度探讨。通过三个具体的实例...
通向架构师的道路(第十四天)Axis2 Web Service安全之rampart 本篇文章主要讲述了Axis2 Web Service安全之rampart的知识点,包括加密保护Web Service传输、基本概念、对称加密、非对称加密、数字签名等内容。 一...
在“通向架构师的道路(第十一天)之Axis2_Web_Service(二)”的主题中,我们继续探讨如何使用Axis2框架构建和使用Web服务。在前一天的讲解中,我们了解了如何生成一个基于Axis2的WebService,以及四种不同的客户端调用...
(第十二天)之Axis2 Web Service(三) (第十三天)Axis2 Web Service安全初步 (第十四天)Axis2 Web Service安全之rampart (第十五天)IBM Websphere的安装与优化 (第十六天)IBM Websphere与IBM HttpServer的...
【通向架构师的道路(第十天)之Axis2_Web_Service(一)】 在软件开发领域,架构师的角色至关重要,他们需要对技术栈有深入理解,包括如何选择适合的工具和框架来构建高效、可扩展的系统。在本文中,我们将探讨通向...
10. **通向架构师的道路(第十三天)Axis2_Web_Service安全初步.docx** Axis2是Apache提供的Web服务引擎,文档可能介绍了Web服务的基本概念、Axis2的使用,以及如何确保Web服务的安全性,如WS-Security等。 通过...
Axis2 Web服务架构师之路 Axis2 是一个基于 JAVA 语言的最新的 SOAP 规范(SOAP 1.2)和 SOAP with Attachments 规范(来自 Apache Group)的开放源代码实现。Axis2 框架来自 Apache 开放源代码组织,具有灵活的...
而"通向架构师的道路(第十一天)之Axis2_Web_Service(二).docx"则涉及到Web服务的开发,轴心2(Axis2)是Apache提供的一个强大的Web服务框架。 综上所述,这些文档构成了一套全面的学习路径,涵盖了企业级应用架构的...
【通向架构师的道路】是一篇详尽的指南,旨在帮助初学者逐步迈进架构师的领域。该文从基础架构的搭建开始,逐渐深入到高级技术应用和优化,覆盖了多个关键的技术点,如服务器整合、性能调优、权限系统设计、Web服务...
### Axis开发Web Service实例详解 #### 一、概述 在探讨如何使用Apache Axis来开发Web Service之前,我们首先需要了解一些基本概念。 **Web Service**是一种标准的技术框架,用于实现不同平台之间的应用通信。它...
【Apache Axis2 Web Service 教程】 Apache Axis2 是一个流行的开源Web服务框架,用于创建、部署和管理高性能的Web服务。本教程将详细介绍如何在Eclipse环境中利用Apache Axis2搭建Web服务及其客户端。 **环境配置...
5. **服务测试**:学习如何使用Axis2内置的测试工具或通过SOAP UI等第三方工具来测试Web服务的功能和性能。 6. **消息处理**:了解Axis2如何处理SOAP消息,包括消息格式、编码和解码,以及如何自定义消息处理器。 7....
基于AXIS2实现Web Service开发是一项常见的任务,尤其在企业级应用中,Web Service作为不同系统间通信的重要桥梁。AXIS2是Apache软件基金会提供的一个轻量级、高性能的Web Service框架,它提供了完整的Web Service...
本讲堂重点探讨的是 Axis2,一个强大的Web Service框架,它是Apache软件基金会开发的第二代Web Service引擎。 一、什么是Axis2? Axis2是Apache Axis的升级版,它提供了更高效、更灵活的服务架构。Axis2基于模块化...
【用Axis2开发Web Service】是本文的核心主题,轴心技术是Java开发Web服务的一种框架,相较于Axis1,其过程更为简洁。以下是关于使用Axis2开发Web Service的详细步骤和知识点: 1. **实验环境搭建**: - 首先确保...
### Eclipse 生成 Axis2 Web Service 客户端 #### 一、概述 本文将详细介绍如何在Eclipse开发环境中创建基于Axis2的Web Service客户端。Axis2是Apache组织下的一个开源项目,它提供了一种用于构建服务端和服务...
标题中的“Axis2_Service_Archiver_1.3.0”指的是一个针对MyEclipse集成开发环境的Axis2 Web服务插件,版本为1.3.0。这个插件是Axis2框架的一部分,用于简化在MyEclipse中创建、部署和管理Axis2 Web服务的过程。 ...