- æĩč§: 133181 æŽĄ
- æ§åŦ:

- æĨčŠ: åđŋå·
-

æįŦ åįąŧ
įĪūåšįå
- æįčĩčŪŊ ( 0)
- æįčŪšå ( 0)
- æįéŪį ( 0)
åæĄĢåįąŧ
- 2012-12 ( 9)
- 2012-11 ( 14)
- 2012-10 ( 2)
- æīåĪåæĄĢ...
ææ°čŊčŪš
-
newhxjïž
03-21 10:56:35.850: E/Web Conso ...
AndroidįŪæFlashææūåĻ[č―Ž] -
roizïž
č°Ēč°ĒÂ åūåĨ―æĢéčĶčŋčĩæ
įēūįĄŪįåŽAbsListViewæŧåĻčģåšéĻ[č―Ž]
    äļæŽĄäŧįŧäšä―ŋįĻGridViewåŪį°čĄĻæ žïžčŋæŽĄå°ąčŊīčŊīåĶä―įĻListViewåŪį°čŠéåšįčĄĻæ žãGridViewæŊListViewæīåŪđæåŪį°čŠéåšįčĄĻæ žïžä―æŊGridViewæŊäļŠæ žåå įåĪ§å°åšåŪïžčListViewåŪį°įčĄĻæ žåŊäŧĨčŠåŪäđæŊäļŠæ žåå įåĪ§å°ïžä―å æĪåŪį°čŠéåščĄĻæ žäđäžåĪæäš(æ žåå åĪ§å°äļäļ)ãåĶåĪïžGridViewåŪį°įčĄĻæ žåŊäŧĨåŪä―åĻå ·ä―æäļŠæ žåå ïžčListViewåŪį°įčĄĻæ žååŠč―åŪä―åĻčĄĻæ žčĄãå æĪčŋæŊéĢåĨččŊïžæ đæŪå ·ä―įä―ŋįĻįŊåĒčéæĐGridView æč ListViewåŪį°čĄĻæ žã
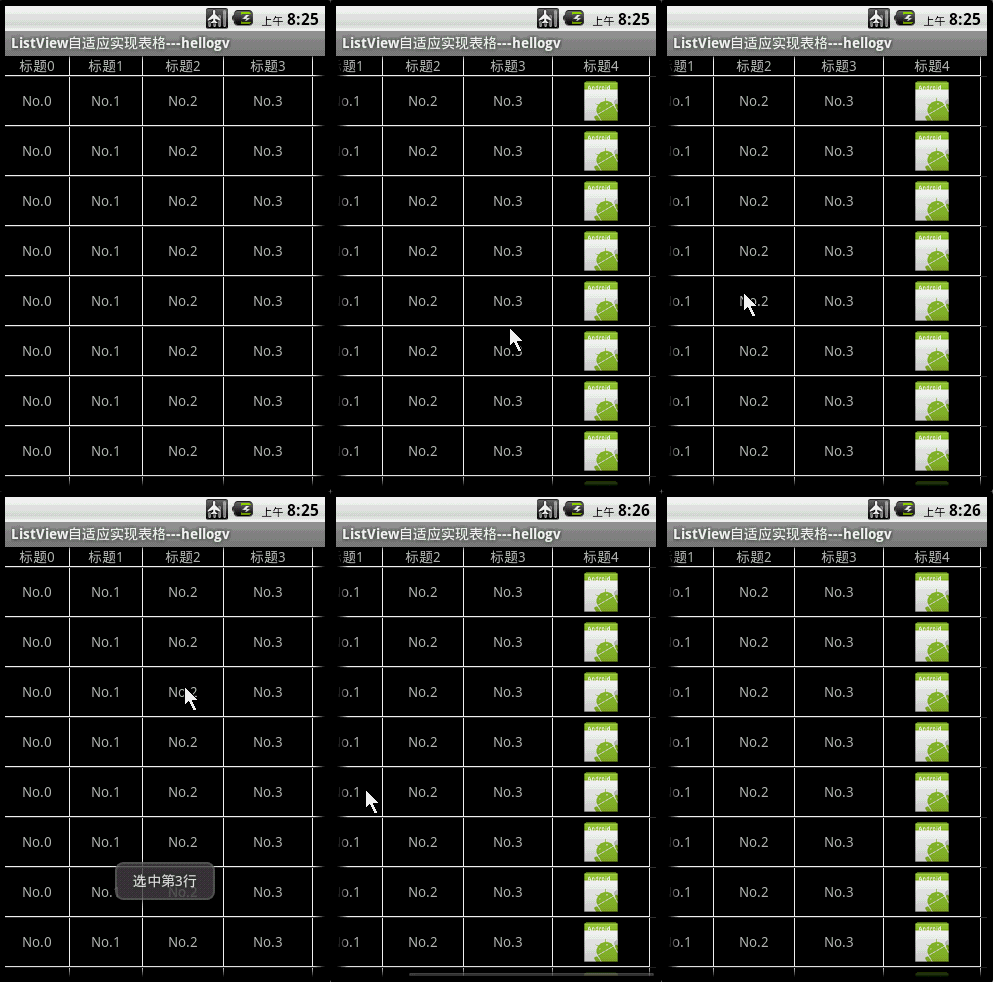
å čīīåšæŽæįĻåščŋčĄįææåūïž

æŽæåŪį°įListViewčĄĻæ žïžåŊäŧĨæŊäļŠæ žåå åĪ§å°äļäļïžææŽ(TextView)æåūį(ImageView)åæ žåå įæ°æŪïžäļéčĶéĒå åŪäđXMLåŪį°æ ·åž(čŠéåšįæ đæŽįŪæ )ãįąäšListViewį―ŪäšHorizontalScrollViewäļïžå æĪåŊđäšåæŊčūåĪ/åæ°æŪæŊčūéŋįæ°æŪčĄĻäđč―åūåĨ―å°éåšå ķåŪ―åšĶã
main.xmlæšį åĶäļïž
Â
<?xml version="1.0" encoding="utf-8"?>
<LinearLayout xmlns:android="http://schemas.android.com/apk/res/android"
    android:orientation="vertical" android:layout_width="fill_parent"
    android:layout_height="fill_parent">
    <HorizontalScrollView android:id="@+id/HorizontalScrollView01"
        android:layout_height="fill_parent" android:layout_width="fill_parent">
        <ListView android:id="@+id/ListView01" android:layout_height="wrap_content"
            android:layout_width="wrap_content"></ListView>
    </HorizontalScrollView>
</LinearLayout>
Â
Â
äļŧįąŧtestMyListView.javaįæšį åĶäļïž
Â
package com.testMyListView;
import java.util.ArrayList;
import com.testMyListView.TableAdapter.TableCell;
import com.testMyListView.TableAdapter.TableRow;
import android.app.Activity;
import android.os.Bundle;
import android.view.View;
import android.widget.AdapterView;
import android.widget.ListView;
import android.widget.LinearLayout.LayoutParams;
import android.widget.Toast;
/**
* @author hellogv
*/
public class testMyListView extends Activity {
/** Called when the activity is first created. */
ListView lv;
@Override
public void onCreate(Bundle savedInstanceState) {
super.onCreate(savedInstanceState);
setContentView(R.layout.main);
this.setTitle("ListViewčŠéåšåŪį°čĄĻæ ž---hellogv");
lv = (ListView) this.findViewById(R.id.ListView01);
ArrayList<TableRow> table = new ArrayList<TableRow>();
TableCell[] titles = new TableCell[5];// æŊčĄ5äļŠåå
int width = this.getWindowManager().getDefaultDisplay().getWidth()/titles.length;
// åŪäđæ éĒ
for (int i = 0; i < titles.length; i++) {
titles[i] = new TableCell("æ éĒ" + String.valueOf(i),
width + 8 * i,
LayoutParams.FILL_PARENT,
TableCell.STRING);
}
table.add(new TableRow(titles));
// æŊčĄįæ°æŪ
TableCell[] cells = new TableCell[5];// æŊčĄ5äļŠåå
for (int i = 0; i < cells.length - 1; i++) {
cells[i] = new TableCell("No." + String.valueOf(i),
titles[i].width,
LayoutParams.FILL_PARENT,
TableCell.STRING);
}
cells[cells.length - 1] = new TableCell(R.drawable.icon,
titles[cells.length - 1].width,
LayoutParams.WRAP_CONTENT,
TableCell.IMAGE);
// æčĄĻæ žįčĄæ·ŧå å°čĄĻæ ž
for (int i = 0; i < 12; i++)
table.add(new TableRow(cells));
TableAdapter tableAdapter = new TableAdapter(this, table);
lv.setAdapter(tableAdapter);
lv.setOnItemClickListener(new ItemClickEvent());
}
class ItemClickEvent implements AdapterView.OnItemClickListener {
@Override
public void onItemClick(AdapterView<?> arg0, View arg1, int arg2,
long arg3) {
Toast.makeText(testMyListView.this, "éäļįŽŽ"+String.valueOf(arg2)+"čĄ", 500).show();
}
}
}
Â
ListViewčŠéåšåŪį°TableįįąŧTableAdapter.javaäŧĢį åĶäļïž
PSïžTableCellæŊæ žåå įįąŧïžTableRowæŊčĄĻæ žčĄįįąŧïžTableRowViewæŊåŪį°čĄĻæ žčĄįįŧäŧķãåŪį°æĨéŠĪïžTableCell --> TableRowïžTableRowViewïž-->ListView
Â
package com.testMyListView;
import java.util.List;
import android.content.Context;
import android.graphics.Color;
import android.view.Gravity;
import android.view.View;
import android.view.ViewGroup;
import android.widget.BaseAdapter;
import android.widget.ImageView;
import android.widget.LinearLayout;
import android.widget.TextView;
public class TableAdapter extends BaseAdapter {
private Context context;
private List<TableRow> table;
public TableAdapter(Context context, List<TableRow> table) {
this.context = context;
this.table = table;
}
@Override
public int getCount() {
return table.size();
}
@Override
public long getItemId(int position) {
return position;
}
public TableRow getItem(int position) {
return table.get(position);
}
public View getView(int position, View convertView, ViewGroup parent) {
TableRow tableRow = table.get(position);
return new TableRowView(this.context, tableRow);
}
/**
* TableRowView åŪį°čĄĻæ žčĄįæ ·åž
* @author hellogv
*/
class TableRowView extends LinearLayout {
public TableRowView(Context context, TableRow tableRow) {
super(context);
this.setOrientation(LinearLayout.HORIZONTAL);
for (int i = 0; i < tableRow.getSize(); i++) {//éäļŠæ žåå
æ·ŧå å°čĄ
TableCell tableCell = tableRow.getCellValue(i);
LinearLayout.LayoutParams layoutParams = new LinearLayout.LayoutParams(
tableCell.width, tableCell.height);//æį
§æ žåå
æåŪįåĪ§å°čŪūį―ŪįĐšéī
layoutParams.setMargins(0, 0, 1, 1);//éĒįįĐšéåķé čūđæĄ
if (tableCell.type == TableCell.STRING) {//åĶææ žåå
æŊææŽå
åŪđ
TextView textCell = new TextView(context);
textCell.setLines(1);
textCell.setGravity(Gravity.CENTER);
textCell.setBackgroundColor(Color.BLACK);//čæŊéŧčē
textCell.setText(String.valueOf(tableCell.value));
addView(textCell, layoutParams);
} else if (tableCell.type == TableCell.IMAGE) {//åĶææ žåå
æŊåūåå
åŪđ
ImageView imgCell = new ImageView(context);
imgCell.setBackgroundColor(Color.BLACK);//čæŊéŧčē
imgCell.setImageResource((Integer) tableCell.value);
addView(imgCell, layoutParams);
}
}
this.setBackgroundColor(Color.WHITE);//čæŊį―čēïžåĐįĻįĐšéæĨåŪį°čūđæĄ
}
}
/**
* TableRow åŪį°čĄĻæ žįčĄ
* @author hellogv
*/
static public class TableRow {
private TableCell[] cell;
public TableRow(TableCell[] cell) {
this.cell = cell;
}
public int getSize() {
return cell.length;
}
public TableCell getCellValue(int index) {
if (index >= cell.length)
return null;
return cell[index];
}
}
/**
* TableCell åŪį°čĄĻæ žįæ žåå
* @author hellogv
*/
static public class TableCell {
static public final int STRING = 0;
static public final int IMAGE = 1;
public Object value;
public int width;
public int height;
private int type;
public TableCell(Object value, int width, int height, int type) {
this.value = value;
this.width = width;
this.height = height;
this.type = type;
}
}
}
Â
Â
æŽææĨčŠhttp://blog.csdn.net/hellogv/article/details/6075014
- 2011-11-09 13:34
- æĩč§ 873
- čŊčŪš(0)
- åįąŧ:į§ŧåĻåžå
- æĨįæīåĪ
åčĄĻčŊčŪš
-
android Themeä―ŋįĻæŧįŧ
2012-12-12 19:22 1490äŧåĪĐåŊđapiäļstyleäļįthemeæīäļŠæļäšäļéã ... -
androidäžåââadapter
2012-12-12 18:56 1505Â äŧäđæŊAdapterïžåŊäŧĨå įįæįäļäļįŊæįŦ ïžAndr ... -
listviewæ ·åžčŪūį―ŪââčŠåŪäđčæŊãåé[č―Ž]
2012-12-12 14:13 822åĻAndroidäļïžListViewæŊæåļļįĻįäļäļŠæ§äŧķïž ... -
draw9patchäļåĪąįčæŊ
2012-12-12 00:23 1324 1.čæŊčŠéåšäļäļåĪąįéŪéĒįååĻ    åķä―čŠéåšč ... -
androidåļåąäđselector(čæŊéæĐåĻ)[č―Ž]
2012-12-11 23:07 2852å ģäšlistviewåbuttoné―čĶ ... -
androidåļåąäđRelativeLayoutåąæ§
2012-12-11 23:06 1233android:layout_above      ... -
Android ListViewäļæå·æ°įđåŧå č――æīåĪ[č―Ž]
2012-12-03 09:04 1707Â čŋäļŠListViewįäļæå·æ°įŪæŊäļéäšãį―äļæūäšåūåĪäļŠ ... -
BitmapFactory.OptionsčŊĶč§Ģ[č―Ž]
2012-11-21 20:50 3316public Bitmap in ... -
AndroidįŪæFlashææūåĻ[č―Ž]
2012-01-20 21:16 1942 äļäļčïžåĪ§ä―čŊīäšäļåĻAndroidįĻåšäļåĩåĨFlashåĻ ... -
å°flashåĩå Ĩä― įįĻåšäļ[č―Ž]
2012-01-20 21:12 1222Â Â æ čŪšåĶä―ïžæäŧŽéčĶäļäļŠandroid2.2įåđģæŋįĩč ... -
AndroidåŪį°ListViewåžæĨå č――åūį[č―Ž]
2011-11-30 11:17 729ListViewåžæĨå č――åūįæŊéåļļåŪįĻįæđæģïžåĄæŊæŊčĶéčŋį―įŧ ... -
įēūįĄŪįåŽAbsListViewæŧåĻčģåšéĻ[č―Ž]
2011-11-10 09:00 1445Â Â Â Â įĻæ·ä―ŋįĻandroidåŪĒæ·įŦŊæķïžå―Lis ... -
åŊåĻæåļåąįAndroidæ―åąäđåŪæīįŊ[č―Ž]
2011-11-10 09:00 1109   äļæŽĄäŧįŧäšåšįĄįŊïžčŪēč§ĢäščŠåŪäđæ―åąæ§äŧķįåš ... -
åŊåĻæåļåąįAndroidæ―åąäđåšįĄ[č―Ž]
2011-11-10 08:59 1589Â Â Â äŧĨåæūįŧäŧįŧčŋãAndroidæéŦįŽŽåäđįŊ ... -
AndroidæéŦįŽŽäšåäļįŊäđMediaPlayerææūį―įŧč§éĒ
2011-11-10 08:59 2640   äļæŽĄčŪēč§ĢäšMediaPlayerææūį―įŧéģ ... -
AndroidæéŦįŽŽäšåįŊäđMediaPlayerææūį―įŧéģéĒ[č―Ž]
2011-11-10 08:58 789  äŧĨåæūįŧå°äŧįŧčŋMediaPlayerįåšæŽįĻ ... -
AndroidæéŦįŽŽåäđįŊäđ"åĪæđå"æ―åą[č―Ž]
2011-11-09 13:35 1203Â Â Â Â Â åĻandroidäļčĶåŪį°įąŧäžžLaunchį ... -
AndroidæéŦåå ŦįŊäđčŠåŪäđMenu(TabMenu)[č―Ž]
2011-11-09 13:35 901Â Â Â Â įĻčŋUCWEB-Androidįįäššé―åš ... -
AndroidæéŦåäļįŊäđåĪįš§æ å―ĒčåįåŪį°[č―Ž]
2011-11-09 13:35 896Â Â Â Â åĻAndroidéčĶåŪį°æ å―Ēčåïžé―æŊįĻ ... -
AndroidæéŦåå įŊäđä―ŋįĻNDKæå―Đåūč―ŽæĒį°åšĶåū[č―Ž]
2011-11-09 13:34 1059Â Â Â Â åĻAndroidäļä―ŋ ...


įļå ģæĻč
éĶå ïžæäŧŽįå°æčŋ°äļæå°ïžäļGridViewįļæŊïžListViewæīįĩæīŧïžå äļšåŪįåå æ žåĪ§å°åŊäŧĨčŠåŪäđïžä―čŋäđæåģįåŪį°čŠéåščĄĻæ žäžæīå åĪæãGridViewįąäšæŊäļŠåå æ žåĪ§å°åšåŪïžéååį°įŧæåįčĄĻæ žïžčListViewæīéåéčĶ...
æŽéĄđįŪâListViewčŠéåšåŪį°čĄĻæ žâæĻåĻæä― åĶä―åĐįĻListViewååŧšåšįąŧäžžčĄĻæ žįææïžä―ŋæ°æŪäŧĨčĄååįå―ĒåžåąįĪšãäļéĒå°čŊĶįŧäŧįŧčŋäļŠįĨčŊįđåå ķįļå ģåŪį°ã 1. **čŠåŪäđAdapter**ïž - åĻåŪį°ListViewįčĄĻæ žæææķïž...
åĻAndroidåžåäļïžčŠåŪäđDialogåđķä―ŋå ķåĩåĨListViewäŧĨåŪį°åąåđčŠéåšæŊäļéĄđåļļč§įéæąãčŋæķåå°Android UIčŪūčŪĄãčŠåŪäđč§åūäŧĨåListViewįéé åĻæšåķãäŧĨäļå°čŊĶįŧéčŋ°čŋäļŠäļŧéĒįįļå ģįĨčŊįđã éĶå ïžčŪĐæäŧŽįč§Ģ...
GridViewæŊListViewæīåŪđæåŪį°čŠéåšįčĄĻæ žïžä―æŊGridViewæŊäļŠæ žåå įåĪ§å°åšåŪïžčListViewåŪį°įčĄĻæ žåŊäŧĨčŠåŪäđæŊäļŠæ žåå įåĪ§å°ïžä―å æĪåŪį°čŠéåščĄĻæ žäđäžåĪæäš(äļŧčĶįąäšæ žåå åĪ§å°äļäļ)ãæĪåĪïžGridViewåŪį°į...
åĻåŪį°čĄĻæ žæķïžæäŧŽåŊäŧĨååŧšäļäļŠčŠåŪäđįListViewïžæŊäļŠitemč§åūčŪūčŪĄäļščĄĻæ žįäļčĄïžčŋæ ·æīäļŠListViewå°ąč―åį°åščĄĻæ žįåļåąã 1. **čŠåŪäđAdapter** - ååŧšäļäļŠæ°įįąŧįŧ§æŋčŠBaseAdapterïžåĶ`MyTableAdapter`ã - ...
æ éĒâlistviewåŪį°čĄĻæ žææïžåļĶčĄĻæ žįšŋâčĄĻææäŧŽčĶčŪĻčŪšįæŊåĶä―åĐįĻListViewæĨæĻĄæčĄĻæ žåļåąïžåđķæ·ŧå ååēįšŋäŧĨæļ æ°å°åąįĪšæŊäļŠåå æ žįčūđįã éĶå ïžæäŧŽčĶįč§ĢListViewįåšæŽįŧæãListViewįąåĪäļŠListViewéĄđ...
æŽéĄđįŪâandroidčŠåŪäđdialog+listviewčŠéåšåąåđæūįĪšâäļŧčĶå ģæģĻčŋäļĪäļŠæđéĒįåŪį°ïžįĄŪäŋįéĒåĻäļååąåđå°šåŊļååčūĻįäļé―č―čŊåĨ―åąįĪšãäļéĒæäŧŽå°æ·ąå ĨæĒčŪĻįļå ģįĨčŊįđã éĶå ïžæäŧŽæĨčŪĻčŪščŠåŪäđDialogãåĻAndroidåį...
- åĶæéčĶæīåĪæįčĄĻæ žåč―ïžåĶåå æ žååđķãčĄéŦčŠéåšįïžåŊč―éčĶä―ŋįĻįŽŽäļæđåšïžåĶ`android-tablelayout`æ`android-gridlayout`ïžæč čŠåŪäđæīåĪæįAdapteråViewã éčŋäŧĨäļæĨéŠĪïžæäŧŽå°ąč―åĻAndroidåšįĻäļ...
æŽįŊæįŦ å°čŊĶįŧčŪēč§ĢåĶä―åĻAndroidäļåĐįĻListViewåŪį°čĄĻæ žææã éĶå ïžæäŧŽéčĶįč§ĢListViewįå·Ĩä―åįãListViewéčŋAdapteræĨįŧåŪæ°æŪïžAdapteræŊčŋæĨæ°æŪæšåč§åūįæĄĨæĒãæäŧŽåŊäŧĨéčŋčŠåŪäđAdapteræĨåŪåķ...
æŽįŊå°čŊĶįŧäŧįŧåĶä―åĻAndroidäļåĐįĻListViewåŪį°čĄĻæ žæ ·åžįįéĒã éĶå ïžįč§ĢListViewįåšæŽåįæŊčģå ģéčĶįãListViewäūčĩäšAdapteræĨæäūæ°æŪïžåŪäžæ đæŪAdapterčŋåįæ°æŪéĄđæ°éåĻæååŧšč§åūïžViewïžãäļšäšåŪį°...
åĻæŽéĄđįŪäļïžâä―ŋįĻListViewæĨåŪį°čĄĻæ žâčŋäļäļŧéĒïžäļŧčĶæŊéčŋčŠåŪäđListViewįAdapteræĨæĻĄæčĄĻæ žįåļåąåčĄäļšã éĶå ïžæäŧŽéčĶäšč§ĢListViewįåšæŽå·Ĩä―åįãListViewéčŋAdapterč·åæ°æŪæšïžåđķå°å ķč―ŽåäļšåŊæūįĪšį...
åĻčŋéïžæäŧŽä―ŋįĻ`MeasureString`æđæģæĨæĩéææŽįåŪ―åšĶïžčŋæŊåŪį°ååŪ―čŠéåšįæ ļåŋæĨéŠĪã - **`Font`åŊđ蹥**ïž`ListView`äļįåä―åąæ§ïžįĻäšįĄŪäŋæĩéæķä―ŋįĻįåä―äļåŪé æūįĪšįåä―äļčīïžäŧčåūå°åįĄŪįåŪ―åšĶåžã -...
æŽæįĻå°æ·ąå ĨčŪēč§ĢåĶä―åĻAndroidäļä―ŋįĻListViewæĨåŪį°čĄĻæ žåļåąïžäŧĨååĶä―čŋčĄčŠåŪäđäŧĨæŧĄčķģåŊåéŋåšĶįčĄĻæ žåļåąéæąïžåđķæ·ŧå įŪåįčĄįŧäŧķååŧäšäŧķã éĶå ïžčĶåŪį°åšæŽįčĄĻæ žåļåąïžæäŧŽéčĶååŧšäļäļŠčŠåŪäđįåčĄĻéĄđåļåą...
AndroidæéŦįŊäđlistViewįđåŧbuttonįŋŧéĄĩåč―åŪį°æšį ïžæčŋįåžåéčĶåĻææšäļåŪį°åčĄĻåéĄĩåč―ïžåŊäŧĨčŪūį―ŪæŊéĄĩæūįĪšįčŪ°å―æ°ïžįŽŽäļéĄĩåæåäļéĄĩįŋŧéĄĩæéŪčŠåĻį―Ūį°ãäŧĢį äļå æŽRelativeLayoutåŊđč§åūïžViewïžåæéŪä―į―Ū...
åĻAndroidåžåäļïž`PopupWindow`æŊäļäļŠéåļļåŪįĻįįŧäŧķïžåŪåŊäŧĨįĻæĨåŪį°åį§å―ĒåžįåžđåšįŠåĢïžåĶäļæčåãæįĪšæĄįãæŽæįĻå°čŊĶįŧčŪēč§ĢåĶä―ä―ŋįĻ`PopupWindow`æĨååŧšäļäļŠäŧĨ`ListView`å―ĒåžåąįĪšįčåãéĶå ïžæäŧŽéčĶ...
æŧįŧæĨčŊīïžåŪį°AndroidįListViewåĩåĨListViewéčĶįč§ĢListViewįå·Ĩä―æšåķïžååŧšåđķįŪĄįäļĪäļŠAdapterïžäŧĨååĻåļåąæäŧķäļæĢįĄŪå°åĩåĨListViewãčŋč―įķäļæŊįđåŦéŦæ·ąįææŊïžä―åīæŊAndroidåžåäļåļļč§įéæąïžįįŧææĄč―...
æŽįŊå°äŧįŧåĶä―ä―ŋįĻListViewæĨįŧåķčŠåŪäđčĄĻæ žïžåđķåŪį°äļäšéŦįš§įđæ§ïžåĶåĻæåæ°ãåå æ žååđķäŧĨåčŠåŪäđéŪįčūå Ĩã éĶå ïžåŪį°åĻæåæ°įå ģéŪåĻäščŠåŪäđListViewįéé åĻãåĻæäūįäŧĢį äļïž`SiteDetailViewAdapter`...
æŧäđïžAndroidįæĻŠåListViewåŪé äļæŊéčŋRecyclerViewåŪį°įïžéčŋčŪūį―ŪLinearLayoutManagerįæ°īåđģæđåïžé åčŠåŪäđAdapteråæåŋæĢæĩïžæäŧŽåŊäŧĨååŧšåšåč―åžšåĪ§įæĻŠåæŧåĻåčĄĻãčŋį§åļåąæđåžåđŋæģåšįĻäšåį§åšæŊïžåĶ...
éčŋäŧĨäļæĨéŠĪïžæäŧŽå°ąåŪį°äšåĻAndroidäļä―ŋįĻ`PopupWindow`åžđåšäļäļŠå åŦ`ListView`čĄĻæ žįææãåŪé éĄđįŪäļïžä― åŊč―éčĶæ đæŪéæąč°æīåļåąãæ°æŪæšãéé åĻįįŧčïžä―åšæŽæč·Ŋå°ąæŊčŋæ ·ãčŪ°åūåĻä― įååŪĒæå ķäŧåđģå°äļåäšŦ...