- 浏览: 159048 次
- 性别:

- 来自: 北京
-

文章分类
最新评论
-
sudaxian:
哥啊。得多少jar支持说一声啊,你这完全是写给自己看的。jar ...
JEECG 通用数据库导入导出excel -
sky_kk:
很好
解决使用FireFox下Flash上传文件时SESSION丢失的问题(swfupload) -
wdxheb:
作者有文学天赋,别放弃治疗
悟透JavaScript (转帖[绝对经典]) -
hoho922:
页面是: <div class="eas ...
jeecg v2.0 实现上传功能 -
hoho922:
请教个问题啊,我做上传功能时总提示错误:[org.apache ...
jeecg v2.0 实现上传功能
Menu家族成员
YAHOO.widget.Menu
YAHOO.widget.Overlay
的子类,其他menu容器的超类. Menu类创建一个容器(Container)并放置一列垂直的列表.每项菜单称为MenuItem.
YAHOO.widget.ContextMenu
Menu的子类,创建一个菜单,能被某html元素的contextmenu事件触发.每项菜单称为MenuItem.
YAHOO.widget.MenuBar
Menu的子类,只不过是水平风格而不是垂直风格.每项菜单称为MenuItem.
组成关系图如下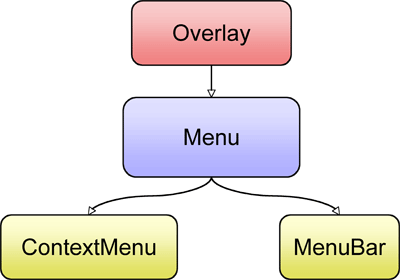
Menu 和 MenuItem 的关系图如下
每个MenuItem 又可以是一个Menu,这叫做 sub menu item.
开始
以下库是必须的:(注:这段是翻译官方网的,有问题.原因在后文有说明
)
< link rel ="stylesheet" type ="text/css" href ="http://yui.yahooapis.com/2.5.2/build/menu/assets/skins/sam/menu.css" >
<!-- Dependencies -->
< script type ="text/javascript" src ="http://yui.yahooapis.com/2.5.2/build/yahoo-dom-event/yahoo-dom-event.js" ></ script >
< script type ="text/javascript" src ="http://yui.yahooapis.com/2.5.2/build/container/container_core-min.js" ></ script >
<!-- Source File -->
< script type ="text/javascript" src ="http://yui.yahooapis.com/2.5.2/build/menu/menu-min.js" ></ script >
基本用法
Menu可以通过html或js两种方式完成配置.Menu组件遵循
YAHOO.widget.Module
的模型,用一个div作为body,所有<li>元素象征一个item.最简单的menu如下,传入div的id并依次调用render,show方法即可,如下:
< html >
< head >
< meta http-equiv ="Content-Type" content ="text/html; charset=utf-8" >
< title > 交通违法数据处理系统 2009 </ title >
<!-- Core + Skin CSS -->
< link rel ="stylesheet" type ="text/css" href ="http://yui.yahooapis.com/2.5.2/build/menu/assets/skins/sam/menu.css" >
<!-- Dependencies -->
< script type ="text/javascript" src ="http://yui.yahooapis.com/2.5.2/build/yahoo-dom-event/yahoo-dom-event.js" ></ script >
< script type ="text/javascript" src ="http://yui.yahooapis.com/2.5.2/build/container/container_core-min.js" ></ script >
<!-- Source File -->
< script type ="text/javascript" src ="http://yui.yahooapis.com/2.5.2/build/menu/menu-min.js" ></ script >
</ head >
< body class ="yui-skin-sam" >
< div id ="basicmenu" class ="yuimenu" >
< div class ="bd" >
< ul class ="first-of-type" >
< li class ="yuimenuitem" >
< a class ="yuimenuitemlabel" href ="http://mail.yahoo.com" >
Yahoo! Mail
</ a >
</ li >
< li class ="yuimenuitem" >
< a class ="yuimenuitemlabel" href ="http://addressbook.yahoo.com" >
Yahoo! Address Book
</ a >
</ li >
< li class ="yuimenuitem" >
< a class ="yuimenuitemlabel" href ="http://calendar.yahoo.com" >
Yahoo! Calendar
</ a >
</ li >
< li class ="yuimenuitem" >
< a class ="yuimenuitemlabel" href ="http://notepad.yahoo.com" >
Yahoo! Notepad
</ a >
</ li >
</ ul >
</ div >
</ div >
< script >
YAHOO.util.Event.onContentReady( " basicmenu " , function () {
/*
Instantiate a Menu. The first argument passed to the
constructor is the id of the element in the DOM that represents
the Menu instance.
*/
var oMenu = new YAHOO.widget.Menu( " basicmenu " );
/*
Call the "render" method with no arguments since the markup for
this Menu instance already exists in the DOM.
*/
oMenu.render();
// Show the Menu instance
oMenu.show();
});
</ script >
</ body >
</ html >
Js初始化Menu
在html里放一个div,在Menu的构造函数里传入div的id,并调用addItem
,
insertItem
, 和 addItems
等方法添加元素,如下
< html >
< head >
< meta http-equiv ="content-type" content ="text/html; charset=utf-8" >
< title > Basic Menu From JavaScript </ title >
< style type ="text/css" >
/* margin and padding on body element
can introduce errors in determining
element position and are not recommended;
we turn them off as a foundation for YUI
CSS treatments. */
body {
margin : 0 ;
padding : 0 ;
}
#rendertarget {
width : 180px ;
}
</ style >
< link rel ="stylesheet" type ="text/css" href ="http://yui.yahooapis.com/2.5.2/build/fonts/fonts-min.css" />
< link rel ="stylesheet" type ="text/css" href ="http://yui.yahooapis.com/2.5.2/build/menu/assets/skins/sam/menu.css" />
< script type ="text/javascript" src ="http://yui.yahooapis.com/2.5.2/build/yahoo-dom-event/yahoo-dom-event.js" ></ script >
< script type ="text/javascript" src ="http://yui.yahooapis.com/2.5.2/build/container/container_core-min.js" ></ script >
< script type ="text/javascript" src ="http://yui.yahooapis.com/2.5.2/build/menu/menu-min.js" ></ script >
<!-- begin custom header content for this example -->
< style type ="text/css" >
/*
Set the "zoom" property to "normal" since it is set to "1" by the
".example-container .bd" rule in yui.css and this causes a Menu
instance's width to expand to 100% of the browser viewport.
*/
div.yuimenu .bd {
zoom : normal ;
}
</ style >
<!-- end custom header content for this example -->
</ head >
< body class =" yui-skin-sam" >
< div id ="rendertarget" ></ div >
< script type ="text/javascript" >
/*
Initialize and render the Menu when the element it is to be
rendered into is ready to be scripted.
*/
YAHOO.util.Event.onAvailable( " rendertarget " , function () {
/*
Instantiate a Menu: The first argument passed to the
constructor is the id of the element in the page
representing the Menu; the second is an object literal
of configuration properties.
*/
var oMenu = new YAHOO.widget.Menu( " basicmenu " , { fixedcenter: true ,visible: true ,position: " static " });
/*
Add items to the Menu instance by passing an array of object literals
(each of which represents a set of YAHOO.widget.MenuItem
configuration properties) to the "addItems" method.
*/
oMenu.addItems([
{ text: " Yahoo! Mail " , url: " http://mail.yahoo.com " },
{ text: " Yahoo! Address Book " , url: " http://addressbook.yahoo.com " },
{ text: " Yahoo! Calendar " , url: " http://calendar.yahoo.com " },
{ text: " Yahoo! Notepad " , url: " http://notepad.yahoo.com " }
]);
/*
Since this Menu instance is built completely from script, call the
"render" method passing in the DOM element that it should be
appended to.
*/
oMenu.render( " rendertarget " );
// Set focus to the Menu when it is made visible
oMenu.show();
});
</ script >
</ body >
</ html >
如果你运行这两个例子,你会发现第二个菜单比第一个好看很多,原因在于官方网的getting start章节里少引了一些必需的库.完整的js和css库应该如上第二个例子,即:
< link rel ="stylesheet" type ="text/css" href ="http://yui.yahooapis.com/2.5.2/build/fonts/fonts-min.css" />
< link rel ="stylesheet" type ="text/css" href ="http://yui.yahooapis.com/2.5.2/build/menu/assets/skins/sam/menu.css" />
< script type ="text/javascript" src ="http://yui.yahooapis.com/2.5.2/build/yahoo-dom-event/yahoo-dom-event.js" ></ script >
< script type ="text/javascript" src ="http://yui.yahooapis.com/2.5.2/build/container/container_core-min.js" ></ script >
< script type ="text/javascript" src ="http://yui.yahooapis.com/2.5.2/build/menu/menu-min.js" ></ script >
前两个例子的菜单是一直显示的,特别主意的是第二个例子,通过Menu的初始化函数传入配置让菜单一直显示.
用button控制菜单显示与否,看官网的例子得了.在这里
, 重点是这两句:
oMenu.subscribe( " show " , oMenu.focus);
YAHOO.util.Event.addListener( " menutoggle " , " click " , oMenu.show, null , oMenu);
创建子菜单
Html方式创建子菜单
方法很简单,再创建一个Menu,然后放到某个<li>元素里即可,如下例子:(重点看submenu begin end 一段)
< html >
< head >
< meta http-equiv ="Content-Type" content ="text/html; charset=utf-8" >
< title > 交通违法数据处理系统 2009 </ title >
< link rel ="stylesheet" type ="text/css" href ="http://yui.yahooapis.com/2.5.2/build/fonts/fonts-min.css" />
< link rel ="stylesheet" type ="text/css" href ="http://yui.yahooapis.com/2.5.2/build/menu/assets/skins/sam/menu.css" />
< script type ="text/javascript" src ="http://yui.yahooapis.com/2.5.2/build/yahoo-dom-event/yahoo-dom-event.js" ></ script >
< script type ="text/javascript" src ="http://yui.yahooapis.com/2.5.2/build/container/container_core-min.js" ></ script >
< script type ="text/javascript" src ="http://yui.yahooapis.com/2.5.2/build/menu/menu-min.js" ></ script >
</ head >
< body class ="yui-skin-sam" >
< div id ="productsandservices" class ="yuimenu" >
< div class ="bd" >
< ul class ="first-of-type" >
< li class ="yuimenuitem" >
< a class ="yuimenuitemlabel" href ="#communication" >
Communication
</ a >
<!-- A submenu begin:****************************************************************** -->
< div id ="communication" class ="yuimenu" >
< div class ="bd" >
< ul >
< li class ="yuimenuitem" >
< a class ="yuimenuitemlabel" href ="http://mail.yahoo.com" >
Yahoo! Mail
</ a >
</ li >
< li class ="yuimenuitem" >
< a class ="yuimenuitemlabel" href ="http://addressbook.yahoo.com" >
Yahoo! Address Book
</ a >
</ li >
< li class ="yuimenuitem" >
< a class ="yuimenuitemlabel" href ="http://calendar.yahoo.com" >
Yahoo! Calendar
</ a >
</ li >
< li class ="yuimenuitem" >
< a class ="yuimenuitemlabel" href ="http://notepad.yahoo.com" >
Yahoo! Notepad
</ a >
</ li >
</ ul >
</ div >
</ div >
<!-- A submenu end:****************************************************************** -->
</ li >
< li class ="yuimenuitem" >
< a class ="yuimenuitemlabel" href ="http://shopping.yahoo.com" >
Shopping
</ a >
<!-- A submenu -->
< div id ="shopping" class ="yuimenu" >
< div class ="bd" >
< ul >
<!-- Items for the submenu go here -->
</ ul >
</ div >
</ div >
</ li >
< li class ="yuimenuitem" >
< a class ="yuimenuitemlabel" href ="http://entertainment.yahoo.com" >
Entertainment
</ a >
<!-- A submenu -->
< div id ="entertainment" class ="yuimenu" >
< div class ="bd" >
< ul >
<!-- Items for the submenu go here -->
</ ul >
</ div >
</ div >
</ li >
< li class ="yuimenuitem" >
< a class ="yuimenuitemlabel" href ="#information" >
Information
</ a >
<!-- A submenu -->
< div id ="information" class ="yuimenu" >
< div class ="bd" >
< ul >
<!-- Items for the submenu go here -->
</ ul >
</ div >
</ div >
</ li >
</ ul >
</ div >
</ div >
< script >
YAHOO.util.Event.onContentReady( " productsandservices " , function () {
/*
Instantiate a Menu. The first argument passed to the
constructor is the id of the element in the DOM that represents
the Menu instance.
*/
var oMenu = new YAHOO.widget.Menu( " productsandservices " );
/*
Call the "render" method with no arguments since the markup for
this Menu instance already exists in the DOM.
*/
oMenu.render();
// Show the Menu instance
oMenu.show();
});
</ script >
</ body >
</ html >
Js方式创建子菜单
比用html方式简单,在加入菜单的时候,加个subitem对象即可:
< html >
< head >
< meta http-equiv ="content-type" content ="text/html; charset=utf-8" >
< title > Basic Menu From JavaScript </ title >
< style type ="text/css" >
/* margin and padding on body element
can introduce errors in determining
element position and are not recommended;
we turn them off as a foundation for YUI
CSS treatments. */
body {
margin : 0 ;
padding : 0 ;
}
#rendertarget {
width : 180px ;
}
</ style >
< link rel ="stylesheet" type ="text/css" href ="http://yui.yahooapis.com/2.5.2/build/fonts/fonts-min.css" />
< link rel ="stylesheet" type ="text/css" href ="http://yui.yahooapis.com/2.5.2/build/menu/assets/skins/sam/menu.css" />
< script type ="text/javascript" src ="http://yui.yahooapis.com/2.5.2/build/yahoo-dom-event/yahoo-dom-event.js" ></ script >
< script type ="text/javascript" src ="http://yui.yahooapis.com/2.5.2/build/container/container_core-min.js" ></ script >
< script type ="text/javascript" src ="http://yui.yahooapis.com/2.5.2/build/menu/menu-min.js" ></ script >
<!-- begin custom header content for this example -->
< style type ="text/css" >
/*
Set the "zoom" property to "normal" since it is set to "1" by the
".example-container .bd" rule in yui.css and this causes a Menu
instance's width to expand to 100% of the browser viewport.
*/
div.yuimenu .bd {
zoom : normal ;
}
</ style >
<!-- end custom header content for this example -->
</ head >
< body class =" yui-skin-sam" >
< div id ="rendertarget" ></ div >
< script type ="text/javascript" >
YAHOO.util.Event.onAvailable( " rendertarget " , function () {
var oMenu = new YAHOO.widget.Menu( " basicmenu " , { fixedcenter: true ,visible: true ,position: " static " });
oMenu.addItems([
{ text: " Yahoo! Mail " ,
submenu: {
id: " submenu1 " , // Id for the submenu element to be created
// Array of YAHOO.widget.MenuItem configuration properties
itemdata: [ " Menu Item One " , " Menu Item Two " , " Menu Item Three " ]
}
},
{ text: " Yahoo! Address Book " , url: " http://addressbook.yahoo.com " },
{ text: " Yahoo! Calendar " , url: " http://calendar.yahoo.com " },
{ text: " Yahoo! Notepad " , url: " http://notepad.yahoo.com " }
]);
oMenu.render( " rendertarget " );
oMenu.show();
});
</ script >
</ body >
</ html >
Menu的配置
在构造Menu或者增加item的时候,都可以加入一些配置选项,如下.完整的配置选项请参考api.
var oMenu = new YAHOO.widget.Menu( " mymenu " , { visible: true });
oMenu.addItems([
{ text: " Menu Item One " , disabled: true },
{ text: " Menu Item Two " , checked: true }
]);
oMenu.render(document.body);
});
在初始化之后,Menu和每个Item都保留有一个cfg对象.该对象保留着配置信息,可以通过getProperty和setProperty方法取得.如下:
var oMenu = new YAHOO.widget.Menu( " mymenu " , { visible: true });
oMenu.addItems([
{ text: " Menu Item One " , disabled: true },
{ text: " Menu Item Two " , checked: true }
]);
oMenu.render(document.body);
alert(oMenu.getItem( 0 ).cfg.getProperty( " text " )); // alerts "Menu Item One"
oMenu.getItem( 0 ).cfg.setProperty( " disabled " , false );
alert(oMenu.cfg.getProperty( " visible " )); // alerts "true"
oMenu.cfg.setProperty( " visible " , false );
alert(oMenu.cfg.getProperty( " visible " )); // alerts "false"
});
Menu的事件
以下例子展示了如何改写show和hide方法,这两个方法继承自Module组件.在方法的参数p_aArgs中,第一个参数是event对象,第二个参数是MenuItem本身.
YAHOO.util.Event.onDOMReady(
function
() {
//
Create a new Menu instance
var
oMenu
=
new
YAHOO.widget.Menu(
"
mymenu
"
);
oMenu.addItems([
"
Menu Item 1
"
,
"
Menu Item 2
"
,
"
Menu Item 3
"
]);
//
Define a handler for the "show" event
function
onShow(p_sType, p_aArgs) {
alert(
this
.id
+
"
is now visible
"
);
}
//
Define a handler for the "hide" event
function
onHide(p_sType, p_aArgs) {
alert(
this
.id
+
"
is now hidden
"
);
}
//
Subscribe to the "show" and "hide" events
oMenu.subscribe(
"
show
"
, onShow);
oMenu.subscribe(
"
hide
"
, onHide);
oMenu.render(document.body);
    function onClick(p_sType, p_aArgs) {

        var oEvent = p_aArgs[0],    // DOM Event
            oMenuItem = p_aArgs[1]; // YAHOO.widget.MenuItem instance


        // Alert the type of the DOM event

        alert(oEvent.type);


        // If a MenuItem was clicked, alert the value of its text label

        if (oMenuItem) {

            alert(oMenuItem.cfg.getProperty("text"));

        }

    }


    // Subscribe to the "click" event

    oMenu.subscribe("click", onClick);
    oMenu.show();
});


发表评论

相关推荐
YUI提供了多种可重用的UI控件,如按钮(button)、表格(table)、菜单(menu)、日期选择器(datepicker)等。这些控件封装了复杂的交互逻辑,使开发者能快速构建用户界面。 #### 2.2 动画(Animation) YUI的...
外加热强制循环蒸发器装配图(CAD).rar
数控车床纵向进给系统设计.zip
j
爬虫 bangumi名称和评论数
基于SpringBoot的垃圾分类回收系统,系统包含两种角色:管理员、用户主要功能如下。 【用户功能】 首页:浏览垃圾分类回收系统信息。 个人中心:管理个人信息,查看历史记录和订单状态。 运输管理:查看运输信息,垃圾回收的时间和地点。 公告管理:阅读系统发布的相关通知和公告。 垃圾回收管理:查看垃圾回收的信息,回收类型和进度。 垃圾出库申请管理:提交和查看垃圾出库申请的状态。 【管理员功能】 首页:查看垃圾分类回收系统。 个人中心:管理个人信息。 管理员管理:审核和管理注册管理员用户的信息。 用户管理:审核和管理注册用户的信息。 运输管理:监管和管理系统中的运输信息。 公告管理:发布、编辑和删除系统的通知和公告。 垃圾回收管理:监管和管理垃圾回收的信息。 垃圾出库申请管理:审批和管理用户提交的垃圾出库申请。 基础数据管理:管理系统的基础数据,运输类型、公告类型和垃圾回收类型。 二、项目技术 编程语言:Java 数据库:MySQL 项目管理工具:Maven 前端技术:Vue 后端技术:SpringBoot 三、运行环境 操作系统:Windows、macOS都可以 JDK版本:JDK1.8以上都可以 开发工具:IDEA、Ecplise、Myecplise都可以 数据库: MySQL5.7以上都可以 Maven:任意版本都可以
内容概要:本文档是台湾大学计算机科学与信息工程系2021年秋季学期《算法设计与分析》课程的第一次作业(Homework#1)。作业包含四道编程题和三道手写题,旨在考察学生对算法设计和分析的理解与应用能力。编程题涉及汉诺塔、数组计算、矩形点对、糖果分配等问题;手写题涵盖渐近符号证明、递归方程求解、幽灵腿游戏优化、不公平的卢卡斯问题等。文档详细描述了每个问题的具体要求、输入输出格式、测试用例以及评分标准。此外,还提供了编程技巧和注意事项,如避免延迟提交、正确引用资料、处理大输入文件等。 适合人群:具备一定编程基础的本科生或研究生,特别是修读过或正在修读算法设计与分析相关课程的学生。 使用场景及目标:①帮助学生巩固课堂所学的算法理论知识;②通过实际编程练习提高解决复杂问题的能力;③为后续更深入的学习和研究打下坚实的基础。 其他说明:此作业强调团队合作和个人独立思考相结合的重要性,鼓励学生在讨论后用自己的语言表达解决方案,并注明参考资料。对于编程题,特别提醒学生注意输入文件可能较大,建议采取适当的优化措施以确保程序运行效率。
基于SpringBoot的铁路订票管理系统,系统包含两种角色:管理员、用户主要功能如下。 【用户功能】 首页:浏览铁路订票管理系统的主要信息。 火车信息:查看火车的相关信息,包括车次、出发地、目的地和票价等。 公告资讯:阅读系统发布的相关通知和资讯。 后台管理:进行系统首页、个人中心、车票预订管理、车票退票管理等操作。 个人中心:管理个人信息,查看订单历史记录等。 【管理员功能】 首页:查看铁路订票管理系统。 个人中心:修改密码、管理个人信息。 用户管理:审核和管理注册用户的信息。 火车类型管理:管理系统中的火车类型信息。 火车信息管理:监管和管理系统中的火车信息,添加、编辑、删除等。 车票预订管理:处理用户的车票预订请求。 车票退票管理:处理用户的车票退票请求。 系统管理:管理系统的基本设置,公告资讯、关于我们、系统简介和轮播图管理。 二、项目技术 编程语言:Java 数据库:MySQL 项目管理工具:Maven 前端技术:Vue 后端技术:SpringBoot 三、运行环境 操作系统:Windows、macOS都可以 JDK版本:JDK1.8以上都可以 开发工具:IDEA、Ecplise、Myecplise都可以 数据库: MySQL5.7以上都可以 Maven:任意版本都可以
塑料架注射模具设计.rar
基于json文件数据驱动的的接口测试框架
铁丝缠绕包装机设计-缠绕盘设计.rar
linux
圆柱体相贯线焊接专机工作台设计.rar
硬币分拣机设计.rar
内容概要:本文探讨了开发行业级机器学习和数据挖掘软件的经验与教训,指出当前研究界与工业界之间的脱节问题。作者分享了开发LIBSVM和LIBLINEAR的经验,强调了用户需求的重要性。大多数用户并非机器学习专家,期望简单易用的工具来获得良好结果。文章还详细介绍了支持向量机(SVM)的实际应用案例,包括数据预处理(如特征缩放)、参数选择等步骤,并提出了为初学者设计的简易流程。此外,作者讨论了在设计机器学习软件时应考虑的功能选择、选项数量、性能优化与数值稳定性等问题,强调了软件开发与实验代码的区别以及鼓励研究人员参与高质量软件开发的重要性。 适合人群:对机器学习软件开发感兴趣的科研人员、工程师及从业者,尤其是那些希望了解如何将学术研究成果转化为实际可用工具的人士。 使用场景及目标:①帮助非机器学习专家的用户更好地理解和使用机器学习方法;②指导开发者在设计机器学习软件时考虑用户需求、功能选择、性能优化等方面的问题;③促进学术界与工业界之间的合作,推动高质量机器学习软件的发展。 其他说明:本文不仅提供了具体的开发经验和技巧,还呼吁建立激励机制,鼓励更多研究人员投入到机器学习软件的开发中,以解决当前存在的研究与应用脱节的问题。
一天入门pandas代码
该资源为joblib-0.12.0-py2.py3-none-any.whl,欢迎下载使用哦!
内容概要:本文档《xtuner_requirements.txt》列出了用于支持特定项目(可能是机器学习或深度学习项目)运行所需的所有Python包及其版本。其中不仅包括常见的数据处理和科学计算库如numpy、pandas,还包括了与深度学习密切相关的库如torch、transformers等。值得注意的是,文档中还特别指定了NVIDIA CUDA相关组件的具体版本,确保了GPU加速环境的一致性和兼容性。此外,文档中也包含了从GitHub直接安装的xtuner库,明确了具体的提交哈希值,保证了代码来源的精确性。 适合人群:对机器学习、深度学习领域有一定了解并需要搭建相应开发环境的研发人员,尤其是那些希望复现特定实验结果或基于已有模型进行二次开发的研究者和技术爱好者。 使用场景及目标:①帮助开发者快速搭建完整的开发环境,确保所有依赖项正确无误;②为研究人员提供一个稳定的实验平台,以便于重复实验和验证结果;③作为项目协作的基础,确保团队成员之间的环境一致性,减少因环境差异带来的问题。 阅读建议:由于该文档主要为技术性依赖列表,在阅读时应重点关注所需安装的库及其版本号,特别是CUDA相关组件和自定义库(如xtuner)的安装方式。对于非技术人员而言,可能需要额外查阅相关资料来理解各库的作用。同时,在实际操作过程中,建议按照文档中的顺序逐一安装依赖,避免版本冲突等问题的发生。
j
液氮带控制点工艺流程图.rar