- 浏览: 468312 次
- 性别:

- 来自: 广州
-

最新评论
-
lhgyy00:
很好,回去好好研究下,3Q
博客资源与博客工具大全 -
ljl.java:
♦
你会遇到几段恋情?很准的哦~ -
ljl.java:
♦
你会遇到几段恋情?很准的哦~ -
jzzwy:
你这个red5是什么版本 Iterator<IConne ...
red5获取在线用户列表 -
81365341:
看着标题“red5配置详解”点进来的,结果没看到一句和配置有关 ...
red5配置详解
Seam provides two nice additions to JBPM the first one (which this tutorial is about) is a powerful integration between Seam components + JSF and JBPM, the second one is Page Flow Definition : we'll treat this latter in a separate tutorial as it's simply a different way to describe your application flow and what actions and decisions can happen in each place.
How seam integrates with JBPM ?
Seam folds business processes into the Seam container by relying on three key coordinators:
- The business process context: Seam assimilates the stateful context bound to the process instance as one of its own. Business process-scoped context variables are exchanged with the jBPM process context transparently, but are otherwise treated just like any other context variable. They can participate in bijection and be resolved using EL notation. Value expressions can also be used in the process definition descriptor to resolve context variables in the Seam container.
- Declarative business process controls: A set of annotations and page descriptor tags are included that can initiate or resume a process instance, start and end tasks, and bring variables from an active process into scope, all without calling out directly to jBPM. Seam as includes a set of UI controls for selecting the process or task instance on which to operate.
- Identity management: Seam provides a basic component named actor for registering the actor id and group ids that will be passed on to the process instance to record the current participant. The actor component is typically populated during the authentication routine.
Configuring Seam to work with JBPM
Step 1 : Add JBPM libraries
The JAR file jbpm-3.X.X.jar is required for jBPM and it is located
under the lib directory of the Seam distribution. We need to place this
JAR file at the root of the EAR and then add a reference to the JAR in
the application.xml file.
Here's a sample of your application.xml file with JBPM libs in it
- <application>
- <display-name>Sample JBPM Seam Application</display-name>
- <module>
- <web>
- <web-uri>seamJbpm.war</web-uri>
- <context-root>/seamJbpm</context-root>
- </web>
- </module>
- <module>
- <java>jboss-seam.jar</java>
- </module>
- <module>
- <java>jbpm-3.1.2.jar</java>
- </module>
- </application>
<application>
<display-name>Sample JBPM Seam Application</display-name>
<module>
 <web>
  <web-uri>seamJbpm.war</web-uri>
   <context-root>/seamJbpm</context-root>
 </web>
</module>
<module>
 <java>jboss-seam.jar</java>
</module>
<module>
 <java>jbpm-3.1.2.jar</java>
</module>
</application>
Step 2: Add hibernate config file
As we saw in our previous tutorial, jBPM works by interacting with a
database, and it uses Hibernate as its persistence mechanism for the
database. You can pickup the hibernate.cfg.xml file that comes with the jBPM release. This file needs to be inserted into the root of your ear.
Step 3: Tell seam which are your process definitions (and pageflows)
In your components.xml you need to declare the process definitions used by your applications
- <bpm:jbpm>
- <bpm:process-definitions>
- <value>processDefinition.xml</value>
- </bpm:process-definitions>
- </bpm:jbpm>
<bpm:jbpm>
        <bpm:process-definitions>
         <value>processDefinition.xml</value>
        </bpm:process-definitions>
    </bpm:jbpm>
(Besides this you must declare here you pageflows, but we'll explore Page Flows in the next tutorial)
Step 4: Let Seam manage transactions
JBPM used in a standalone environment uses its own resource-local transactions when performing persistence operations. However when used in combination with Seam this can lead to transaction conflicts: so you need simply tell JBPM to participate in the global transaction managed by Seam (and not use its own)
Add this line to jbpm.cfg.xml file:- <jbpm-configuration>
- <jbpm-context>
- <service name="persistence">
- <factory>
- <bean class="org.jbpm.persistence.db.DbPersistenceServiceFactory">
- <field name="isTransactionEnabled"><false/></field>
- </bean>
- </factory>
- </service>
- <service name="tx" factory="org.jbpm.tx.TxServiceFactory" />
- <service name="message" factory="org.jbpm.msg.db.DbMessageServiceFactory" />
- <service name="scheduler" factory="org.jbpm.scheduler.db.DbSchedulerServiceFactory" />
- <service name="logging" factory="org.jbpm.logging.db.DbLoggingServiceFactory" />
- <service name="authentication" factory="org.jbpm.security.authentication.DefaultAuthenticationServiceFactory" />
- </jbpm-context>
- </jbpm-configuration>
<jbpm-configuration>
  <jbpm-context>
    <service name="persistence">
       <factory>
          <bean class="org.jbpm.persistence.db.DbPersistenceServiceFactory">
             <field name="isTransactionEnabled"><false/></field>
          </bean>
       </factory>
    </service>
    <service name="tx" factory="org.jbpm.tx.TxServiceFactory" />
    <service name="message" factory="org.jbpm.msg.db.DbMessageServiceFactory" />
    <service name="scheduler" factory="org.jbpm.scheduler.db.DbSchedulerServiceFactory" />
    <service name="logging" factory="org.jbpm.logging.db.DbLoggingServiceFactory" />
   <service name="authentication" factory="org.jbpm.security.authentication.DefaultAuthenticationServiceFactory" />
  </jbpm-context>
</jbpm-configuration>
(Also this file will stay in the root of the ear)
A Sample application
Piece 1: the processdefinition
Here we'll show a simple process which has 2 Tasks in it.
An order is placed at the beggining of the process and then the order
needs to be delivered. Just to keep it simple we have only one actor in
this process which will be the used logged in.

Picture 1: the process view designed with Eclipse plugin
- <process-definition xmlns="urn:jbpm.org:jpdl-3.2" name="simple">
- <start-state name="start">
- <transition name="trPlaceOrder" to="PlaceOrder" />
- </start-state>
- <task-node name="PlaceOrder">
- <task name="placeOrderTask">
- <assignment actor-id="#{actor.id}" />
- </task>
- <transition name="next" to="Deliver" />
- <transition name="cancel" to="error" />
- </task-node>
- <task-node name="Deliver">
- <task name="getFromStock">
- <assignment actor-id="#{actor.id}" />
- </task>
- <transition name="next" to="end" />
- <transition name="cancel" to="error" />
- </task-node>
- <end-state name="error" />
- <end-state name="end" />
- </process-definition>
<process-definition xmlns="urn:jbpm.org:jpdl-3.2" name="simple">
 <start-state name="start">
  <transition name="trPlaceOrder" to="PlaceOrder" />
 </start-state>
 <task-node name="PlaceOrder">
  <task name="placeOrderTask">
   <assignment actor-id="#{actor.id}" />
  </task>
  <transition name="next" to="Deliver" />
  <transition name="cancel" to="error" />
 </task-node>
 <task-node name="Deliver">
  <task name="getFromStock">
   <assignment actor-id="#{actor.id}" />
  </task>
  <transition name="next" to="end" />
  <transition name="cancel" to="error" />
 </task-node>
 <end-state name="error" />
 <end-state name="end" />
</process-definition>
Notice the expression #{actor.id}. This is an example of how to inject a seam component into your process definition. In the next module everything will be clear.
Piece 2: the login module & login view:
The login module and the login view are showed here :
This is the login view:
- <%@ taglib uri="<a href="http://java.sun.com/jsf/html">http://java.sun.com/jsf/html</a>" prefix="h"%>
- <%@ taglib uri="<a href="http://java.sun.com/jsf/core">http://java.sun.com/jsf/core</a>" prefix="f"%>
- <html>
- <head>
- <title>Login</title>
- </head>
- <body>
- Enter your username
- <f:view>
- <h:form>
- <div>
- <h:inputText value="#{login.user}"/>
- <h:commandButton value="Login" action="#{login.login}"/>
- </div>
- </h:form>
- </f:view>
- </body>
- </html>
<%@ taglib uri="http://java.sun.com/jsf/html" prefix="h"%>
<%@ taglib uri="http://java.sun.com/jsf/core" prefix="f"%>
<html>
<head>
<title>Login</title>
</head>
<body>
Enter your username
<f:view>
 <h:form>
   <div>
     <h:inputText value="#{login.user}"/>
     <h:commandButton value="Login" action="#{login.login}"/>
   </div>
 </h:form>
</f:view>
</body>
</html>
This is the login Module
- import org.jboss.seam.annotations.In;
- import org.jboss.seam.annotations.Name;
- import org.jboss.seam.bpm.Actor;
- @Name("login")
- public class LoginModule
- {
- @In private Actor actor;
- private String user;
- public String getUser() {
- return user;
- }
- public void setUser(String user) {
- this.user = user;
- }
- public String login()
- {
- actor.setId(user);
- return "/todo.jsp";
- }
- }
import org.jboss.seam.annotations.In;
import org.jboss.seam.annotations.Name;
import org.jboss.seam.bpm.Actor;

@Name("login")
public class LoginModule
{

   @In private Actor actor;

   private String user;

   public String getUser() {
      return user;
   }

   public void setUser(String user) {
      this.user = user;
   }

   public String login()
   {
      actor.setId(user);
      return "/todo.jsp";
   }
}
Here's the actor object we've seen before.
 What is the Actor ? it's
a Seam component that is stored in the session. In general, you should
create your actor component when you are logging in to the website.
What is the Actor ? it's
a Seam component that is stored in the session. In general, you should
create your actor component when you are logging in to the website.
The actor will be used later on to assign the Task to an actor-id:
<task name="getFromStock">
<assignment actor-id="#{actor.id}"/>
</task>
Piece n. 3 : the POJO process manager.
Believe it or not this little POJO does all the job that is needed to Create a task, and handle @Start and @Stop
- import org.jboss.seam.annotations.bpm.CreateProcess;
- import org.jboss.seam.annotations.bpm.EndTask;
- import org.jboss.seam.annotations.Name;
- import org.jboss.seam.annotations.bpm.StartTask;
- import org.jboss.seam.annotations.*;
- import org.jboss.seam.ScopeType;
- @Name("orderStock")
- public class OrderStock
- {
- @Out(scope=ScopeType.BUSINESS_PROCESS, required=false)
- Long processQuantity;
- private int quantity ;
- public int getQuantity()
- {
- return quantity;
- }
- public void setQuantity(int quantity) {
- this.quantity = quantity;
- }
- @CreateProcess(definition="simple")
- public void startProcess() {
- processQuantity = new Long(getQuantity());
- }
- @StartTask
- @EndTask(transition="next")
- public void done() {
- }
- @StartTask
- @EndTask(transition="cancel")
- public void cancel() {
- }
- }
import org.jboss.seam.annotations.bpm.CreateProcess;
import org.jboss.seam.annotations.bpm.EndTask;
import org.jboss.seam.annotations.Name;
import org.jboss.seam.annotations.bpm.StartTask;
import org.jboss.seam.annotations.*;
import org.jboss.seam.ScopeType;

@Name("orderStock")


public class OrderStock
{

   @Out(scope=ScopeType.BUSINESS_PROCESS, required=false)
   Long processQuantity;

   private int quantity ;

   public int getQuantity()
   {
      return quantity;
   }

   public void setQuantity(int quantity) {
      this.quantity = quantity;
   }

  @CreateProcess(definition="simple")
  public  void startProcess() {
    processQuantity = new Long(getQuantity());
  }
  @StartTask
  @EndTask(transition="next")
    public void done() {
  }
  @StartTask
  @EndTask(transition="cancel")
    public void cancel() {
  }

}
It's most intuitive: the method startProcess will be recalled by JSF to start the JBPM process
@CreateProcess(definition="simple")
public void startProcess() {
.....
}
You see, process definition is passed as parameter to the annotation. The Seam @StartTask annotation starts work on a task. The @EndTask ends the task, and allows the business process execution to resume.
In this sample we've two methods done and cancel which will be used to drive our process : calling done moves the Token to the transition "next" while calling cancel moves to the transition "cancel". (Here
for keeping it simple the methods handle both @StartTask and @EndTask
but you're free to use a separate method for each of this phases)
A last thing: maybe you've noticed the expression:
@Out(scope=ScopeType.BUSINESS_PROCESS, required=false)
Long processQuantity;
this outjects the process variable processQuantity and makes it available to the view.
Piece n. 4 : the view component
Ok so we need a last piece of this puzzle: the view component. this will be a standard JSF page BUT....with special Seam annotations in it:
- <%@ taglib uri="http://java.sun.com/jsf/html" prefix="h"%>
- <%@ taglib uri="http://java.sun.com/jsf/core" prefix="f"%>
- <%@ taglib uri="http://jboss.com/products/seam/taglib" prefix="s"%>
- <html>
- <body>
- <h2>Order system</h2>
- <f:view>
- <h:form id="list">
- <div>
- <h:outputText value="There are no order at the moment." rendered="#{empty taskInstancePriorityList}"/>
- <h:dataTable value="#{taskInstancePriorityList}"
- var="task" rendered="#{not empty taskInstancePriorityList}"
- bgcolor="#F1F1F1" border="10">
- <h:column>
- <f:facet name="header">
- <h:outputText value="Created"/>
- </f:facet>
- <h:outputText value="#{task.taskMgmtInstance.processInstance.start}">
- <s:convertDateTime type="date"/>
- </h:outputText>
- </h:column>
- <h:column>
- <f:facet name="header">
- <h:outputText value="Name"/>
- </f:facet>
- <h:outputText value="#{task.name}"/>
- </h:column>
- <h:column>
- <f:facet name="header">
- <h:outputText value="Quantity"/>
- </f:facet>
- <h:outputText value="#{task.variables['processQuantity']}"/>
- </h:column>
- <h:column>
- <s:button action="#{orderStock.done}" taskInstance="#{task}" value="Done"/>
- </h:column>
- <h:column>
- <s:button action="#{orderStock.cancel}" taskInstance="#{task}" value="Cancel"/>
- </h:column>
- </h:dataTable>
- </div>
- <div>
- <h:messages/>
- </div>
- </h:form>
- <h:form id="new">
- <div>
- <h:inputText value="#{orderStock.quantity}" />
- <h:commandButton value="Enter order quantity" action="#{orderStock.startProcess}"/>
- </div>
- </h:form>
- </f:view>
- </body>
- </html>
<%@ taglib uri="http://java.sun.com/jsf/html" prefix="h"%>
<%@ taglib uri="http://java.sun.com/jsf/core" prefix="f"%>
<%@ taglib uri="http://jboss.com/products/seam/taglib" prefix="s"%>
<html>
<body>
<h2>Order system</h2>
<f:view>
   <h:form id="list">
      <div>
         <h:outputText value="There are no order at the moment." rendered="#{empty taskInstancePriorityList}"/>
         <h:dataTable value="#{taskInstancePriorityList}"
            var="task" rendered="#{not empty taskInstancePriorityList}"
            bgcolor="#F1F1F1" border="10">
            <h:column>
                <f:facet name="header">
                    <h:outputText value="Created"/>
                </f:facet>
                <h:outputText value="#{task.taskMgmtInstance.processInstance.start}">
                    <s:convertDateTime type="date"/>
                </h:outputText>
            </h:column>

            <h:column>
                <f:facet name="header">
                    <h:outputText value="Name"/>
                </f:facet>
                  <h:outputText value="#{task.name}"/>
            </h:column>

            <h:column>
                <f:facet name="header">
                    <h:outputText value="Quantity"/>
                </f:facet>
                  <h:outputText value="#{task.variables['processQuantity']}"/>
            </h:column>

            <h:column>
                <s:button action="#{orderStock.done}" taskInstance="#{task}" value="Done"/>
            </h:column>
            <h:column>
                <s:button action="#{orderStock.cancel}" taskInstance="#{task}" value="Cancel"/>
            </h:column>

         </h:dataTable>
      </div>
      <div>
      <h:messages/>
      </div>
   </h:form>
   <h:form id="new">
      <div>
         <h:inputText value="#{orderStock.quantity}" />
         <h:commandButton value="Enter order quantity" action="#{orderStock.startProcess}"/>
      </div>
   </h:form>
</f:view>
</body>
</html>
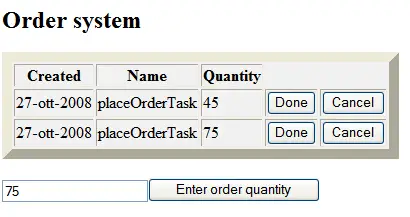
Here's a little explanation to the expression you find in the JSF:
#{taskInstancePriorityList} Loads the Datatable with an array of Tasks
#{task.taskMgmtInstance.processInstance.start} Displays the start date of the process
#{task.name} recalls task.getName()
#{task.variables['processQuantity']} Displays the task variable processQuantity
#{task} the reference to the TaskInstance
#{orderStock.done} Simple invocation of method done
#{orderStock.cancel} Simple invocation of method cancel
When the view is render you'll see a simple Datatable with 2 buttons in
it, one for Advancing the process state and another to Drop it.
So can you see the beauty of Seam ? you have already lots of built-in to manage your process:
in a JBPM standalone application you have to request the JBPM Context,
query the Task list, fill the Task list in a Collection, feed this
collection to JSF...simply to show your task.
When you became practical with Seam configuration file creating a JBPM tabular-data view of your process is a matter of minutes.
Packaging your application:
Here's a view of your ear file:
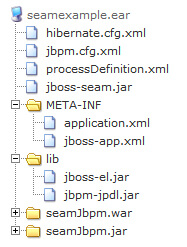
At the root of your ear file you have the main configuration files: hibernate config file, jbpm config file and your process definition.
Exploring further the jar and war files:
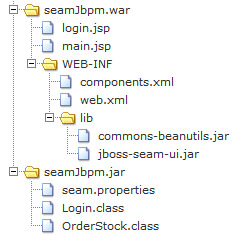
Nothing new here, you should already know from the previous tutorial about seam.properties and components.xml. As said before components.xml holds the list of process definition used by this sample.
I suggest you when you're beginning your Seam experiments to make use of the build.xml files that come wit


发表评论

相关推荐
Seam、JBPM、EJB和JSF是Java开发中的重要技术栈,它们在企业级应用开发中扮演着核心角色。下面将详细解释这些技术及其在"Seam JBPM Eclipse工程例子"中的应用。 1. **Seam**: Seam是一个全面的Java EE框架,它...
droolsjbpm-integration, Drools和jBPM与 seam,spring,camel的集成. . 开发口水和 jBPM如果你想要构建或者贡献到一个项目,则阅读这里文档 。 我们将通过正确设置开发环境来节省你和我们大量的时间。 它解决了所有...
4. **支持多种流程定义语言**:除了默认支持的jPDL、WS-BPEL和Seam框架的Pageflow外,jBPM还计划支持更多流程定义语言,以适应不同的业务场景需求。 5. **严格的流程版本控制**:jBPM提供了严格的版本控制机制,...
与Seam,Spring,OSGi等集成 BPM通过以业务用户和开发人员喜欢的方式提供流程管理功能和工具,从而实现业务分析师,开发人员和最终用户之间的桥梁。域特定的节点可以插入调色板,使业务用户更容易理解这些过程。 ...
**JBoss Seam——深度整合框架** JBoss Seam是一款开源的企业级应用框架,它以其深度集成的能力而闻名。这个框架的设计目标是简化Java EE(现在称为Jakarta EE)开发,通过提供一个统一的环境来整合各种技术和组件...
jBPM集成示例 (jBPM Integration Example) - **理解代码**:此示例重点介绍了如何将Seam与jBPM流程引擎相结合,实现业务流程的自动化处理。通过分析示例代码,可以学习到如何定义流程模型、集成Seam组件与jBPM流程...
- **理解代码**:该部分介绍了一个结合Seam与jBPM(Java Business Process Model)实现的待办事项管理应用,涉及流程设计、任务分配等。 - **工作原理**:通过Seam与jBPM的集成,实现了业务流程与Web界面的紧密结合...
- **Seam 和 jBPM 集成**:通过将 Seam 组件与 jBPM 流程引擎相结合,实现业务流程的自动化。 - **任务管理**:Seam 负责用户界面和交互逻辑,jBPM 负责处理任务的执行流程。 **1.4.2 工作原理** - **流程定义**:...
除了JBPM(一个用于业务流程管理的工具)之外,Seam还支持与其他常用的工具和组件如Spring、邮件发送、权限管理等进行集成,从而增强应用的功能。 #### 三、Seam框架的功能与特点 ##### 1. 一站式(FullStack)的...
它不仅能够在任何JavaEE应用服务器或简单的JDBC配置的JVM中运行,还支持多种可执行流程语言,如jPDL、WS-BPEL以及Seam框架的Pageflow。其核心优势体现在以下十个方面: 1. **嵌入式工作流引擎**:jBPM采用嵌入式...
- **DVD商店**: 展示了Seam与jBPM的集成,以及如何构建业务流程驱动的应用程序。 - **IssueTracker**: 介绍了Seam工作区管理的用法,适用于需要管理大量数据或任务的场景。 - **Hibernate预订系统**: 通过结合...
- **Integration with jBPM**:解释如何利用 jBPM 来管理订单处理流程。 ##### 8. 博客示例 通过这个示例,可以了解如何在 Seam 2.1 中实现可书签化的 URL,以便更好地支持 RESTful 设计风格的应用程序。 - **...
- **集成实践**:Seam与jBPM之间的紧密集成意味着开发者可以利用Seam组件和表达式语言(EL)来启动、管理和监控业务流程,这种集成方式在本书之前章节中已经被广泛讨论过。 #### 知识点三:BPM去神秘化 - **常见误解...
- **jBPM集成**:Seam与jBPM(Java Business Process Model)的整合,为业务流程管理提供了强大的支持。这使得开发人员能够更加轻松地实现业务流程驱动的应用。 - **JBoss Rules/Drools集成**:通过与JBoss Rules...
- **待办事项示例**(Seam and jBPM: the todo list example):这个示例结合了Seam和jBPM(Java Business Process Management),演示了如何将工作流集成到Seam应用中。具体包括任务的创建、分配和完成等操作。 - *...