转自:https://blog.csdn.net/dolacmeng/article/details/46291111
先放上我的代码:新建一个CircleView,继承UIView
#import "CircleView.h"

#define ScreenWidth [[UIScreen mainScreen] bounds].size.width
#define ScreenHeight [[UIScreen mainScreen] bounds].size.height
#define circle_btn_width ScreenWidth/6.3
#define circle_radius (ScreenWidth/2 - circle_btn_width + 10)

@interface CircleView()

@property (nonatomic) UIBezierPath *circle;
@property (nonatomic) CAShapeLayer *shapeLayer;
@property (nonatomic) NSTimer *timer;
@property (nonatomic) UIView *circleView;

@end

@implementation CircleView

- (instancetype)initWithFrame:(CGRect)frame{
    self = [super initWithFrame:frame];
    if (self) {

        _circle = [UIBezierPath bezierPathWithOvalInRect:CGRectMake(0, 0, circle_radius*2, circle_radius*2)];
        CAShapeLayer *shape = [CAShapeLayer new];
        shape.frame = CGRectMake(0, 50, circle_radius*2, circle_radius*2);
        shape.position = self.center;
        shape.fillColor = [UIColor clearColor].CGColor;
        shape.lineWidth = 2.f;
        shape.strokeColor = [UIColor grayColor].CGColor;
        shape.strokeStart = 0.f;
        shape.strokeEnd = 1.f;
        shape.path = _circle.CGPath;
        [self.layer addSublayer:shape];

        _shapeLayer = [CAShapeLayer layer];
        _shapeLayer.frame = CGRectMake(0, 0, circle_radius*2, circle_radius*2);
        _shapeLayer.position = self.center;
        _shapeLayer.fillColor = [UIColor clearColor].CGColor;
        _shapeLayer.lineWidth = 2.f;
        _shapeLayer.strokeColor = [UIColor redColor].CGColor;
        _shapeLayer.strokeStart = 0.f;
        _shapeLayer.strokeEnd = 0.f;
        _shapeLayer.path = _circle.CGPath;
        [self.layer addSublayer:_shapeLayer];

        CGAffineTransform transform = CGAffineTransformIdentity;
        self.transform = CGAffineTransformRotate(transform, -M_PI/2);

        _timer = [NSTimer scheduledTimerWithTimeInterval:1.f target:self selector:@selector(animate) userInfo:nil repeats:YES];
    }

    return self;
}

-(void)animate{
    _shapeLayer.strokeEnd += 0.1;
}
调用:
CircleView *circleView = [[CircleView alloc]initWithFrame:CGRectMake(0, 0, circle_radius*2, circle_radius*2)];
circleView.center = self.view.center;
[self.view addSubview:circleView];
原理是下文:
UIBezierPath可以绘制矢量路径,而CAShapeLayer是Layer的子类,可以在屏幕进行绘制,本文主要思想是:CAShapeLayer按照UIBezierPath的矢量路径进行绘制。
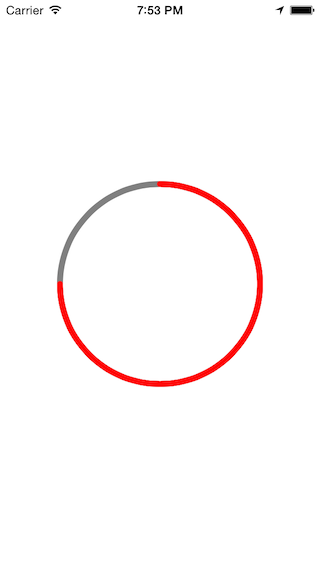
效果图如图:
方法如下:
    @interface ViewController (){
        CAShapeLayer *shapeLayer;
        NSTimer *timer;
    }

    @end

    @implementation ViewController

    - (void)viewDidLoad {
        [super viewDidLoad];

        //第一步,通过UIBezierPath设置圆形的矢量路径
        UIBezierPath *circle = [UIBezierPath bezierPathWithOvalInRect:CGRectMake(0, 0, 200, 200)];

        //第二步,用CAShapeLayer沿着第一步的路径画一个完整的环(颜色灰色,起始点0,终结点1)
        CAShapeLayer *bgLayer = [CAShapeLayer layer];
        bgLayer.frame = CGRectMake(0, 0, 200, 200);//设置Frame
        bgLayer.position = self.view.center;//居中显示
        bgLayer.fillColor = [UIColor clearColor].CGColor;//填充颜色=透明色
        bgLayer.lineWidth = 2.f;//线条大小
        bgLayer.strokeColor = [UIColor grayColor].CGColor;//线条颜色
        bgLayer.strokeStart = 0.f;//路径开始位置
        bgLayer.strokeEnd = 1.f;//路径结束位置
        bgLayer.path = circle.CGPath;//设置bgLayer的绘制路径为circle的路径
        [self.view.layer addSublayer:bgLayer];//添加到屏幕上

        //第三步,用CAShapeLayer沿着第一步的路径画一个红色的环形进度条,但是起始点=终结点=0,所以开始不可见
        shapeLayer = [CAShapeLayer layer];
        shapeLayer.frame = CGRectMake(0, 0, 200, 200);
        shapeLayer.position = self.view.center;
        shapeLayer.fillColor = [UIColor clearColor].CGColor;
        shapeLayer.lineWidth = 2.f;
        shapeLayer.strokeColor = [UIColor redColor].CGColor;
        shapeLayer.strokeStart = 0;
        shapeLayer.strokeEnd = 0;
        shapeLayer.path = circle.CGPath;
        [self.view.layer addSublayer:shapeLayer];

        //第四步,用一个定时器进行测试,每一秒,进度加10%
        timer = [NSTimer scheduledTimerWithTimeInterval:1.f target:self selector:@selector(animate) userInfo:nil repeats:YES];
    }

    -(void)animate{
        shapeLayer.strokeEnd += 0.1;
    }
我们可以对以上代码封装为一个CircleView,继承自View,封装后代码如下:
CircleView.h文件
    #import <UIKit/UIKit.h>

    @interface CircleView : UIView

    @property(assign,nonatomic)CGFloat startValue;
    @property(assign,nonatomic)CGFloat lineWidth;
    @property(assign,nonatomic)CGFloat value;
    @property(strong,nonatomic)UIColor *lineColr;

    @end
CircleView.m文件:
    #import "CircleView.h"

    @interface CircleView()
    @property(strong,nonatomic)UIBezierPath *path;
    @property(strong,nonatomic)CAShapeLayer *shapeLayer;
    @property(strong,nonatomic)CAShapeLayer *bgLayer;

    @end

    @implementation CircleView


    - (instancetype)initWithFrame:(CGRect)frame
    {
        self = [super initWithFrame:frame];
        if (self) {
            _path = [UIBezierPath bezierPathWithOvalInRect:self.bounds];

            _bgLayer = [CAShapeLayer layer];
            _bgLayer.frame = self.bounds;
            _bgLayer.fillColor = [UIColor clearColor].CGColor;
            _bgLayer.lineWidth = 2.f;
            _bgLayer.strokeColor = [UIColor grayColor].CGColor;
            _bgLayer.strokeStart = 0.f;
            _bgLayer.strokeEnd = 1.f;
            _bgLayer.path = _path.CGPath;
            [self.layer addSublayer:_bgLayer];

            _shapeLayer = [CAShapeLayer layer];
            _shapeLayer.frame = self.bounds;
            _shapeLayer.fillColor = [UIColor clearColor].CGColor;
            _shapeLayer.lineWidth = 2.f;
            _shapeLayer.lineCap = kCALineCapRound;
            _shapeLayer.strokeColor = [UIColor redColor].CGColor;
            _shapeLayer.strokeStart = 0.f;
            _shapeLayer.strokeEnd = 0.f;


            _shapeLayer.path = _path.CGPath;
            [self.layer addSublayer:_shapeLayer];

        }
        return self;
    }

    @synthesize value = _value;
    -(void)setValue:(CGFloat)value{
        _value = value;
        _shapeLayer.strokeEnd = value;
    }
    -(CGFloat)value{
        return _value;
    }

    @synthesize lineColr = _lineColr;
    -(void)setLineColr:(UIColor *)lineColr{
        _lineColr = lineColr;
        _shapeLayer.strokeColor = lineColr.CGColor;
    }
    -(UIColor*)lineColr{
        return _lineColr;
    }

    @synthesize lineWidth = _lineWidth;
    -(void)setLineWidth:(CGFloat)lineWidth{
        _lineWidth = lineWidth;
        _shapeLayer.lineWidth = lineWidth;
        _bgLayer.lineWidth = lineWidth;
    }
    -(CGFloat)lineWidth{
        return _lineWidth;
    }

    @end
在需要使用的ViewContrller中使用以下代码调用即可:
    CircleView *view = [[CircleView alloc] initWithFrame:CGRectMake(0, 0, 200, 200)];
       [self.view addSubview:view];
       view.center = self.view.center;
       [view setLineWidth:6.f];
       [view setLineColr:[UIColor redColor]];
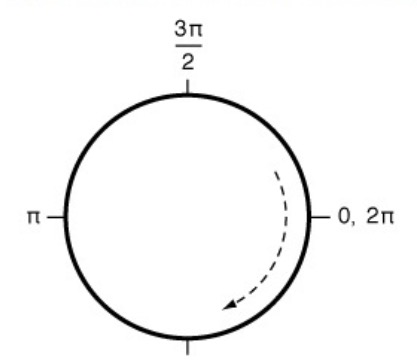
另外默认的坐标如下图(图来自http://justsee.iteye.com/blog/1972853)
有时候我们需要开始点在顶部,即(3/2)π 处,其中一个思路是将整个View逆时针旋转90度即可,在CircleView.m的initWithFrame中添加以下代码即可:
CGAffineTransform transform = CGAffineTransformIdentity;
self.transform = CGAffineTransformRotate(transform, -M_PI / 2);
注意:变型只能对UIView使用,对CAShapeLayer没有效果
参考:
1.iOS开发贝塞尔曲线UIBezierPath(后记)
https://www.cnblogs.com/ioshe/p/5481841.html


相关推荐
这个"ios-贝塞尔曲线实现有动画的画圆.zip"文件内容很可能包含了一个使用贝塞尔曲线来动态绘制圆形的示例项目。下面将详细解释贝塞尔曲线的基本概念、如何用UIBezierPath画圆以及如何添加动画效果。 贝塞尔曲线是一...
在iOS开发中,实现画线和画圆的功能是一项常见的需求,比如在教育、设计或游戏应用中。这个“iOS画线画圆源码”提供了一种解决方案,它允许用户通过手势在屏幕上绘制线条和圆形,并且支持撤销(undo)、重做(redo)...
在iOS开发中,有时我们需要自定义视图来呈现特定的数据或设计效果,比如画出圆形图。本示例提供了一个简单的iOS应用,它使用Objective-C(OC)语言实现了纯代码绘制圆形图的功能,而且带有半封装的形式,方便开发者...
### ArcGIS API for iOS 开发知识点详述 #### 一、ArcGIS API for iOS 概览 **ArcGIS API for iOS** 是一款专为iOS平台设计的地理信息系统开发工具包,旨在帮助开发者轻松构建具备地图可视化与地理数据分析等功能...
在iOS开发中,自定义图形绘制是提升应用视觉效果和用户体验的重要手段。本文将深入探讨如何使用UIKit框架中的Core Graphics库来实现圆、扇形和圆弧的自定义绘制。这些知识点对于iOS开发者来说,是增强UI设计能力的...
在iOS开发中,有时我们需要实现自定义的图形绘制,例如创建一个简单的画圆示例。这个"ios-一个简单的画圆demo.zip"压缩包提供了一个基础的代码示例,教你如何在iOS应用中使用Swift语言纯代码方式绘制一个圆形。我们...
在iOS开发中,视图动画是一项重要的技术,用于创建丰富的用户界面和动态效果。这个名为“ios-一句话划线画圆.zip”的压缩包显然包含了与视图动画相关的代码示例,特别是关于在屏幕上画线和画圆的功能。下面将详细...
在iOS中,我们可以使用UIBezierPath来创建和操作路径,其中包括画圆。 1. 创建圆形进度条视图: 首先,创建一个自定义的UIView子类,比如名为`CircleProgressView`。在这个类中,我们需要初始化圆的中心点、半径、...
在iOS开发中,绘制图形是一项基础且重要的任务,特别是在创建自定义UI或者动画效果时。这个"ios-绘制圆上的点.zip"项目显然涉及到在圆形路径上绘制点,并且优化了动画性能,使得动画更加流畅。现在我们来深入探讨...
在Android或iOS平台上,系统都提供了内置的手势识别框架,如Android的GestureDetector和MotionEvent,以及iOS的UIPanGestureRecognizer等。然而,为了实现自定义的复杂手势,如圆圈手势,我们需要进行更深层次的编程...
`CGContextAddArc()`函数用于画圆,`CGContextAddLineToPoint()`和`CGContextMoveToPoint()`则用于画出指针。此外,`CGContextSetLineWidth()`可以设置线条宽度,`CGContextSetStrokeColorWithColor()`用于设定颜色...
在`drawRect:`中,开发者通常会使用`CGContext`进行绘图操作,例如画圆、设置渐变色等。 颜色渐变在iOS中可以通过`CAGradientLayer`实现。`CAGradientLayer`是Core Animation框架的一部分,它可以创建从一种颜色...
在iOS开发中,触摸事件(Touch Events)是用户与设备交互的基础,特别是在构建具有高度交互性的用户界面时。本文将详细讲解如何在iOS环境中,尤其是使用iOS 7和Storyboard的情况下,处理触摸事件来实现根据手指移动...
本教程通过"ios-绘制圆和圆上的点.zip"压缩包中的DrawTest项目,展示了如何利用Core Graphics框架来实现动态地画圆以及在其上绘制点,并通过动画执行线段。虽然当前版本存在性能问题,但其提供的思路对于学习iOS绘图...
在本示例中,"贝赛尔曲线画圆边框"是指利用贝塞尔曲线来绘制出圆形的边框。这种方法尤其适用于UI设计、动画制作等领域,因为它可以提供平滑且精确的线条控制,使圆形边框看起来更加美观。 首先,我们来理解贝塞尔...
在iOS开发中,"ios-画圈圈.zip" 指的可能是一个示例项目,用于展示如何在应用中实现画圆或圆形图形的功能。这个项目链接指向了GitHub上的一个名为"LocalConfigManagerDemo"的仓库,这通常是一个包含源代码、资源文件...
使用native(objc,kotlin)代码处理图片数据,图片处理方便,可用于保存/上传/预览图片。 效果展示: ... 支持 翻动 庄稼 旋转 规模 矩阵 添加文字 混合图像 合并多张图片 ...画圆 绘制路径 画贝塞尔 高斯模糊
这里需要使用`CGContext`进行图形绘制,例如使用`addEllipse(in:)`来画圆,然后设置填充色和半径。 4. 更新圆点大小:当页面改变时,我们需要更新圆点的大小。这可以通过监听`currentPage`属性的变化(KVO或代理方法...
- 为了让时钟指针动态转动,开发者会使用`UIView`的动画API,如`animate(withDuration:animations:)`,或者基于Core Animation的`CABasicAnimation`来创建平滑的时间更新动画。 6. **日期与时间处理**: - 需要...
`FZHDrawCircle`实现动态画圆的原理是利用`CADisplayLink`。`CADisplayLink`是一个与屏幕刷新同步的定时器,可以确保每次绘制都在新的一帧开始时进行,从而实现平滑的动画效果。在项目中,创建`CADisplayLink`实例...