一 基础几何体
1 二维图形:二维图形都是基于x和y轴构建的,即展示的形式就是他们都是“直立”的,如果希望这些二维图形躺下,则需要将几何体沿着x轴向后旋转1/4圈
mesh.rotation.x=-Math.PI/2;
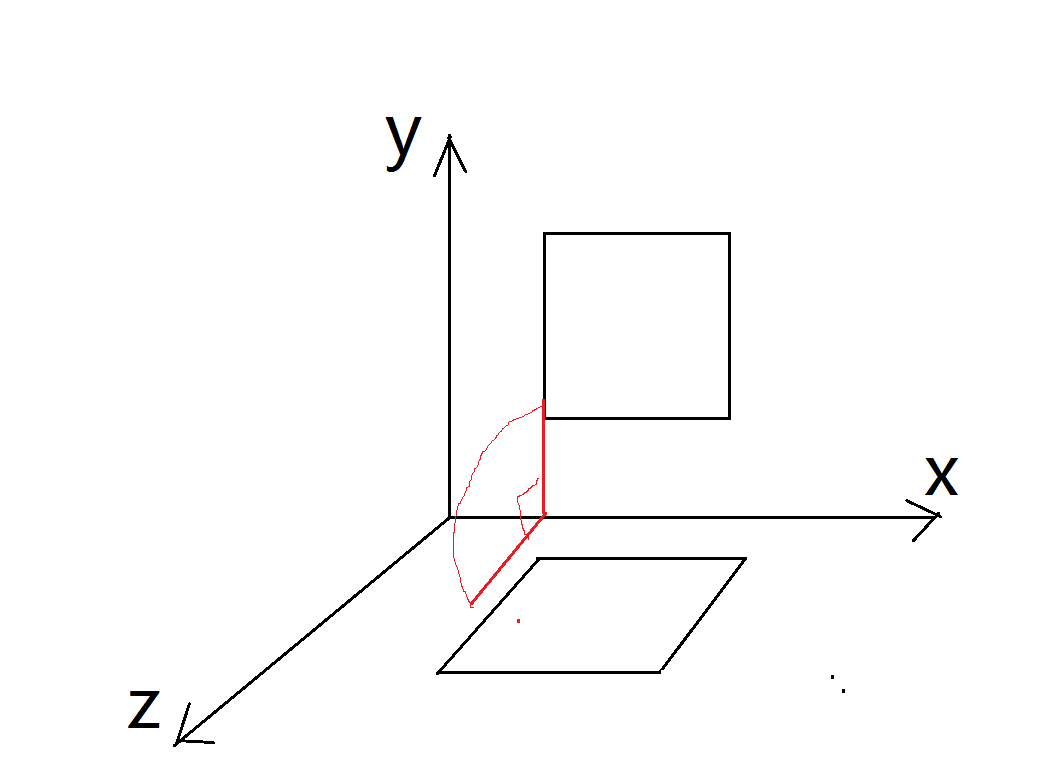
1.1 PlaneGeometry:平面几何体 new THREE.PlaneGeometry(width,height,widthSegments,heightSegments)
<!DOCTYPE html>

<html>

<head>
    <title>Example 05.01 - Basic 2D geometries - Plane</title>
    <script type="text/javascript" src="../libs/three.js"></script>

    <script type="text/javascript" src="../libs/stats.js"></script>
    <script type="text/javascript" src="../libs/dat.gui.js"></script>
    <style>
        body {
            /* set margin to 0 and overflow to hidden, to go fullscreen */
            margin: 0;
            overflow: hidden;
        }
    </style>
</head>
<body>

<div id="Stats-output">
</div>
<!-- Div which will hold the Output -->
<div id="WebGL-output">
</div>

<!-- Javascript code that runs our Three.js examples -->
<script type="text/javascript">

    // once everything is loaded, we run our Three.js stuff.
    function init() {

        //var stats = initStats();

        // create a scene, that will hold all our elements such as objects, cameras and lights.
        var scene = new THREE.Scene();

        // create a camera, which defines where we're looking at.
        var camera = new THREE.PerspectiveCamera(45, window.innerWidth / window.innerHeight, 0.1, 1000);

        // create a render and set the size
        var webGLRenderer = new THREE.WebGLRenderer();
        webGLRenderer.setClearColor(new THREE.Color(0xEEEEEE, 1.0));
        webGLRenderer.setSize(window.innerWidth, window.innerHeight);
        webGLRenderer.shadowMapEnabled = true;

        //宽 高,宽度分为几段,长度分为几段
        var plane = createMesh(new THREE.PlaneGeometry(10, 14, 4, 4));
        // add the sphere to the scene
        scene.add(plane);

        // position and point the camera to the center of the scene
        camera.position.x = -20;
        camera.position.y = 30;
        camera.position.z = 40;
        camera.lookAt(new THREE.Vector3(10, 0, 0));


        // add spotlight for the shadows
        var spotLight = new THREE.SpotLight(0xffffff);
        spotLight.position.set(-40, 60, -10);
        scene.add(spotLight);

        // add the output of the renderer to the html element
        document.getElementById("WebGL-output").appendChild(webGLRenderer.domElement);

        // call the render function
        var step = 0;


        // setup the control gui
        var controls = new function () {
            // we need the first child, since it's a multimaterial

            //初始控制器的宽和高展示的是上面我们new THREE.Plane的宽和高
            //所以我们使用对象plane来获取其宽和高以及宽度的段数和高度的段数
            this.width = plane.children[0].geometry.parameters.width;
            this.height = plane.children[0].geometry.parameters.height;

            this.widthSegments = plane.children[0].geometry.parameters.widthSegments;
            this.heightSegments = plane.children[0].geometry.parameters.heightSegments;

            this.redraw = function () {
                // remove the old plane
                scene.remove(plane);
                // create a new one
                plane = createMesh(new THREE.PlaneGeometry(controls.width, controls.height, Math.round(controls.widthSegments), Math.round(controls.heightSegments)));
                // add it to the scene.
                scene.add(plane);
            };
        };

        var gui = new dat.GUI();
        gui.add(controls, 'width', 0, 40).onChange(controls.redraw);
        gui.add(controls, 'height', 0, 40).onChange(controls.redraw);
        gui.add(controls, 'widthSegments', 0, 10).onChange(controls.redraw);
        gui.add(controls, 'heightSegments', 0, 10).onChange(controls.redraw);
        render();

        function createMesh(geom) {

            // 生成一个法向量材质
            var meshMaterial = new THREE.MeshNormalMaterial();
            //几何体的两面都应用该材质
            meshMaterial.side = THREE.DoubleSide;
            //生成一个基础材质,即赋予几何体一种简单的颜色或者线框
            var wireFrameMat = new THREE.MeshBasicMaterial();
            //看来基础材质在此处的作用是线框
            wireFrameMat.wireframe = true;

            // create a multimaterial
            //一种几何体应用多种材质THREE.SceneUtils.createMultiMaterialObject
            var plane = THREE.SceneUtils.createMultiMaterialObject(geom, [meshMaterial, wireFrameMat]);

            return plane;
        }

        function render() {
            //stats.update();

            plane.rotation.y = step += 0.01;

            // render using requestAnimationFrame
            requestAnimationFrame(render);
            webGLRenderer.render(scene, camera);
        }


    }
    window.onload = init;
</script>
</body>
</html>
1.2 CircleGeometry:二维圆/部分圆:new THREE.CircleGeometry(radius,segment,thetaStart开始角度,thetaLength角度)
<!DOCTYPE html>

<html>

<head>
    <title>Example 05.02 - Basic 2D geometries - Circle</title>
    <script type="text/javascript" src="../libs/three.js"></script>

    <script type="text/javascript" src="../libs/stats.js"></script>
    <script type="text/javascript" src="../libs/dat.gui.js"></script>
    <style>
        body {
            /* set margin to 0 and overflow to hidden, to go fullscreen */
            margin: 0;
            overflow: hidden;
        }
    </style>
</head>
<body>

<div id="Stats-output">
</div>
<!-- Div which will hold the Output -->
<div id="WebGL-output">
</div>

<!-- Javascript code that runs our Three.js examples -->
<script type="text/javascript">

    // once everything is loaded, we run our Three.js stuff.
    function init() {

        var stats = initStats();

        // create a scene, that will hold all our elements such as objects, cameras and lights.
        var scene = new THREE.Scene();

        // create a camera, which defines where we're looking at.
        var camera = new THREE.PerspectiveCamera(45, window.innerWidth / window.innerHeight, 0.1, 1000);

        // create a render and set the size
        var webGLRenderer = new THREE.WebGLRenderer();
        webGLRenderer.setClearColor(new THREE.Color(0xEEEEEE, 1.0));
        webGLRenderer.setSize(window.innerWidth, window.innerHeight);
        webGLRenderer.shadowMapEnabled = true;

        var circle = createMesh(new THREE.CircleGeometry(4, 10, 0, Math.PI * 2));
        // add the sphere to the scene
        scene.add(circle);

        // position and point the camera to the center of the scene
        camera.position.x = -20;
        camera.position.y = 30;
        camera.position.z = 40;
        camera.lookAt(new THREE.Vector3(10, 0, 0));


        // add spotlight for the shadows
        var spotLight = new THREE.SpotLight(0xffffff);
        spotLight.position.set(-40, 60, -10);
        scene.add(spotLight);

        // add the output of the renderer to the html element
        document.getElementById("WebGL-output").appendChild(webGLRenderer.domElement);

        // call the render function
        var step = 0;


        // setup the control gui
        var controls = new function () {
            // we need the first child, since it's a multimaterial


            //console.log(circle.children[0].geometry);
            this.radius =circle.children[0].geometry.parameters.radius;

            this.thetaStart =circle.children[0].geometry.parameters.thetaStart;
            this.thetaLength =circle.children[0].geometry.parameters.thetaLength;
            this.segments =circle.children[0].geometry.parameters.segments;

            this.redraw = function () {
                // remove the old plane
                scene.remove(circle);
                // create a new one
                circle = createMesh(new THREE.CircleGeometry(controls.radius, controls.segments, controls.thetaStart, controls.thetaLength));
                // add it to the scene.

                scene.add(circle);
            };
        };

        var gui = new dat.GUI();
        gui.add(controls, 'radius', 0, 40).onChange(controls.redraw);
        gui.add(controls, 'segments', 0, 40).onChange(controls.redraw);
        gui.add(controls, 'thetaStart', 0, 2 * Math.PI).onChange(controls.redraw);
        gui.add(controls, 'thetaLength', 0, 2 * Math.PI).onChange(controls.redraw);
        render();

        function createMesh(geom) {

            // assign two materials
            var meshMaterial = new THREE.MeshNormalMaterial();
            meshMaterial.side = THREE.DoubleSide;
            var wireFrameMat = new THREE.MeshBasicMaterial();
            wireFrameMat.wireframe = true;

            // create a multimaterial
            var mesh = THREE.SceneUtils.createMultiMaterialObject(geom, [meshMaterial, wireFrameMat]);

            //将该二维圆形“放倒”
            mesh.rotation.x=-Math.PI/2
            return mesh;
        }

        function render() {
            stats.update();

            circle.rotation.y = step += 0.01;

            // render using requestAnimationFrame
            requestAnimationFrame(render);
            webGLRenderer.render(scene, camera);
        }

        function initStats() {

            var stats = new Stats();
            stats.setMode(0); // 0: fps, 1: ms

            // Align top-left
            stats.domElement.style.position = 'absolute';
            stats.domElement.style.left = '0px';
            stats.domElement.style.top = '0px';

            document.getElementById("Stats-output").appendChild(stats.domElement);

            return stats;
        }
    }
    window.onload = init;
</script>
</body>
</html>
1.3 塑形平面:ShapeGeometry
使用ShapeGeometry定制图形,必须使用shape的绘制函数,下面我们先介绍一下绘制函数
Shape对象(注意与ShapGeometry对象的区别)的绘图函数
| 函数名称 | 描述 |
| moveTo | 将绘图点移动到某个位置 |
| lineTo | /从当前位置绘制一条直线到指定的x,y处 |
| quadraticCurveTo(acPx,acPy) | 二次曲线 |
| bezierCurveTo(acPx1,acPy1,acPx2,acPy2,x,y) | 贝塞尔曲线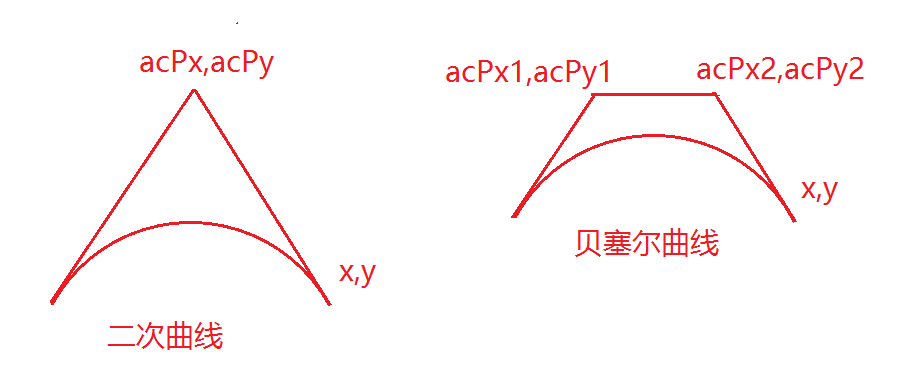
|
| splineThru(数组集合) | 沿着所给定的点,绘制一条光滑的曲线,参数是一个THREE.Vector2的数组 |
|
arc(ax,ay,aRdius,aStartAngle,aEndAngle,aClockwise) |
ax,ay用来指定圆心与当前位置之间的偏移量, aRadius半径, aStartAngle,aEndAngle开始与结束的弧长, 以及aClockwise顺/逆时针 |
| makeGeometry | 该函数从Shape对象返回一个ShapeGeometry对象 |
| createPointsGeometry(divisions) |
将图形转换为一个点集,参数为返回点的数量,该值越高,返回的点越多,再次绘制图形时曲线越光滑 参数divisions会分别应用到路径的每一个部分 |
| createSpacedPointsGeometry(divisions) | 与createPointsGeometry函数功能相同,但是该方法的参数会一次性的应用到整个路径上 |
<!DOCTYPE html>

<html>

<head>
    <title>Example 05.03 - Basic 2D geometries - Shape</title>
    <script type="text/javascript" src="../libs/three.js"></script>

    <script type="text/javascript" src="../libs/stats.js"></script>
    <script type="text/javascript" src="../libs/dat.gui.js"></script>
    <style>
        body {
            /* set margin to 0 and overflow to hidden, to go fullscreen */
            margin: 0;
            overflow: hidden;
        }
    </style>
</head>
<body>

<div id="Stats-output">
</div>
<!-- Div which will hold the Output -->
<div id="WebGL-output">
</div>

<!-- Javascript code that runs our Three.js examples -->
<script type="text/javascript">

    // once everything is loaded, we run our Three.js stuff.
    function init() {

        // create a scene, that will hold all our elements such as objects, cameras and lights.
        var scene = new THREE.Scene();

        // create a camera, which defines where we're looking at.
        var camera = new THREE.PerspectiveCamera(45, window.innerWidth / window.innerHeight, 0.1, 1000);

        // create a render and set the size
        var webGLRenderer = new THREE.WebGLRenderer();
        webGLRenderer.setClearColor(new THREE.Color(0xEEEEEE, 1.0));
        webGLRenderer.setSize(window.innerWidth, window.innerHeight);
        webGLRenderer.shadowMapEnabled = true;
        var shape=drawShape();//此处返回的是Shape对象
        var shapeGeo=new THREE.ShapeGeometry(shape);//Shape对象是作为参数传递给ShapeGeometry对象的构造函数的
        var shapeMesh = createMesh(shapeGeo);//几何体与材质相结合生成一个网格
        // add the sphere to the scene
        scene.add(shapeMesh);//将网格追加到场景中

        // position and point the camera to the center of the scene
        camera.position.x = -30;
        camera.position.y = 70;
        camera.position.z = 70;
        camera.lookAt(new THREE.Vector3(10, 0, 0));


        // add spotlight for the shadows
        var spotLight = new THREE.SpotLight(0xffffff);
        spotLight.position.set(-40, 60, -10);
        scene.add(spotLight);

        // add the output of the renderer to the html element
        document.getElementById("WebGL-output").appendChild(webGLRenderer.domElement);

        // call the render function
        var step = 0;


        // setup the control gui
        var controls = new function () {

            this.asGeom = function () {
                // remove the old plane
                scene.remove(shapeMesh);
                // create a new one
      //注意shape,shapGeometry的关系
                var shape=drawShape();
                var shapeGeo=new THREE.ShapeGeometry(shape);
                shapeMesh = createMesh(shapeGeo);
                // add it to the scene.
                scene.add(shapeMesh);
            };

            this.asPoints = function () {
                // remove the old plane
                scene.remove(shapeMesh);
                // create a new one
                var
                shapeMesh = createLine(drawShape(), false);
                // add it to the scene.
                scene.add(shapeMesh);
            };

            this.asSpacedPoints = function () {
                // remove the old plane
                scene.remove(shapeMesh);
                // create a new one
                shapeMesh = createLine(drawShape(), true);
                // add it to the scene.
                scene.add(shapeMesh);
            };
        };

        var gui = new dat.GUI();
        gui.add(controls, 'asGeom');
        gui.add(controls, 'asPoints');
        gui.add(controls, 'asSpacedPoints');


        render();

        function drawShape() {

            // create a basic shape
            var shape = new THREE.Shape();

            // startpoint开始的点
            shape.moveTo(10, 10);

            // straight line upwards 沿着开始点画直线
            shape.lineTo(10, 40);

            // the top of the figure, curve to the right 绘制贝塞尔曲线
            shape.bezierCurveTo(15, 25, 25, 25, 30, 40);

            // spline back down 沿着所提供的坐标集合绘制一条光滑的曲线,起始点是当前所在的位置
            shape.splineThru(
                    [new THREE.Vector2(32, 30),
                        new THREE.Vector2(28, 20),
                        new THREE.Vector2(30, 10),
                    ]);

            // curve at the bottom,绘制二次曲线
            shape.quadraticCurveTo(20, 15, 10, 10);

            // add 'eye' hole one
            var hole1 = new THREE.Path();
            //绘制圆弧
            hole1.absellipse(16, 24, 2, 3, 0, Math.PI * 2, true);
            shape.holes.push(hole1);

            // add 'eye hole 2'
            var hole2 = new THREE.Path();
            hole2.absellipse(23, 24, 2, 3, 0, Math.PI * 2, true);
            shape.holes.push(hole2);

            // add 'mouth'
            var hole3 = new THREE.Path();
            hole3.absarc(20, 16, 2, 0, Math.PI, true);
            shape.holes.push(hole3);

            //Shape对象的makeGeometry方法,用于返回一个几何体
            console.log(shape.makeGeometry());
            return shape;
        }

        function createMesh(geom) {
            //console.log(geom);
            // assign two materials
            var meshMaterial = new THREE.MeshNormalMaterial();
            meshMaterial.side = THREE.DoubleSide;
            var wireFrameMat = new THREE.MeshBasicMaterial();
            wireFrameMat.wireframe = true;

            // create a multimaterial
            var mesh = THREE.SceneUtils.createMultiMaterialObject(geom, [meshMaterial, wireFrameMat]);

            return mesh;
        }

        function createLine(shape, spaced) {
            console.log(shape);
            if (!spaced) {

                var mesh = new THREE.Line(shape.createPointsGeometry(10), new THREE.LineBasicMaterial({
                    color: 0xff3333,
                    linewidth: 2
                }));
                return mesh;
            } else {
            //three.js的该方法错误createSpacedPointsGeometry
                var points=shape.createSpacedPointsGeometry(3);
                var mesh = new THREE.Line(points, new THREE.LineBasicMaterial({
                    color: 0xff3333,
                    linewidth: 2
                }));
                return mesh;
            }

        }

        function render() {
            //stats.update();

            shapeMesh.rotation.y = step += 0.01;

            // render using requestAnimationFrame
            requestAnimationFrame(render);
            webGLRenderer.render(scene, camera);
        }
    }
    window.onload = init;
</script>
</body>
</html>
二、三维几何体
2.1 BoxGeometry:立方体 new THREE.BoxGeometry(width,height,depth,widthSegements,heightSegements,depthSegements)
<!DOCTYPE html>

<html>

<head>
    <title>Example 05.04 - Basic 2D geometries - Cube</title>
    <script type="text/javascript" src="../libs/three.js"></script>

    <script type="text/javascript" src="../libs/stats.js"></script>
    <script type="text/javascript" src="../libs/dat.gui.js"></script>
    <style>
        body {
            /* set margin to 0 and overflow to hidden, to go fullscreen */
            margin: 0;
            overflow: hidden;
        }
    </style>
</head>
<body>

<div id="Stats-output">
</div>
<!-- Div which will hold the Output -->
<div id="WebGL-output">
</div>

<!-- Javascript code that runs our Three.js examples -->
<script type="text/javascript">

    // once everything is loaded, we run our Three.js stuff.
    function init() {

        var stats = initStats();

        // create a scene, that will hold all our elements such as objects, cameras and lights.
        var scene = new THREE.Scene();

        // create a camera, which defines where we're looking at.
        var camera = new THREE.PerspectiveCamera(45, window.innerWidth / window.innerHeight, 0.1, 1000);

        // create a render and set the size
        var webGLRenderer = new THREE.WebGLRenderer();
        webGLRenderer.setClearColor(new THREE.Color(0xEEEEEE, 1.0));
        webGLRenderer.setSize(window.innerWidth, window.innerHeight);
        webGLRenderer.shadowMapEnabled = true;

        var cube = createMesh(new THREE.BoxGeometry(10, 10, 10, 1, 1, 1));
        // add the sphere to the scene
        scene.add(cube);

        // position and point the camera to the center of the scene
        camera.position.x = -20;
        camera.position.y = 30;
        camera.position.z = 40;
        camera.lookAt(new THREE.Vector3(10, 0, 0));


        // add spotlight for the shadows
        var spotLight = new THREE.SpotLight(0xffffff);
        spotLight.position.set(-40, 60, -10);
        scene.add(spotLight);

        // add the output of the renderer to the html element
        document.getElementById("WebGL-output").appendChild(webGLRenderer.domElement);

        // call the render function
        var step = 0;


        // setup the control gui
        var controls = new function () {

            this.width = cube.children[0].geometry.parameters.width;
            this.height = cube.children[0].geometry.parameters.height;
            this.depth = cube.children[0].geometry.parameters.depth;

            this.widthSegments = cube.children[0].geometry.parameters.widthSegments;
            this.heightSegments = cube.children[0].geometry.parameters.heightSegments;
            this.depthSegments = cube.children[0].geometry.parameters.depthSegments;


            this.redraw = function () {
                // remove the old plane
                scene.remove(cube);
                // create a new one
                cube = createMesh(new THREE.BoxGeometry(controls.width, controls.height, controls.depth, Math.round(controls.widthSegments), Math.round(controls.heightSegments), Math.round(controls.depthSegments)));
                // add it to the scene.
                scene.add(cube);
            };
        };

        var gui = new dat.GUI();
        gui.add(controls, 'width', 0, 40).onChange(controls.redraw);
        gui.add(controls, 'height', 0, 40).onChange(controls.redraw);
        gui.add(controls, 'depth', 0, 40).onChange(controls.redraw);
        gui.add(controls, 'widthSegments', 0, 10).onChange(controls.redraw);
        gui.add(controls, 'heightSegments', 0, 10).onChange(controls.redraw);
        gui.add(controls, 'depthSegments', 0, 10).onChange(controls.redraw);
        render();

        function createMesh(geom) {

            // assign two materials
            var meshMaterial = new THREE.MeshNormalMaterial();
            meshMaterial.side = THREE.DoubleSide;
            var wireFrameMat = new THREE.MeshBasicMaterial();
            wireFrameMat.wireframe = true;

            // create a multimaterial
            var mesh = THREE.SceneUtils.createMultiMaterialObject(geom, [meshMaterial, wireFrameMat]);

            return mesh;
        }

        function render() {
            stats.update();

            cube.rotation.y = step += 0.01;

            // render using requestAnimationFrame
            requestAnimationFrame(render);
            webGLRenderer.render(scene, camera);
        }

        function initStats() {

            var stats = new Stats();
            stats.setMode(0); // 0: fps, 1: ms

            // Align top-left
            stats.domElement.style.position = 'absolute';
            stats.domElement.style.left = '0px';
            stats.domElement.style.top = '0px';

            document.getElementById("Stats-output").appendChild(stats.domElement);

            return stats;
        }
    }
    window.onload = init;
</script>
</body>
</html>
2.2 SphereGeometry球体
参数:radius半径,
widthSegements竖直方向分段,
heightSegments水平方向分段,
phiStart从x轴的什么地方开始绘制0-2*pi,
phiLength绘制多少弧度,
thetaStart从y轴的什么地方开始绘制,
thetaLength绘制多少弧度
<!DOCTYPE html>

<html>

<head>
    <title>Example 05.05 - Basic 3D geometries - Sphere</title>
    <script type="text/javascript" src="../libs/three.js"></script>

    <script type="text/javascript" src="../libs/stats.js"></script>
    <script type="text/javascript" src="../libs/dat.gui.js"></script>
    <style>
        body {
            /* set margin to 0 and overflow to hidden, to go fullscreen */
            margin: 0;
            overflow: hidden;
        }
    </style>
</head>
<body>

<div id="Stats-output">
</div>
<!-- Div which will hold the Output -->
<div id="WebGL-output">
</div>

<!-- Javascript code that runs our Three.js examples -->
<script type="text/javascript">

    // once everything is loaded, we run our Three.js stuff.
    function init() {

        var stats = initStats();

        // create a scene, that will hold all our elements such as objects, cameras and lights.
        var scene = new THREE.Scene();

        // create a camera, which defines where we're looking at.
        var camera = new THREE.PerspectiveCamera(45, window.innerWidth / window.innerHeight, 0.1, 1000);

        // create a render and set the size
        var webGLRenderer = new THREE.WebGLRenderer();
        webGLRenderer.setClearColor(new THREE.Color(0xEEEEEE, 1.0));
        webGLRenderer.setSize(window.innerWidth, window.innerHeight);
        webGLRenderer.shadowMapEnabled = true;

        var sphere = createMesh(new THREE.SphereGeometry(4, 10, 10));
        // add the sphere to the scene
        scene.add(sphere);

        // position and point the camera to the center of the scene
        camera.position.x = -20;
        camera.position.y = 30;
        camera.position.z = 40;
        camera.lookAt(new THREE.Vector3(10, 0, 0));


        // add the output of the renderer to the html element
        document.getElementById("WebGL-output").appendChild(webGLRenderer.domElement);

        // call the render function
        var step = 0;


        // setup the control gui
        var controls = new function () {
            // we need the first child, since it's a multimaterial
            this.radius = sphere.children[0].geometry.parameters.radius;
            this.widthSegments = sphere.children[0].geometry.parameters.widthSegments;
            this.heightSegments = sphere.children[0].geometry.parameters.heightSegments;
            this.phiStart = 0;
            this.phiLength = Math.PI * 2;
            this.thetaStart = 0;
            this.thetaLength = Math.PI;


            this.redraw = function () {
                // remove the old plane
                scene.remove(sphere);
                // create a new one
          var r=controls.radius;
          var ws=controls.widthSegments;
          var hs= controls.heightSegments;
var ps=controls.phiStart;
var pl=controls.phiLength;
var ts=controls.thetaStart;
var tl=controls.thetaLength
          var geo=new THREE.SphereGeometry(r, ws,hs , ps,pl , ts,tl )

                sphere = createMesh(geo);
                // add it to the scene.
                scene.add(sphere);
            };
        };

        var gui = new dat.GUI();
        gui.add(controls, 'radius', 0, 40).onChange(controls.redraw);
        gui.add(controls, 'widthSegments', 0, 20).onChange(controls.redraw);
        gui.add(controls, 'heightSegments', 0, 20).onChange(controls.redraw);
        gui.add(controls, 'phiStart', 0, 2 * Math.PI).onChange(controls.redraw);
        gui.add(controls, 'phiLength', 0, 2 * Math.PI).onChange(controls.redraw);
        gui.add(controls, 'thetaStart', 0, 2 * Math.PI).onChange(controls.redraw);
        gui.add(controls, 'thetaLength', 0, 2 * Math.PI).onChange(controls.redraw);


        render();

        function createMesh(geom) {

            // assign two materials
            var meshMaterial = new THREE.MeshNormalMaterial();
            meshMaterial.side = THREE.DoubleSide;
            var wireFrameMat = new THREE.MeshBasicMaterial();
            wireFrameMat.wireframe = true;

            // create a multimaterial
            var mesh = THREE.SceneUtils.createMultiMaterialObject(geom, [meshMaterial, wireFrameMat]);

            return mesh;
        }

        function render() {
            stats.update();

            sphere.rotation.y = step += 0.01;

            // render using requestAnimationFrame
            requestAnimationFrame(render);
            webGLRenderer.render(scene, camera);
        }

        function initStats() {

            var stats = new Stats();
            stats.setMode(0); // 0: fps, 1: ms

            // Align top-left
            stats.domElement.style.position = 'absolute';
            stats.domElement.style.left = '0px';
            stats.domElement.style.top = '0px';

            document.getElementById("Stats-output").appendChild(stats.domElement);

            return stats;
        }
    }
    window.onload = init;
</script>
</body>
</html>

2.3 CylinderGeometry:构建圆柱体
参数:radiusTop:圆柱顶部的半径
radiusBottom:圆柱底部的半径
height:圆柱体的高度
segmentsX:沿x轴,即竖向分割为多少段
segmentsY:沿Y轴,即横向分割为多少段
openEnded:网格顶部和底部是否封闭
<!DOCTYPE html>

<html>

<head>
    <title>Example 05.07 - Basic 3D geometries - Cylinder</title>
    <script type="text/javascript" src="../libs/three.js"></script>

    <script type="text/javascript" src="../libs/stats.js"></script>
    <script type="text/javascript" src="../libs/dat.gui.js"></script>
    <style>
        body {
            /* set margin to 0 and overflow to hidden, to go fullscreen */
            margin: 0;
            overflow: hidden;
        }
    </style>
</head>
<body>

<div id="Stats-output">
</div>
<!-- Div which will hold the Output -->
<div id="WebGL-output">
</div>

<!-- Javascript code that runs our Three.js examples -->
<script type="text/javascript">

    // once everything is loaded, we run our Three.js stuff.
    function init() {

        var stats = initStats();

        // create a scene, that will hold all our elements such as objects, cameras and lights.
        var scene = new THREE.Scene();

        // create a camera, which defines where we're looking at.
        var camera = new THREE.PerspectiveCamera(45, window.innerWidth / window.innerHeight, 0.1, 1000);

        // create a render and set the size
        var webGLRenderer = new THREE.WebGLRenderer();
        webGLRenderer.setClearColor(new THREE.Color(0xEEEEEE, 1.0));
        webGLRenderer.setSize(window.innerWidth, window.innerHeight);
        webGLRenderer.shadowMapEnabled = true;

        var cylinder = createMesh(new THREE.CylinderGeometry(20, 20, 20));
        // add the sphere to the scene
        scene.add(cylinder);

        // position and point the camera to the center of the scene
        camera.position.x = -30;
        camera.position.y = 40;
        camera.position.z = 50;
        camera.lookAt(new THREE.Vector3(10, 0, 0));

        // add the output of the renderer to the html element
        document.getElementById("WebGL-output").appendChild(webGLRenderer.domElement);

        // call the render function
        var step = 0;


        // setup the control gui
        var controls = new function () {
            // we need the first child, since it's a multimaterial

            this.radiusTop = 20;
            this.radiusBottom = 20;
            this.height = 20;

            this.radialSegments = 8;
            this.heightSegments = 8;

            this.openEnded = false;

            this.redraw = function () {
                // remove the old plane
                scene.remove(cylinder);
                // create a new one
                var rt=controls.radiusTop;//圆柱顶部的半径,可以为负数
                var rb=controls.radiusBottom;//圆柱底部的半径
                var h=controls.height;//圆柱体的高度
                var rs=controls.radialSegments;//圆柱体竖向的段数
                var hs=controls.heightSegments;//圆柱体横向的段数
                var oe=controls.openEnded;//圆柱体的底部和顶部是否封闭
                cylinder = createMesh(new THREE.CylinderGeometry(rt, rb, h,rs , hs,oe ));
                // add it to the scene.
                scene.add(cylinder);
            };
        };

        var gui = new dat.GUI();
        gui.add(controls, 'radiusTop', -40, 40).onChange(controls.redraw);
        gui.add(controls, 'radiusBottom', -40, 40).onChange(controls.redraw);
        gui.add(controls, 'height', 0, 40).onChange(controls.redraw);
        gui.add(controls, 'radialSegments', 1, 20).step(1).onChange(controls.redraw);
        gui.add(controls, 'heightSegments', 1, 20).step(1).onChange(controls.redraw);
        gui.add(controls, 'openEnded').onChange(controls.redraw);


        render();

        function createMesh(geom) {

            // assign two materials
            var meshMaterial = new THREE.MeshNormalMaterial();
            meshMaterial.side = THREE.DoubleSide;
            var wireFrameMat = new THREE.MeshBasicMaterial();
            wireFrameMat.wireframe = true;

            // create a multimaterial
            var mesh = THREE.SceneUtils.createMultiMaterialObject(geom, [meshMaterial, wireFrameMat]);

            return mesh;
        }

        function render() {
            stats.update();

            cylinder.rotation.y = step += 0.01;

            // render using requestAnimationFrame
            requestAnimationFrame(render);
            webGLRenderer.render(scene, camera);
        }

        function initStats() {

            var stats = new Stats();
            stats.setMode(0); // 0: fps, 1: ms

            // Align top-left
            stats.domElement.style.position = 'absolute';
            stats.domElement.style.left = '0px';
            stats.domElement.style.top = '0px';

            document.getElementById("Stats-output").appendChild(stats.domElement);

            return stats;
        }
    }
    window.onload = init;
</script>
</body>
</html>
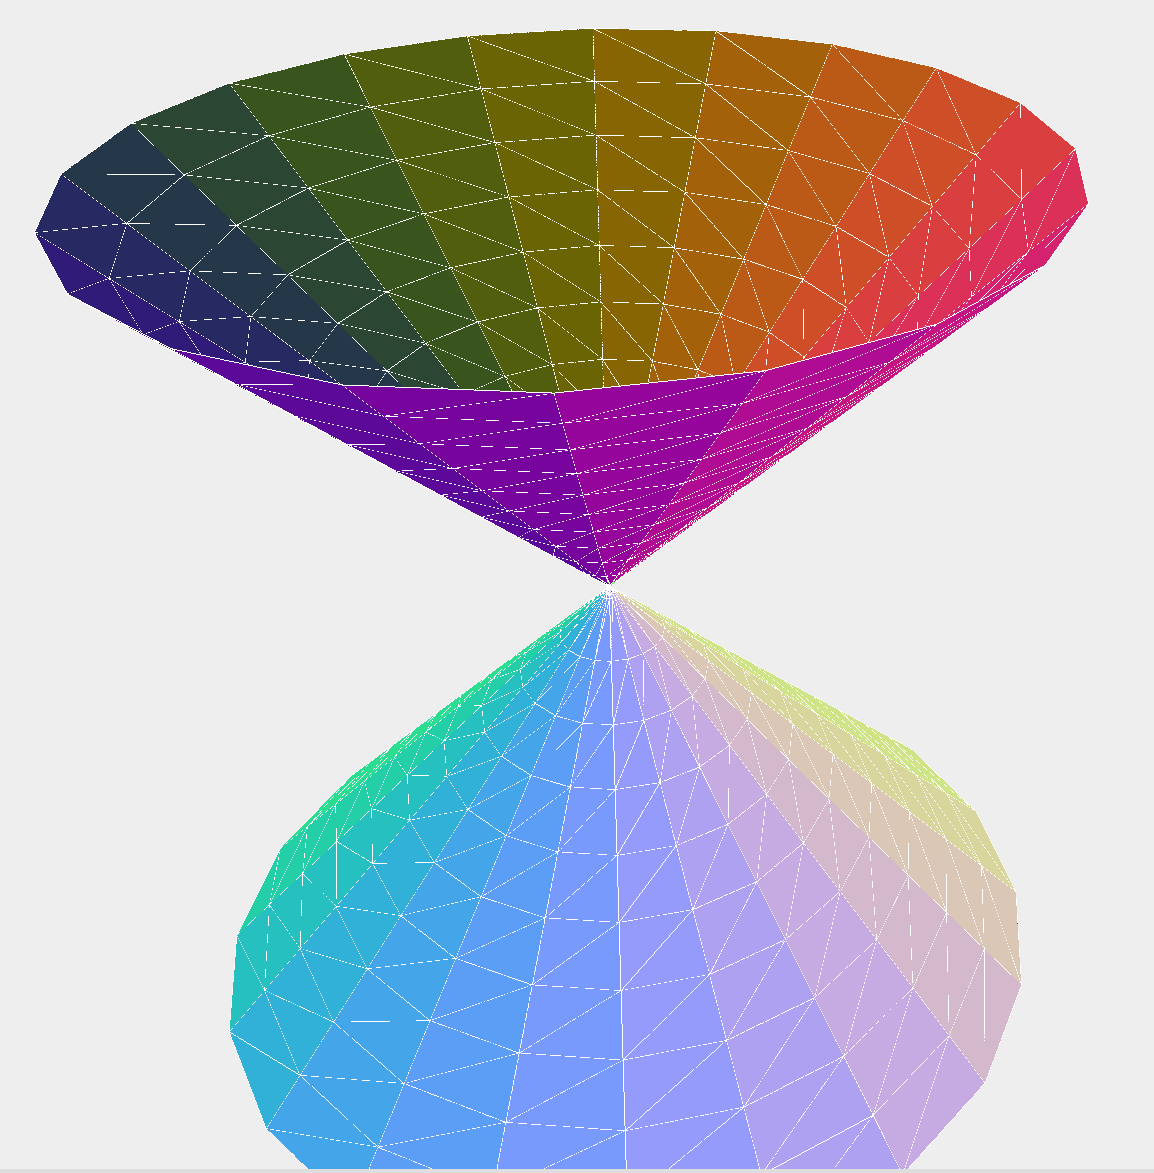
2.4 圆环RingGeometry:类似于甜甜圈
参数:radius:半径,整个圆环的半径
tube:圆环的半径,注意与radius的区别
radialSegments:沿圆环长度方向分割的段数
tubularSegments:沿圆环宽度方向分割的段数
arc:绘制多少圆环,即是否为2*pi
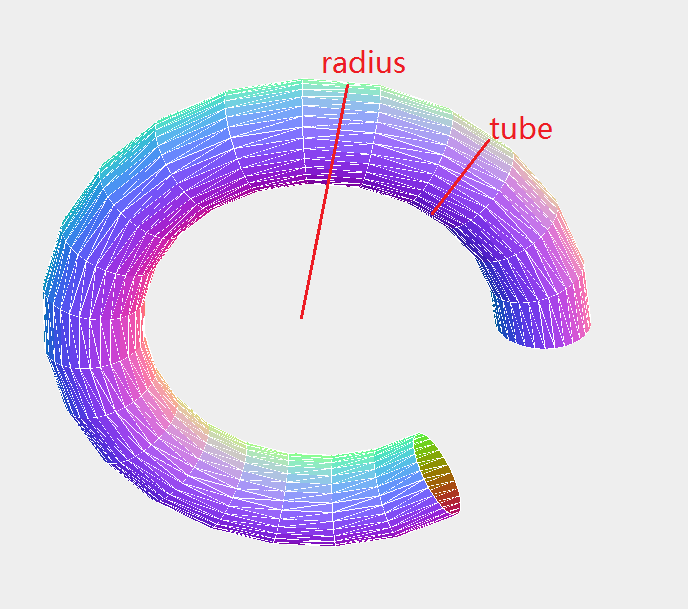
<!DOCTYPE html>

<html>

<head>
    <title>Example 05.09 - Basic 3D geometries - Ring</title>
    <script type="text/javascript" src="../libs/three.js"></script>

    <script type="text/javascript" src="../libs/stats.js"></script>
    <script type="text/javascript" src="../libs/dat.gui.js"></script>
    <style>
        body {
            /* set margin to 0 and overflow to hidden, to go fullscreen */
            margin: 0;
            overflow: hidden;
        }
    </style>
</head>
<body>

<div id="Stats-output">
</div>
<!-- Div which will hold the Output -->
<div id="WebGL-output">
</div>

<!-- Javascript code that runs our Three.js examples -->
<script type="text/javascript">

    // once everything is loaded, we run our Three.js stuff.
    function init() {

        var stats = initStats();

        // create a scene, that will hold all our elements such as objects, cameras and lights.
        var scene = new THREE.Scene();

        // create a camera, which defines where we're looking at.
        var camera = new THREE.PerspectiveCamera(45, window.innerWidth / window.innerHeight, 0.1, 1000);

        // create a render and set the size
        var webGLRenderer = new THREE.WebGLRenderer();
        webGLRenderer.setClearColor(new THREE.Color(0xEEEEEE, 1.0));
        webGLRenderer.setSize(window.innerWidth, window.innerHeight);
        webGLRenderer.shadowMapEnabled = true;

        var torus = createMesh(new THREE.RingGeometry());
        // add the sphere to the scene
        scene.add(torus);

        // position and point the camera to the center of the scene
        camera.position.x = -30;
        camera.position.y = 40;
        camera.position.z = 50;
        camera.lookAt(new THREE.Vector3(10, 0, 0));

        // add the output of the renderer to the html element
        document.getElementById("WebGL-output").appendChild(webGLRenderer.domElement);

        // call the render function
        var step = 0;


        // setup the control gui
        var controls = new function () {
            // we need the first child, since it's a multimaterial

            this.innerRadius = 0;
            this.outerRadius = 50;
            this.thetaSegments = 8;
            this.phiSegments = 8;
            this.thetaStart = 0;
            this.thetaLength = Math.PI * 2;

            this.redraw = function () {
                // remove the old plane
                scene.remove(torus);
                // create a new one
                var ir=controls.innerRadius;
                var or=controls.outerRadius;
                var tseg=controls.thetaSegments;
                var ps=controls.phiSegments;
                var ts=controls.thetaStart;
                var tl=controls.thetaLength;
                torus = createMesh(new THREE.RingGeometry(ir,or ,tseg ,ps , ts, tl));
                // add it to the scene.
                scene.add(torus);
            };
        };

        var gui = new dat.GUI();
        gui.add(controls, 'innerRadius', 0, 40).onChange(controls.redraw);
        gui.add(controls, 'outerRadius', 0, 100).onChange(controls.redraw);
        gui.add(controls, 'thetaSegments', 1, 40).step(1).onChange(controls.redraw);
        gui.add(controls, 'phiSegments', 1, 20).step(1).onChange(controls.redraw);
        gui.add(controls, 'thetaStart', 0, Math.PI * 2).onChange(controls.redraw);
        gui.add(controls, 'thetaLength', 0, Math.PI * 2).onChange(controls.redraw);


        render();

        function createMesh(geom) {

            // assign two materials
            var meshMaterial = new THREE.MeshNormalMaterial();
            meshMaterial.side = THREE.DoubleSide;
            var wireFrameMat = new THREE.MeshBasicMaterial();
            wireFrameMat.wireframe = true;

            // create a multimaterial
            var mesh = THREE.SceneUtils.createMultiMaterialObject(geom, [meshMaterial, wireFrameMat]);

            return mesh;
        }

        function render() {
            stats.update();

            torus.rotation.y = step += 0.01;

            // render using requestAnimationFrame
            requestAnimationFrame(render);
            webGLRenderer.render(scene, camera);
        }

        function initStats() {

            var stats = new Stats();
            stats.setMode(0); // 0: fps, 1: ms

            // Align top-left
            stats.domElement.style.position = 'absolute';
            stats.domElement.style.left = '0px';
            stats.domElement.style.top = '0px';

            document.getElementById("Stats-output").appendChild(stats.domElement);

            return stats;
        }
    }
    window.onload = init;
</script>
</body>
</html>
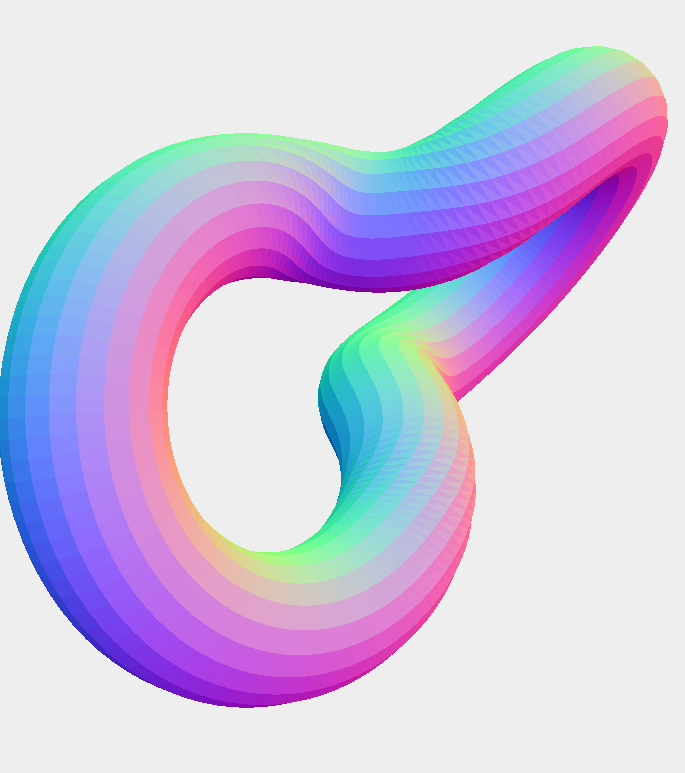
2.5 TorusKnotGeometry环面纽结
参数:radius:半径
tube:环的实际半径
radialSegments:沿圆环长度方向分割的段数
tubularSegments:沿圆环宽度方向分割的段数
p:多久旋转一次
q:绕其内部旋转多少次
heightScale:通过该属性可以拉伸环面纽结
<!DOCTYPE html>

<html>

<head>
    <title>Example 05.08 - Basic 3D geometries - Torusknot</title>
    <script type="text/javascript" src="../libs/three.js"></script>

    <script type="text/javascript" src="../libs/stats.js"></script>
    <script type="text/javascript" src="../libs/dat.gui.js"></script>
    <style>
        body {
            /* set margin to 0 and overflow to hidden, to go fullscreen */
            margin: 0;
            overflow: hidden;
        }
    </style>
</head>
<body>

<div id="Stats-output">
</div>
<!-- Div which will hold the Output -->
<div id="WebGL-output">
</div>

<!-- Javascript code that runs our Three.js examples -->
<script type="text/javascript">

    // once everything is loaded, we run our Three.js stuff.
    function init() {

        var stats = initStats();

        // create a scene, that will hold all our elements such as objects, cameras and lights.
        var scene = new THREE.Scene();

        // create a camera, which defines where we're looking at.
        var camera = new THREE.PerspectiveCamera(45, window.innerWidth / window.innerHeight, 0.1, 1000);

        // create a render and set the size
        var webGLRenderer = new THREE.WebGLRenderer();
        webGLRenderer.setClearColor(new THREE.Color(0xEEEEEE, 1.0));
        webGLRenderer.setSize(window.innerWidth, window.innerHeight);
        webGLRenderer.shadowMapEnabled = true;

        var knot = createMesh(new THREE.TorusKnotGeometry(10, 1, 64, 8, 2, 3, 1));
        // add the sphere to the scene
        scene.add(knot);

        // position and point the camera to the center of the scene
        camera.position.x = -30;
        camera.position.y = 40;
        camera.position.z = 50;
        camera.lookAt(new THREE.Vector3(10, 0, 0));

        // add the output of the renderer to the html element
        document.getElementById("WebGL-output").appendChild(webGLRenderer.domElement);

        // call the render function
        var step = 0;


        // setup the control gui
        var controls = new function () {
            // we need the first child, since it's a multimaterial
            this.radius = knot.children[0].geometry.parameters.radius;
            this.tube = 0.3;
            this.radialSegments = knot.children[0].geometry.parameters.radialSegments;
            this.tubularSegments = knot.children[0].geometry.parameters.tubularSegments;
            this.p = knot.children[0].geometry.parameters.p;
            this.q = knot.children[0].geometry.parameters.q;
            this.heightScale = knot.children[0].geometry.parameters.heightScale;

            this.redraw = function () {
                // remove the old plane
                scene.remove(knot);
                // create a new one
                var r=controls.radius;
                var t=controls.tube;
                var rs=Math.round(controls.radialSegments);
                var ts=Math.round(controls.tubularSegments);
                var p=Math.round(controls.p);
                var q=Math.round(controls.q);
                var hs=controls.heightScale;
                knot = createMesh(new THREE.TorusKnotGeometry(r,t , rs, ts, p,q ,hs ));
                // add it to the scene.
                scene.add(knot);
            };
        };

        var gui = new dat.GUI();
        gui.add(controls, 'radius', 0, 40).onChange(controls.redraw);
        gui.add(controls, 'tube', 0, 40).onChange(controls.redraw);
        gui.add(controls, 'radialSegments', 0, 400).step(1).onChange(controls.redraw);
        gui.add(controls, 'tubularSegments', 1, 20).step(1).onChange(controls.redraw);
        gui.add(controls, 'p', 1, 10).step(1).onChange(controls.redraw);
        gui.add(controls, 'q', 1, 15).step(1).onChange(controls.redraw);
        gui.add(controls, 'heightScale', 0, 5).onChange(controls.redraw);


        render();

        function createMesh(geom) {

            // assign two materials
            var meshMaterial = new THREE.MeshNormalMaterial({});
            meshMaterial.side = THREE.DoubleSide;

            // create a multimaterial
            var mesh = THREE.SceneUtils.createMultiMaterialObject(geom, [meshMaterial]);

            return mesh;
        }

        function render() {
            stats.update();

            knot.rotation.y = step += 0.01;

            // render using requestAnimationFrame
            requestAnimationFrame(render);
            webGLRenderer.render(scene, camera);
        }

        function initStats() {

            var stats = new Stats();
            stats.setMode(0); // 0: fps, 1: ms

            // Align top-left
            stats.domElement.style.position = 'absolute';
            stats.domElement.style.left = '0px';
            stats.domElement.style.top = '0px';

            document.getElementById("Stats-output").appendChild(stats.domElement);

            return stats;
        }
    }
    window.onload = init;
</script>
</body>
</html>
2.6 多面体PolyhedronGeometry
参数:vertices顶点
faces:面
radius:多面体的半径,即大小,这里只是缩放,并不是真的改变坐标
detail:当该值为1时,x面体的每个面分割为x个面体,当参数为2时,在参数为1的基础上,再次将各个面分割为x面体,依次类推


<!DOCTYPE html>

<html>

<head>
    <title>Example 05.09 - Basic 3D geometries - Polyhedron</title>
    <script type="text/javascript" src="../libs/three.js"></script>

    <script type="text/javascript" src="../libs/stats.js"></script>
    <script type="text/javascript" src="../libs/dat.gui.js"></script>
    <style>
        body {
            /* set margin to 0 and overflow to hidden, to go fullscreen */
            margin: 0;
            overflow: hidden;
        }
    </style>
</head>
<body>

<div id="Stats-output">
</div>
<!-- Div which will hold the Output -->
<div id="WebGL-output">
</div>

<!-- Javascript code that runs our Three.js examples -->
<script type="text/javascript">

    // once everything is loaded, we run our Three.js stuff.
    function init() {

        var stats = initStats();

        // create a scene, that will hold all our elements such as objects, cameras and lights.
        var scene = new THREE.Scene();

        // create a camera, which defines where we're looking at.
        var camera = new THREE.PerspectiveCamera(45, window.innerWidth / window.innerHeight, 0.1, 1000);

        // create a render and set the size
        var webGLRenderer = new THREE.WebGLRenderer();
        webGLRenderer.setClearColor(new THREE.Color(0xEEEEEE, 1.0));
        webGLRenderer.setSize(window.innerWidth, window.innerHeight);
        webGLRenderer.shadowMapEnabled = true;

        var polyhedron = createMesh(new THREE.IcosahedronGeometry(10, 0));
        // add the sphere to the scene
        scene.add(polyhedron);

        // position and point the camera to the center of the scene
        camera.position.x = -30;
        camera.position.y = 40;
        camera.position.z = 50;
        camera.lookAt(new THREE.Vector3(10, 0, 0));

        // add the output of the renderer to the html element
        document.getElementById("WebGL-output").appendChild(webGLRenderer.domElement);

        // call the render function
        var step = 0;


        // setup the control gui
        var controls = new function () {
            // we need the first child, since it's a multimaterial
            this.radius = 10;
            this.detail = 0;
            this.type = 'Icosahedron';


            this.redraw = function () {
                // remove the old plane
                scene.remove(polyhedron);
                // create a new one

                switch (controls.type) {
                    case 'Icosahedron':
                    //正20面体
          polyhedron = createMesh(new THREE.IcosahedronGeometry(controls.radius, controls.detail));
          break;
          case 'Tetrahedron':
          //正四面体
          polyhedron = createMesh(new THREE.TetrahedronGeometry(controls.radius, controls.detail));
         break;
                    case 'Octahedron':
                    //正八面体
                        polyhedron = createMesh(new THREE.OctahedronGeometry(controls.radius, controls.detail));
                        break;
                    case 'Dodecahedron':
                    //正十二面体
                        polyhedron = createMesh(new THREE.DodecahedronGeometry(controls.radius, controls.detail));
                        break;
                    case 'Custom':
                        var vertices = [
                            1, 1, 1, -1, -1, 1, -1, 1, -1, 1, -1, -1
                        ];

                        var indices = [
                            2, 1, 0, 0, 3, 2, 1, 3, 0, 2, 3, 1
                        ];

                        polyhedron = createMesh(new THREE.PolyhedronGeometry(vertices, indices, controls.radius, controls.detail));
                        break;
                }

                // add it to the scene.
                scene.add(polyhedron);
            };
        };

        var gui = new dat.GUI();
        gui.add(controls, 'radius', 0, 40).step(1).onChange(controls.redraw);
        gui.add(controls, 'detail', 0, 3).step(1).onChange(controls.redraw);
        gui.add(controls, 'type', ['Icosahedron', 'Tetrahedron', 'Octahedron', 'Dodecahedron', 'Custom']).onChange(controls.redraw);


        render();

        function createMesh(geom) {

            // assign two materials
            var meshMaterial = new THREE.MeshNormalMaterial();
            meshMaterial.side = THREE.DoubleSide;
            var wireFrameMat = new THREE.MeshBasicMaterial();
            wireFrameMat.wireframe = true;

            // create a multimaterial
            var mesh = THREE.SceneUtils.createMultiMaterialObject(geom, [meshMaterial, wireFrameMat]);

            return mesh;
        }

        function render() {
            stats.update();

            polyhedron.rotation.y = step += 0.01;

            // render using requestAnimationFrame
            requestAnimationFrame(render);
            webGLRenderer.render(scene, camera);
        }

        function initStats() {

            var stats = new Stats();
            stats.setMode(0); // 0: fps, 1: ms

            // Align top-left
            stats.domElement.style.position = 'absolute';
            stats.domElement.style.left = '0px';
            stats.domElement.style.top = '0px';

            document.getElementById("Stats-output").appendChild(stats.domElement);

            return stats;
        }
    }
    window.onload = init;
</script>
</body>
</html>


相关推荐
《THREE.JS开发指南源码》是针对学习Three.js这一流行JavaScript库的开发者们的一份宝贵资源。Three.js是一个强大的3D库,它允许在Web浏览器中创建和展示复杂的三维图形,无需用户安装任何额外的软件。这个压缩包...
第5章讲解Three.js中几何体的创建和设置;第6章展示如何设置、使用Three.js库中的高级几何体,例如凸面体和扫描体;第7章讲解如何使用Three.js库中的粒子系统;第8章展示如何从外部导入网格和几何体;第9章探索各种...
《Three.js开发指南》是针对WebGL库Three.js的一本详尽教程,旨在帮助开发者深入理解和运用这个强大的3D图形库。Three.js是JavaScript的一个开源项目,它为Web浏览器提供了简单易用的接口,用于创建复杂的3D场景、...
这个"Three.js 开发指南源码-3"很可能是针对 Three.js 的一系列教程或示例代码的第三部分,旨在帮助开发者更深入地理解和掌握 Three.js 的使用。在这里,我们将深入探讨 Three.js 的基础知识,特别是与 "textures" ...
《three.js开发必备》资源包含了三个关键组成部分:THREE.JS开发指南的PDF文档和多个版本的three.min.js库。这个资源对于想要深入理解和实践three.js的开发者来说是极其宝贵的。 首先,我们来探讨THREE.JS开发指南...
这个标题表明这是一个关于three.js的中文学习资源,它包含了开发指南和实际的示例源代码。three.js是一个基于WebGL的JavaScript库,用于在浏览器中创建3D图形。这意味着读者将能够学习如何使用three.js进行3D建模、...
《THREE.JS开发指南》是一本专注于介绍WebGL库three.js的专业教程,旨在帮助开发者掌握在网页上创建3D图形的技术。three.js是JavaScript的一个强大框架,它简化了WebGL的复杂性,使得3D编程变得更加易用。这本书详细...
- **第 5 章**:结合前几章的知识点,讲解如何创建网格对象,即如何将几何体和材质结合起来。 - **重点**:网格对象的创建过程,以及如何利用网格对象来构建复杂的 3D 场景。 - **第 6 章**:介绍动画技术,包括...
《THREE.JS开发指南》是一本专注于介绍WebGL库Three.js的专业书籍,旨在帮助开发者深入理解和高效使用这个强大的3D图形库。Three.js是JavaScript的一个框架,它为WebGL提供了一个简单易用的接口,使得在网页上创建...
**Three.js 开发包第123版** Three.js 是一款强大的JavaScript库,它使得WebGL(Web图形库)的使用变得简单易行,从而在网页上实现3D图形的渲染。WebGL是一种基于OpenGL标准的JavaScript API,允许在浏览器中进行...
第5章 学习使用几何体 5.1 Three.js提供的基础几何体 5.2 总结 第6章 使用高级几何体和二元操作 6.1 ConvexGeometry 6.2 LatheGeometry 6.3 通过拉伸创建几何体 6.4 创建三维文本 6.5 使用二元操作组合网格 ...
《three.js开发指南 第2版源码》是一个与WebGL相关的资源包,专注于three.js库的深入学习和实践。three.js是JavaScript中最受欢迎的3D图形库,它为WebGL提供了一个高级接口,使得在浏览器中创建交互式3D场景变得容易...
- **第3、4、5章**:详细介绍如何创建和操作几何体、材质以及网格对象,包括基本几何体的生成、材质属性的调整等。 - **第6章**:讲解动画制作的基本原理和技巧,例如关键帧动画和物理引擎的集成。 - **第7章**:...
《Three.js开发指南》是一本深入探讨WebGL库Three.js的专业书籍,其配套代码提供了丰富的实践案例和示例,帮助读者更好地理解和应用three.js进行3D网页开发。Three.js是JavaScript的一个库,它封装了复杂的WebGL接口...
《THREE.JS开发指南》资源包包含了丰富的素材和学习材料,专为想要深入理解和实践THREE.JS的开发者设计。THREE.JS是基于WebGL的JavaScript库,用于在浏览器中创建3D图形,其强大的功能和易用性使得它在网页3D交互...
《Three.js 开发指南》是一本详尽的资源,旨在帮助开发者深入了解并精通Three.js,这是一个基于WebGL的JavaScript库,用于在Web浏览器中创建3D图形。此资源包括一个完整的导图,提供了清晰的学习路径,使初学者和...
例如,你可以使用Three.js轻松地创建3D几何体(如立方体、球体、平面等),并为它们添加材质和纹理,使其看起来更加真实。此外,Three.js还支持加载外部3D模型文件(如OBJ、FBX格式)。 在《Three.js入门指南》中,...
【标题】"Three.js从0到1实操案例"涵盖了使用JavaScript开发语言,特别是专注于ECMAScript和前端技术中的Three.js库进行3D图形编程的基础知识。Three.js是一个流行的JavaScript库,它使得在Web浏览器中创建和展示...
它提供了丰富的功能,如几何体创建、纹理贴图、光照处理、动画系统等,使得Web上的3D开发变得更加便捷。 在【压缩包子文件的文件名称列表】中,“3d-panoramic-vision-master”可能是项目源代码的主目录,包含了一...
2. **对象与属性**:详细讲解Three.js中的主要对象类型,如几何体、材质、相机和光源的属性和使用方法。 3. **动画与交互**:教学如何使用Three.js实现物体运动、用户交互,如鼠标点击或键盘控制。 4. **加载模型...