
ه¯¹è¯و،†ه¯¹ن؛ژه؛”用ن¹ںوک¯ه؟…ن¸چهڈ¯ه°‘çڑ„ن¸€ن¸ھ组ن»¶ï¼Œهœ¨Androidن¸ن¹ںن¸چن¾‹ه¤–,ه¯¹è¯و،†ه¯¹ن؛ژن¸€ن؛›وڈگç¤؛é‡چè¦پن؟،وپ¯ï¼Œوˆ–者ن¸€ن؛›éœ€è¦پ用وˆ·é¢ه¤–ن؛¤ن؛’çڑ„ن¸€ن؛›ه†…ه®¹ه¾ˆوœ‰ه¸®هٹ©م€‚
è‡ھه®ڑن¹‰Dialogو¥éھ¤ï¼ڑآ
1م€پن¸»è¦پهˆ›ه»؛Javaç±»,ه¹¶ç»§و‰؟Dialogآ
2م€پهˆ›ه»؛ه¸ƒه±€و–‡ن»¶و¥هٹ è½½ه’Œن¸€ن؛›و ·ه¼ڈو–‡ن»¶
و•ˆوœه›¾ï¼ڑآ
آ آ آ آ آ آ آ آ آ آ آ آ آ آ آ آ 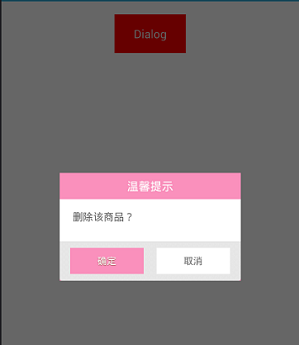
آ آ آ آ آ آ آ
DialogBox.java
- publicآ classآ DialogBoxآ extendsآ Dialogآ {آ آ
- آ آ
- آ آ آ آ publicآ DialogBox(Contextآ context)آ {آ آ
- آ آ آ آ آ آ آ آ super(context);آ آ
- آ آ آ آ }آ آ
- آ آ
- آ آ آ آ publicآ DialogBox(Contextآ context,آ intآ theme)آ {آ آ
- آ آ آ آ آ آ آ آ super(context,آ theme);آ آ
- آ آ آ آ }آ آ
- آ آ
- آ آ آ آ publicآ staticآ classآ Builderآ {آ آ
- آ آ آ آ آ آ آ آ privateآ Contextآ context;آ آ
- آ آ آ آ آ آ آ آ privateآ Stringآ title;آ آ
- آ آ آ آ آ آ آ آ privateآ Stringآ message;آ آ
- آ آ آ آ آ آ آ آ privateآ Stringآ positiveButtonText;آ آ
- آ آ آ آ آ آ آ آ privateآ Stringآ negativeButtonText;آ آ
- آ آ آ آ آ آ آ آ privateآ Viewآ contentView;آ آ
- آ آ آ آ آ آ آ آ privateآ DialogInterface.OnClickListenerآ positiveButtonClickListener;آ آ
- آ آ آ آ آ آ آ آ privateآ DialogInterface.OnClickListenerآ negativeButtonClickListener;آ آ
- آ آ
- آ آ آ آ آ آ آ آ publicآ Builder(Contextآ context)آ {آ آ
- آ آ آ آ آ آ آ آ آ آ آ آ this.contextآ =آ context;آ آ
- آ آ آ آ آ آ آ آ }آ آ
- آ آ
- آ آ آ آ آ آ آ آ publicآ Builderآ setMessage(Stringآ message)آ {آ آ
- آ آ آ آ آ آ آ آ آ آ آ آ this.messageآ =آ message;آ آ
- آ آ آ آ آ آ آ آ آ آ آ آ returnآ this;آ آ
- آ آ آ آ آ آ آ آ }آ آ
- آ آ
- آ آ آ آ آ آ آ آ /**آ
- آ آ آ آ آ آ آ آ آ *آ Setآ theآ Dialogآ messageآ fromآ resourceآ
- آ آ آ آ آ آ آ آ آ *آ آ
- آ آ آ آ آ آ آ آ آ *آ @paramآ titleآ
- آ آ آ آ آ آ آ آ آ *آ @returnآ
- آ آ آ آ آ آ آ آ آ */آ آ
- آ آ آ آ آ آ آ آ publicآ Builderآ setMessage(intآ message)آ {آ آ
- آ آ آ آ آ آ آ آ آ آ آ آ this.messageآ =آ (String)آ context.getText(message);آ آ
- آ آ آ آ آ آ آ آ آ آ آ آ returnآ this;آ آ
- آ آ آ آ آ آ آ آ }آ آ
- آ آ
- آ آ آ آ آ آ آ آ /**آ
- آ آ آ آ آ آ آ آ آ *آ Setآ theآ Dialogآ titleآ fromآ resourceآ
- آ آ آ آ آ آ آ آ آ *آ آ
- آ آ آ آ آ آ آ آ آ *آ @paramآ titleآ
- آ آ آ آ آ آ آ آ آ *آ @returnآ
- آ آ آ آ آ آ آ آ آ */آ آ
- آ آ آ آ آ آ آ آ publicآ Builderآ setTitle(intآ title)آ {آ آ
- آ آ آ آ آ آ آ آ آ آ آ آ this.titleآ =آ (String)آ context.getText(title);آ آ
- آ آ آ آ آ آ آ آ آ آ آ آ returnآ this;آ آ
- آ آ آ آ آ آ آ آ }آ آ
- آ آ
- آ آ آ آ آ آ آ آ /**آ
- آ آ آ آ آ آ آ آ آ *آ Setآ theآ Dialogآ titleآ fromآ Stringآ
- آ آ آ آ آ آ آ آ آ *آ آ
- آ آ آ آ آ آ آ آ آ *آ @paramآ titleآ
- آ آ آ آ آ آ آ آ آ *آ @returnآ
- آ آ آ آ آ آ آ آ آ */آ آ
- آ آ
- آ آ آ آ آ آ آ آ publicآ Builderآ setTitle(Stringآ title)آ {آ آ
- آ آ آ آ آ آ آ آ آ آ آ آ this.titleآ =آ title;آ آ
- آ آ آ آ آ آ آ آ آ آ آ آ returnآ this;آ آ
- آ آ آ آ آ آ آ آ }آ آ
- آ آ
- آ آ آ آ آ آ آ آ publicآ Builderآ setContentView(Viewآ v)آ {آ آ
- آ آ آ آ آ آ آ آ آ آ آ آ this.contentViewآ =آ v;آ آ
- آ آ آ آ آ آ آ آ آ آ آ آ returnآ this;آ آ
- آ آ آ آ آ آ آ آ }آ آ
- آ آ
- آ آ آ آ آ آ آ آ /**آ
- آ آ آ آ آ آ آ آ آ *آ Setآ theآ positiveآ buttonآ resourceآ andآ it'sآ listenerآ
- آ آ آ آ آ آ آ آ آ *آ آ
- آ آ آ آ آ آ آ آ آ *آ @paramآ positiveButtonTextآ
- آ آ آ آ آ آ آ آ آ *آ @returnآ
- آ آ آ آ آ آ آ آ آ */آ آ
- آ آ آ آ آ آ آ آ publicآ Builderآ setPositiveButton(intآ positiveButtonText,آ آ
- آ آ آ آ آ آ آ آ آ آ آ آ آ آ آ آ DialogInterface.OnClickListenerآ listener)آ {آ آ
- آ آ آ آ آ آ آ آ آ آ آ آ this.positiveButtonTextآ =آ (String)آ contextآ آ
- آ آ آ آ آ آ آ آ آ آ آ آ آ آ آ آ آ آ آ آ .getText(positiveButtonText);آ آ
- آ آ آ آ آ آ آ آ آ آ آ آ this.positiveButtonClickListenerآ =آ listener;آ آ
- آ آ آ آ آ آ آ آ آ آ آ آ returnآ this;آ آ
- آ آ آ آ آ آ آ آ }آ آ
- آ آ
- آ آ آ آ آ آ آ آ publicآ Builderآ setPositiveButton(Stringآ positiveButtonText,آ آ
- آ آ آ آ آ آ آ آ آ آ آ آ آ آ آ آ DialogInterface.OnClickListenerآ listener)آ {آ آ
- آ آ آ آ آ آ آ آ آ آ آ آ this.positiveButtonTextآ =آ positiveButtonText;آ آ
- آ آ آ آ آ آ آ آ آ آ آ آ this.positiveButtonClickListenerآ =آ listener;آ آ
- آ آ آ آ آ آ آ آ آ آ آ آ returnآ this;آ آ
- آ آ آ آ آ آ آ آ }آ آ
- آ آ
- آ آ آ آ آ آ آ آ publicآ Builderآ setNegativeButton(intآ negativeButtonText,آ آ
- آ آ آ آ آ آ آ آ آ آ آ آ آ آ آ آ DialogInterface.OnClickListenerآ listener)آ {آ آ
- آ آ آ آ آ آ آ آ آ آ آ آ this.negativeButtonTextآ =آ (String)آ contextآ آ
- آ آ آ آ آ آ آ آ آ آ آ آ آ آ آ آ آ آ آ آ .getText(negativeButtonText);آ آ
- آ آ آ آ آ آ آ آ آ آ آ آ this.negativeButtonClickListenerآ =آ listener;آ آ
- آ آ آ آ آ آ آ آ آ آ آ آ returnآ this;آ آ
- آ آ آ آ آ آ آ آ }آ آ
- آ آ
- آ آ آ آ آ آ آ آ publicآ Builderآ setNegativeButton(Stringآ negativeButtonText,آ آ
- آ آ آ آ آ آ آ آ آ آ آ آ آ آ آ آ DialogInterface.OnClickListenerآ listener)آ {آ آ
- آ آ آ آ آ آ آ آ آ آ آ آ this.negativeButtonTextآ =آ negativeButtonText;آ آ
- آ آ آ آ آ آ آ آ آ آ آ آ this.negativeButtonClickListenerآ =آ listener;آ آ
- آ آ آ آ آ آ آ آ آ آ آ آ returnآ this;آ آ
- آ آ آ آ آ آ آ آ }آ آ
- آ آ
- آ آ آ آ آ آ آ آ publicآ DialogBoxآ create()آ {آ آ
- آ آ آ آ آ آ آ آ آ آ آ آ LayoutInflaterآ inflaterآ =آ (LayoutInflater)آ contextآ آ
- آ آ آ آ آ آ آ آ آ آ آ آ آ آ آ آ آ آ آ آ .getSystemService(Context.LAYOUT_INFLATER_SERVICE);آ آ
- آ آ آ آ آ آ آ آ آ آ آ آ finalآ DialogBoxآ dialogآ =آ newآ DialogBox(context,آ R.style.Dialog);آ آ
- آ آ آ آ آ آ آ آ آ آ آ آ Viewآ layoutآ =آ inflater.inflate(R.layout.dialog_normal_layout,آ null);آ آ
- آ آ آ آ آ آ آ آ آ آ آ آ dialog.addContentView(layout,آ newآ LayoutParams(آ آ
- آ آ آ آ آ آ آ آ آ آ آ آ آ آ آ آ آ آ آ آ LayoutParams.FILL_PARENT,آ LayoutParams.WRAP_CONTENT));آ آ
- آ آ آ آ آ آ آ آ آ آ آ آ ((TextView)آ layout.findViewById(R.id.title)).setText(title);آ آ
- آ آ آ آ آ آ آ آ آ آ آ آ ifآ (positiveButtonTextآ !=آ null)آ {آ آ
- آ آ آ آ آ آ آ آ آ آ آ آ آ آ آ آ ((Button)آ layout.findViewById(R.id.positiveButton))آ آ
- آ آ آ آ آ آ آ آ آ آ آ آ آ آ آ آ آ آ آ آ آ آ آ آ .setText(positiveButtonText);آ آ
- آ آ آ آ آ آ آ آ آ آ آ آ آ آ آ آ ifآ (positiveButtonClickListenerآ !=آ null)آ {آ آ
- آ آ آ آ آ آ آ آ آ آ آ آ آ آ آ آ آ آ آ آ ((Button)آ layout.findViewById(R.id.positiveButton))آ آ
- آ آ آ آ آ آ آ آ آ آ آ آ آ آ آ آ آ آ آ آ آ آ آ آ آ آ آ آ .setOnClickListener(newآ View.OnClickListener()آ {آ آ
- آ آ آ آ آ آ آ آ آ آ آ آ آ آ آ آ آ آ آ آ آ آ آ آ آ آ آ آ آ آ آ آ publicآ voidآ onClick(Viewآ v)آ {آ آ
- آ آ آ آ آ آ آ آ آ آ آ آ آ آ آ آ آ آ آ آ آ آ آ آ آ آ آ آ آ آ آ آ آ آ آ آ positiveButtonClickListener.onClick(dialog,آ آ
- آ آ آ آ آ آ آ آ آ آ آ آ آ آ آ آ آ آ آ آ آ آ آ آ آ آ آ آ آ آ آ آ آ آ آ آ آ آ آ آ آ آ آ آ DialogInterface.BUTTON_POSITIVE);آ آ
- آ آ آ آ آ آ آ آ آ آ آ آ آ آ آ آ آ آ آ آ آ آ آ آ آ آ آ آ آ آ آ آ }آ آ
- آ آ آ آ آ آ آ آ آ آ آ آ آ آ آ آ آ آ آ آ آ آ آ آ آ آ آ آ });آ آ
- آ آ آ آ آ آ آ آ آ آ آ آ آ آ آ آ }آ آ
- آ آ آ آ آ آ آ آ آ آ آ آ }آ elseآ {آ آ
- آ آ آ آ آ آ آ آ آ آ آ آ آ آ آ آ layout.findViewById(R.id.positiveButton).setVisibility(آ آ
- آ آ آ آ آ آ آ آ آ آ آ آ آ آ آ آ آ آ آ آ آ آ آ آ View.GONE);آ آ
- آ آ آ آ آ آ آ آ آ آ آ آ }آ آ
- آ آ آ آ آ آ آ آ آ آ آ آ ifآ (negativeButtonTextآ !=آ null)آ {آ آ
- آ آ آ آ آ آ آ آ آ آ آ آ آ آ آ آ ((Button)آ layout.findViewById(R.id.negativeButton))آ آ
- آ آ آ آ آ آ آ آ آ آ آ آ آ آ آ آ آ آ آ آ آ آ آ آ .setText(negativeButtonText);آ آ
- آ آ آ آ آ آ آ آ آ آ آ آ آ آ آ آ ifآ (negativeButtonClickListenerآ !=آ null)آ {آ آ
- آ آ آ آ آ آ آ آ آ آ آ آ آ آ آ آ آ آ آ آ ((Button)آ layout.findViewById(R.id.negativeButton))آ آ
- آ آ آ آ آ آ آ آ آ آ آ آ آ آ آ آ آ آ آ آ آ آ آ آ آ آ آ آ .setOnClickListener(newآ View.OnClickListener()آ {آ آ
- آ آ آ آ آ آ آ آ آ آ آ آ آ آ آ آ آ آ آ آ آ آ آ آ آ آ آ آ آ آ آ آ publicآ voidآ onClick(Viewآ v)آ {آ آ
- آ آ آ آ آ آ آ آ آ آ آ آ آ آ آ آ آ آ آ آ آ آ آ آ آ آ آ آ آ آ آ آ آ آ آ آ negativeButtonClickListener.onClick(dialog,آ آ
- آ آ آ آ آ آ آ آ آ آ آ آ آ آ آ آ آ آ آ آ آ آ آ آ آ آ آ آ آ آ آ آ آ آ آ آ آ آ آ آ آ آ آ آ DialogInterface.BUTTON_NEGATIVE);آ آ
- آ آ آ آ آ آ آ آ آ آ آ آ آ آ آ آ آ آ آ آ آ آ آ آ آ آ آ آ آ آ آ آ }آ آ
- آ آ آ آ آ آ آ آ آ آ آ آ آ آ آ آ آ آ آ آ آ آ آ آ آ آ آ آ });آ آ
- آ آ آ آ آ آ آ آ آ آ آ آ آ آ آ آ }آ آ
- آ آ آ آ آ آ آ آ آ آ آ آ }آ elseآ {آ آ
- آ آ آ آ آ آ آ آ آ آ آ آ آ آ آ آ layout.findViewById(R.id.negativeButton).setVisibility(آ آ
- آ آ آ آ آ آ آ آ آ آ آ آ آ آ آ آ آ آ آ آ آ آ آ آ View.GONE);آ آ
- آ آ آ آ آ آ آ آ آ آ آ آ }آ آ
- آ آ آ آ آ آ آ آ آ آ آ آ ifآ (messageآ !=آ null)آ {آ آ
- آ آ آ آ آ آ آ آ آ آ آ آ آ آ آ آ ((TextView)آ layout.findViewById(R.id.message)).setText(message);آ آ
- آ آ آ آ آ آ آ آ آ آ آ آ }آ elseآ ifآ (contentViewآ !=آ null)آ {آ آ
- آ آ آ آ آ آ آ آ آ آ آ آ آ آ آ آ ((LinearLayout)آ layout.findViewById(R.id.content))آ آ
- آ آ آ آ آ آ آ آ آ آ آ آ آ آ آ آ آ آ آ آ آ آ آ آ .removeAllViews();آ آ
- آ آ آ آ آ آ آ آ آ آ آ آ آ آ آ آ ((LinearLayout)آ layout.findViewById(R.id.content)).addView(آ آ
- آ آ آ آ آ آ آ آ آ آ آ آ آ آ آ آ آ آ آ آ آ آ آ آ contentView,آ newآ LayoutParams(LayoutParams.FILL_PARENT,آ آ
- آ آ آ آ آ آ آ آ آ آ آ آ آ آ آ آ آ آ آ آ آ آ آ آ آ آ آ آ آ آ آ آ LayoutParams.FILL_PARENT));آ آ
- آ آ آ آ آ آ آ آ آ آ آ آ }آ آ
- آ آ آ آ آ آ آ آ آ آ آ آ dialog.setContentView(layout);آ آ
- آ آ آ آ آ آ آ آ آ آ آ آ returnآ dialog;آ آ
- آ آ آ آ آ آ آ آ }آ آ
- آ آ
- آ آ آ آ }آ آ
- }آ آ
è‡ھه®ڑن¹‰Viewçڑ„ه¸ƒه±€و–‡ن»¶ï¼ڑ
آ
<?xml version="1.0" encoding="utf-8"?>
<FrameLayout xmlns:android="http://schemas.android.com/apk/res/android"
android:layout_width="fill_parent"
android:layout_height="fill_parent"
android:clickable="true"
android:orientation="vertical"
android:padding="20.0dip" >
<LinearLayout
android:layout_width="fill_parent"
android:layout_height="wrap_content"
android:layout_gravity="center"
android:background="#FA90BC"
android:orientation="vertical" >
<TextView
android:id="@+id/title"
style="@style/text_18_ffffff"
android:layout_width="fill_parent"
android:layout_height="40.0dip"
android:gravity="center"
android:text="وڈگç¤؛"
android:visibility="visible" />
<LinearLayout
android:id="@+id/content"
android:layout_width="fill_parent"
android:layout_height="wrap_content"
android:background="#ffffff"
android:gravity="center" >
<TextView
android:id="@+id/message"
style="@style/text_16_666666"
android:layout_width="fill_parent"
android:layout_height="wrap_content"
android:gravity="left|center"
android:lineSpacingMultiplier="1.5"
android:minHeight="65.0dip"
android:paddingBottom="15.0dip"
android:paddingLeft="20.0dip"
android:paddingRight="20.0dip"
android:paddingTop="15.0dip" />
</LinearLayout>
<View
android:layout_width="fill_parent"
android:layout_height="1.0px"
android:background="#ffd0d0d0" />
<LinearLayout
android:layout_width="fill_parent"
android:layout_height="60.0dip"
android:layout_gravity="bottom"
android:background="@drawable/dialog_bottom_bg"
android:gravity="center"
android:orientation="horizontal" >
<Button
android:id="@+id/positiveButton"
style="@style/text_15_ffffff_sdw"
android:layout_width="114.0dip"
android:layout_height="40.0dip"
android:background="#FA90BC"
android:gravity="center"
android:text="ç،®ه®ڑ" />
<Button
android:id="@+id/negativeButton"
style="@style/text_15_666666_sdw"
android:layout_width="114.0dip"
android:layout_height="40.0dip"
android:layout_marginLeft="20.0dip"
android:background="#ffffff"
android:gravity="center"
android:text="هڈ–و¶ˆ" />
</LinearLayout>
</LinearLayout>
</FrameLayout>
MainActivity.Java
آ
آ
public class MainActivity extends Activity {
@Override
protected void onCreate(Bundle savedInstanceState) {
super.onCreate(savedInstanceState);
setContentView(R.layout.activity_main);
}
public void showAlertDialog(View view) {
DialogBox.Builder builder = new DialogBox.Builder(this);
builder.setMessage("هˆ 除该ه•†ه“پï¼ں");
builder.setTitle("و¸©é¦¨وڈگç¤؛");
builder.setPositiveButton("ç،®ه®ڑ", new DialogInterface.OnClickListener() {
public void onClick(DialogInterface dialog, int which) {
dialog.dismiss();
// ن½ çڑ„و“چن½œن؛‹é،¹
}
});
builder.setNegativeButton("هڈ–و¶ˆ",
new android.content.DialogInterface.OnClickListener() {
public void onClick(DialogInterface dialog, int which) {
dialog.dismiss();
}
});
builder.create().show();
}
}
آ


相ه…³وژ¨èچگ
وœ¬و–‡ه°†و·±ه…¥وژ¢è®¨ه¦‚ن½•ه®çژ°ن¸€ن¸ھه¸¦وœ‰هٹ¨ç”»و•ˆوœçڑ„è‡ھه®ڑن¹‰Dialog,ه¹¶ن»¥"android è‡ھه®ڑن¹‰Dialogوڈگç¤؛+هٹ¨ç”»و•ˆوœ"ن¸؛ن¸»é¢ک,结هگˆوڈگن¾›çڑ„هژ‹ç¼©هŒ…و–‡ن»¶`XAlertDialogLibrary`,详细讲解相ه…³çں¥è¯†ç‚¹م€‚ 首ه…ˆï¼Œوˆ‘ن»¬و¥çگ†è§£ن»€ن¹ˆوک¯Dialogم€‚هœ¨...
وœ¬é،¹ç›®â€œQTè‡ھه®ڑن¹‰dialogوڈگç¤؛çھ—â€ç€é‡چن؛ژé€ڑè؟‡ç؛¯ن»£ç پو–¹ه¼ڈهˆ›ه»؛ه¯¹è¯و،†ï¼Œو— 需ن½؟用UIو–‡ن»¶م€‚ن¸‹é¢ه°†è¯¦ç»†éکگè؟°ç›¸ه…³çں¥è¯†ç‚¹م€‚ 1. **è‡ھه®ڑن¹‰ه¯¹è¯و،†çڑ„هˆ›ه»؛**ï¼ڑ هœ¨QTن¸ï¼Œهڈ¯ن»¥ç»§و‰؟`QDialog`ç±»و¥هˆ›ه»؛è‡ھه®ڑن¹‰ه¯¹è¯و،†م€‚`QDialog`وک¯QTن¸çڑ„...
هœ¨Androidه¼€هڈ‘ن¸ï¼Œè‡ھه®ڑن¹‰Dialogوک¯ن¸€ç§چه¸¸è§پçڑ„需و±‚,用ن؛ژوڈگن¾›ن¸€ç§چè½»é‡ڈç؛§çڑ„用وˆ·ن؛¤ن؛’ç•Œé¢ï¼Œه¦‚وڈگç¤؛ن؟،وپ¯وˆ–者è؟›è،Œé€‰و‹©و“چن½œم€‚وœ¬ç¤؛ن¾‹وک¯ه…³ن؛ژه¦‚ن½•هˆ›ه»؛ن¸€ن¸ھه…·وœ‰ه¤ڑ选هٹں能çڑ„Dialog,结هگˆن؛†Dialogم€پListViewه’ŒCheckBoxçڑ„ن½؟用م€‚ن¸‹é¢...
هœ¨وںگن؛›وƒ…ه†µن¸‹ï¼Œوˆ‘ن»¬هڈ¯èƒ½ه¸Œوœ›هˆ›ه»؛ن¸€ç§چن»‹ن؛ژهژںç”ںDialogه’Œè‡ھه®ڑن¹‰Dialogن¹‹é—´çڑ„وڈگç¤؛و،†ï¼Œه®ƒن؟وŒپن؛†هژںç”ںé£ژو ¼ï¼Œن½†هڈ¯ن»¥هپڑن¸€ن؛›ه°ڈه¹…ه؛¦çڑ„ه®ڑهˆ¶م€‚è؟™هڈ¯ن»¥é€ڑè؟‡è®¾ç½®AlertDialogçڑ„Viewو¥ه®çژ°ï¼ڑ ```java View customView = ...
هœ¨Androidه¼€هڈ‘ن¸ï¼Œè‡ھه®ڑن¹‰Dialogوک¯ن¸€ç§چه¸¸è§پçڑ„用وˆ·ç•Œé¢ï¼ˆUI)设è®،وٹ€وœ¯ï¼Œç”¨ن؛ژوڈگن¾›ن¸ژ用وˆ·ن؛¤ن؛’çڑ„ه¼¹ه‡؛ه¼ڈçھ—هڈ£م€‚é€ڑه¸¸ï¼Œوˆ‘ن»¬ن½؟用Dialogو¥وک¾ç¤؛é‡چè¦پçڑ„ن؟،وپ¯م€پوڈگç¤؛وˆ–è؟›è،Œç®€هچ•çڑ„و“چن½œï¼Œه¦‚ç™»ه½•م€پو³¨ه†Œç‰م€‚وœ¬و•™ç¨‹ه°†è¯¦ç»†ن»‹ç»چه¦‚ن½•هœ¨...
هœ¨Androidه¼€هڈ‘ن¸ï¼Œè‡ھه®ڑن¹‰Dialogوک¯ن¸€ç§چه¸¸è§پçڑ„用وˆ·ن؛¤ن؛’و–¹ه¼ڈ,ه®ƒèƒ½وڈگن¾›و›´ن¸؛ن¸°ه¯Œçڑ„ç•Œé¢ه±•ç¤؛ه’Œه®ڑهˆ¶هŒ–هٹں能م€‚هœ¨ه¤„çگ†ه¤ڑç؛§èڈœهچ•ه¤ڑ选问é¢کو—¶ï¼Œن¼ ç»ںçڑ„هپڑو³•هڈ¯èƒ½ن¼ڑه¯¼è‡´ن»£ç په¤چو‚ه؛¦ه¢هٹ ,逻辑éڑ¾ن»¥ç»´وٹ¤م€‚وœ¬و–‡ه°†و·±ه…¥وژ¢è®¨ه¦‚ن½•é€ڑè؟‡è‡ھه®ڑن¹‰...
هœ¨Androidه¼€هڈ‘ن¸ï¼Œè‡ھه®ڑن¹‰Dialogوک¯ن¸€ç§چه¸¸è§پçڑ„需و±‚,用ن؛ژوڈگن¾›ç”¨وˆ·ن؛¤ن؛’ه’Œن؟،وپ¯ه±•ç¤؛çڑ„çھ—هڈ£م€‚"هگ„ç§چè‡ھه®ڑن¹‰dialog"è؟™ن¸ھن¸»é¢کو¶µç›–ن؛†ه‡ ن¸ھé‡چè¦پçڑ„è‡ھه®ڑن¹‰Dialogç±»ه‹ï¼ŒهŒ…و‹¬è‡ھه®ڑن¹‰ه¯¹è¯و،†م€په¤ڑ选ه¯¹è¯و،†م€پهچ•é€‰ه¯¹è¯و،†ن»¥هڈٹوœ€ç®€هچ•çڑ„ه¯¹è¯و،†...
هœ¨Androidه¼€هڈ‘ن¸ï¼Œè‡ھه®ڑن¹‰Dialogه¼¹ه‡؛و،†وک¯ن¸€ن¸ھه¸¸è§پçڑ„需و±‚,ه®ƒهڈ¯ن»¥ه¸®هٹ©وˆ‘ن»¬وڈگن¾›و›´ن¸°ه¯Œçڑ„用وˆ·ن؛¤ن؛’ن½“éھŒï¼Œن½؟ه¾—ن؟،وپ¯وڈگç¤؛وˆ–者و“چن½œé€‰و‹©و›´هٹ ن¸ھو€§هŒ–م€‚وœ¬ç¯‡ه°†è¯¦ç»†è®²è§£ه¦‚ن½•هˆ›ه»؛ه’Œن½؟用è‡ھه®ڑن¹‰Dialog,ن»¥هڈٹو¶‰هڈٹهˆ°çڑ„相ه…³çں¥è¯†ç‚¹م€‚ ...
é»ک认çڑ„Dialogو ·ه¼ڈهڈ¯èƒ½و— و³•و»،足و‰€وœ‰è®¾è®،需و±‚,ه› و¤ه¼€هڈ‘者ه¸¸ه¸¸éœ€è¦پè‡ھه®ڑن¹‰Dialogو¥ه®çژ°ç‰¹ه®ڑçڑ„视觉و•ˆوœه’Œهٹں能م€‚وœ¬ç¯‡ه°†è¯¦ç»†ن»‹ç»چه¦‚ن½•هœ¨Androidن¸هˆ›ه»؛è‡ھه®ڑن¹‰çڑ„Dialogه¼¹çھ—وڈگç¤؛م€‚ 首ه…ˆï¼Œوˆ‘ن»¬éœ€è¦پçگ†è§£Dialogçڑ„هں؛وœ¬ç»“و„م€‚...
هœ¨DialogSampleé،¹ç›®ن¸ï¼Œهڈ¯èƒ½è؟کن¼ڑهŒ…هگ«ن¸€ن؛›ه…³ن؛ژه¦‚ن½•ن½؟用ه·¥ه…·ï¼ˆه¦‚Android Studioçڑ„ه¸ƒه±€é¢„览م€پ调试وٹ€ه·§ç‰ï¼‰çڑ„وڈگç¤؛,ن»¥ه¸®هٹ©ه¼€هڈ‘者و›´ه¥½هœ°çگ†è§£ه’Œه®çژ°è‡ھه®ڑن¹‰Dialogم€‚ و€»çڑ„و¥è¯´ï¼Œè‡ھه®ڑن¹‰Dialogوک¯وڈگهچ‡Androidه؛”用用وˆ·ن½“éھŒçڑ„...
هœ¨Androidه¼€هڈ‘ن¸ï¼Œè‡ھه®ڑن¹‰Dialogه’ŒToastوک¯وڈگهچ‡ç”¨وˆ·ن½“éھŒه’Œç•Œé¢ن¸ھو€§هŒ–çڑ„é‡چè¦پو‰‹و®µم€‚Dialogé€ڑه¸¸ç”¨ن؛ژهگ‘用وˆ·ه±•ç¤؛é‡چè¦پن؟،وپ¯وˆ–需è¦پ用وˆ·هپڑه‡؛ه†³ç–çڑ„وƒ…ه†µï¼Œè€ŒToastهˆ™ç”¨ن؛ژè½»é‡ڈç؛§çڑ„é€ڑçں¥ï¼Œن¸چو‰“و–用وˆ·çڑ„ه½“ه‰چو“چن½œم€‚ن»¥ن¸‹وک¯ه¯¹ه¦‚ن½•è‡ھه®ڑن¹‰...
هœ¨وœ¬و•™ç¨‹ن¸ï¼Œوˆ‘ن»¬ه°†و·±ه…¥وژ¢è®¨ه¦‚ن½•هœ¨ç™¾ه؛¦هœ°ه›¾APIن¸هˆ›ه»؛è‡ھه®ڑن¹‰Dialog,ن»¥ن¾؟ن¸؛用وˆ·وڈگن¾›و›´هٹ ن¸ھو€§هŒ–çڑ„ن؛¤ن؛’ن½“éھŒم€‚ 首ه…ˆï¼Œوˆ‘ن»¬éœ€è¦پن؛†è§£Dialogçڑ„هں؛وœ¬و¦‚ه؟µم€‚Dialogوک¯Androidç³»ç»ںوڈگن¾›çڑ„ن¸€ç§چUI组ن»¶ï¼Œه®ƒوµ®ن؛ژه؛”用程ه؛ڈçڑ„ن¸»çھ—هڈ£ن¹‹ن¸ٹ...
è‡ھه®ڑن¹‰Dialogن¸چن»…能ه¤ںو»،足هں؛وœ¬çڑ„وڈگç¤؛هٹں能,è؟کهڈ¯ن»¥و ¹وچ®ه؛”用çڑ„é£ژو ¼ه’Œéœ€و±‚è؟›è،Œه®ڑهˆ¶ï¼Œن»ژ而وڈگهچ‡ç”¨وˆ·ن½“éھŒم€‚ن»¥ن¸‹وک¯ه¯¹ç»™ه®ڑو–‡ن»¶ن¸و¶‰هڈٹçڑ„è‡ھه®ڑن¹‰Dialogçں¥è¯†ç‚¹çڑ„详细说وکژï¼ڑ 1. **هں؛وœ¬çڑ„ه¯¹è¯و،†.rar**ï¼ڑ è؟™ن¸ھو–‡ن»¶هڈ¯èƒ½هŒ…هگ«ن؛†ن¸€ن؛›...
هœ¨Androidه¼€هڈ‘ن¸ï¼ŒDialogوک¯ن¸€ç§چه¸¸è§پçڑ„用وˆ·ن؛¤ن؛’ç•Œé¢ï¼Œç”¨ن؛ژهœ¨ن¸»ç؛؟程ن¸وک¾ç¤؛ن¸´و—¶çڑ„é€ڑçں¥وˆ–وڈگç¤؛ن؟،وپ¯م€‚é»ک认çڑ„Dialogو ·ه¼ڈه’Œه°؛ه¯¸ه¾€ه¾€ن¸چ能و»،足و‰€وœ‰ه¼€هڈ‘者çڑ„需و±‚,ه› و¤ï¼Œن؛†è§£ه¦‚ن½•è‡ھه®ڑن¹‰Dialogçڑ„و ·ه¼ڈم€په¤§ه°ڈه’Œن½چç½®وک¯éه¸¸é‡چè¦پçڑ„...
Dialogوک¯Androidç³»ç»ںوڈگن¾›çڑ„ن¸€ç§چ用وˆ·ç•Œé¢ç»„ن»¶ï¼Œç”¨ن؛ژهœ¨ن¸»ç•Œé¢ن¹‹ن¸ٹوک¾ç¤؛ن¸€ن¸ھن¸´و—¶çڑ„çھ—هڈ£ï¼Œé€ڑه¸¸ç”¨و¥وڈگç¤؛用وˆ·ن¸€ن؛›ن؟،وپ¯وˆ–请و±‚用وˆ·çڑ„输ه…¥م€‚é»ک认çڑ„Dialogو ·ه¼ڈهڈ¯èƒ½و— و³•و»،足و‰€وœ‰è®¾è®،需و±‚,ه› و¤è‡ھه®ڑن¹‰Dialogه°±وک¾ه¾—ه°¤ن¸؛é‡چè¦پم€‚ هœ¨...
هœ¨Androidه¼€هڈ‘ن¸ï¼ŒDialogوک¯ن¸€ç§چéه¸¸ه¸¸è§پçڑ„用وˆ·ن؛¤ن؛’组ن»¶ï¼Œه®ƒç”¨ن؛ژوک¾ç¤؛ن¸€ن؛›ن¸´و—¶و€§çڑ„ن؟،وپ¯وˆ–وڈگç¤؛,é€ڑه¸¸ن¸چن¼ڑهچ وچ®و•´ن¸ھه±ڈه¹•م€‚然而,系ç»ںé»ک认çڑ„Dialogو ·ه¼ڈوœ‰é™گ,ن¸؛ن؛†و»،足و›´ن¸°ه¯Œçڑ„设è®،需و±‚,ه¼€هڈ‘者ه¸¸ه¸¸éœ€è¦په¯¹Dialogè؟›è،Œè‡ھه®ڑن¹‰...
Dialogوک¯Androidç³»ç»ںوڈگن¾›çڑ„ن¸€ç§چè½»é‡ڈç؛§çھ—هڈ£ï¼Œه®ƒو¼‚وµ®هœ¨ه؛”用ن¸»çھ—هڈ£ن¹‹ن¸ٹ,هڈ¯ن»¥ç”¨و¥وڈگç¤؛用وˆ·ن؟،وپ¯وˆ–è؟›è،Œç®€هچ•çڑ„ن؛¤ن؛’و“چن½œم€‚é»ک认çڑ„Dialogو ·ه¼ڈهڈ¯èƒ½و— و³•و»،足و‰€وœ‰è®¾è®،需و±‚,ه› و¤ه¼€هڈ‘者ç»ڈه¸¸éœ€è¦پè‡ھه®ڑن¹‰ه…¶ه¤–观ه’Œè،Œن¸؛م€‚ 2. **...
androidè‡ھه®ڑن¹‰Dialogن¸‹è½½و–‡ن»¶ ,هœ¨è‡ھه®ڑن¹‰çڑ„Dialogن¸ٹوک¾ç¤؛و–‡ن»¶ن¸‹è½½çڑ„é€ںه؛¦ه’ŒProgressBarè؟›ه؛¦ï¼Œه…±ن؛«ç»™ه¤§ه®¶ï¼پ و¬¢è؟ژوŒ‡ç‚¹وڈگè®® Email:vipa1888@163.com QQ 840950105 Author: spring sky