
转载自: http://tecadmin.net/install-elasticsearch-on-linux/#
Elasticsearch is flexible and powerful open source, distributed real-time search and analytic engine. Using a simple set of APIs, it provides the ability for full-text search. Elastic search is freely available under the Apache 2 license, which provides most flexibility.

This tutorial will help you to setup Elasticsearch single node cluster on CentOS, Red Hat, Ubuntu, Debian and LinuxMint systems.
1. Verify Java
Java is the primary requirement for installing Elasticsearch. So make sure you have Java installed on your system.
# java -version

java version "1.8.0_31"
Java(TM) SE Runtime Environment (build 1.8.0_31-b13)
Java HotSpot(TM) 64-Bit Server VM (build 25.31-b07, mixed mode)
If you don’t have Java installed on your system, use one of following link to install it first.
2. Download Elasticsearch Archive
Now download the latest Elasticsearch archive from its official download page. At the time of last update of this article Elasticsearch 2.3.1 version is latest version available to download.
$ /tmp
$ wget https://download.elastic.co/elasticsearch/elasticsearch/elasticsearch-2.3.1.tar.gz
Now extract downloaded Elasticsearch archive on your system.
$ tar xzf elasticsearch-2.3.1.tar.gz
3. Configure Elasticsearch
Now we need to setup Elasticsearch cluster and node name. Elasticsearch uses “elasticsearch” as default cluster name, We recommend to change it as per your setup.
$ mv elasticsearch-2.3.1 /usr/share/elasticsearch
$ cd /usr/share/elasticsearch
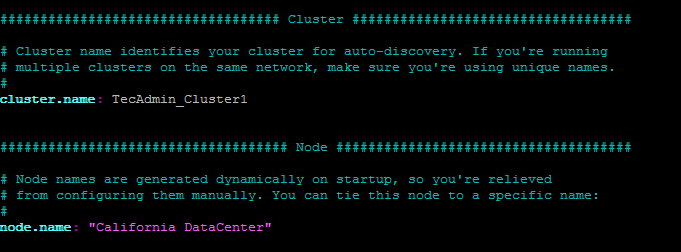
To change cluster named edit config/elasticsearch.yml file and update following values. Node names are dynamically generated, but to keep a fixed user-friendly name change it also. You may also need to change network host to access elasticsearch from remote hosts.
$ vim config/elasticsearch.yml
  network.host: 192.168.10.100
  cluster.name: TecAdmin_Cluster1
  node.name: "California DataCenter"
4. Install Elasticsearch-Head Plugin
elasticsearch-head is a web front end for browsing and interacting with an Elastic Search cluster. Use the following command to install it.
$ bin/plugin install mobz/elasticsearch-head
5. Starting Elasticsearch Cluster
As the Elasticsearch setup is completed. Let the start Elasticsearch cluster using following command.
$ ./bin/elasticsearch &
6. Verify Setup
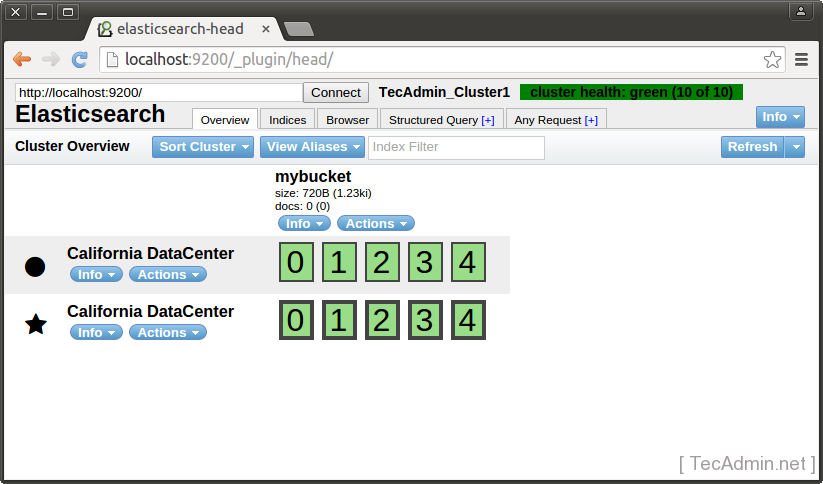
You have all done, just need to verify setup. Elasticsearch works on port default port 9200, open your browser to point your server on port 9200, You will find some thing like below output
http://localhost:9200/_plugin/head/
http://svt1.tecadmin.net:9200/

7. Basic Examples of Elasticsearch Uses
Following examples will help you to add, fetch and search data in Elasticsearch cluster.
Creating Bucket
curl -XPUT http://localhost:9200/mybucket
Output:
{"acknowledged":true}
Adding Data to Elasticsearch
Use following commands to add some data in Elasticsearch.
Command 1:
curl -XPUT 'http://localhost:9200/mybucket/user/johny' -d '{ "name" : "Rahul Kumar" }'
Output:
{"_index":"mybucket","_type":"user","_id":"johny","_version":1,"created":true}
Command 2:
curl -XPUT 'http://localhost:9200/mybucket/post/1' -d '
{
    "user": "Rahul",
    "postDate": "01-15-2015",
    "body": "This is Demo Post 1 in Elasticsearch" ,
    "title": "Demo Post 1"
}'
Output:
{"_index":"mybucket","_type":"post","_id":"1","_version":1,"created":true}
Command 3:
curl -XPUT 'http://localhost:9200/mybucket/post/2' -d '
{
    "user": "TecAdmin",
    "postDate": "01-15-2015",
    "body": "This is Demo Post 2 in Elasticsearch" ,
    "title": "Demo Post 2"
}'
Output:
{"_index":"mybucket","_type":"post","_id":"2","_version":1,"created":true}
Fetching Data from Elasticsearch
Use following command to GET data from ElasticSearch and read the output.
curl -XGET 'http://localhost:9200/mybucket/user/johny?pretty=true'
curl -XGET 'http://localhost:9200/mybucket/post/1?pretty=true'
curl -XGET 'http://localhost:9200/mybucket/post/2?pretty=true'
Searching in Elasticsearch
Use following command to search data from elastic search. Below command will search all data associated with user johny.
curl 'http://localhost:9200/mybucket/post/_search?q=user:TecAdmin&pretty=true'
Output:
{
  "took" : 145,
  "timed_out" : false,
  "_shards" : {
    "total" : 5,
    "successful" : 5,
    "failed" : 0
  },
  "hits" : {
    "total" : 1,
    "max_score" : 0.30685282,
    "hits" : [ {
      "_index" : "mybucket",
      "_type" : "post",
      "_id" : "2",
      "_score" : 0.30685282,
      "_source":
{
    "user": "TecAdmin",
    "postDate": "01-15-2015",
    "body": "This is Demo Post 2 in Elasticsearch" ,
    "title": "Demo Post 2"
}
    } ]
  }
}
Congratulation’s! You have successfully configured elasticsearch single node cluster on your Linux system.


相关推荐
CentOS 7 Elasticsearch 服务开机自启配置 CentOS 7 操作系统中,Elasticsearch 服务默认不能以 root 用户身份启动,因此需要创建一个新的用户来启动 Elasticsearch 服务。下面将详细介绍如何配置 Elasticsearch ...
[elastic@elastic ~]$ /usr/local/elastic_node1/bin/elasticsearch-plugin install xpack ``` 然后,我们需要配置 xpack 插件。 ``` [elastic@elastic ~]$ vim /usr/local/elastic_node1/config/elasticsearch.yml ...
npm install path/to/elasticsearch_node ``` 这里的 `path/to/elasticsearch_node` 是你下载的 `elasticsearch_node` 包的路径。 ### 2. 使用 `elasticsearch_node` 模块 在 `app.js` 文件中,首先需要引入 `...
You will then see how to install and configure ElasticSearch and the ElasticSearch monitoring plugins. Then, you will proceed to install and use the Marvel dashboard to monitor ElasticSearch. You ...
This book will be your hands-on guide as you explore and put to use the features of Elasticsearch 5.0. You will install and set up Elasticsearch and its related plugins, and handle documents using ...
一键安装elasticsearch脚本,Elasticsearch 是位于 Elastic Stack 核心的分布式搜索和分析引擎。Logstash 和 Beats 有助于收集、聚合和丰富您的数据并将其存储在 Elasticsearch 中。Kibana 使您能够以交互方式探索、...
Elasticsearch 配置文件是集群的核心配置文件,主要包括 cluster.name、node.name、path.data 等配置项。不同的节点需要不同的配置文件,例如 10.177.33.45 节点、10.177.33.46 节点和 10.177.33.47 节点。 知识点 ...
Monitor your Elasticsearch cluster's health, and diagnose and solve its performance and reliability issuesElasticSearch is a distributed search server similar to Apache Solr with a focus on large ...
### ElasticSearch 7.9.0在CentOS 7上的部署及配置详解 #### 一、环境准备与系统参数调整 在正式安装ElasticSearch之前,为了确保其能够正常运行,需要对Linux服务器进行必要的环境配置。特别是对于CentOS 7系统而...
1. **环境准备**: 首先确保你的系统支持Elasticsearch 7.x,通常Linux发行版如Ubuntu、CentOS是首选。安装Java运行环境(JDK 8或以上),因为Elasticsearch依赖Java。 2. **下载安装包**: 从官方网站获取Elastic...
**Node.js与Elasticsearch的官方Node.js客户端库** 在当今大数据时代,高效的数据存储、检索和分析变得至关重要。Elasticsearch作为一个强大的分布式搜索引擎,因其出色的表现和易用性而备受青睐。对于使用Node.js...
elasticsearch 全文搜索引擎在centOs8.x环境下 安装配置服务搭建
This course aims to create a smooth learning path that will teach you how to effectively use Elasticsearch with other de facto components and get the most out of Elasticsearch. Through this ...
* cluster.name: xxx-elasticsearch * node.name: node-1(三台服务器分别配置成 node-1、node-2、node-3) * path.data: /home/elasticsearch-6.5.3/data(存储路径,根据实际情况可调整) * network.host: 10.10....
**Elasticsearch 7.14 在 Linux (CentOS) 上的安装与配置** Elasticsearch 是一个开源的全文搜索引擎,被广泛应用于日志分析、实时监控、数据搜索等领域。版本 7.14 提供了多项性能优化和新功能,以提升搜索效率和...