首先在res/xml文件夹下建立preferences.xml
01
|
<?xmlversion="1.0"encoding="utf-8"?>
|
02
|
<PreferenceScreenxmlns:android="http://schemas.android.com/apk/res/android">
|
04
|
<PreferenceCategoryandroid:title="inline_preferences">
|
07
|
android:key="checkbox_preference"
|
08
|
android:summary="summary_toggle_preference"
|
09
|
android:title="title_toggle_preference"/>
|
12
|
<PreferenceCategoryandroid:title="dialog_based_preferences">
|
15
|
android:dialogTitle="dialog_title_edittext_preference"
|
16
|
android:key="edittext_preference"
|
17
|
android:summary="summary_edittext_preference"
|
18
|
android:title="title_edittext_preference"/>
|
21
|
android:dialogTitle="dialog_title_list_preference"
|
22
|
android:entries="@array/entries_list_preference"
|
23
|
android:entryValues="@array/entryvalues_list_preference"
|
24
|
android:key="list_preference"
|
25
|
android:summary="summary_list_preference"
|
26
|
android:title="title_list_preference"/>
|
29
|
<PreferenceCategoryandroid:title="launch_preferences">
|
32
|
android:key="screen_preference"
|
33
|
android:summary="summary_screen_preference"
|
34
|
android:title="title_screen_preference">
|
37
|
android:key="next_screen_checkbox_preference"
|
38
|
android:summary="summary_next_screen_toggle_preference"
|
39
|
android:title="title_next_screen_toggle_preference"/>
|
43
|
android:summary="summary_intent_preference"
|
44
|
android:title="title_intent_preference">
|
47
|
android:action="android.intent.action.VIEW"
|
48
|
android:data="http://www.android.com"/>
|
52
|
<PreferenceCategoryandroid:title="preference_attributes">
|
55
|
android:key="parent_checkbox_preference"
|
56
|
android:summary="summary_parent_preference"
|
57
|
android:title="title_parent_preference"/>
|
60
|
android:dependency="parent_checkbox_preference"
|
61
|
android:key="child_checkbox_preference"
|
62
|
android:layout="?android:attr/preferenceLayoutChild"
|
63
|
android:summary="summary_child_preference"
|
64
|
android:title="title_child_preference"/>
|
然后在代码中加载preferences.xml
1
|
publicclassMyPreferenceActivityextendsPreferenceActivity
{
|
2
|
/**
 Called when the activity is first created. */
|
4
|
publicvoidonCreate(Bundle
savedInstanceState) {
|
5
|
super.onCreate(savedInstanceState);
|
6
|
addPreferencesFromResource(R.xml.preferences);
|
这样就创建了从xml加载preferences的默认的PreferenceActivity。
在加载了preferences.xml的PreferenceActivity中,a top-levelpreference是一个PreferenceScreen,可用getPreferenceScreen()获取。PreferenceScreen和PreferenceCategory继承自PreferenceGroup,它们可以包含一个或多个PreferenceScreen,PreferenceCategory或者是具体的preference(如EditTextPreference、CheckBoxPreference)。由于PreferenceScreen,PreferenceCategory,EditTextPreference等都是继承自Preference,因此可以通过setLayoutResource()方法设置自己的布局样式。下面将遍历所有Preference,并设置自己的样式,代码如下:
01
|
privatevoidsetLayoutResource(Preference
preference) {
|
02
|
if(preferenceinstanceofPreferenceScreen)
{
|
03
|
PreferenceScreen
 ps = (PreferenceScreen) preference;
|
04
|
ps.setLayoutResource(R.layout.preference_screen);
|
05
|
intcnt
= ps.getPreferenceCount();
|
06
|
for(inti
=0;
i < cnt; ++i) {
|
07
|
Preference
 p = ps.getPreference(i);
|
10
|
}elseif(preferenceinstanceofPreferenceCategory)
{
|
11
|
PreferenceCategory
 pc = (PreferenceCategory) preference;
|
12
|
pc.setLayoutResource(R.layout.preference_category);
|
13
|
intcnt
= pc.getPreferenceCount();
|
14
|
for(inti
=0;
i < cnt; ++i) {
|
15
|
Preference
 p = pc.getPreference(i);
|
19
|
preference.setLayoutResource(R.layout.preference);
|
1
|
PreferenceScreen
 preferenceScreen = getPreferenceScreen();
|
2
|
setLayoutResource(preferenceScreen);
|
preference_screen.xml
01
|
<?xmlversion="1.0"encoding="utf-8"?>
|
02
|
<LinearLayoutxmlns:android="http://schemas.android.com/apk/res/android"
|
03
|
android:layout_width="match_parent"
|
04
|
android:layout_height="wrap_content"
|
05
|
android:gravity="center_vertical"
|
06
|
android:minHeight="?android:attr/listPreferredItemHeight"
|
07
|
android:paddingRight="?android:attr/scrollbarSize">
|
10
|
android:id="@+android:id/icon"
|
11
|
android:layout_width="wrap_content"
|
12
|
android:layout_height="wrap_content"
|
13
|
android:layout_gravity="center"
|
14
|
android:src="@drawable/ic_launcher"/>
|
17
|
android:layout_width="wrap_content"
|
18
|
android:layout_height="wrap_content"
|
19
|
android:layout_marginBottom="6dip"
|
20
|
android:layout_marginLeft="15dip"
|
21
|
android:layout_marginRight="6dip"
|
22
|
android:layout_marginTop="6dip"
|
23
|
android:layout_weight="1">
|
26
|
android:id="@+android:id/title"
|
27
|
android:layout_width="wrap_content"
|
28
|
android:layout_height="wrap_content"
|
29
|
android:ellipsize="marquee"
|
30
|
android:fadingEdge="horizontal"
|
31
|
android:singleLine="true"
|
32
|
android:textAppearance="@android:style/TextAppearance.Large"
|
33
|
android:textColor="#FFFF1234"
|
37
|
android:id="@+android:id/summary"
|
38
|
android:layout_width="wrap_content"
|
39
|
android:layout_height="wrap_content"
|
40
|
android:layout_alignLeft="@android:id/title"
|
41
|
android:layout_below="@android:id/title"
|
43
|
android:textAppearance="@android:style/TextAppearance.Small"
|
44
|
android:textColor="#FF888888"/>
|
48
|
android:id="@+android:id/widget_frame"
|
49
|
android:layout_width="wrap_content"
|
50
|
android:layout_height="match_parent"
|
51
|
android:gravity="center_vertical"
|
52
|
android:orientation="vertical"/>
|
preference_category.xml
01
|
<?xmlversion="1.0"encoding="utf-8"?>
|
02
|
<LinearLayoutxmlns:android="http://schemas.android.com/apk/res/android"
|
03
|
android:layout_width="match_parent"
|
04
|
android:layout_height="wrap_content"
|
05
|
android:background="#FF123456"
|
06
|
android:gravity="center_vertical"
|
07
|
android:minHeight="?android:attr/listPreferredItemHeight"
|
08
|
android:paddingRight="?android:attr/scrollbarSize">
|
11
|
android:id="@+android:id/icon"
|
12
|
android:layout_width="wrap_content"
|
13
|
android:layout_height="wrap_content"
|
14
|
android:layout_gravity="center"
|
15
|
android:src="@drawable/ic_launcher"/>
|
18
|
android:layout_width="wrap_content"
|
19
|
android:layout_height="wrap_content"
|
20
|
android:layout_marginBottom="6dip"
|
21
|
android:layout_marginLeft="15dip"
|
22
|
android:layout_marginRight="6dip"
|
23
|
android:layout_marginTop="6dip"
|
24
|
android:layout_weight="1">
|
27
|
android:id="@+android:id/title"
|
28
|
android:layout_width="wrap_content"
|
29
|
android:layout_height="wrap_content"
|
30
|
android:ellipsize="marquee"
|
31
|
android:fadingEdge="horizontal"
|
32
|
android:singleLine="true"
|
33
|
android:textAppearance="@android:style/TextAppearance.Large"
|
34
|
android:textColor="#FFFF0000"/>
|
37
|
android:id="@+android:id/summary"
|
38
|
android:layout_width="wrap_content"
|
39
|
android:layout_height="wrap_content"
|
40
|
android:layout_alignLeft="@android:id/title"
|
41
|
android:layout_below="@android:id/title"
|
43
|
android:textAppearance="@android:style/TextAppearance.Small"
|
44
|
android:textColor="#FF00FF00"/>
|
48
|
android:id="@+android:id/widget_frame"
|
49
|
android:layout_width="wrap_content"
|
50
|
android:layout_height="match_parent"
|
51
|
android:gravity="center_vertical"
|
52
|
android:orientation="vertical"/>
|
preference.xml
01
|
<?xmlversion="1.0"encoding="utf-8"?>
|
02
|
<LinearLayoutxmlns:android="http://schemas.android.com/apk/res/android"
|
03
|
android:layout_width="match_parent"
|
04
|
android:layout_height="wrap_content"
|
05
|
android:gravity="center_vertical"
|
06
|
android:minHeight="?android:attr/listPreferredItemHeight"
|
07
|
android:paddingRight="?android:attr/scrollbarSize">
|
10
|
android:id="@+android:id/icon"
|
11
|
android:layout_width="wrap_content"
|
12
|
android:layout_height="wrap_content"
|
13
|
android:layout_gravity="center"/>
|
16
|
android:layout_width="wrap_content"
|
17
|
android:layout_height="wrap_content"
|
18
|
android:layout_marginBottom="6dip"
|
19
|
android:layout_marginLeft="15dip"
|
20
|
android:layout_marginRight="6dip"
|
21
|
android:layout_marginTop="6dip"
|
22
|
android:layout_weight="1">
|
25
|
android:id="@+android:id/title"
|
26
|
android:layout_width="wrap_content"
|
27
|
android:layout_height="wrap_content"
|
28
|
android:ellipsize="marquee"
|
29
|
android:fadingEdge="horizontal"
|
30
|
android:singleLine="true"
|
31
|
android:textAppearance="@android:style/TextAppearance.Medium"
|
32
|
android:textColor="#FF00FFFF"/>
|
35
|
android:id="@+android:id/summary"
|
36
|
android:layout_width="wrap_content"
|
37
|
android:layout_height="wrap_content"
|
38
|
android:layout_alignLeft="@android:id/title"
|
39
|
android:layout_below="@android:id/title"
|
41
|
android:textAppearance="@android:style/TextAppearance.Small"
|
42
|
android:textColor="#FFFFFF00"/>
|
46
|
android:id="@+android:id/widget_frame"
|
47
|
android:layout_width="wrap_content"
|
48
|
android:layout_height="match_parent"
|
49
|
android:gravity="center_vertical"
|
50
|
android:orientation="vertical"/>
|
下面介绍加顶部布局,其实也是添加加一个preference,通过preferenceScreen的addPreference添加。首先自定义一个PreferenceHead,布局中有一个返回按钮。
01
|
packagecom.preference.main;
|
03
|
importandroid.content.Context;
|
04
|
importandroid.preference.Preference;
|
05
|
importandroid.view.View;
|
06
|
importandroid.view.View.OnClickListener;
|
07
|
importandroid.widget.Button;
|
09
|
publicclassPreferenceHeadextendsPreference
{
|
11
|
privateOnClickListener
onBackButtonClickListener;
|
13
|
publicPreferenceHead(Context
context) {
|
15
|
setLayoutResource(R.layout.preference_head);
|
19
|
protectedvoidonBindView(View
view) {
|
20
|
super.onBindView(view);
|
21
|
Button
 btBack = (Button) view.findViewById(R.id.back);
|
22
|
btBack.setOnClickListener(newOnClickListener()
{
|
25
|
publicvoidonClick(View
v) {
|
26
|
if(onBackButtonClickListener
!=null)
{
|
27
|
onBackButtonClickListener.onClick(v);
|
33
|
publicvoidsetOnBackButtonClickListener(OnClickListener
onClickListener) {
|
34
|
this.onBackButtonClickListener
= onClickListener;
|
01
|
<?xml
version="1.0"encoding="utf-8"?>
|
02
|
<LinearLayout
 xmlns:android=
"http://schemas.android.com/apk/res/android"
|
03
|
android:layout_width="match_parent"
|
04
|
android:layout_height="60.0dip"
|
05
|
android:background="#8000FF00"
|
06
|
android:gravity="center_vertical">
|
09
|
android:id="@+id/back"
|
10
|
android:layout_width="wrap_content"
|
11
|
android:layout_height="wrap_content"
|
12
|
android:layout_margin="10.0dip"
|
然后在代码中实现
01
|
PreferenceHead
ph =newPreferenceHead(this);
|
02
|
ph.setOnBackButtonClickListener(newOnClickListener()
{
|
05
|
publicvoidonClick(View
v) {
|
10
|
preferenceScreen.addPreference(ph);
|
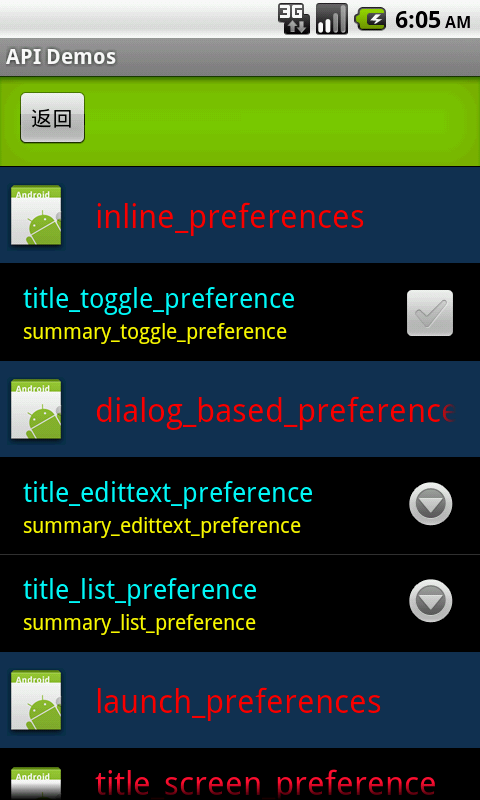
这样就完成了一个具有返回按钮的顶部布局的PreferenceActivity,效果图如下


分享到:


相关推荐
总的来说,自定义PreferenceActivity的样式和界面涉及到多个层次的工作,包括但不限于创建自定义布局、重写Preference的视图创建、应用主题和调整样式属性。通过这些方法,开发者可以打造出独具特色且易于使用的设置...
这可以通过创建自定义的主题或者重写`Preference`类的样式属性来实现,例如更改背景颜色、文字样式等。 5. **处理点击事件**:虽然`Preference`本身已经处理了大部分点击事件,但如果你想在用户点击某个设置项时...
- 在`SettingActivity`中,使用`setContentView()`加载布局,然后通过`findPreference()`找到对应的`Preference`实例,设置监听器或者修改属性。 - 如果使用`PreferenceFragmentCompat`,则在`SettingActivity`中...
很想做个天气预警的功能, 想用preferences来做界面。 看了很多preferences感觉定制性太差 所以自己做了一个。 应该是不错的demo 定制preferences在preferencesActivity中的布局 和自定义了对话框的布局
导语:PreferenceActivity是一个方便设置管理的界面,但是对于界面显示来说比较单调,所以自定义布局就很有必要了。本文举例说明在Preference中自定义layout的方法。笔者是为了在设置中插入@有米v4广告条才研究了一...
开发者可以通过XML布局文件定义一系列的`Preference`,然后在`PreferenceActivity`中加载这些配置。这些XML布局文件通常位于`res/xml`目录下,且遵循`PreferenceScreen`根节点的结构。例如,`PreferenceScreen`文件...
PreferenceActivity是Android系统中用于构建设置界面的一种特殊Activity,它简化了创建具有各种开关、选择器和输入字段的设置布局的过程。这篇博文可能是关于如何优化PreferenceActivity的UI,以提高用户体验和性能...
虽然Android 3.0(API级别11)之后推荐使用`PreferenceFragment`替代`PreferenceActivity`,但仍然可以通过自定义布局和重写方法来实现`PreferenceActivity`的高级定制。例如,可以覆盖`onCreateHeaderView`来创建...
在Android开发中,为应用程序创建自定义设置界面时,开发者经常会用到PreferenceActivity。这篇博客将深入探讨PreferenceActivity的使用方法和相关知识点。 首先,PreferenceActivity是Android SDK提供的一个基类,...
"仿IOS的PreferenceActivity界面"就是一个这样的实践,它主要涉及到Android的Preference类和Activity的使用,以及UI样式的美化。PreferenceActivity是Android系统提供的一种用于展示设置界面的特殊Activity,它能够...
`PreferenceActivity`是基于`ListActivity`的,它会自动解析XML布局文件中的`<Preference>`元素,并将它们展示为一个可交互的列表。开发者通常会在`res/xml`目录下创建一个包含设置项的XML文件,如`settings.xml`。 ...
3. **SwitchPreference**: 自Android 5.0(API级别21)开始引入,SwitchPreference提供了更现代的开关样式。它与CheckBoxPreference类似,但提供了滑动开关的视觉效果。在XML中,使用(对于兼容库)或<Switch...
标题与描述均提及了《Android中PreferenceActivity详解》,这一主题涉及了Android开发中关于用户偏好设置的核心组件——PreferenceActivity的深入解析。以下是基于标题、描述、标签以及部分内容的关键知识点总结,...
它允许开发者使用XML文件来定义界面布局,然后在代码中将这些布局与功能关联起来,方便地实现设置项的保存和读取。 首先,让我们深入理解PreferenceActivity的工作原理。PreferenceActivity会解析一个或多个XML资源...
`PreferenceActivity`继承自`ListActivity`,它会自动将`Preference` XML布局文件中的各项偏好转化为可点击的列表项。这种活动类型非常适合用于创建应用的设置界面,因为它提供了标准的UI元素,如开关、单选按钮、复...
PreferenceActivity用法简介 Android X
描述中提到的博客链接(已省略)可能详细介绍了如何使用`PreferenceActivity`创建自定义设置页面的步骤和技巧。通常,这个过程包括以下几个关键步骤: 1. **创建Preference XML**:首先,你需要在项目的res/xml目录...
首先,`PreferenceActivity`是Android框架的一部分,它继承自`ListActivity`,并提供了处理`<preference>` XML布局文件的能力。这些XML文件通常放在`res/xml`目录下,包含了用户界面的各个设置项定义。例如,一个...