Picture
| Time Limit: 2000MS | Memory Limit: 10000K | |
| Total Submissions: 10229 | Accepted: 5421 |
Description
A number of rectangular posters, photographs and other pictures of the same shape are pasted on a wall. Their sides are all vertical or horizontal. Each rectangle can be partially or totally covered by the others. The length of the boundary of the union of all rectangles is called the perimeter.
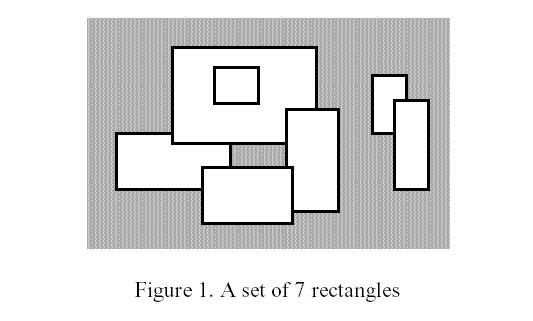
Write a program to calculate the perimeter. An example with 7 rectangles is shown in Figure 1.

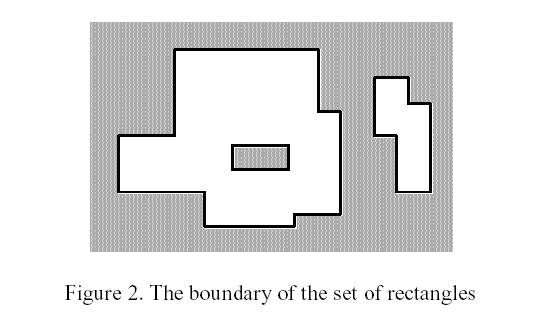
The corresponding boundary is the whole set of line segments drawn in Figure 2.

The vertices of all rectangles have integer coordinates.
Write a program to calculate the perimeter. An example with 7 rectangles is shown in Figure 1.

The corresponding boundary is the whole set of line segments drawn in Figure 2.

The vertices of all rectangles have integer coordinates.
Input
Your program is to read from standard input. The first line contains the number of rectangles pasted on the wall. In each of the subsequent lines, one can find the integer coordinates of the lower left vertex and the upper right vertex of each rectangle. The values of those coordinates are given as ordered pairs consisting of an x-coordinate followed by a y-coordinate.
0 <= number of rectangles < 5000
All coordinates are in the range [-10000,10000] and any existing rectangle has a positive area.
0 <= number of rectangles < 5000
All coordinates are in the range [-10000,10000] and any existing rectangle has a positive area.
Output
Your program is to write to standard output. The output must contain a single line with a non-negative integer which corresponds to the perimeter for the input rectangles.
Sample Input
7
-15 0 5 10
-5 8 20 25
15 -4 24 14
0 -6 16 4
2 15 10 22
30 10 36 20
34 0 40 16
Sample Output
228
题意:
给出 N(0 ~ 5000)个矩形,后给出每个矩形的左下坐标和右上坐标。所有的矩形给出之后,会有一个覆盖的轮廓,求出这个轮廓的周长。
思路:
线段树 + 扫描线 + 离散化。lc 维护左端点是否被覆盖,rc 维护右端点是否被覆盖,len 维护覆盖的长度,num 代表一共覆盖的顶点数, cover 代表覆盖区间的次数。将一个矩形的左竖边标记为 1,右竖边标记为 -1,注意算横边的时候,是用原来的 num 覆盖顶点数来算。之后再插入新的纵边,再查询总长 len 后,res +=( len - 上一次的 len)。注意更新 len 的时候,是更新离散化前的长度值。标记要用 += 值来标记,而不能直接用 1 或者 -1 来替换区间,因为可能会有一个区间被覆盖了两次的可能,比如样例:
2
5 1 10 2
6 1 15 2
如果直接用 1 或者 -1 覆盖得出的答案是 12,若用 += 的话则才是正确答案 22。
观察 push_up 函数:
void push_up (int node, int l, int r) {
        if (cover[node]) {
                len[node] = yy[r] - yy[l];
                lc[node] = rc[node] = 1;
                num[node] = 2;
                //代表这个区间被覆盖
        } else if (r - l == 1) {
                len[node] = lc[node] =
                rc[node] = num[node] = 0;
                //这个区间不被覆盖,且又是叶子节点
        } else {
                len[node] = len[node << 1] + len[node << 1 | 1];
                lc[node] = lc[node << 1];
                rc[node] = rc[node << 1 | 1];
                num[node] = num[node << 1] + num[node << 1 | 1];
                if (rc[node << 1] && lc[node << 1 | 1]) num[node] -= 2;
                //这个区间不被覆盖,且不是叶子节点
        }
}
AC:
#include <cstdio>
#include <cstring>
#include <algorithm>
#include <cmath>

using namespace std;

const int MAX = 20005;

typedef struct {
        int x, y1, y2, temp;
} node;

node line[5005 * 2];
int yy[MAX];

int lc[MAX * 3], rc[MAX * 3], cover[MAX * 3];
int len[MAX * 3], num[MAX * 3];

bool cmp (node a, node b) {
        if (a.x != b.x) return a.x < b.x;
        return a.temp > b.temp;
}

void push_up (int node, int l, int r) {
        if (cover[node]) {
                len[node] = yy[r] - yy[l];
                lc[node] = rc[node] = 1;
                num[node] = 2;
        } else if (r - l == 1) {
                len[node] = lc[node] =
                rc[node] = num[node] = 0;
        } else {
                len[node] = len[node << 1] + len[node << 1 | 1];
                lc[node] = lc[node << 1];
                rc[node] = rc[node << 1 | 1];
                num[node] = num[node << 1] + num[node << 1 | 1];
                if (rc[node << 1] && lc[node << 1 | 1]) num[node] -= 2;
        }
}

void build (int node, int l, int r) {

        if (r - l == 1) {
                cover[node] = 0;
                lc[node] = rc[node] =
                len[node] = num[node] = 0;
        } else {
                int mid = (r + l) >> 1;
                build(node << 1, l, mid);
                build(node << 1 | 1, mid, r);
                push_up(node, l, r);
                cover[node] = 0;
        }
}

void updata (int node, int l, int r, int cl, int cr, int c) {

        if (cl > r || cr < l) return;
        if (cl <= l && cr >= r) {
                cover[node] += c;
                push_up(node, l, r);
                return;
        }
        if (r - l == 1) return;

        int mid = (r + l) >> 1;
        updata(node << 1, l, mid, cl, cr, c);
        updata(node << 1 | 1, mid, r, cl, cr, c);
        push_up(node, l, r);
}

int main () {
        int t;

        while (~scanf("%d", &t)) {

                int n = 0, ans = 0;
                while (t--) {
                        int x1, y1, x2, y2;
                        scanf("%d%d%d%d", &x1, &y1, &x2, &y2);
                        line[n].x = x1;
                        line[n].y1 = y1;
                        line[n].y2 = y2;
                        line[n++].temp = 1;

                        line[n].x = x2;
                        line[n].y1 = y1;
                        line[n].y2 = y2;
                        line[n++].temp = -1;

                        yy[ans++] = y1;
                        yy[ans++] = y2;
                }

                sort(line, line + n, cmp);

                sort(yy, yy + ans);
                ans = unique(yy, yy + ans) - yy;

                build(1, 0, ans - 1);
                int res = 0, last = 0;
                for (int i = 0; i < n; ++i) {
                        int cl = lower_bound(yy, yy + ans, line[i].y1) - yy;
                        int cr = lower_bound(yy, yy + ans, line[i].y2) - yy;

                        if(i) res += num[1] * (line[i].x - line[i - 1].x);

                        updata(1, 0, ans - 1, cl, cr, line[i].temp);
                        res += abs(len[1] - last);

                        last = len[1];

                }

                printf("%d\n", res);
        }

        return 0;
}


相关推荐
- Atlantis(1151):经典的扫描线求矩形面积交,通过离散化和线段树实现。 - Picture(1177):要求求解矩形周长的并,需要维护线段树中的多个信息。 - K-th Number(2155):使用线段树维护归并排序树,并采用...
这是我昨天刚实现的,之前在csdn上找了很多资料,但没找到在picture控件中绘制鼠标坐标和移动的,我在集结了他们的后实现了这个,其中还有我的txt文档,集结了很多网上博客论坛里的重要相关注意事项。和我一样的菜鸟...
FANUC PICTURE是FANUC数控系统中的一个重要组成部分,它提供了一个直观的图形化环境,使得操作人员能够更加便捷地与数控设备交互。系统的主要特点包括: 1. **图形化编程**:用户可以通过拖放方式创建和编辑PLC程序...
该对话框是我学习MFC时老师给我布置的第一个任务,个人认为对于新手具有一定的参考价值,其中主要是熟悉各种常用控件的使用(包含八种控件)、定时器的使用以及在Picture Control中动态画正弦曲线。
如果我们要在Picture控件的中心画出两条交叉的分割线,即十字线,可以利用MFC的图形设备接口(GDI)来实现。GDI是Windows API的一部分,它提供了丰富的图形绘制功能。下面我们将详细探讨如何实现这个功能。 首先,...
"kongzhi_picture database"表明存在一个图片数据库,用于存储扫描后的图像数据。描述中的“扫描仪”和“扫描”功能暗示这是一个能够通过物理扫描设备获取图像的软件。 首先,我们来深入理解ActiveX控件“EasyScan....
FANUC PICTURE,全称为Programmable Interface for Numerical Control Picture,是FANUC公司开发的一种图形化编程语言,主要用于工业机器人的控制和自动化设备的操作界面设计。在无心磨削领域,FANUC PICTURE的应用...
OpenGL是一种强大的图形编程接口,广泛应用于游戏开发、科学可视化、3D建模等领域。在Microsoft Foundation Class (MFC) 库中,我们可以利用MFC的对话框类来创建用户界面,而Picture控件则用于显示图像。本篇将详细...
将opencv中的Mat格式的图片显示在mfc中的picture控件上,该程序已经被放在了一个函数中间,只需调用该函数ShowMatImgToWnd(CWnd* pWnd, cv::Mat img)就可以将所需的图片显示在picture控件上了,其中CWnd* pWnd参数中...
《FANUC Picture v4.7:工业自动化的人机交互界面设计》 FANUC Picture v4.7是一款由FANUC公司推出的图形化编程软件,专为在操作面板上创建和编辑用户界面(UI)而设计。这款软件在工业自动化领域广泛应用,尤其在...
《深入探索VS2019中的PictureControl控件在MFC应用中的实现》 在Microsoft Visual Studio 2019(VS2019)环境下,MFC(Microsoft Foundation Classes)是一个强大的C++库,用于构建Windows应用程序。在这个库中,...
在Microsoft Foundation Classes (MFC)框架中,Picture控件通常被用来显示图像,它是一个CStatic派生的类。在本教程中,我们将探讨如何在使用Visual Studio 2017开发MFC应用程序时,为Picture控件添加鼠标响应事件,...
在对话框的初始化函数(通常是`OnInitDialog()`)中,可以通过以下方式设置: ```cpp // 获取图片控件的指针 CStatic* pPicCtrl = (CStatic*)GetDlgItem(IDC_PICTURECTRL); // IDC_PICTURECTRL是控件ID // 添加SS_...
在本文中,我们将深入探讨如何在Visual Studio 2008环境下,利用MFC(Microsoft Foundation Classes)的Picture控件来显示图像和视频,并结合OpenCV 2.0库进行图像处理,以及如何捕获摄像头画面。以下是实现这些功能...
在iOS9中引入的“画中画”(Picture in Picture, 简称PIP)功能,是一项创新的多任务处理技术,旨在提升用户在使用iPhone或iPad时的体验。这项功能允许用户在进行视频播放的同时,继续使用其他应用程序,极大地提高...
(VS2008+OpenCV2.0)利用MFC的Picture控件显示图像和视频摄像头画面,后面又添加了播放视频和捕获摄像头画面的功能,其中播放视频的功能只有 'Play' 和 'Stop',不能实现暂停,可供初学者学习参考。
在Microsoft Visual C++ 6.0(简称VC6)中,Picture控件是一个非常实用的组件,它允许程序员在应用程序中方便地显示图像。这个控件的使用大大简化了图形界面的设计,使得开发者无需深入研究复杂的图形编程即可实现...
在 MFC 编程中,获取 Picture 控件的鼠标点击坐标位置是一项常见的需求,特别是在自定义 Dialog 中加入了 Picture 控件的情况下。以下将详细介绍如何获取 Picture 控件的鼠标点击坐标位置。 首先,需要重载 CDialog...