一、关于mongodb
| MongoDB是一个基于分布式文件存储的数据库。由C++语言编写。旨在为WEB应用提供可扩展的高性能数据存储解决方案。 MongoDB是一个介于关系数据库和非关系数据库之间的产品,是非关系数据库当中功能最丰富,最像关系数据库的。他支持的数据结构非常松散,是类似json的bjson格式,因此可以存储比较复杂的数据类型。Mongo最大的特点是他支持的查询语言非常强大,其语法有点类似于面向对象的查询语言,几乎可以实现类似关系数据库单表查询的绝大部分功能,而且还支持对数据建立索引。 |
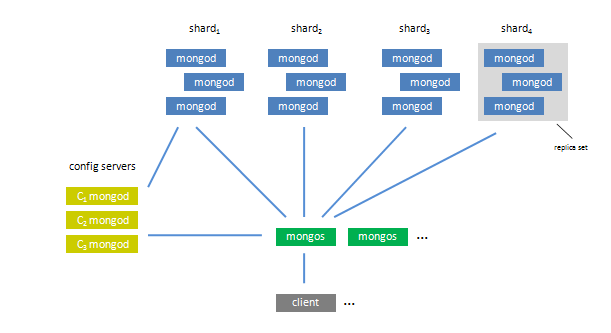
二、mongodb分布式应用原理
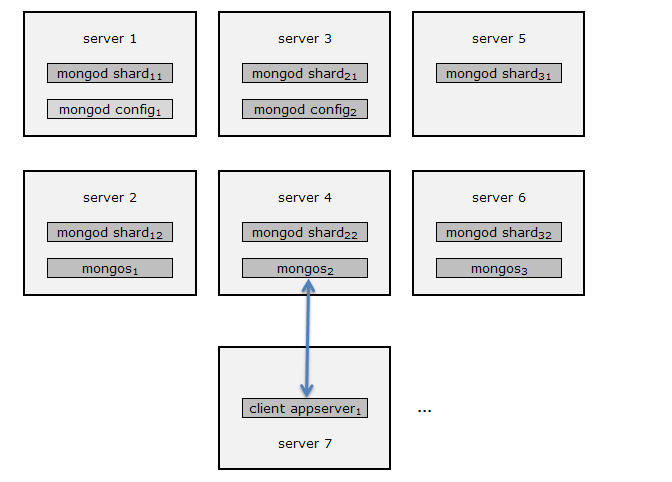
三、mongodb分布式部署方式
| 当然也有其他的方案,比如把mongos部署在所有的mongod(server1-6)上,又或者在每个运用服务器(server7)上部署mongos。这样部署有个好处在于,appserver和mongos之间的通信建立在localhost interface上,减少了通信成本。当然,此乃官方说法,但本人有想法,尽管减少了appserver和mongos之间的通信成本,但mongos与mongod之间的通信成本却增加了,而且把mongos部署在appserver上并不是很利于sa管理,mongoDB应该是一个相对独立的系统,与应用的耦合度应该尽量降到最低,万一应用想要换数据库,也能多少减少些工作量。 |
-
wget http://fastdl.mongodb.org/linux/mongodb-linux-x86_64-2.0.4.tgz
-
tar zxvf mongodb-linux-2.0.4.tgz
-
cp -fr mongodb-linux-*2.0.4/* /data/mongodb/
-
mkdir -p /data/mongodb/data/ #创建数据存储目录
-
mkdir -p /data/mongodb/log/ #创建日志存储目录
-
mkdir -p /data/mongodb/config/ #创建配置存储目录
-
mkdir -p /data/mongodb/arbiter/ #创建仲裁节点存储目录
-
mongod --fork --bind_ip 127.0.0.1 --port 11811 --dbpath /data0/mongodb/data --directoryperdb --logpath /data0/mongodb/log/db1.log --logappend --nohttpinterface
-
netstat -ntlp|grep mongod
-
简单的参数说明:
-
–logpath 日志文件路径
-
–master 指定为主机器
-
–slave 指定为从机器
-
–source 指定主机器的IP地址
-
–pologSize 指定日志文件大小不超过64M.因为resync是非常操作量大且耗时,最好通过设置一个足够大的oplogSize来避免resync(默认的 oplog大小是空闲磁盘大小的5%)。
-
–logappend 日志文件末尾添加
-
–port 启用端口号
-
–fork 在后台运行
-
–only 指定只复制哪一个数据库
-
–slavedelay 指从复制检测的时间间隔
-
–auth 是否需要验证权限登录(用户名和密码)
-
–noauth 不需要验证权限登录(用户名和密码)
-
1.Shard分片--
-
第一组分片
-
192.168.200.226:
-
/data/mongodb/bin/mongod --replSet rep1 --fork --port 11813 --maxConns 65535 --dbpath /data/mongodb/data --directoryperdb --logpath /data/mongodb/log/db.log --logappend --nohttpinterface
-
#启动rep1分片的一个数据节点
-
/data/mongodb/bin/mongos --configdb 192.168.201.226:11812 --port 11811 --fork --chunkSize 256 --logpath /data/mongodb/log/ms.log #启动路由节点,读取201.226上的配置节点的配置文件,(在配置节点启动后启动)
-
/data/mongodb/bin/mongod --replSet rep1 --fork --port 11814 --dbpath /data/mongodb/arbiter --directoryperdb --logpath /data/mongodb/log/arbiter.log --logappend --nohttpinterface
-
#启动分片的仲裁节点
-
192.168.201.226:
-
/data/mongodb/bin/mongod --replSet rep1 --fork --port 11813 --maxConns 65535 --dbpath /data/mongodb/data --directoryperdb --logpath /data/mongodb/log/db.log --logappend --nohttpinterface
-
#启动rep1分片的第二个数据节点
-
/data/mongodb/bin/mongos --configdb 192.168.201.226:11812 --port 11811 --fork --chunkSize 256 --logpath /data/mongodb/log/ms.log
-
#启动第二个路由节点 (在配置节点启动后启动)
-
2.ConfigServer---
-
#启动config server
-
192.168.201.226:
-
/data/mongodb/bin/mongod --configsvr --dbpath /data/mongodb/config --port 11812 --fork --logpath /data/mongodb/log/mc.log
-
#启动配置节点,注意配置节点应该优先启动,不然路由节点读取不到配置节点信息则会启动失败。
-
3.Mongos路由---
-
#启动mongos,指定config server, chunkSize 256M
-
192.168.201.226:
-
/data/mongodb/bin/mongos --configdb 192.168.201.226:11812 --port 11811 --fork --chunkSize 256 --logpath /data/mongodb/log/ms.log
-
#启动路由节点
-
4.配置replSet: 连接任一mongod members
-
mongo 192.168.201.226:11813
-
config = {_id: 'rep1', members: [
-
{_id: 0, host: '192.168.200.226:11813', priority: 2}, #priority 为定义优先级,默认为1,高优先级会被认为是主节点优先启用。
-
{_id: 1, host: '192.168.201.226:11813'},
-
{_id: 2, host: '192.168.200.226:11814', arbiterOnly: true}]
-
}
-
rs.initiate(config);
-
rs.status()
-
5.连接mongos增加shard 80G
-
mongo 192.168.201.226:11811/admin
-
show dbs
-
use admin
-
db.runCommand({addshard:'rep1/192.168.201.226:11813,192.168.200.226:11813',maxsize:81920})
-
db.runCommand({listshards:1})
-
6.连接mongos增加创建test库和c1集合,并测试
-
mongo 192.168.201.226:11811/admin
-
db.runCommand({enablesharding:'test'})
-
printShardingStatus()
-
db.runCommand({shardcollection:'test.auto_increment_id', key:{_id:1}, unique : true})
-
db.runCommand({shardcollection:'test.c1', key:{_id:1}, unique : true})
-
for (var i = 1; i <= 100; i++)db.c1.save({id:i,value1:"1234567890",value2:"1234567890",value3:"1234567890",value4:"1234567890"})
-
db.c1.stats()
-
db.createCollection("cap_coll", {capped:true, size:100000, max:100});
-
db.mycoll.validate();
-
-
7.检查: db.printCollectionStats()
-
-
8.管理: mongo 127.0.0.1:11811
-
show dbs
-
use admin
-
show collections
-
db.serverStatus()
-
db.shutdownServer()
-
exit
-
9.索引:
-
db.product_data.ensureIndex({data_id: 1}, {unique: true,dropDups: true}); #创建索引
-
db.product_data.dropIndexes(); #删除索引
| 至此,mongodb的分布式架构就架起来了,并且通过测试和log的分析,可看服务是否正常,下面就需要php客户端的支持,和程序的运行,之后加到监控里,就可以在线上部署使用了。 |
-
# wget http://pecl.php.net/get/mongo-1.2.6.tgz
-
# tar zxvf mongo-1.2.6.tgz
-
# cd mongo-1.2.6
-
# /usr/local/php5/bin/phpize
-
# ./configure --enable-mongo=share--with-php-config=/usr/local/php5/bin/php-config
-
# make && make installl
-
将生成的拓展mongo.so文件添加到php.ini中,重启php-fpm,或者apache,然后查看下phpinfo()
-
请编辑php.ini文件。添加如下一行:
-
extension=mongo.so
-
然后用php输出:phpinfo,就可以看到mongo的信息了。。这样就说明你安装成功的了!
-
ssh-keygen ##如果是root用户,生成的默认目录为/root/.ssh下2个文件id_rsa(公钥) id_rsa.pub(私钥)
-
cd /root/.ssh/ && chmod 600 id_rsa* 把这2个文件修改权限,为600
-
ssh-copy-id -i /root/.ssh/id_rsa root@192.168.200.1 #加被监控节点公私钥认证
-
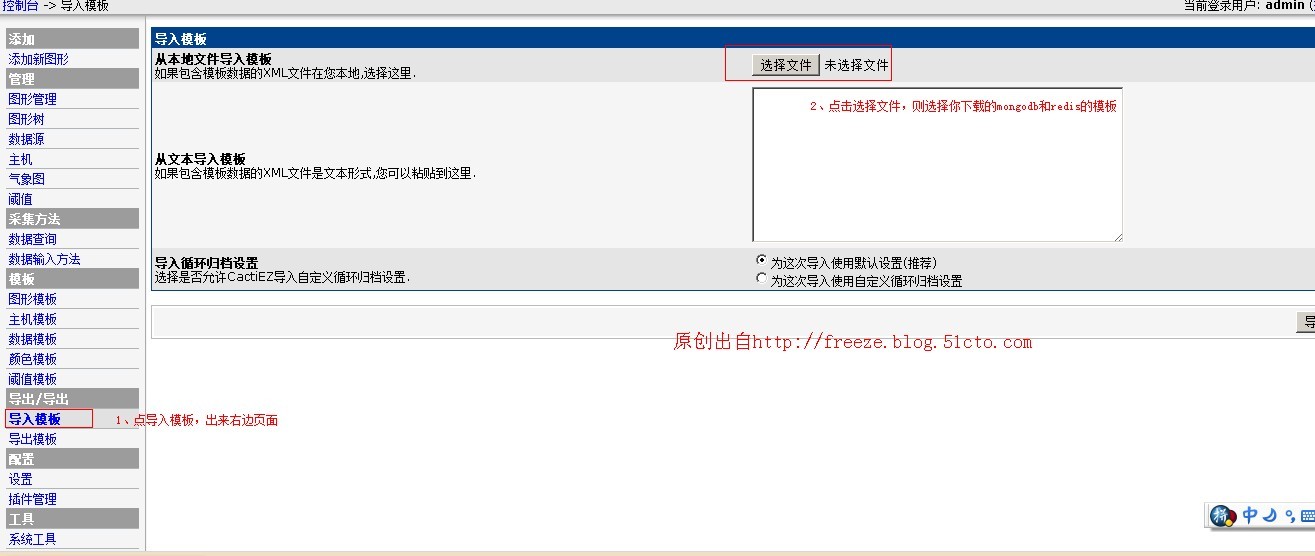
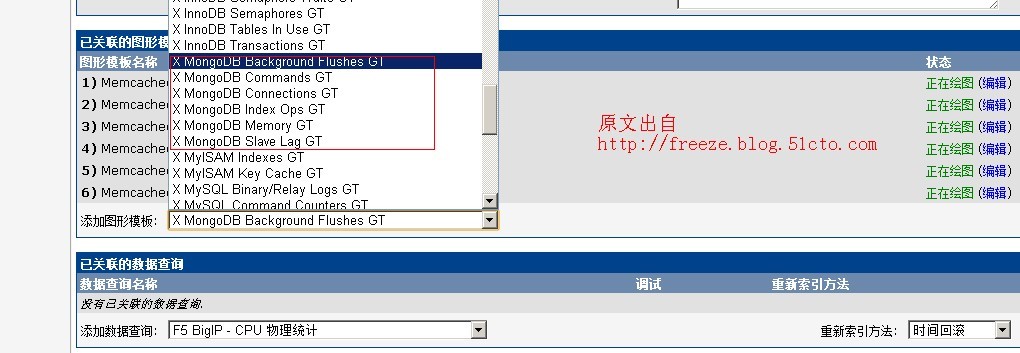
mongodb或redis的监控所需到的是你下载目录中的better-cacti-templates-1.1.8\scripts下的
-
ss_get_by_ssh.php 这个脚本 这个脚本需要放在cacti的服务端。
-
如果你cacti是装到/var/www/html/cacti/目录下。
-
把该文件放在其下面的scripts目录下。别忘了看下权限。要有执行权限。
-
# ============================================================================
-
$ssh_user = 'root'; # SSH username
-
$ssh_port = 22; # SSH port
-
$ssh_iden = '-i /root/.ssh/id_rsa'; # SSH identity
-
##修改根据你的配置,你的ssh连接用户,还有认证私钥的位置。
-
$memcache_port = 11211; # Which port memcached listens on
-
$redis_port = 6379; # Which port redis listens on
-
function mongodb_cmdline ( $options ) {
-
return “echo \”db._adminCommand({serverStatus:1, repl:1})\” | /usr/local/mongo/mongodb/bin/mongo –port 10000″;
-
}
-
php /var/www/html/scripts/ss_get_by_ssh.php --type mongodb --host 192.168.200.1 --items c,de,df,dg,dh,di,dj,dk,dl,dm,dn,do,dp,dq,dr,ds,dt,du
第一节 准备工作
一 安装mongodb
我这里选用rehl 5.6作为其运行载体。
1. 下载mongodb的linux版本(注意32位和64位的区别),下载地址:http://www.mongodb.org/downloads
# wget http://fastdl.mongodb.org/linux/mongodb-linux-x86_64-2.0.4.tgz
2. 将下载的mongodb安装文件 mongodb-linux-x86_64-2.0.4.tgz 放到/usr/local/下
3. 解压
# tar -zxvf mongodb-linux-x86_64-2.0.4.tgz
重命名
# mv mongodb-linux-x86_64-2.0.4 /usr/local/mongodb
4. 创建数据库文件目录, # mkdir -p /data/mongodb,我把数据库文件目录放在当前文件夹下,# mkdir -p data/db,创建日志目录 #mkdir -p log
二 启动
首先用命令进入到bin目录下:cd /usr/local/mongodb/bin
方式一:直接运行命令启动
./mongod –port 10000 –fork –logpath= logpath=/data/mongodb/log/mongodb.log -- logappend -- dbpath=/data/mongodb/data/db
方式二:通过配置文件方式启动(推荐)。
1.在服务器上新建mongodb.conf配置文件(建议用命令生成,放在mongodb同一个目录下)
内容为:
port=10000 #端口号
fork=true #以守护进程的方式运行,创建服务器进程
#master=true #单主从配置时设为主服务器
#salve=true ##单主从配置时设为从服务器
logpath=/data/mongodb/log/mongodb.log #日志输出文件路径
logappend=true #日志输出方式
dbpath=/data/mongodb/data/db #数据库路径
replSet=blort #设置富本集的名字
shardsvr=true #设置是否分片
2.运行./mongod –config ~/.mongodb.conf 命令(--config可以直接写成-f)。
输出:
all output going to: /data/mongodb/log/mongodb.log
forked process: 5315
mongodb 启动参数
--quiet # 安静输出
--port arg # 指定服务端口号,默认端口27017
--bind_ip arg # 绑定服务IP,若绑定127.0.0.1,则只能本机访问,不指定默认本地所有IP
--logpath arg # 指定MongoDB日志文件,注意是指定文件不是目录
--logappend # 使用追加的方式写日志
--pidfilepath arg # PID File 的完整路径,如果没有设置,则没有PID文件
--keyFile arg # 集群的私钥的完整路径,只对于Replica Set 架构有效
--unixSocketPrefix arg # UNIX域套接字替代目录,(默认为 /tmp)
--fork # 以守护进程的方式运行MongoDB,创建服务器进程
--auth # 启用验证
--cpu # 定期显示CPU的CPU利用率和iowait
--dbpath arg # 指定数据库路径
--diaglog arg # diaglog选项 0=off 1=W 2=R 3=both 7=W+some reads
--directoryperdb # 设置每个数据库将被保存在一个单独的目录
--journal # 启用日志选项,MongoDB的数据操作将会写入到journal文件夹的文件里
--journalOptions arg # 启用日志诊断选项
--ipv6 # 启用IPv6选项
--jsonp # 允许JSONP形式通过HTTP访问(有安全影响)
--maxConns arg # 最大同时连接数 默认2000
--noauth # 不启用验证
--nohttpinterface # 关闭http接口,默认关闭27018端口访问
--noprealloc # 禁用数据文件预分配(往往影响性能)
--noscripting # 禁用脚本引擎
--notablescan # 不允许表扫描
--nounixsocket # 禁用Unix套接字监听
--nssize arg (=16) # 设置信数据库.ns文件大小(MB)
--objcheck # 在收到客户数据,检查的有效性,
--profile arg # 档案参数 0=off 1=slow, 2=all
--quota # 限制每个数据库的文件数,设置默认为8
--quotaFiles arg # number of files allower per db, requires --quota
--rest # 开启简单的rest API
--repair # 修复所有数据库run repair on all dbs
--repairpath arg # 修复库生成的文件的目录,默认为目录名称dbpath
--slowms arg (=100) # value of slow for profile and console log
--smallfiles # 使用较小的默认文件
--syncdelay arg (=60) # 数据写入磁盘的时间秒数(0=never,不推荐)
--sysinfo # 打印一些诊断系统信息
--upgrade # 如果需要升级数据库
* Replicaton 参数
--------------------------------------------------------------------------------
--fastsync # 从一个dbpath里启用从库复制服务,该dbpath的数据库是主库的快照,可用于快速启用同步
--autoresync # 如果从库与主库同步数据差得多,自动重新同步,
--oplogSize arg # 设置oplog的大小(MB)
* 主/从参数
--------------------------------------------------------------------------------
--master # 主库模式
--slave # 从库模式
--source arg # 从库 端口号
--only arg # 指定单一的数据库复制
--slavedelay arg # 设置从库同步主库的延迟时间
* Replica set(副本集)选项:
--------------------------------------------------------------------------------
--replSet arg # 设置副本集名称
* Sharding(分片)选项
--------------------------------------------------------------------------------
--configsvr # 声明这是一个集群的config服务,默认端口27019,默认目录/data/configdb
--shardsvr # 声明这是一个集群的分片,默认端口27018
--noMoveParanoia # 关闭偏执为moveChunk数据保存?
三 查询进程和关闭数据库
1. 运行 ps -ef|grep mongo 命令查询服务器进程
2. 运行 kill -2 5315命令kill掉5315的进程
四 进入数据库并简单操作数据库
1.运行./mongo –port 1000进入刚刚启动的端口号为10000的数据库
2.使用use test可以切换集合(相当于数据库表),这里切换到了test集合
3.使用db.test.insert("a","b");向集合插入数据
4.使用db.test.find();查询集合里的数据
5.更多shell命令请查阅相关文档
五 注意事项
1. 防火墙设置(测试时可直接关闭linux关闭防火墙:立即但不永久生效:service iptables stop重启永久生效:chkconfig iptables off)
第二节 副本集
简单的说,副本集就是有自动故障恢复功能的主从集群,副本集没有固定的"主节点",集群会通过投票选举一个"主节点"。当主节点岩机时,会变更到其他节点。副本集布在不同机器上时,至少要启动三个(单数)数据库服务器进程,否则启动时投票不成功会一直初始化不了。
一 以配置文件方式启动三台机器上的数据库服务器
1. 三台服务器的配置文件:
port=10000 #端口号
fork=true #以守护进程的方式运行,创建服务器进程
logpath=/data/mongodb/log/mongodb.log #日志输出文件路径
logappend=true #日志输出方式
dbpath=/data/mongodb/data/db #数据库路径
replSet=blort #设置富本集的名字为blort,replSet是让服务器知道在这个"blort"副本集中还有别的机器
# replSet=blort /10.10.112.181:10000, 10.10.112.191:10000#设置富本集的名字,这种方式也可以,意思就是"blort"副本集其他机器,位置在10.10.112.181:10000和10.10.112.191:10000,但不推荐
2. 通命令启动三台数据库服务器
/usr/local/mongodb/bin/mongod -f /data/mongodb/blort/config.conf
/usr/local/mongodb/bin/mongod -f /data/mongodb/blort2/config.conf
/usr/local/mongodb/bin/mongod -f /data/mongodb/blort3/config.conf
二 初始化副本集(只能初始化一次)
/usr/local/mongodb/bin/mongo --port 30001
use admin
方法一:
db.runCommand({"replSetInitiate":{"_id":"blort","members":[{"_id":0,"host":"10.10.113.122:30001"},{"_id":1,"host":"10.10.113.122:30002"},{"_id":2,"host":"10.10.113.122:30003","arbiterOnly":true}]}})
方法二:
config={_id:'blort',members:[{"_id":0,host:'10.10.113.122:30001},{"_id":1,host:'10.10.113.122:30002'},{"_id":2,"host":"10.10.113.122:30003","arbiterOnly":true}]};
rs.initiate(config);
三 增加和设置副本集
有几种不同类型的节点可以存在于副本集:
Standard :存在于副本,参与投票,有可能成为活跃节点(即主节点)
Passive :存储了完整的数据副本,参与投票,不能成为活跃节点
Arbiter:仲裁者,只参与投票,不能成为活跃节点
Priority:优先级,(投票会投优先级高的,如果相同,则投数据最新的)
以上类型可以通过以下命令对副本集合进行修改或者增加服务器
db.runCommand({"replSetReconfig":{"_id":"test3","version":2,"members":[{"_id":0,"host":"10.10.113.122:30001"},{"_id":1,"host":"10.10.113.122:30002"},{"_id":2,"host":"10.10.113.122:30003","arbiterOnly":true}]}})
增加副本服务器
在增加一个从服务器节点
a.以相同副本集名字启动一台服务器
b.通过rs.add命令往system.replset添加新的从服务器成员
rs.add("10.10.113.122:30005"); 或者rs.add({"_id":4,"host":"10.10.113.122:30005"})
添加仲裁
rs.addArb("10.10.113.122:30004");
四 读扩展
待研究
五 用户校验
未成功
use test;
db.addUser("test","123456");
db.auth("test","123456");
db.system.users.find();
db.system.users.remove("test","123456");
第二节 replica sets + shard (双机方案,单机模拟)
一 准备
mkdir -p /data/mongodb/shard1-1/db/
mkdir -p /data/mongodb/shard1-1/log/
/data/mongodb/shard1-1/config.conf
port=30001 #端口号
fork=true #以守护进程的方式运行,创建服务器进程
#nohttpinterface=true # 关闭http接口,默认关闭27018端口访问 port + 1000
rest = true #http接口 启动rest 使能访问 。与nohttpinterface 对应 只开一个
shardsvr=true #启动分片
#oplogSize=100 #复制日志大小 MB
logpath=/data/mongodb/shard1-1/log/shard1-1.log #日志输出文件路径
logappend=true #日志输出方式
dbpath=/data/mongodb/shard1-1/db #数据库路径
directoryperdb=true # 设置每个数据库将被保存在一个单独的目录
replSet=shard1 #设置富本集的名字为shard1,replSet是让服务器知道在这个"shard1"副本集中还有别的机器
#auth=true # 启用验证
mkdir -p /data/mongodb/shard1-1a/db/
mkdir -p /data/mongodb/shard1-1a/log/
/data/mongodb/shard1-1a/config.conf
port=30002 #端口号
fork=true #以守护进程的方式运行,创建服务器进程
#nohttpinterface=true # 关闭http接口,默认关闭27018端口访问 port + 1000
rest = true #http接口 启动rest 使能访问 。与nohttpinterface 对应 只开一个
shardsvr=true #启动分片
#oplogSize=100 #复制日志大小 MB
logpath=/data/mongodb/shard1-1a/log/shard1-1a.log #日志输出文件路径
logappend=true #日志输出方式
dbpath=/data/mongodb/shard1-1a/db #数据库路径
directoryperdb=true # 设置每个数据库将被保存在一个单独的目录
replSet=shard1 #设置富本集的名字为shard1,replSet是让服务器知道在这个"shard1"副本集中还有别的机器
#auth=true # 启用验证
mkdir -p /data/mongodb/shard1-2/db/
mkdir -p /data/mongodb/shard1-2/log/
/data/mongodb/shard1-2/config.conf
port=30003 #端口号
fork=true #以守护进程的方式运行,创建服务器进程
#nohttpinterface=true # 关闭http接口,默认关闭27018端口访问 port + 1000
rest = true #http接口 启动rest 使能访问 。与nohttpinterface 对应 只开一个
shardsvr=true #启动分片
#oplogSize=100 #复制日志大小 MB
logpath=/data/mongodb/shard1-2/log/shard1-2.log #日志输出文件路径
logappend=true #日志输出方式
dbpath=/data/mongodb/shard1-2/db #数据库路径
directoryperdb=true # 设置每个数据库将被保存在一个单独的目录
replSet=shard1 #设置富本集的名字为shard1,replSet是让服务器知道在这个"shard1"副本集中还有别的机器
#auth=true # 启用验证
mkdir -p /data/mongodb/shard2-1/db/
mkdir -p /data/mongodb/shard2-1/log/
/data/mongodb/shard2-1/config.conf
port=32001 #端口号
fork=true #以守护进程的方式运行,创建服务器进程
#nohttpinterface=true # 关闭http接口,默认关闭27018端口访问 port + 1000
rest = true #http接口 启动rest 使能访问 。与nohttpinterface 对应 只开一个
shardsvr=true #启动分片
#oplogSize=100 #复制日志大小 MB
logpath=/data/mongodb/shard2-1/log/shard2-1.log #日志输出文件路径
logappend=true #日志输出方式
dbpath=/data/mongodb/shard2-1/db #数据库路径
directoryperdb=true # 设置每个数据库将被保存在一个单独的目录
replSet=shard2 #设置富本集的名字为shard2,replSet是让服务器知道在这个"shard2"副本集中还有别的机器
#auth=true # 启用验证
mkdir -p /data/mongodb/shard2-1a/db/
mkdir -p /data/mongodb/shard2-1a/log/
/data/mongodb/shard2-1a/config.conf
port=32002 #端口号
fork=true #以守护进程的方式运行,创建服务器进程
#nohttpinterface=true # 关闭http接口,默认关闭27018端口访问 port + 1000
rest = true #http接口 启动rest 使能访问 。与nohttpinterface 对应 只开一个
shardsvr=true #启动分片
#oplogSize=100 #复制日志大小 MB
logpath=/data/mongodb/shard2-1a/log/shard2-1a.log #日志输出文件路径
logappend=true #日志输出方式
dbpath=/data/mongodb/shard2-1a/db #数据库路径
directoryperdb=true # 设置每个数据库将被保存在一个单独的目录
replSet=shard2 #设置富本集的名字为shard2,replSet是让服务器知道在这个"shard2"副本集中还有别的机器
#auth=true # 启用验证
mkdir -p /data/mongodb/shard2-2/db/
mkdir -p /data/mongodb/shard2-2/log/
/data/mongodb/shard2-2/config.conf
port=32003 #端口号
fork=true #以守护进程的方式运行,创建服务器进程
#nohttpinterface=true # 关闭http接口,默认关闭27018端口访问 port + 1000
rest = true #http接口 启动rest 使能访问 。与nohttpinterface 对应 只开一个
shardsvr=true #启动分片
#oplogSize=100 #复制日志大小 MB
logpath=/data/mongodb/shard2-2/log/shard2-2.log #日志输出文件路径
logappend=true #日志输出方式
dbpath=/data/mongodb/shard2-2/db #数据库路径
directoryperdb=true # 设置每个数据库将被保存在一个单独的目录
replSet=shard2 #设置富本集的名字为shard2,replSet是让服务器知道在这个"shard2"副本集中还有别的机器
#auth=true # 启用验证
mkdir -p /data/mongodb/config1/db/
mkdir -p /data/mongodb/config1/log/
/data/mongodb/config1/config.conf
dbpath = /data/mongodb/config1/db
configsvr = true
port = 40001
logpath =/data/mongodb/config1/log/config1.log
logappend = true
fork = true
#auth=true # 启用验证
mkdir -p /data/mongodb/config2/db/
mkdir -p /data/mongodb/config2/log/
/data/mongodb/config2/config.conf
dbpath = /data/mongodb/config2/db
configsvr = true
port = 40002
logpath =/data/mongodb/config2/log/config2.log
logappend = true
fork = true
#auth=true # 启用验证
mkdir -p /data/mongodb/config3/db/
mkdir -p /data/mongodb/config3/log/
/data/mongodb/config3/config.conf
dbpath = /data/mongodb/config3/db
configsvr = true
port = 40003
logpath =/data/mongodb/config3/log/config3.log
logappend = true
fork = true
#auth=true # 启用验证
mkdir -p /data/mongodb/mongos1/log/
/data/mongodb/mongos1/config.conf
configdb =10.10.113.122:40001,10.10.113.122:40002,10.10.113.122:40003
port = 50001
chunkSize = 1
logpath =/data/mongodb/mongos1/log/mongos1.log
logappend = true
fork = true
#auth=true # 启用验证
mkdir -p /data/mongodb/mongos2/log/
/data/mongodb/mongos2/config.conf
configdb =10.10.113.122:40001,10.10.113.122:40002,10.10.113.122:40003
port = 50002
chunkSize = 1
logpath =/data/mongodb/mongos2/log/mongos2.log
logappend = true
fork = true
#auth=true # 启用验证
二 启动
shard1 副本 启动
/usr/local/mongodb/bin/mongod -f /data/mongodb/shard1-1/config.conf
/usr/local/mongodb/bin/mongod -f /data/mongodb/shard1-1a/config.conf
/usr/local/mongodb/bin/mongod -f /data/mongodb/shard1-2/config.conf
/usr/local/mongodb/bin/mongo --port 30001
use admin
db.runCommand({"replSetInitiate":{"_id":"shard1","members":[{"_id":0,"host":"10.10.113.122:30001"},{"_id":1,"host":"10.10.113.122:30002","arbiterOnly":true},{"_id":2,"host":"10.10.113.122:30003"}]}})
shard2 副本 启动
/usr/local/mongodb/bin/mongod -f /data/mongodb/shard2-1/config.conf
/usr/local/mongodb/bin/mongod -f /data/mongodb/shard2-1a/config.conf
/usr/local/mongodb/bin/mongod -f /data/mongodb/shard2-2/config.conf
/usr/local/mongodb/bin/mongo --port 31001
use admin
db.runCommand({"replSetInitiate":{"_id":"shard2","members":[{"_id":0,"host":"10.10.113.122:32001"},{"_id":1,"host":"10.10.113.122:32002","arbiterOnly":true},{"_id":2,"host":"10.10.113.122:32003"}]}})
config1 启动
/usr/local/mongodb/bin/mongod -f /data/mongodb/config1/config.conf
config2 启动
/usr/local/mongodb/bin/mongod -f /data/mongodb/config2/config.conf
config3 启动
/usr/local/mongodb/bin/mongod -f /data/mongodb/config3/config.conf
mongos1 启动
/usr/local/mongodb/bin/mongos -f /data/mongodb/mongos1/config.conf
mongos2 启动
/usr/local/mongodb/bin/mongos -f /data/mongodb/mongos2/config.conf
/usr/local/mongodb/bin/mongo --port 50001
use admin
db.runCommand({addshard:"shard1/10.10.113.122:30001,10.10.113.122:30003",name:"shard1", maxsize:100})
db.runCommand({addshard:"shard2/10.10.113.122:32001,10.10.113.122:32003",name:"shard2", maxsize:100})
db.runCommand({listshards:1})
use test
db.test.insert({"aaa":"bbb"});
第三节 replica sets + shard (3机高可用 , 一主双备份)
一 方案
每个分片3服务器,前期采用三台,日后服务器的增加考虑灾备,服务增加的基数最少为三台(或才有双机方案)。
Server1 10.10.113.122 Server1 10.10.113.132 Server3 10.10.113.133
类型 服务器 用途 系统 说明
存储/数据 Server1 Shard1/Shard2/Shard3 Linux 64位 Shard1:10001;Shard2:10002,Shard3:10003;
Server2 Shard1/Shard2/Shard3 Linux 64位 Shard1:10001;Shard2:10002,Shard3:10003;
Server3 Shard1/Shard2/Shard3 Linux 64位 Shard1:10001;Shard2:10002,Shard3:10003;
配置 Server1 Config1 Linux 64位 Config1:20000;
Server2 Config2 Linux 64位 Config2:20000;
Server3 Config3 Linux 64位 Config3:20000;
路由 Server1 Mongos1 Linux 64位 Mongos:30000;
Server2 Mongos2 Linux 64位 Mongos:30000;
Server3 Mongos3 Linux 64位 Mongos:30000;
二 准备
安装mongodb 参照第一节
linux 传文件
# scp mongodb-linux-x86_64-2.0.4.tgz root@10.10.113.132:/root
# ssh 10.10.113.132
删除目录
# rm -r -f /data/mongodb
创建配置、日志、分片、key文件存储目录及验证文件
mkdir /data/mongodb/configsvr/ -p
mkdir /data/mongodb/log/ -p
mkdir /data/mongodb/shard1/ -p
mkdir /data/mongodb/shard2/ -p
mkdir /data/mongodb/shard3/ -p
mkdir /data/mongodb/key/ -p
mkdir /data/mongodb/conf/security/ -p
mkdir /data/mongodb/conf/nosecurity/ -p
创建配置文件
1、 创建验证文件security于/data/mongodb/key/目录,关赋予可读权限,命令如下:
cd /data/mongodb/key/
echo 'hycloudmongodbkey' > security
chmod 600 security
2、 创建shard1.conf、shard2.conf、shard3.conf、configsvr.conf、mongos.conf于/data/mongodb/conf/security/ 和 /data/mongodb/conf/nosecurity/的目录,内容分别如下:
shard1.conf
dbpath = /data/mongodb/shard1
directoryperdb = true
shardsvr = true
replSet = shard1
#bind_ip = 10.10.113.122,localhost
port = 10001
oplogSize = 100
logpath =/data/mongodb/log/shard1.log
logappend = true
profile = 1
slowms = 5
rest = true
fork = true
keyFile = /data/mongodb/key/security #nosecurity目录将该行删除
shard2.conf
dbpath = /data/mongodb/shard2
directoryperdb = true
shardsvr = true
replSet = shard2
#bind_ip = 10.10.113.122,localhost
port = 10002
oplogSize = 100
logpath = /data/mongodb/log/shard2.log
logappend = true
profile = 1
slowms = 5
rest = true
fork = true
keyFile = /data/mongodb/key/security #nosecurity目录将该行删除
shard3.conf
dbpath = /data/mongodb/shard3
directoryperdb = true
shardsvr = true
replSet = shard3
#bind_ip = 10.10.113.122,localhost
port = 10003
oplogSize = 100
logpath = /data/mongodb/log/shard3.log
logappend = true
profile = 1
slowms = 5
rest = true
fork = true
keyFile = /data/mongodb/key/security #nosecurity目录将该行删除
configsvr.conf
dbpath = /data/mongodb/configsvr
directoryperdb = true
configsvr = true
port = 20000
logpath =/data/mongodb/log/configsvr.log
logappend = true
fork = true
keyFile = /data/mongodb/key/security #nosecurity目录将该行删除
mongos.conf
configdb =10.10.113.122:20000, 10.10.113.132:20000, 10.10.113.133:20000
port = 30000
chunkSize = 1 #单位 mb 生成环境请使用 200 或删除
logpath =/data/mongodb/log/mongos.log
logappend = true
fork = true
keyFile = /data/mongodb/key/security #nosecurity目录将该行删除
分片配置
说明:分片要在无验证环境中配置,否则会出现无权限等异常。采用以下命令启动Server1\Server2\Server3上的shard1\shard2\shard3:
# /usr/local/mongodb/bin/mongod -f /data/mongodb/conf/nosecurity/shard1.conf
# /usr/local/mongodb/bin/mongod -f /data/mongodb/conf/nosecurity/shard2.conf
# /usr/local/mongodb/bin/mongod -f /data/mongodb/conf/nosecurity/shard3.conf
以下命令查看是否正常启动:
# netstat -lnpt # 或 ps -ef | grep mongo
启动后连接到shard1\shard2\shard3分别进行配置,在任意一台服务器即可,以下是具体配置过程:
# /usr/local/mongodb/bin/mongo --port 10001
>use admin
>config = {_id:"shard1", members: [
{_id: 0, host:"10.10.113.122:10001"},
{_id: 1, host:"10.10.113.132:10001"},
{_id: 2, host:"10.10.113.133:10001"}]
};
>rs.initiate(config)
>exit
# /usr/local/mongodb/bin/mongo --port 10002
>use admin
>config = {_id:"shard2", members: [
{_id: 0, host:"10.10.113.132:10002"},
{_id: 1, host:"10.10.113.133:10002"},
{_id: 2, host:"10.10.113.122:10002"}]
};
>rs.initiate(config)
>exit
# /usr/local/mongodb/bin/mongo --port 10003
>use admin
>config = {_id:"shard3", members: [
{_id: 0, host:"10.10.113.133:10003"},
{_id: 1, host:"10.10.113.122:10003"},
{_id: 2, host:"10.10.113.132:10003"}]
};
>rs.initiate(config)
至此,已完成分片配置
路由设置
路由是能过config来连接分片服务器,在启动路由进程时,先启动配置进程,路由配置过程如下:
# /usr/local/mongodb/bin/mongod -f /data/mongodb/conf/nosecurity/configsvr.conf
# /usr/local/mongodb/bin/mongos -f /data/mongodb/conf/nosecurity/mongos.conf
启动后,连接路由进行分片添加,只需配置一台路由。注:分片操作需在admin库下进行,另外必需在无验证要求下进行,即采用前面创建于nosecurity文件夹下的配置。
# /usr/local/mongodb/bin/mongo --port 30000
mongos> use admin
mongos> db.runCommand({addshard:"shard1/10.10.113.122:10001,10.10.113.132:10001,10.10.113.133:10001",name:"shard1", maxsize:20480} )
mongos> db.runCommand({addshard:"shard2/10.10.113.122:10002,10.10.113.132:10002,10.10.113.133:10002",name:"shard2", maxsize:20480} )
mongos> db.runCommand({addshard:"shard3/10.10.113.122:10003,10.10.113.132:10003,10.10.113.133:10003",name:"shard3", maxsize:20480} )
命令检查分片添加情况,如出现以下结果则表示配置成功:
mongos> db.runCommand( {listshards : 1 } )
权限控制
MongoDB默认为验证模式。如需对数据库进行权限控制,需先采用无验证模式登录,进入admin库创建管理员用户后,再采用验证模式登录。通过前面创建的管理员帐号进行数据库与用户的创建。MongoDB集群的权限与单台的权限控制的不同之处在于,单台是通过-auth属性,集群是通过keyFile来进行服务器间的验证。以下介绍配置全过程。
前面的所有步骤,都是在nosecurity模式下进行。如果没有采用非验证模式的需要将所有进程(分片、配置、mongos)停止,将切换到无验证模式。
步骤一:先进行登录,并切换进admin库创建管理员帐号
# /usr/local/mongodb/bin/mongo --port 30000
mongos>use admin
mongos>db.addUser('admin','123456')
{
"singleShard" :"192.168.2.88:20000,192.168.2.89:20000,192.168.2.90:20000",
"n" : 0,
"connectionId" : 211,
"err" : null,
"ok" : 1
}
{
"_id" :ObjectId("4f6c78ddad912a3ac6833ece"),
"user" : "admin",
"readOnly" : false,
"pwd" :"95ec4261124ba5951720b199908d892b"
}
验证用户名与密码
mongos> db.auth('admin','123456')
1
mongos>exit
步骤二:退出后,将Server1\Server2\Server3服务器上MongoDB的所有进程(分片、配置、mongos)停止,将切换到验证模式。具体命令如下:
#killall mongod mongos
#netstat -lnpt
# /usr/local/mongodb/bin/mongod -f /data/mongodb/conf/security/shard1.conf
# /usr/local/mongodb/bin/mongod -f /data/mongodb/conf/security/shard2.conf
# /usr/local/mongodb/bin/mongod -f /data/mongodb/conf/security/shard3.conf
# netstat -lnpt
# /usr/local/mongodb/bin/mongod -f /data/mongodb/conf/security/configsvr.conf
# /usr/local/mongodb/bin/mongos -f /data/mongodb/conf/security/mongos.conf
启动后,如对库进行查看,则会报以下异常:
# /usr/local/mongodb/bin/mongo 10.10.113.122:30000/admin
MongoDB shell version: 2.0.4
connecting to:10.10.113.122:30000/admin
> show dbs
Fri Mar 23 22:28:28 uncaughtexception: listDatabases failed:{ "ok" : 0, "errmsg" :"unauthorized" }
以下是正常登录后显示的信息:
# /usr/local/mongodb/bin/mongo 10.10.113.122:30000/admin
MongoDB shell version: 2.0.4
connecting to:10.10.113.122:30000/admin
>db.auth('admin','123456')
1
mongos>
步骤三:以下是数据库及数据库用户创建的过程:
mongos> use hello
switched to db hello
mongos>db.addUser('sa','sa')
{
"singleShard" :"shard2/10.10.113.122:10002,10.10.113.132:10002,10.10.113.133:10002",
"n" : 0,
"lastOp" :NumberLong("5723101431532093441"),
"connectionId" : 38,
"err" : null,
"ok" : 1
}
{
"user" : "sa",
"readOnly" : false,
"pwd" :"75692b1d11c072c6c79332e248c4f699",
"_id" :ObjectId("4f6c8a6e9f67b049a20a00de")
}
mongos> exit
bye
# /usr/local/mongodb/bin/mongo 10.10.113.122:30000/hello -u sa -p
MongoDB shell version: 2.0.4
Enter password:
connecting to:10.10.113.122:30000/hello
> show collections
system.indexes
system.users
> db.system.users.find()
{ "_id" :ObjectId("4f6c8a6e9f67b049a20a00de"), "user" :"sa", "readOnly" : false, "pwd" :"75692b1d11c072c6c79332e248c4f699" }
分片
# /usr/local/mongodb/bin/mongo -port 30000
> use test
导入数据
> use admin
> db.runCommand({"enablesharding":"test"})
> db.runCommand({"shardcollection":"test.doc","key":{"_id":1}})
第四节 replica sets + shard (3机高可用 , 一主一备份一仲裁)
一 方案
每个分片3服务器,前期采用三台,日后服务器的增加考虑灾备,服务增加的基数最少为三台(或用有双机方案)。
Server1 10.10.113.122 Server1 10.10.113.132 Server3 10.10.113.133
类型 服务器 用途 系统 说明
存储/数据 Server1 Shard1/Shard2/Shard3 Linux 64位 Shard1:10001;Shard2:10002,Shard3:10003;
Server2 Shard1/Shard2/Shard3 Linux 64位 Shard1:10001;Shard2:10002,Shard3:10003;
Server3 Shard1/Shard2/Shard3 Linux 64位 Shard1:10001;Shard2:10002,Shard3:10003;
配置 Server1 Config1 Linux 64位 Config1:20000;
Server2 Config2 Linux 64位 Config2:20000;
Server3 Config3 Linux 64位 Config3:20000;
路由 Server1 Mongos1 Linux 64位 Mongos:30000;
Server2 Mongos2 Linux 64位 Mongos:30000;
Server3 Mongos3 Linux 64位 Mongos:30000;
二 准备
安装mongodb 参照第一节
linux 传文件
# scp mongodb-linux-x86_64-2.0.4.tgz root@10.10.113.132:/root
# ssh 10.10.113.132
创建配置、日志、分片、key文件存储目录及验证文件
mkdir /data/mongodb/configsvr/ -p
mkdir /data/mongodb/log/ -p
mkdir /data/mongodb/shard1/ -p
mkdir /data/mongodb/shard2/ -p
mkdir /data/mongodb/shard3/ -p
mkdir /data/mongodb/key/ -p
mkdir /data/mongodb/conf/security/ -p
mkdir /data/mongodb/conf/nosecurity/ -p
创建配置文件
1、 创建验证文件security于/data/mongodb/key/目录,关赋予可读权限,命令如下:
cd /data/mongodb/key/
echo 'hycloudmongodbkey' > security
chmod 600 /data/mongodb/key/security
2、 创建shard1.conf、shard2.conf、shard3.conf、configsvr.conf、mongos.conf于/data/mongodb/conf/security/ 和 /data/mongodb/conf/nosecurity/的目录,内容分别如下:
shard1.conf
dbpath = /data/mongodb/shard1
directoryperdb = true
shardsvr = true
replSet = shard1
#bind_ip = 10.10.113.122,localhost
port = 10001
oplogSize = 100
logpath =/data/mongodb/log/shard1.log
logappend = true
profile = 1
slowms = 5
rest = true
fork = true
keyFile = /data/mongodb/key/security #nosecurity目录将该行删除
shard2.conf
dbpath = /data/mongodb/shard2
directoryperdb = true
shardsvr = true
replSet = shard2
#bind_ip = 10.10.113.122,localhost
port = 10002
oplogSize = 100
logpath = /data/mongodb/log/shard2.log
logappend = true
profile = 1
slowms = 5
rest = true
fork = true
keyFile = /data/mongodb/key/security #nosecurity目录将该行删除
shard3.conf
dbpath = /data/mongodb/shard3
directoryperdb = true
shardsvr = true
replSet = shard3
#bind_ip = 10.10.113.122,localhost
port = 10003
oplogSize = 100
logpath = /data/mongodb/log/shard3.log
logappend = true
profile = 1
slowms = 5
rest = true
fork = true
keyFile = /data/mongodb/key/security #nosecurity目录将该行删除
configsvr.conf
dbpath = /data/mongodb/configsvr
directoryperdb = true
configsvr = true
port = 20000
logpath =/data/mongodb/log/configsvr.log
logappend = true
fork = true
keyFile = /data/mongodb/key/security #nosecurity目录将该行删除
mongos.conf
configdb =10.10.113.122:20000, 10.10.113.132:20000, 10.10.113.133:20000
port = 30000
chunkSize = 1 #单位 mb 生成环境请使用 200 或删除
logpath =/data/mongodb/log/mongos.log
logappend = true
fork = true
keyFile = /data/mongodb/key/security #nosecurity目录将该行删除
分片配置
说明:分片要在无验证环境中配置,否则会出现无权限等异常。采用以下命令启动Server1\Server2\Server3上的shard1\shard2\shard3:
# /usr/local/mongodb/bin/mongod -f /data/mongodb/conf/nosecurity/shard1.conf
# /usr/local/mongodb/bin/mongod -f /data/mongodb/conf/nosecurity/shard2.conf
# /usr/local/mongodb/bin/mongod -f /data/mongodb/conf/nosecurity/shard3.conf
以下命令查看是否正常启动:
# netstat -lnpt # 或 ps -ef | grep mongo
启动后连接到shard1\shard2\shard3分别进行配置,在任意一台服务器即可,以下是具体配置过程:(注意不能在仲裁机器初始化)
# /usr/local/mongodb/bin/mongo --port 10001
>use admin
>config = {_id:"shard1", members: [
{_id: 0, host:"10.10.113.122:10001"},
{_id: 1, host:"10.10.113.132:10001"},
{_id: 2, host:"10.10.113.133:10001","arbiterOnly":true}]
};
>rs.initiate(config)
>exit
# /usr/local/mongodb/bin/mongo --port 10002
>use admin
>config = {_id:"shard2", members: [
{_id: 0, host:"10.10.113.132:10002"},
{_id: 1, host:"10.10.113.133:10002"},
{_id: 2, host:"10.10.113.122:10002","arbiterOnly":true}]
};
>rs.initiate(config)
>exit
# /usr/local/mongodb/bin/mongo --port 10003
>use admin
>config = {_id:"shard3", members: [
{_id: 0, host:"10.10.113.133:10003"},
{_id: 1, host:"10.10.113.122:10003"},
{_id: 2, host:"10.10.113.132:10003","arbiterOnly":true}]
};
>rs.initiate(config)
至此,已完成分片配置
路由设置
路由是能过config来连接分片服务器,在启动路由进程时,先启动配置进程,路由配置过程如下:
# /usr/local/mongodb/bin/mongod -f /data/mongodb/conf/nosecurity/configsvr.conf
# /usr/local/mongodb/bin/mongos -f /data/mongodb/conf/nosecurity/mongos.conf
启动后,连接路由进行分片添加,只需配置一台路由。注:分片操作需在admin库下进行,另外必需在无验证要求下进行,即采用前面创建于nosecurity文件夹下的配置。
# /usr/local/mongodb/bin/mongo --port 30000
mongos> use admin
# maxsize:20480 #单位 mb 分片限制大小 根据实际服务器来定
mongos> db.runCommand({addshard:"shard1/10.10.113.122:10001,10.10.113.132:10001,10.10.113.133:10001",name:"shard1", maxsize:20480} )
mongos> db.runCommand({addshard:"shard2/10.10.113.132:10002,10.10.113.133:10002,10.10.113.122:10002",name:"shard2", maxsize:20480} )
mongos> db.runCommand({addshard:"shard3/10.10.113.133:10003,10.10.113.122:10003,10.10.113.132:10003",name:"shard3", maxsize:20480} )
命令检查分片添加情况,如出现以下结果则表示配置成功:
mongos> db.runCommand( {listshards : 1 } )
权限控制
MongoDB默认为验证模式。如需对数据库进行权限控制,需先采用无验证模式登录,进入admin库创建管理员用户后,再采用验证模式登录。通过前面创建的管理员帐号进行数据库与用户的创建。MongoDB集群的权限与单台的权限控制的不同之处在于,单台是通过-auth属性,集群是通过keyFile来进行服务器间的验证。以下介绍配置全过程。
前面的所有步骤,都是在nosecurity模式下进行。如果没有采用非验证模式的需要将所有进程(分片、配置、mongos)停止,将切换到无验证模式。
步骤一:先进行登录,并切换进admin库创建管理员帐号
# /usr/local/mongodb/bin/mongo --port 30000
mongos>use admin
mongos>db.addUser('admin','123456')
{
"singleShard" :"192.168.2.88:20000,192.168.2.89:20000,192.168.2.90:20000",
"n" : 0,
"connectionId" : 211,
"err" : null,
"ok" : 1
}
{
"_id" :ObjectId("4f6c78ddad912a3ac6833ece"),
"user" : "admin",
"readOnly" : false,
"pwd" :"95ec4261124ba5951720b199908d892b"
}
验证用户名与密码
mongos> db.auth('admin','123456')
1
mongos>exit
步骤二:退出后,将Server1\Server2\Server3服务器上MongoDB的所有进程(分片、配置、mongos)停止,将切换到验证模式。具体命令如下:
# killall mongod mongos
# netstat -lnpt
# /usr/local/mongodb/bin/mongod -f /data/mongodb/conf/security/shard1.conf
# /usr/local/mongodb/bin/mongod -f /data/mongodb/conf/security/shard2.conf
# /usr/local/mongodb/bin/mongod -f /data/mongodb/conf/security/shard3.conf
# netstat -lnpt # ps -ef | grep mongo
# /usr/local/mongodb/bin/mongod -f /data/mongodb/conf/security/configsvr.conf
# /usr/local/mongodb/bin/mongos -f /data/mongodb/conf/security/mongos.conf
启动后,如对库进行查看,则会报以下异常:
# /usr/local/mongodb/bin/mongo 10.10.113.122:30000/admin
MongoDB shell version: 2.0.4
connecting to:10.10.113.122:30000/admin
> show dbs
Fri Mar 23 22:28:28 uncaughtexception: listDatabases failed:{ "ok" : 0, "errmsg" :"unauthorized" }
以下是正常登录后显示的信息:
# /usr/local/mongodb/bin/mongo 10.10.113.122:30000/admin
MongoDB shell version: 2.0.4
connecting to:10.10.113.122:30000/admin
>db.auth('admin','123456')
1
mongos>
步骤三:以下是数据库及数据库用户创建的过程:
mongos> use hello
switched to db hello
mongos>db.addUser('sa','sa')
{
"singleShard" :"shard2/10.10.113.122:10002,10.10.113.132:10002,10.10.113.133:10002",
"n" : 0,
"lastOp" :NumberLong("5723101431532093441"),
"connectionId" : 38,
"err" : null,
"ok" : 1
}
{
"user" : "sa",
"readOnly" : false,
"pwd" :"75692b1d11c072c6c79332e248c4f699",
"_id" :ObjectId("4f6c8a6e9f67b049a20a00de")
}
mongos> exit
bye
# /usr/local/mongodb/bin/mongo 10.10.113.122:30000/hello -u sa -p
MongoDB shell version: 2.0.4
Enter password:
connecting to:10.10.113.122:30000/hello
> show collections
system.indexes
system.users
> db.system.users.find()
{ "_id" :ObjectId("4f6c8a6e9f67b049a20a00de"), "user" :"sa", "readOnly" : false, "pwd" :"75692b1d11c072c6c79332e248c4f699" }
分片
# /usr/local/mongodb/bin/mongo -port 30000
> use admin
> db.runCommand({"enablesharding":"test"})
> db.runCommand({"shardcollection":"test.doc","key":{"_id":1}})
> db.runCommand({"shardcollection":"test.txt","key":{"_id":1}})
索引
> use test
> db.fs.chunks.ensureIndex({files_id: 1});
> use admin
> db.runCommand({ shardcollection : "test.fs.chunks", key : { files_id : 1 }})
索引
> use test
> db.doc.ensureIndex({"letter":1})
导入数据
查询数据
分片管理
> use config
> show collections
> db.shards.find()
> db.databases.find()
> db.chunks.find()
> db.printShardingStatus()
===============================================================================================================================
#下载编译好的版本
wget http://fastdl.mongodb.org/linux/mongodb-linux-x86_64-2.2.3.tgz
tar vxzf mongodb-linux-x86_64-2.2.3.tgz
cd mongodb-linux-x86_64-2.2.3
#创建3个mongodb实例的目录
mkdir -p /home/mongodb/rs0-0 /home/mongodb/rs0-1 /home/mongodb/rs0-2
#启动3个mongodb实例,参数--replSet用来配置replica group
./mongod --port 27017 --dbpath /home/mongodb/rs0-0 --replSet rs0 &
./mongod --port 27018 --dbpath /home/mongodb/rs0-1 --replSet rs0 &
./mongod --port 27019 --dbpath /home/mongodb/rs0-2 --replSet rs0 &
#启动客户端
./mongo --port 27017
#配置replica信息,添加3节点,请在1分钟内配置完成
>rsconf = { _id: "rs0", members: [ { _id: 0, host: "192.168.2.100:27017" } ] }
>rs.initiate( rsconf )
>rs.add("192.168.2.100:27018")
>rs.add("192.168.2.100:27019")
#查看配置结果
>rs.conf()
上面的过程如下
[root@ghost-rider bin]# ./mongo --port 27017
MongoDB shell version: 2.2.3
connecting to: 127.0.0.1:27017/test
> rsconf = { _id: "rs0", members: [ { _id: 0, host: "192.168.2.100:27017" } ] }
{
	"_id" : "rs0",
	"members" : [
		{
			"_id" : 0,
			"host" : "192.168.2.100:27017"
		}
	]
}
> rs.initiate( rsconf )
{
	"info" : "Config now saved locally.  Should come online in about a minute.",
	"ok" : 1
}
> rs.conf()
{
	"_id" : "rs0",
	"version" : 1,
	"members" : [
		{
			"_id" : 0,
			"host" : "192.168.2.100:27017"
		}
	]
}
rs0:STARTUP2> rs.add("192.168.2.100:27018")
{
	"errmsg" : "exception: need most members up to reconfigure, not ok : 192.168.2.100:27018",
	"code" : 13144,
	"ok" : 0
}
rs0:PRIMARY> rs.add("192.168.2.100:27019")
{ "ok" : 1 }
rs0:PRIMARY> rs.conf()
{
	"_id" : "rs0",
	"version" : 2,
	"members" : [
		{
			"_id" : 0,
			"host" : "192.168.2.100:27017"
		},
		{
			"_id" : 1,
			"host" : "192.168.2.100:27019"
		}
	]
}
rs0:PRIMARY> rs.add("192.168.2.100:27018")
{ "down" : [ "192.168.2.100:27018" ], "ok" : 1 }
rs0:PRIMARY> rs.conf()
{
	"_id" : "rs0",
	"version" : 3,
	"members" : [
		{
			"_id" : 0,
			"host" : "192.168.2.100:27017"
		},
		{
			"_id" : 1,
			"host" : "192.168.2.100:27019"
		},
		{
			"_id" : 2,
			"host" : "192.168.2.100:27018"
		}
	]
}
rs0:PRIMARY> rs.status()
{
	"set" : "rs0",
	"date" : ISODate("2013-03-12T07:26:48Z"),
	"myState" : 1,
	"members" : [
		{
			"_id" : 0,
			"name" : "192.168.2.100:27017",
			"health" : 1,
			"state" : 1,
			"stateStr" : "PRIMARY",
			"uptime" : 210,
			"optime" : Timestamp(1363073190000, 1),
			"optimeDate" : ISODate("2013-03-12T07:26:30Z"),
			"self" : true
		},
		{
			"_id" : 1,
			"name" : "192.168.2.100:27019",
			"health" : 1,
			"state" : 2,
			"stateStr" : "SECONDARY",
			"uptime" : 41,
			"optime" : Timestamp(1363073190000, 1),
			"optimeDate" : ISODate("2013-03-12T07:26:30Z"),
			"lastHeartbeat" : ISODate("2013-03-12T07:26:47Z"),
			"pingMs" : 0
		},
		{
			"_id" : 2,
			"name" : "192.168.2.100:27018",
			"health" : 0,
			"state" : 8,
			"stateStr" : "(not reachable/healthy)",
			"uptime" : 0,
			"optime" : Timestamp(0, 0),
			"optimeDate" : ISODate("1970-01-01T00:00:00Z"),
			"lastHeartbeat" : ISODate("1970-01-01T00:00:00Z"),
			"pingMs" : 0,
			"errmsg" : "socket exception [CONNECT_ERROR] for 192.168.2.100:27018"
		}
	],
	"ok" : 1
}
rs0:PRIMARY>
#编译相应包,1.3源码编译出来的没有此jar包,需自己下载编译并放置到plugin/mongodb目录
git clone git://github.com/mongodb/mongo-java-driver.git
mvn clean package -Dmaven.test.skip=true
#编译输出:mongo-java-driver-2.11.0-SNAPSHOT.jar
#放置jar包:mongo-java-driver-2.11.0-SNAPSHOT.jar到插件目录下面
#最终插件的目录下:
C:\Projects\elasticsearch-rtf.0.19.4\plugins\mongodb>ls
elasticsearch-river-mongodb-1.3.0-SNAPSHOT.jar
mongo-java-driver-2.11.0-SNAPSHOT.jar
#fiddler创建mongodb-river的meta信息,一个collection,一个river配置
curl  -XPUT http://192.168.2.100:9200/_river/mongodb/_meta -d'
{
    "type": "mongodb",
    "mongodb": {
 "servers":
    [
      { "host": "192.168.2.100", "port": 27017 },
      { "host": "192.168.2.100", "port": 27018 },
      { "host": "192.168.2.100", "port": 27019 }
    ],

        "db": "testmongo",
        "collection": "person"
    },
    "index": {
        "name": "mongoindex",
        "type": "person"
    }
}'
#创建另外一个collection的river配置
curl -XPUT http://192.168.2.100:9200/_river/mongodb_your_name/_meta -d'
{
    "type": "mongodb",
    "mongodb": {
 "servers":
    [
      { "host": "192.168.2.100", "port": 27017 },
      { "host": "192.168.2.100", "port": 27018 },
      { "host": "192.168.2.100", "port": 27019 }
    ],

        "db": "mydatabase",
        "collection": "your_collection"
    },
    "index": {
        "name": "mongo-xxx",
        "type": "your_type"
    }
}
'
#往mongodb里面保存数据
use testmongo
var p = {firstName: "John", lastName: "Doe"}
db.person.save(p)

use mydatabase
var p = {firstName: "John", lastName: "Doe"}
db.your_collection.save(p)
#从elasticsearch里面查询数据
curl -XGET 'http://localhost:9200/mongoindex/_search?q=firstName:John'
#返回结果如下:
{
    "took": 12,
    "timed_out": false,
    "_shards": {
        "total": 5,
        "successful": 5,
        "failed": 0
    },
    "hits": {
        "total": 2,
        "max_score": 1,
        "hits": [
            {
                "_index": "mongoindex",
                "_type": "person",
                "_id": "513ef017c1243708e42b6355",
                "_score": 1,
                "_source": {
                    "_id": "513ef017c1243708e42b6355",
                    "firstName": "John",
                    "lastName": "medcl"
                }
            },
            {
                "_index": "mongoindex",
                "_type": "person",
                "_id": "513edd36e0813607bee3b468",
                "_score": 1,
                "_source": {
                    "_id": "513edd36e0813607bee3b468",
                    "firstName": "John",
                    "lastName": "Doe"
                }
            }
        ]
    }
}
都来自于
https://github.com/richardwilly98/elasticsearch-river-mongodb
https://github.com/richardwilly98/elasticsearch-river-mongodb/wiki
http://satishgandham.com/2012/09/a-complete-guide-to-integrating-mongodb-with-elastic-search/
http://docs.mongodb.org/manual/tutorial/deploy-replica-set/
本文来自: mongodb&mongodb-river(elasticsearch)部署
大家可以加我个人微信号:scccdgf







相关推荐
【基于MongoDB分布式集群架构的日志系统及分片方法】 MongoDB是一种流行的开源文档数据库,以其灵活性、可扩展性和高性能而被广泛应用于日志管理、大数据处理和其他领域。本技术方案涉及利用MongoDB的分布式集群...
MongoDB 分布式集群是MongoDB数据库系统中的一个重要特性,它允许数据库跨越多个服务器,以提供水平扩展、高可用性和故障恢复能力。MongoDB的分布式设计使得它能够处理大规模的数据存储和复杂的查询操作,适合于...
(3) 请在报告中使用文字和截图详细描述MongoDB分片集群搭建及配置的主要步骤: - 搭建配置集服务器(Mongod) - 搭建分片集服务器(Mongod) - 搭建路由节点服务器(Mongos) - 添加分片集到集群 - 创建数据库...
### MongoDB分布式集群搭建详解 #### 一、集群与分布式概念 **集群(Cluster)**与**分布式(Distributed)**是两种常见的架构设计模式,用于提高系统的可用性、可伸缩性和性能。 1. **集群(Cluster)** - **定义**:...
### Linux安装ElasticSearch与MongoDB分布式集群环境下数据同步 #### 概述 在现代的大数据处理场景下,为了提高数据处理效率以及更好地利用资源,通常会采用多种数据库技术组合的方式来构建系统架构。Elastic...
该毕业设计项目主要关注的是构建一个基于...综上所述,这个毕业设计项目涵盖了MongoDB分布式数据库的使用、实时数据采集、Node.js后端开发、Web系统架构等多个核心IT技术,对于学习和掌握这些技能提供了实战平台。
以下是对MongoDB集群架构的详细说明,包括复制集和分片集群的关键概念和最佳实践。 1. **复制集**: - **读写设置**:复制集的主要目的是提供高可用性。默认情况下,所有写操作都会发送到Primary节点,读操作也...
#### 二、MongoDB集群架构设计 MongoDB支持多种部署模式,包括单机部署、主从复制、副本集和分片等。其中,**集群**主要是指通过**分片(Sharding)**和**副本集(Replica Set)**两种技术实现的数据分布和高可用...
本文将围绕“Nginx + keepalived + MongoDB + haproxy + Sphinx”这一技术栈,详细介绍如何实现一个稳定的分布式集群部署方案。 #### 二、关键技术解析 ##### 1. Nginx **定义**:Nginx是一款高性能的HTTP和反向...
一、 MongoDB 分布式集群架构 MongoDB 的分布式集群架构由多个副本集、路由服务器以及配置服务器构成。在该架构中,副本集中的主节点服务器参与用户的访问,次节点作为主节点的备用节点增加整个系统的鲁棒性,配置...
### Java面试中的分布式集群关键技术:MongoDB与Redis #### 心跳机制详解 在分布式系统中,为了确保各个节点间的连接稳定性和及时发现并处理断线情况,通常会使用心跳机制来保持通信链路的活跃状态。心跳机制的...
根据提供的文件内容,这篇文章主要探讨了在云计算环境下,如何基于MongoDB搭建GML(Geography Markup Language)分布式集群环境。接下来,我们将详细解析文章中涉及的关键知识点。 ### 分布式系统与分布式开发 ...
3. 提高性能:MongoDB 集群架构可以提高性能,通过分布式存储和并发处理来提高系统性能。 五、结论 MongoDB 集群架构是一种非常有用的技术,可以解决大规模数据存储问题。通过本文,我们可以了解 MongoDB 集群架构...
《大型分布式网站架构设计与实践》是一本深入探讨如何构建高效、可扩展、高可用性的分布式网站架构的专业书籍。在当今互联网行业中,随着用户数量的急剧增长和业务复杂度的不断提升,传统的单体架构已无法满足需求,...
特别是对于需要高并发处理能力和大数据量处理能力的应用场景,MongoDB的分布式架构可以提供显著的优势。同时,MongoDB支持动态查询、模式自由、完整的索引支持等特性,使得开发者能够灵活地构建各种复杂的应用。 在...
#### 一、MongoDB 集群架构 MongoDB 的分布式部署涉及多种服务组件,这些组件协同工作以提供高度可扩展且具有容错能力的数据存储解决方案。 **1.1 配置服务(Config Server)** 配置服务负责存储集群的元数据信息...