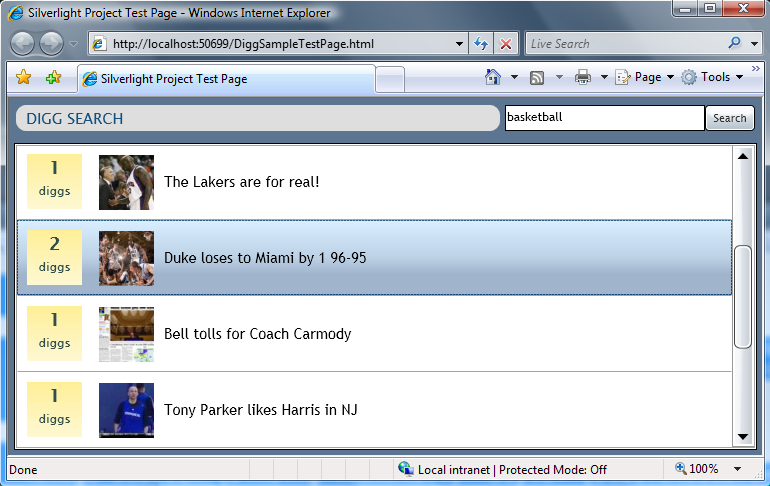
This is part five of eight tutorials that walk through how to build a simple Digg client application using the Beta1 release of Silverlight 2. These tutorials are intended to be read in-order, and help explain some of the core programming concepts of Silverlight. Bookmark my Silverlight 2 Reference page for more of Silverlight posts and content.
<Download Code> Click here to download a completed version of this Digg client sample. </Download Code>
Displaying our Digg Stories using the ListBox and DataBinding
Previously we've been using the DataGrid control to display our Digg stories. This works great when we want to display the content in a column format. For our Digg application, though, we probably want to tweak the appearance a little more and have it look less like a DataGrid of stories and more like a List of them. The good news is that this easy - and it doesn't require us to change any of our application code to accomplish this.
We'll start by replacing our DataGrid control with a <ListBox> control. We'll keep the control name the same as before ("StoriesList"):

When we run our application again and search for stories, the ListBox will display the following results:

You might be wondering - why is each item "DiggSample.DiggStory"? The reason for this is because we are binding DiggStory objects to the ListBox (and the default behavior is to call ToString() on them). If we want to display the "Title" property of the DiggStory object instead, we can set the "DisplayMemberPath" property on the ListBox:

When we do this the Title will be what is displayed in the ListBox:

If we want to show more than one value at a time, or customize the layout of each item more, we can override the ListBox control's ItemTemplate and supply a custom DataTemplate. Within this DataTemplate we can customize how each DiggStory object is displayed.
For example, we could display both the DiggStory Title and NumDiggs value using a DataTemplate like below.

We can databind any public properties we want from our DiggStory object within the DataTemplate. Notice above how we are using the {Binding PropertyName} syntax to accomplish this with the two TextBlock controls.
With the above DataTemplate in place, our ListBox will now display its items like below:

Let's then go one step further and change our DataTemplate to the one below. This DataTemplate uses two StackPanels - one to stack row items horizontally, and one to stack some textblocks together vertically:

The above DataTemplate causes our ListBox to display items like the screen-shot below:

when we define the following Style rules in our App.xaml (note how we are using a LinearGradientBrush to get the nice yellow gradient background on the DiggPanel):

One important thing to notice about our ListBox - even though we have customized what the items in it look like, it still automatically provides support for hover and item selection semantics. This is true both when using the mouse and when using the keyboard (up/down arrow keys, home/end, etc):

The ListBox also supports full flow resizing - and will provide automatic scrolling of our custom content when necessary (notice how the horizontal scroll bar appears as the window gets smaller):

Next Steps
We've now switched our data visualization to be List based, and cleaned up the content listing of it.
Let's now complete the last bits of the functionality behavior in the application - and implement a master/details workflow which allows end-users to drill into the specifics of a story when they select an article from the list. To-do that let's jump to our next tutorial: Using User Controls to Implement Master/Detail Scenarios


相关推荐
C#开发WPF/Silverlight动画及游戏系列教程(Game Tutorial) 的源代码 第一部分源码:WPFGameTutorial_PartI.rar(1-20节) 第二部分源码:WPFGameTutorial_PartII.rar (21-26节) 第三部分源码:WPFGameTutorial_Part...
C#开发WPF/Silverlight动画及游戏系列教程(Game Tutorial) 的源代码 第一部分源码:WPFGameTutorial_PartI.rar(1-20节) 第二部分源码:WPFGameTutorial_PartII.rar (21-26节) 第三部分源码:WPFGameTutorial_Part...
C#开发WPF/Silverlight动画及游戏系列教程(Game Tutorial) 的源代码 第一部分源码:WPFGameTutorial_PartI.rar(1-20节) 第二部分源码:WPFGameTutorial_PartII.rar (21-26节) 第三部分源码:WPFGameTutorial_Part...
C#开发WPF/Silverlight动画及游戏系列教程(Game Tutorial) 的源代码 第一部分源码:WPFGameTutorial_PartI.rar(1-20节) 第二部分源码:WPFGameTutorial_PartII.rar (21-26节) 第三部分源码:WPFGameTutorial_Part...
C#开发WPF/Silverlight动画及游戏系列教程(Game Tutorial) 的源代码 第一部分源码:WPFGameTutorial_PartI.rar(1-20节) 第二部分源码:WPFGameTutorial_PartII.rar (21-26节) 第三部分源码:WPFGameTutorial_Part...
C#开发WPF/Silverlight动画及游戏系列教程(Game Tutorial) 的源代码 第一部分源码:WPFGameTutorial_PartI.rar(1-20节) 第二部分源码:WPFGameTutorial_PartII.rar (21-26节) 第三部分源码:WPFGameTutorial_Part...
C#开发WPF/Silverlight动画及游戏系列教程(Game Tutorial) (个人收藏) 目录 (一)让物体动起来① (二)让物体动起来② (三)让物体动起来③ (四)实现2D人物动画① (五)实现2D人物动画② (六)完美移动 (七)传说...
Jesse is well known in the industry in part because of his many bestselling books, including O’Reilly Media’s Programming .NET 3.5, Programming C# 3.0, Learning ASP.NET with AJAX and the soon to be ...
#### 八、优化 URL 生成:Optimizing URL generation in ASP.NET MVC - Part 1 **知识点概述:** 这是一篇分两部分的文章,讨论了如何在 ASP.NET MVC 中优化 URL 生成过程。 **详细知识点:** - **URL 结构设计**...