- 浏览: 893363 次
- 性别:

- 来自: 上海
-

文章分类
最新评论
-
zzuliuli:
很实用,一直关注
mysql的执行计划 -
rxin2009:
你好,最近在解决redis数据同步的问题,找到了tedis,但 ...
taobao/tedis的redis集群 -
zhangping2056:
楼主接下来要考虑页面静态化与细节上面的东西了
Nginx与Redis解决高并发问题 -
XieFuQ:
Tomcat的重启shell脚本 -
jovinlee:
jovinlee 写道 jov ...
Tomcat的重启shell脚本
转自:http://www.roseindia.net/tutorial/spring/spring3/web/spring-3-mvc-validation-example.html
This tutorial shows you how to validate Spring 3 MVC based applications. In Spring 3 MVC annotation based controller has been added and other type of controllers are not deprecated.
In this example application we will be create a Validation form in Spring 3.0 MVC Framework. The validation of the form is done using annotation. The Hibernate validator framework is used for validation of the form data.
The application will present simple user registration form to the user. Form will have the following fields:
- User Name
- Age
- Password
The validator framework will validate the user input. If there is any validation error application will display the appropriate message on the form.
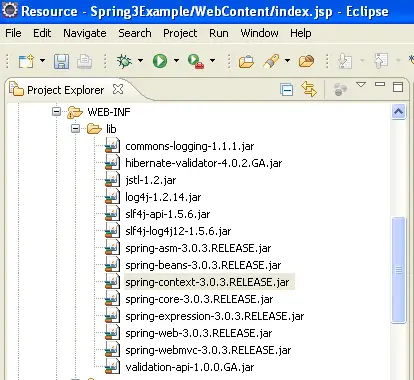
To use the validation framework in the application "hibernate-validator-4.0.2.GA.jar" and " validation-api-1.0.0.GA.jar" must be added to the project libraries.
Application uses following jar files:

Step 1:
Create index.jsp under WebContent . The code index.jsp as :
|
<%@ page language="java" contentType="text/html; charset=ISO-8859-1" pageEncoding="ISO-8859-1"%> <!DOCTYPE html PUBLIC "-//W3C//DTD HTML 4.01 Transitional//EN""http://www.w3.org/TR/html4/loose.dtd"> <html> <head> <meta http-equiv="Content-Type" content="text/html; charset=ISO-8859-1"> <title>Spring 3, MVC Examples</title> </head> <body> <h1>Spring 3, MVC Examples</h1> <ul> <li><a href="forms/validationform.html">Validation Form</a></li> </ul> </body> </html> |
In the above page we are creating a new link to access the Validation Form example from the index page of the application.
Step 2:
Now we will create a model class " ValidationForm.java" under src folder . The code of "ValidationForm.java" is:
package net.roseindia.form;

import javax.validation.constraints.Max;
import javax.validation.constraints.Min;
import javax.validation.constraints.Size;
import javax.validation.constraints.NotNull;
import org.hibernate.validator.constraints.NotEmpty;
import org.springframework.format.annotation.NumberFormat;
import org.springframework.format.annotation.NumberFormat.Style;

public class ValidationForm {
        @NotEmpty
        @Size(min = 1, max = 20)
        private String userName;
        @NotNull
        @NumberFormat(style = Style.NUMBER)
        @Min(1)
        @Max(110)
        private Integer age;
        @NotEmpty(message = "Password must not be blank.")
        @Size(min = 1, max = 10, message = "Password must between 1 to 10 Characters.")
        private String password;

        public void setUserName(String userName) {
                this.userName = userName;
        }

        public String getUserName() {
                return userName;
        }

        public void setAge(Integer age) {
                this.age = age;
        }

        public Integer getAge() {
                return age;
        }

        public void setPassword(String password) {
                this.password = password;
        }

        public String getPassword() {
                return password;
        }
}
In the above class we have added the proper annotation for validating the form values. Here is the list of annotation used for validation:
@NotEmpty
@Size(min = 1, max = 20)
@NotNull
@NumberFormat(style = Style.NUMBER)
@Min(1)
@Max(110)
@NotEmpty(message = "Password must not be blank.")
@Size(min = 1, max = 10, message = "Password must between 1 to 10 Characters.")
Step 3 :
Now create a folder views under WebContent/WEB-INF . Again cerate "validationform.jsp" under WebContent/WEB-INF/views as :
|
<%@ page language="java" contentType="text/html; charset=ISO-8859-1" pageEncoding="ISO-8859-1"%> <%@taglib prefix="form" uri="http://www.springframework.org/tags/form"%> <!DOCTYPE html PUBLIC "-//W3C//DTD HTML 4.01 Transitional//EN""http://www.w3.org/TR/html4/loose.dtd"> <html> <head> <meta http-equiv="Content-Type" content="text/html; charset=ISO-8859-1"> <title>Insert title here</title> </head> <body> <form:form method="post" action="validationform.html" commandName="validationForm"> <table> <tr> <td>User Name:<font color="red"><form:errors path="userName" /></font></td> </tr> <tr> <td><form:input path="userName" /></td> </tr> <tr> <td>Age:<font color="red"><form:errors path="age" /></font></td> </tr> <tr> <td><form:input path="age" /></td> </tr> <tr> <td>Password:<font color="red"><form:errors path="password" /></font></td> </tr> <tr> <td><form:password path="password" /></td> </tr> <tr> <td><input type="submit" value="Submit" /></td> </tr> </table> </form:form> </body> </html> |
In this above jsp file <form:errors path="..." /> tag is used to display the validation error messages.
Step 4:
Now create "validationsuccess.jsp" file under WebContent/WEB-INF/views . The code of "validationsuccess.jsp" is :
|
<%@ page language="java" contentType="text/html; charset=ISO-8859-1" pageEncoding="ISO-8859-1"%> <%@taglib prefix="core" uri="http://java.sun.com/jsp/jstl/core" %> <!DOCTYPE html PUBLIC "-//W3C//DTD HTML 4.01 Transitional//EN""http://www.w3.org/TR/html4/loose.dtd"> <html> <head> <meta http-equiv="Content-Type" content="text/html; charset=ISO-8859-1"> <title>Insert title here</title> </head> <body> <core:out value="${validationForm.userName}" /> Save Successfully. </body> </html> |
Step 5:
Now create Contoller class "ValidationController.java" under src folder. Controller class use for RequestMapping and process the user request. The code of "ValidationController.java" as:
package net.roseindia.controllers;

import net.roseindia.form.ValidationForm;
import java.util.Map;
import javax.validation.Valid;
import org.springframework.stereotype.Controller;
import org.springframework.validation.BindingResult;
import org.springframework.web.bind.annotation.RequestMapping;
import org.springframework.web.bind.annotation.RequestMethod;

@Controller
@RequestMapping("/validationform.html")
public class ValidationController {

        // Display the form on the get request
        @RequestMapping(method = RequestMethod.GET)
        public String showValidatinForm(Map model) {
                ValidationForm validationForm = new ValidationForm();
                model.put("validationForm", validationForm);
                return "validationform";
        }

        // Process the form.
        @RequestMapping(method = RequestMethod.POST)
        public String processValidatinForm(@Valid ValidationForm validationForm,
                        BindingResult result, Map model) {
                if (result.hasErrors()) {
                        return "validationform";
                }
                // Add the saved validationForm to the model
                model.put("validationForm", validationForm);
                return "validationsuccess";
        }

}
The @RequestMapping annotation is used for request uri mapping.
Step 6:
Now modify web.xml as:
|
<?xml version="1.0" encoding="UTF-8"?> <web-app version="2.5" xmlns="http://java.sun.com/xml/ns/j2ee" xmlns:xsi="http://www.w3.org/2001/XMLSchema-instance" xsi:schemaLocation="http://java.sun.com/xml/ns/j2ee http://java.sun.com/xml/ns/j2ee/web-app_2_5.xsd">
<display-name>Spring3Example</display-name> <servlet> <servlet-name>dispatcher</servlet-name> <servlet-class>org.springframework.web.servlet.DispatcherServlet</servlet-class> <load-on-startup>1</load-on-startup> </servlet> <servlet-mapping> <servlet-name>dispatcher</servlet-name> <url-pattern>/forms/*</url-pattern> </servlet-mapping> <welcome-file-list> <welcome-file>index.jsp</welcome-file> </welcome-file-list> </web-app> |
Step 7:
Again create "dispatcher-servlet.xml" under WebContent/WEB-INF . The "dispatcher-servlet.xml" code as :
|
<?xml version="1.0" encoding="UTF-8"?> <beans xmlns="http://www.springframework.org/schema/beans" xmlns:xsi="http://www.w3.org/2001/XMLSchema-instance" xmlns:p="http://www.springframework.org/schema/p" xmlns:context="http://www.springframework.org/schema/context" xmlns:mvc="http://www.springframework.org/schema/mvc" xsi:schemaLocation=" http://www.springframework.org/schema/beans http://www.springframework.org/schema/beans/spring-beans-3.0.xsd http://www.springframework.org/schema/context http://www.springframework.org/schema/context/spring-context-3.0.xsd http://www.springframework.org/schema/mvc http://www.springframework.org/schema/mvc/spring-mvc-3.0.xsd ">
<!-- Enable annotation driven controllers, validation etc... --> <mvc:annotation-driven />
<context:component-scan base-package="net.roseindia.controllers"/>
<bean id="viewResolver" class="org.springframework.web.servlet.view.InternalResourceViewResolver">
<property name="prefix"> <value>/WEB-INF/views/</value> </property> <property name="suffix"> <value>.jsp</value> </property> </bean>
<bean id="messageSource"class="org.springframework.context.support.ReloadableResourceBundleMessageSource"> <property name="basename" value="/WEB-INF/messages" /> </bean>
</beans> |
Where <mvc:annotation-driven> is used for annotation driven controllers and validation. While message Resource configuration is done in "dispatcher-servlet.xml" using following entry:
|
<bean id="messageSource"class="org.springframework.context.support.ReloadableResourceBundleMessageSource"> <property name="basename" value="/WEB-INF/messages" /> </bean> |
Again create customization Message file "messages.properties" under WebContent/WEB-INF. The modify "messages.properties" as
|
NotEmpty.validationForm.userName=User Name must not be blank. Size.validationForm.userName=User Name must between 1 to 20 characters. |
Step 8:
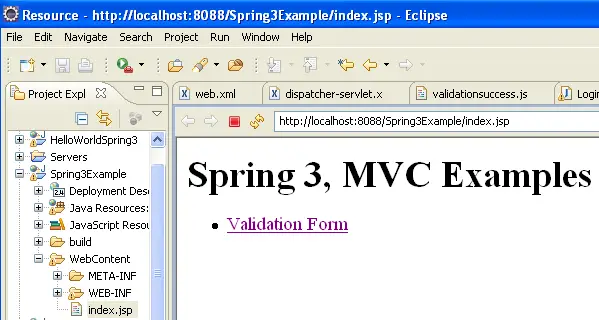
Now run Application display output as :

if click Validation Form hyperlink then open validationform as :

Step 9:
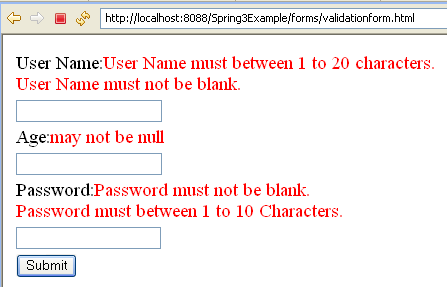
Now Enter userName, Age and Password if find any error display as:

Again display error-

If validation success then display validationsucess page as :

发表评论
-
静态代理之AspectJ编译织入
2019-10-17 08:41 0前面两篇文章都是说的在代码运行时动态的生成class文件达到 ... -
ReentrantLock(重入锁)功能详解和应用演示
2019-10-15 09:54 0https://www.cnblogs.com/taku ... -
Java技术之AQS详解
2019-10-15 09:04 0https://www.jianshu.com/p/da9d ... -
基于AQS实现的Java并发工具类
2019-10-15 09:02 0https://www.cnblogs.com/booths ... -
java线程池ThreadPoolExecutor类使用详解
2019-10-10 17:06 0在《阿里巴巴java开发手册》中指出了线程资源必须通 ... -
java如何实现按指定行读取文件
2019-05-24 18:30 0最近在开发实战中,遇到了一个这样的技术情景: 把 ... -
通过反射把map中的属性赋值到实体类bean对象中
2019-04-12 13:38 0使用过struts2后感觉最方便的就是这个框架能自动把表单 ... -
使用slf4j + Log4j2构建日志
2017-04-07 10:42 0一、背景 Log4j 1.x 在高并发情况下出现死锁导致c ... -
Apache Log4j 2.0值得升级吗
2017-02-08 10:46 0Apache软件基金会最近发布了Log4j 2.0通用版本, ... -
maven deploy到nexus报错:Return code is: 401, ReasonPhrase:Unauthorized
2017-01-16 15:05 0正确 mvn deploy:deploy-file -D ... -
Java四种线程池的使用
2016-12-08 11:10 0Java通过Executors提供四种线程池,分别为:new ... -
Maven类包冲突终极解决小技若干
2016-08-19 14:34 768那句话怎么讲来着的... 引用 如果你爱他,就请让他用 ... -
Linux下Mysql 5.6.21 tar包安装实践
2016-07-25 14:58 3996http://blog.csdn.net/zhanngle ... -
Java8 Lambda表达式教程
2016-06-21 13:36 724http://blog.csdn.net/ioriogami ... -
加密机
2015-12-09 09:57 4763什么是加密机? 加密机是通过国家商用密码主管部门鉴定并批 ... -
maven setting
2015-11-25 16:26 0<?xml version="1.0&quo ... -
SPRING中的线程池ThreadPoolTaskExecutor
2015-11-04 18:20 6067一、初始化 1,直接调用 [java] ... -
解决Maven中使用很多本地jar包的编译问题
2015-10-28 16:58 5399Maven依赖本地非repository中的jar包,依赖j ... -
Spring线程池开发实战及使用spring注解
2015-10-27 11:03 2777作者:chszs,转载需注明。 作者博客主页:http:/ ... -
利用反射调用方法抛出的异常如何被捕获?
2015-10-13 14:41 0我们通常在java开发中采用自定义异常,在业务中遇到 ...


相关推荐
这个简单的Spring3 MVC例子可以帮助初学者理解框架的工作原理,并为实际项目提供基础。在深入学习过程中,你还可以探索更多高级特性,如数据绑定、类型转换、异常处理、国际化、主题支持等,以及如何与Spring Data、...
《Spring3 MVC 深入研究》 Spring3 MVC是Spring框架的重要组成部分,它是一个用于构建Web应用程序的轻量级、模型-视图-控制器(MVC)框架。本篇文章将深入探讨Spring3 MVC的核心概念、工作原理以及如何在实际项目中...
spring3 MVC实战
在这个例子中,Maven配置文件(pom.xml)将列出了所有Spring MVC及其相关依赖,如Spring Framework的核心模块、Spring Web MVC模块以及可能的Junit测试库。 提到“包含jQuery”,这表明在前端部分,项目可能使用了...
总的来说,这个"spring3 mvc例子"为初学者提供了一个了解和实践Spring MVC框架的好机会,同时也展示了如何通过注解驱动的方式减少XML配置,提高开发效率。通过深入学习和实践,你可以更好地掌握Spring MVC的精髓,为...
Spring3MVC是Spring框架的一个重要模块,专为构建Web应用程序提供模型-视图-控制器(MVC)架构支持。这个框架使得开发者可以更轻松地处理HTTP请求、数据绑定、验证以及视图渲染等任务。在"spring3MVC框架demo"中,...
在压缩包文件"spring3_rest"中,可能包含了一个简单的Spring 3.0 MVC和REST的例子,你可以通过这个例子学习如何配置Spring MVC的DispatcherServlet,创建RESTful端点,处理请求和响应,以及如何使用JUnit进行测试。...
3. **创建Spring MVC配置文件**:在servlet-context.xml中,我们需要定义视图解析器(如InternalResourceViewResolver),以及处理器映射器和处理器适配器,以便将HTTP请求映射到控制器方法。 4. **定义Controller*...
Spring MVC 是一款强大的Java Web开发框架,用于构建高效、可维护和模块化的Web应用程序。它作为Spring框架的一部分,提供了一种优雅的方式来处理HTTP请求和响应,使得开发者可以专注于业务逻辑而不是底层实现。在这...
标题 "spring3 mvc jar" 指涉的是Spring框架的第三个主要版本的MVC模块。Spring MVC是Spring框架的一部分,专门用于构建Web应用程序。它提供了模型-视图-控制器(MVC)架构,帮助开发者将业务逻辑、数据处理和用户...
Spring3MVC是Spring框架的一个重要模块,用于构建基于Java的Web应用程序。它提供了一个模型-视图-控制器(MVC)架构,帮助开发者将业务逻辑、数据处理和用户界面分离,实现更清晰的代码组织和更高的可维护性。在这个...
Spring MVC 是一个强大的Java web...通过这个简单的例子,初学者可以全面地了解Spring MVC的工作原理和流程,为更深入的Web开发打下基础。实践中遇到的问题和解决方法也会加深对Spring MVC的理解,有助于提升开发技能。
Spring 3 MVC 是一个强大的Java框架,用于构建Web应用程序。这个例子代码集合提供了一系列的示例,涵盖了Spring MVC的核心概念和关键功能。Spring MVC通过解耦应用程序的不同组件,如控制器、视图、模型和业务逻辑,...
在这个"Spring+MVC+AngularJS例子"中,我们将深入理解这三个技术如何结合在一起,以创建一个完整的maven项目。 Spring框架是一个开源的应用框架,主要用于Java平台,它提供了全面的依赖注入(DI)和面向切面编程...
### Spring Web MVC 外文翻译知识点解析 #### 一、Spring Web MVC介绍 Spring Web MVC 是基于 Servlet API 构建的原始 Web 框架,它从 Spring 框架诞生之初就被包含其中。正式名称“Spring Web MVC”来源于其源...
这个小例子展示了 Spring MVC 的基本使用,包括 Controller 的定义、请求映射以及视图的返回。实际开发中,你可能还会涉及到更多的概念,如拦截器(Interceptor)、模型数据绑定、异常处理、国际化、模板引擎等。...
Spring MVC属于SpringFrameWork的后续产品,已经融合在Spring Web Flow里面。Spring 框架提供了构建 Web 应用程序的全功能 MVC 模块。Spring MVC4是当前zuixin的版本,在众多特性上有了进一步的提升。, 在精通Spring...
标题中的“夏昕老师spring_mvc的例子原代码part3”表明这是一个关于Spring MVC框架的编程实例,由知名讲师夏昕教授讲解。这部分可能是系列教程的一部分,重点在于Spring MVC的实战应用。 描述中提到的“夏老师...
根据提供的信息,我们可以深入探讨Spring MVC框架中注解的应用及其如何简化开发流程。Spring MVC作为企业级应用开发的重要组成部分,采用注解的方式极大地方便了开发者,并减少了对XML配置文件的依赖。 ### Spring ...
在这个简单的例子中,`Spring IOC AOP MVC 简单例子`可能是整个项目的整合示例,它将上述三个核心组件结合在一起,演示了如何在一个实际的Web应用中使用Spring。这个示例可能会包括一个简单的用户登录功能,展示如何...