- æĩč§: 972172 æŽĄ
- æ§åŦ:

- æĨčŠ: åąąčĨŋ
-

æįŦ åįąŧ
įĪūåšįå
- æįčĩčŪŊ ( 0)
- æįčŪšå ( 2)
- æįéŪį ( 0)
åæĄĢåįąŧ
- 2019-12 ( 2)
- 2019-07 ( 3)
- 2019-06 ( 4)
- æīåĪåæĄĢ...
ææ°čŊčŪš
-
į―å°éŧïž
ä― åĨ― åŊäŧĨæäūäļæšį DEMOåïžäļįĨäļšä―ïžæåŊžåšæĨįexcel ...
jxls ä―ŋįĻæĻĄæŋæäŧķåŊžåšįæexcel -
zkzqzzzïž
åäļŧåĻæĶïž
čŪĐåūŪäŋĄäšįŧīį æŦææĻįAPK -
zkzqzzzïž
æč°ĒåäļŧÂ åæĨéĢäšįąŧé―äļæŊåŋ
éĄŧį  æč
čŠå·ąåïžïžåäļŧįæĢ ...
æĒįšĒå æäŧķåŪį°åįæĩ æ -
zkzqzzzïž
åäļŧÂ Â čŊ·éŪä― įå
ķäŧįąŧåĻåŠéåĒïž
æĒįšĒå æäŧķåŪį°åįæĩ æ -
zkzqzzzïž
å
ķäŧįąŧåĻåŠåĒïž
æĒįšĒå æäŧķåŪį°åįæĩ æ
     éĶå čŊīæįæŊïžæäŧŽåAPPåžåïžTabåéĄĩäļįŪĄæŊéĄķéĻčŋæŊåšéĻïžé―æŊåŋ äļåŊå°įïžį―äļäđæåĪŠåĪåĪŠåĪįåŪį°æđåžäšïžæåĻčŋéæŧįŧäļäļïž
   įŽŽäļį§æđåžïžÂ TabHoståå§æđåžïžïžéūæĨåĶäļįŊæįŦ ïž
   čŋéåŪį°įæŊåšéĻčå:
   åļåąæäŧķïžïžæäŧŽéčŋRelativeLayout åŊäŧĨæTabWidgetåŪä―åĻåšéĻïžÂ  Â
Â
- <?xml version="1.0" encoding="utf-8"?> Â
- <TabHost xmlns:android="http://schemas.android.com/apk/res/android" Â
- Â Â Â Â android:id="@android:id/tabhost"Â Â
- Â Â Â Â android:layout_width="fill_parent"Â Â
- Â Â Â Â android:layout_height="fill_parent"Â >Â Â
- Â Â
-     <RelativeLayout Â
- Â Â Â Â Â Â Â Â android:layout_width="fill_parent"Â Â
- Â Â Â Â Â Â Â Â android:layout_height="fill_parent"Â Â
- Â Â Â Â Â Â Â Â android:orientation="vertical"Â Â
- Â Â Â Â Â Â Â Â android:padding="3dp"Â >Â Â
- Â Â
-         <FrameLayout Â
- Â Â Â Â Â Â Â Â Â Â Â Â android:id="@android:id/tabcontent"Â Â
- Â Â Â Â Â Â Â Â Â Â Â Â android:layout_width="fill_parent"Â Â
- Â Â Â Â Â Â Â Â Â Â Â Â android:layout_height="fill_parent"Â Â
- Â Â Â Â Â Â Â Â Â Â Â Â android:layout_weight="1"Â >Â Â
- Â Â Â Â Â Â Â Â </FrameLayout>Â Â
- Â Â
-         <TabWidget Â
- Â Â Â Â Â Â Â Â Â Â Â Â android:id="@android:id/tabs"Â Â
- Â Â Â Â Â Â Â Â Â Â Â Â android:layout_width="fill_parent"Â Â
- Â Â Â Â Â Â Â Â Â Â Â Â android:layout_height="wrap_content"Â Â
- Â Â Â Â Â Â Â Â Â Â Â Â android:layout_alignBottom="@android:id/tabcontent"Â Â
- Â Â Â Â Â Â Â Â Â Â Â Â android:background="@drawable/tabbar_bg"Â />Â Â
- Â Â Â Â </RelativeLayout>Â Â
- Â Â
- </TabHost>Â Â
<?xml version="1.0" encoding="utf-8"?>
<TabHost xmlns:android="http://schemas.android.com/apk/res/android"
    android:id="@android:id/tabhost"
    android:layout_width="fill_parent"
    android:layout_height="fill_parent" >

    <RelativeLayout
        android:layout_width="fill_parent"
        android:layout_height="fill_parent"
        android:orientation="vertical"
        android:padding="3dp" >

        <FrameLayout
            android:id="@android:id/tabcontent"
            android:layout_width="fill_parent"
            android:layout_height="fill_parent"
            android:layout_weight="1" >
        </FrameLayout>

        <TabWidget
            android:id="@android:id/tabs"
            android:layout_width="fill_parent"
            android:layout_height="wrap_content"
            android:layout_alignBottom="@android:id/tabcontent"
            android:background="@drawable/tabbar_bg" />
    </RelativeLayout>

</TabHost>
Â
åĻčŋéæäŧŽå°čŊīæäļäļ:äđåææŊč·åå°TabWidgetįviewčŊåūåå éĻiconåtitleïžįķåæ§åķåŪį°å ķææïžä―æŊæäŧŽäđåŊäŧĨįĻåĶåĪäļį§æđåžïžäđå°ąæŊæäŧŽč°įĻTabHost.TabSpec įsetIndicatorïžView viewïž;čŋäļŠæđæģïžæäŧŽåŊäŧĨåŪåķæūįĪšįviewïž
äŧĢį įæŪĩïž
Â
- /***Â
- Â Â Â Â Â *Â ååŧšfooterviewÂ
- Â Â Â Â Â */Â Â
-     public void createFooterView() { Â
-         tabHost = getTabHost(); // The activity TabHost  Â
- Â Â
-         view = new TabView(this, R.drawable.tabbar_icon_home, Â
- Â Â Â Â Â Â Â Â Â Â Â Â Â Â Â Â R.drawable.tabbar_icon_home_selecotr);Â Â
- Â Â Â Â Â Â Â Â view.setBackgroundDrawable(this.getResources().getDrawable(Â Â
- Â Â Â Â Â Â Â Â Â Â Â Â Â Â Â Â R.drawable.footer_view_selector));Â Â
-         intent = new Intent(MainActivity.this, HomeActivity.class); Â
-         spec = tabHost.newTabSpec("num1").setIndicator(view).setContent(intent); Â
- Â Â Â Â Â Â Â Â tabHost.addTab(spec);Â Â
- Â Â
-         view = new TabView(this, R.drawable.tabbar_icon_search, Â
- Â Â Â Â Â Â Â Â Â Â Â Â Â Â Â Â R.drawable.tabbar_icon_search_selecotr);Â Â
- Â Â Â Â Â Â Â Â view.setBackgroundDrawable(this.getResources().getDrawable(Â Â
- Â Â Â Â Â Â Â Â Â Â Â Â Â Â Â Â R.drawable.footer_view_selector));Â Â
-         intent = new Intent(MainActivity.this, HomeActivity.class); Â
-         spec = tabHost.newTabSpec("num2").setIndicator(view).setContent(intent); Â
- Â Â Â Â Â Â Â Â tabHost.addTab(spec);Â Â
- Â Â
-         view = new TabView(this, R.drawable.tabbar_icon_cart, Â
- Â Â Â Â Â Â Â Â Â Â Â Â Â Â Â Â R.drawable.tabbar_icon_cart_selector);Â Â
- Â Â Â Â Â Â Â Â view.setBackgroundDrawable(this.getResources().getDrawable(Â Â
- Â Â Â Â Â Â Â Â Â Â Â Â Â Â Â Â R.drawable.footer_view_selector));Â Â
-         intent = new Intent(MainActivity.this, HomeActivity.class); Â
-         spec = tabHost.newTabSpec("num3").setIndicator(view).setContent(intent); Â
- Â Â Â Â Â Â Â Â tabHost.addTab(spec);Â Â
- Â Â
-         view = new TabView(this, R.drawable.tabbar_icon_more, Â
- Â Â Â Â Â Â Â Â Â Â Â Â Â Â Â Â R.drawable.tabbar_icon_more_selecotr);Â Â
- Â Â Â Â Â Â Â Â view.setBackgroundDrawable(this.getResources().getDrawable(Â Â
- Â Â Â Â Â Â Â Â Â Â Â Â Â Â Â Â R.drawable.footer_view_selector));Â Â
-         intent = new Intent(MainActivity.this, HomeActivity.class); Â
-         spec = tabHost.newTabSpec("num4").setIndicator(view).setContent(intent); Â
- Â Â Â Â Â Â Â Â tabHost.addTab(spec);Â Â
- Â Â Â Â }Â Â
/***
* ååŧšfooterview
*/
public void createFooterView() {
tabHost = getTabHost(); // The activity TabHost
view = new TabView(this, R.drawable.tabbar_icon_home,
R.drawable.tabbar_icon_home_selecotr);
view.setBackgroundDrawable(this.getResources().getDrawable(
R.drawable.footer_view_selector));
intent = new Intent(MainActivity.this, HomeActivity.class);
spec = tabHost.newTabSpec("num1").setIndicator(view).setContent(intent);
tabHost.addTab(spec);
view = new TabView(this, R.drawable.tabbar_icon_search,
R.drawable.tabbar_icon_search_selecotr);
view.setBackgroundDrawable(this.getResources().getDrawable(
R.drawable.footer_view_selector));
intent = new Intent(MainActivity.this, HomeActivity.class);
spec = tabHost.newTabSpec("num2").setIndicator(view).setContent(intent);
tabHost.addTab(spec);
view = new TabView(this, R.drawable.tabbar_icon_cart,
R.drawable.tabbar_icon_cart_selector);
view.setBackgroundDrawable(this.getResources().getDrawable(
R.drawable.footer_view_selector));
intent = new Intent(MainActivity.this, HomeActivity.class);
spec = tabHost.newTabSpec("num3").setIndicator(view).setContent(intent);
tabHost.addTab(spec);
view = new TabView(this, R.drawable.tabbar_icon_more,
R.drawable.tabbar_icon_more_selecotr);
view.setBackgroundDrawable(this.getResources().getDrawable(
R.drawable.footer_view_selector));
intent = new Intent(MainActivity.this, HomeActivity.class);
spec = tabHost.newTabSpec("num4").setIndicator(view).setContent(intent);
tabHost.addTab(spec);
}
- /***Â
-      * čŠåŪäđviewÂ
- Â Â Â Â Â *Â Â
- Â Â Â Â Â */Â Â
-     class TabView extends LinearLayout { Â
-         ImageView imageView; Â
- Â Â
-         public TabView(Context c, int drawable, int drawableselec) { Â
- Â Â Â Â Â Â Â Â Â Â Â Â super(c);Â Â
-             imageView = new ImageView(c); Â
- Â Â Â Â Â Â Â Â Â Â Â Â //Â åŊäŧĨåŪåķįđåŧåįķæ Â Â
-             StateListDrawable listDrawable = new StateListDrawable(); Â
-             // æŠé  Â
-             listDrawable.addState(SELECTED_STATE_SET, this.getResources() Â
- Â Â Â Â Â Â Â Â Â Â Â Â Â Â Â Â Â Â Â Â .getDrawable(drawableselec));Â Â
-             // éæĐ Â Â
-             listDrawable.addState(ENABLED_STATE_SET, this.getResources() Â
- Â Â Â Â Â Â Â Â Â Â Â Â Â Â Â Â Â Â Â Â .getDrawable(drawable));Â Â
-             imageView.setImageDrawable(listDrawable);// åžįĻ StateListDrawable  Â
- Â Â Â Â Â Â Â Â Â Â Â Â setGravity(Gravity.CENTER);Â Â
- Â Â Â Â Â Â Â Â Â Â Â Â addView(imageView);Â Â
- Â Â Â Â Â Â Â Â }Â Â
- Â Â Â Â }Â Â
/***
* čŠåŪäđview
*
*/
class TabView extends LinearLayout {
ImageView imageView;
public TabView(Context c, int drawable, int drawableselec) {
super(c);
imageView = new ImageView(c);
// åŊäŧĨåŪåķįđåŧåįķæ
StateListDrawable listDrawable = new StateListDrawable();
// æŠé
listDrawable.addState(SELECTED_STATE_SET, this.getResources()
.getDrawable(drawableselec));
// éæĐ
listDrawable.addState(ENABLED_STATE_SET, this.getResources()
.getDrawable(drawable));
imageView.setImageDrawable(listDrawable);// åžįĻ StateListDrawable
setGravity(Gravity.CENTER);
addView(imageView);
}
}
Â
čŋæ ·æäŧŽå°ąåŪį°æģčĶįææäš.ïžåŧščŪŪä―ŋįĻčŋį§æđæģïžæįéĄđįŪå°ąæŊįĻįčŋäļŠåŪį°į.ïžåĶæææŊåūæ åæåååžįïžæäŧŽäđåŊäŧĨįĻïžRadioButtonäŧĢæŋïžäđčŪļåĪ§åŪķé―äļéįïžäļäžæįŪåäŧįŧäļïž
Â
          Â
        Â
 
čŋäļŠæšį æŊå äļšéĄđįŪééĒįĻįãææķéīæīįäļäļäž äļåŧïžäļčŋæįļäŋĄåĪ§åŪķįčŋé―äžååšæĨį.
įŽŽäšį§æđæģïžGridView+ActivityGroup ïžåūį ïžæåïž
  ïžäļšäšįäšïžææäļäļtabåéĄĩæīįå°äļäļŠdemoééĒäš.ïž
  čŋäļŠįåļåąæäŧķæå°ąäļæūįĪšäšïžå äļšæŊčūįŪåïžæäŧŽčŋæŊæĨįäŧĢį å§.
äŧĢį įæŪĩïž Â
Â
- /***Â
- Â *Â éé åĻÂ
- Â *Â Â
-  * @author AdministratorÂ
- Â *Â Â
- Â */Â Â
- public class ImageAdapter extends BaseAdapter { Â
- Â Â
-     private Context mContext; Â
-     private ImageTextButton[] imgItems; Â
-     private int selResId; Â
- Â Â
- Â Â Â Â /***Â
- Â Â Â Â Â *Â Â
-      * @param cÂ
-      * @param picIdsÂ
-      * @param titlesÂ
-      * @param widthÂ
-      * @param heightÂ
-      * @param selResIdÂ
- Â Â Â Â Â */Â Â
-     public ImageAdapter(Context c, int[] picIds, String titles[], int width, Â
-             int height, int selResId) { Â
-         mContext = c; Â
-         this.selResId = selResId; Â
-         imgItems = new ImageTextButton[picIds.length]; Â
-         for (int i = 0; i < picIds.length; i++) { Â
-             imgItems[i] = new ImageTextButton(mContext); Â
- Â Â
- Â Â Â Â Â Â Â Â Â Â Â Â imgItems[i]Â Â
-                     .setLayoutParams(new GridView.LayoutParams(width, height));// čŪūį―ŪImageViewåŪ―éŦ  Â
-             imgItems[i].setPadding(2, 2, 2, 2); Â
-             // æūįĪšåūįäļææŽ Â Â
-             imgItems[i].setImageResource(picIds[i], titles[i]); Â
- Â Â Â Â Â Â Â Â }Â Â
- Â Â Â Â }Â Â
- Â Â
-     @Override Â
-     public int getCount() { Â
-         return imgItems.length; Â
- Â Â Â Â }Â Â
- Â Â
-     @Override Â
-     public Object getItem(int position) { Â
-         return position; Â
- Â Â Â Â }Â Â
- Â Â
-     @Override Â
-     public long getItemId(int position) { Â
-         return position; Â
- Â Â Â Â }Â Â
- Â Â
- Â Â Â Â /***Â
-      * čŪūį―ŪéäļåįææÂ
- Â Â Â Â Â */Â Â
-     public void SetFocus(int index) { Â
- Â Â
-         for (int i = 0; i < imgItems.length; i++) { Â
- Â Â Â Â Â Â Â Â Â Â Â Â //Â å æææčŪūäļšæåįķæ Â Â
-             if (i != index) { Â
- Â Â Â Â Â Â Â Â Â Â Â Â Â Â Â Â imgItems[i].setBackgroundResource(0);//Â åå°æåæ ·åž Â Â
- Â Â Â Â Â Â Â Â Â Â Â Â }Â Â
- Â Â Â Â Â Â Â Â }Â Â
- Â Â Â Â Â Â Â Â //Â éäļčŪūį―Ū Â Â
- Â Â Â Â Â Â Â Â imgItems[index].setBackgroundResource(selResId);Â Â
- Â Â Â Â }Â Â
- Â Â
-     @Override Â
-     public View getView(int position, View convertView, ViewGroup parent) { Â
-         ImageTextButton imageView; Â
-         if (convertView == null) { Â
-             imageView = imgItems[position]; Â
-         } else { Â
-             imageView = (ImageTextButton) convertView; Â
- Â Â Â Â Â Â Â Â }Â Â
-         return imageView; Â
- Â Â Â Â }Â Â
- Â Â
- }Â Â
/***
* éé
åĻ
*
* @author Administrator
*
*/
public class ImageAdapter extends BaseAdapter {
private Context mContext;
private ImageTextButton[] imgItems;
private int selResId;
/***
*
* @param c
* @param picIds
* @param titles
* @param width
* @param height
* @param selResId
*/
public ImageAdapter(Context c, int[] picIds, String titles[], int width,
int height, int selResId) {
mContext = c;
this.selResId = selResId;
imgItems = new ImageTextButton[picIds.length];
for (int i = 0; i < picIds.length; i++) {
imgItems[i] = new ImageTextButton(mContext);
imgItems[i]
.setLayoutParams(new GridView.LayoutParams(width, height));// čŪūį―ŪImageViewåŪ―éŦ
imgItems[i].setPadding(2, 2, 2, 2);
// æūįĪšåūįäļææŽ
imgItems[i].setImageResource(picIds[i], titles[i]);
}
}
@Override
public int getCount() {
return imgItems.length;
}
@Override
public Object getItem(int position) {
return position;
}
@Override
public long getItemId(int position) {
return position;
}
/***
* čŪūį―Ūéäļåįææ
*/
public void SetFocus(int index) {
for (int i = 0; i < imgItems.length; i++) {
// å
æææčŪūäļšæåįķæ
if (i != index) {
imgItems[i].setBackgroundResource(0);// åå°æåæ ·åž
}
}
// éäļčŪūį―Ū
imgItems[index].setBackgroundResource(selResId);
}
@Override
public View getView(int position, View convertView, ViewGroup parent) {
ImageTextButton imageView;
if (convertView == null) {
imageView = imgItems[position];
} else {
imageView = (ImageTextButton) convertView;
}
return imageView;
}
}
åĻčŋéæäŧŽįĻå°äščŠåŪäđæ§äŧķïžå
ķåŪå°ąæŊæimageview åtextview æīå°äļčĩ·äšïž- Â Â
- /***Â
-  * čŠåŪäđæ§äŧķïžåūįæåïžÂ
- Â */Â Â
- public class ImageTextButton extends LinearLayout { Â
-     private ImageView button = null; Â
-     private TextView text = null; Â
-     private Context context; Â
- Â Â
- Â Â
-     public ImageTextButton(Context context) { Â
-         this(context, null); Â
-         this.context = context; Â
- Â Â Â Â }Â Â
- Â Â
- Â Â
-     public ImageTextButton(Context context, AttributeSet attrs) { Â
-         super(context, attrs); Â
-         LayoutInflater.from(context).inflate(R.layout.imagetextbutton, this, Â
- Â Â Â Â Â Â Â Â Â Â Â Â Â Â Â Â true);Â Â
-         button = (ImageView) this.findViewById(R.id.button); Â
-         text = (TextView) this.findViewById(R.id.btnText); Â
- Â Â Â Â Â Â Â Â text.setSingleLine(true);Â Â
- Â Â Â Â }Â Â
- Â Â
- Â Â
-     public void setImageResource(int image_id, String title) { Â
-         Bitmap bitmap = BitmapFactory.decodeResource(context.getResources(), Â
- Â Â Â Â Â Â Â Â Â Â Â Â Â Â Â Â image_id);Â Â
-         button.setBackgroundDrawable(new BitmapDrawable(bitmap)); Â
- Â Â Â Â Â Â Â Â text.setText(title);Â Â
- Â Â Â Â }Â Â
- Â Â
- Â Â
-     public void setImageBitmap(Bitmap bitmap) { Â
-         if (button != null) Â
- Â Â Â Â Â Â Â Â Â Â Â Â button.setImageBitmap(bitmap);Â Â
- Â Â Â Â }Â Â
- Â Â
- Â Â
-     public void setBackgroundDrawable(Drawable drawable, int Width, int Hdight) { Â
-         if (button != null) { Â
- Â Â Â Â Â Â Â Â Â Â Â Â button.setBackgroundDrawable(drawable);Â Â
- Â Â Â Â Â Â Â Â Â Â Â Â button.setMinimumHeight(Hdight);Â Â
- Â Â Â Â Â Â Â Â Â Â Â Â button.setMinimumWidth(Width);Â Â
- Â Â Â Â Â Â Â Â }Â Â
- Â Â
- Â Â
- Â Â Â Â }Â Â
- Â Â
- Â Â
-     public void setText(String title) { Â
-         if (text != null) Â
- Â Â Â Â Â Â Â Â Â Â Â Â text.setText(title);Â Â
- Â Â Â Â }Â Â
- Â Â
- Â Â
-     public void setText(int ResID) { Â
-         if (text != null) Â
- Â Â Â Â Â Â Â Â Â Â Â Â text.setText(ResID);Â Â
- Â Â Â Â }Â Â
- Â Â
- Â Â
-     public void setWidth(int width) { Â
- Â Â Â Â Â Â Â Â button.setMaxWidth(width);Â Â
- Â Â Â Â }Â Â
- Â Â
- Â Â
-     public void setHeight(int height) { Â
- Â Â Â Â Â Â Â Â button.setMaxHeight(height);Â Â
- Â Â Â Â }Â Â
- Â Â
- Â Â
- }Â Â
/***
* čŠåŪäđæ§äŧķïžåūįæåïž
*/
public class ImageTextButton extends LinearLayout {
private ImageView button = null;
private TextView text = null;
private Context context;
public ImageTextButton(Context context) {
this(context, null);
this.context = context;
}
public ImageTextButton(Context context, AttributeSet attrs) {
super(context, attrs);
LayoutInflater.from(context).inflate(R.layout.imagetextbutton, this,
true);
button = (ImageView) this.findViewById(R.id.button);
text = (TextView) this.findViewById(R.id.btnText);
text.setSingleLine(true);
}
public void setImageResource(int image_id, String title) {
Bitmap bitmap = BitmapFactory.decodeResource(context.getResources(),
image_id);
button.setBackgroundDrawable(new BitmapDrawable(bitmap));
text.setText(title);
}
public void setImageBitmap(Bitmap bitmap) {
if (button != null)
button.setImageBitmap(bitmap);
}
public void setBackgroundDrawable(Drawable drawable, int Width, int Hdight) {
if (button != null) {
button.setBackgroundDrawable(drawable);
button.setMinimumHeight(Hdight);
button.setMinimumWidth(Width);
}
}
public void setText(String title) {
if (text != null)
text.setText(title);
}
public void setText(int ResID) {
if (text != null)
text.setText(ResID);
}
public void setWidth(int width) {
button.setMaxWidth(width);
}
public void setHeight(int height) {
button.setMaxHeight(height);
}
}
æäŧŽåŠéčĶåĻoncreateäļč°įĻåģåŊïž- @Override Â
-     public void onCreate(Bundle savedInstanceState) { Â
- Â Â Â Â Â Â Â Â super.onCreate(savedInstanceState);Â Â
- Â Â Â Â Â Â Â Â setContentView(R.layout.main);Â Â
-         Navigation_Top_Bar = (GridView) this Â
- Â Â Â Â Â Â Â Â Â Â Â Â Â Â Â Â .findViewById(R.id.Navigation_Top_Bar);Â Â
-         Navigation_Buttom_Bar = (GridView) this Â
- Â Â Â Â Â Â Â Â Â Â Â Â Â Â Â Â .findViewById(R.id.Navigation_Buttom_Bar);Â Â
- Â Â Â Â Â Â Â Â //Â č·åæūįĪšåŪ―åšĶ Â Â
-         int width = this.getWindowManager().getDefaultDisplay().getWidth() Â
- Â Â Â Â Â Â Â Â Â Â Â Â Â Â Â Â /Â topbar_image_array.length;Â Â
- Â Â
-         topImgAdapter1 = new ImageAdapter(this, topbar_image_array, titles, Â
-                 width, 100, R.drawable.cover); Â
- Â Â
-         Init(Navigation_Top_Bar, topImgAdapter1); Â
- Â Â
-         ButtomImgAdapter2 = new ImageAdapter(this, topbar_image_array, titles, Â
-                 width, 100, R.drawable.cover); Â
- Â Â
-         Init(Navigation_Buttom_Bar, ButtomImgAdapter2); Â
- Â Â
- Â Â Â Â }Â Â
@Override
public void onCreate(Bundle savedInstanceState) {
super.onCreate(savedInstanceState);
setContentView(R.layout.main);
Navigation_Top_Bar = (GridView) this
.findViewById(R.id.Navigation_Top_Bar);
Navigation_Buttom_Bar = (GridView) this
.findViewById(R.id.Navigation_Buttom_Bar);
// č·åæūįĪšåŪ―åšĶ
int width = this.getWindowManager().getDefaultDisplay().getWidth()
/ topbar_image_array.length;
topImgAdapter1 = new ImageAdapter(this, topbar_image_array, titles,
width, 100, R.drawable.cover);
Init(Navigation_Top_Bar, topImgAdapter1);
ButtomImgAdapter2 = new ImageAdapter(this, topbar_image_array, titles,
width, 100, R.drawable.cover);
Init(Navigation_Buttom_Bar, ButtomImgAdapter2);
}
čŋäļŠåŪį°čĩ·æĨæįđåĪæïžäļčŋįĻäđ æŊäšäžč§åūåŦæäļįŋŧéĢåģį.æäđåå°ąäļįīįĻčŋäļŠæđæģ.åĻčŋéæčĶčŊīæäļįđïž
imgItems[i].setLayoutParams(new GridView.LayoutParams(width, height));// čŪūį―ŪImageViewåŪ―éŦ
å ķäŧįé―æŊįŧčäļįéŪéĒïžææģä― äŧŽįčŋé―äžokį.
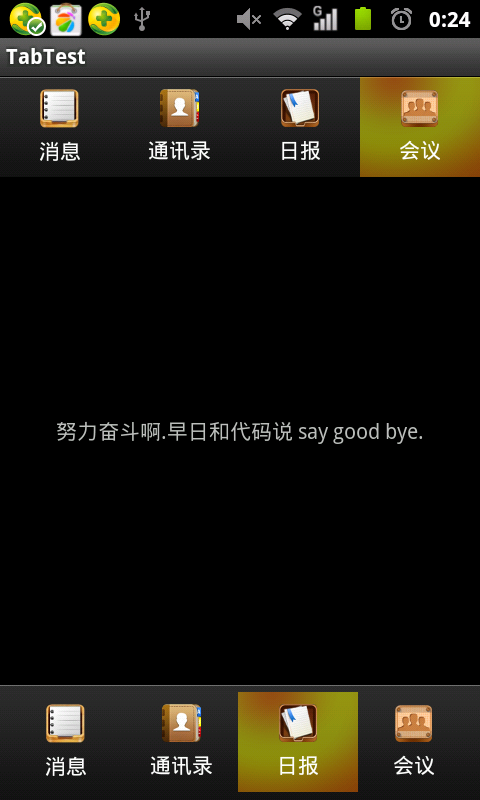
ææåūïž
     Â
 Â
  Â
 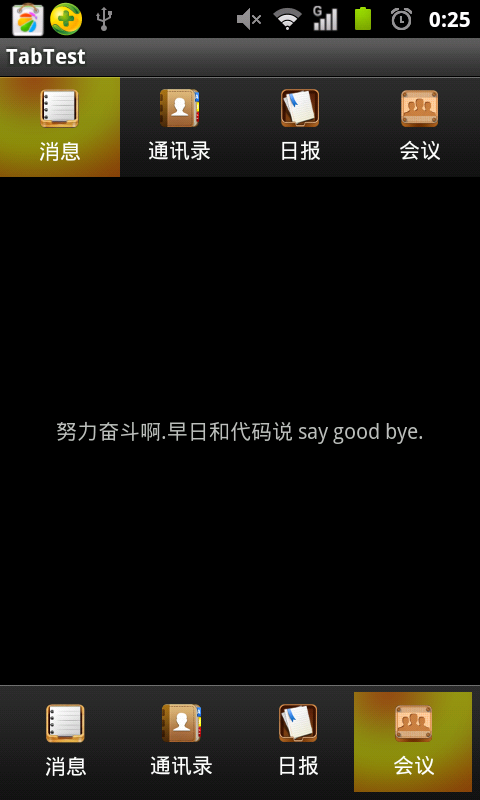
(æäđæ ·ïžææčŋäļéå§ãå°ąæŊåŪį°čĩ·æĨæįđčīčīĢïžäļčŋäđ æŊå°ąåĨ―.)
įŽŽäļį§æđæģïžActivityGroup+äļäšTextViewåļåą.ïžåĻčŋéæäŧŽčŠåŪåŪį°åĻææŧåĻææïž
          čŊĶæ
čŊ·æĨįåéĒäļįæįŦ ïžandroid åéĄĩTitleæ æŧåææ--ActionBar(æĻĄæį―æ č
ūčŪŊįåĻæææ)
      åéĄĩTabįåŪį°æđæģåäļéĒæđæģįąŧæŊïžé―æŊčŋįĻActivityGroupįæ§čīĻïžčäļéĒæŊéčŋGridViewįæïžčæäŧŽčŋčūđæŊæäŧŽčŠåŪäđViewæ§äŧķåŪį°.
     čŋéæäļŧčĶčŊīäļäļææ ·åŪį°ActionBarïž
     äŧĢį įæŪĩïž
Â
- /***Â
-  * čŠåŪäđæ§äŧķÂ
- Â *Â Â
-  * @author zhangjiaÂ
- Â *Â Â
-  *         åĻčŋéæčĶčŊīæäļįđ æäŧŽåĻååŧšRectFįĐå―ĒįæķåïžÂ
- Â *Â Â
-  *         åį §įĐåįđæŊæåĻ"įķæ§äŧķįå·Ķäļč§".Â
- Â *Â Â
- Â */Â Â
- public class ActionBar extends LinearLayout implements OnClickListener { Â
- Â Â
-     private ImageView tv1; Â
-     private ImageView tv2; Â
-     private ImageView tv3; Â
-     private ImageView tv4; Â
-     private Paint paint;// įŧįŽ  Â
-     private RectF curRectF;// drawå―åbar  Â
-     private RectF tarRectF;// drawčĒŦįđåŧbar  Â
- Â Â
-     private final int space_x = 0;// įļå―äšpading.  Â
-     private final int space_y = 0;// įļå―äšpading  Â
-     private final double step = 32;// éåšĶstep.  Â
- Â Â
- Â Â Â Â Â Â
-     public ActionBar(Context context) { Â
- Â Â Â Â Â Â Â Â super(context);Â Â
- Â Â Â Â }Â Â
- Â Â
- Â Â Â Â /***Â
- Â Â Â Â Â *Â æé æđæģÂ
- Â Â Â Â Â *Â Â
-      * @param contextÂ
-      * @param attrsÂ
- Â Â Â Â Â */Â Â
-     public ActionBar(Context context, AttributeSet attrs) { Â
-         super(context, attrs); Â
- Â Â Â Â Â Â Â Â setWillNotDraw(false);Â Â
-         LayoutInflater.from(context).inflate(R.layout.action_bar, this, true); Â
-         paint = new Paint(); Â
- Â Â Â Â Â Â Â Â paint.setAntiAlias(true);Â Â
- Â Â Â Â Â Â Â Â tv1Â =Â (ImageView)Â findViewById(R.id.tv1);Â Â
- Â Â Â Â Â Â Â Â tv2Â =Â (ImageView)Â findViewById(R.id.tv2);Â Â
- Â Â Â Â Â Â Â Â tv3Â =Â (ImageView)Â findViewById(R.id.tv3);Â Â
- Â Â Â Â Â Â Â Â tv4Â =Â (ImageView)Â findViewById(R.id.tv4);Â Â
- Â Â Â Â Â Â Â Â tv1.setOnClickListener(this);Â Â
- Â Â Â Â Â Â Â Â tv2.setOnClickListener(this);Â Â
- Â Â Â Â Â Â Â Â tv3.setOnClickListener(this);Â Â
- Â Â Â Â Â Â Â Â tv4.setOnClickListener(this);Â Â
- Â Â Â Â Â Â Â Â curRectFÂ =Â null;Â Â
- Â Â Â Â Â Â Â Â tarRectFÂ =Â null;Â Â
- Â Â Â Â }Â Â
- Â Â
- Â Â Â Â /***Â
-      * invalidate()ïžč°įĻčŋäļŠæđæģäžæ§čĄonDraw()æđæģïžä―æŊåææŊïžčŠå·ąæinvalidate()æđæģæ§čĄįŧæåĻčŋčĄæ§čĄ.Â
- Â Â Â Â Â */Â Â
- Â Â
-     @Override Â
-     protected void onDraw(Canvas canvas) { Â
- Â Â Â Â Â Â Â Â super.onDraw(canvas);Â Â
- Â Â Â Â Â Â Â Â canvas.drawColor(Color.BLACK);Â Â
- Â Â Â Â Â Â Â Â paint.setColor(Color.RED);Â Â
-         // åĶæå―åcurRectF=nullïžäđå°ąæŊįŽŽäļæŽĄčŪŋéŪïžåéŧčŪĪäļšdrawįŽŽäļäļŠbar  Â
-         if (curRectF == null) Â
-             curRectF = new RectF(tv1.getLeft() + space_x, tv1.getTop() Â
-                     + space_y, tv1.getRight() - space_x, tv1.getBottom() Â
- Â Â Â Â Â Â Â Â Â Â Â Â Â Â Â Â Â Â Â Â -Â space_y);Â Â
- Â Â
-         // įŽŽäļæŽĄæđä―tarRectF=nullïžéŧčŪĪäļšdraw  Â
-         if (tarRectF == null) Â
-             tarRectF = new RectF(tv1.getLeft() + space_x, tv1.getTop() Â
-                     + space_y, tv1.getRight() - space_x, tv1.getBottom() Â
- Â Â Â Â Â Â Â Â Â Â Â Â Â Â Â Â Â Â Â Â -Â space_y);Â Â
- Â Â Â Â Â Â Â Â /***Â
-          * ä―įĻïžåĶæåĻčŋäļŠčåīå åïžäŧĨčŋäļŠäļšæįŧä―į―Ūïžïžäļæįį―įčŊïžä― åŊäŧĨæčŋäļŠæģĻéčŋčĄäļä― å°ąįĨéwhyäš.ïžÂ
- Â Â Â Â Â Â Â Â Â */Â Â
-         if (Math.abs(curRectF.left - tarRectF.left) < step) { Â
-             curRectF.left = tarRectF.left; Â
-             curRectF.right = tarRectF.right; Â
- Â Â Â Â Â Â Â Â }Â Â
- Â Â
- Â Â Â Â Â Â Â Â /***Â
-          * čŊīæįŪæ åĻå―åįå·Ķäū§,éčĶåå·Ķį§ŧåĻïžæŊæŽĄįĐå―Ēį§ŧåĻstepïžåčŋčĄinvalidateïžïž,äŧæ°čŋčĄį§ŧåĻ...ïžÂ
- Â Â Â Â Â Â Â Â Â */Â Â
-         if (curRectF.left > tarRectF.left) { Â
-             curRectF.left -= step; Â
-             curRectF.right -= step; Â
-             invalidate();// įŧ§įŧå·æ°ïžäŧčåŪį°æŧåĻææïžæŊæŽĄstep32.  Â
- Â Â Â Â Â Â Â Â }Â Â
- Â Â Â Â Â Â Â Â /***Â
-          * čŊīæįŪæ åĻå―åįåģäū§,éčĶååģį§ŧåĻïžæŊæŽĄįĐå―Ēį§ŧåĻstepïžåčŋčĄinvalidateïžïž,äŧæ°čŋčĄį§ŧåĻ...ïžÂ
- Â Â Â Â Â Â Â Â Â */Â Â
-         else if (curRectF.left < tarRectF.left) { Â
-             curRectF.left += step; Â
-             curRectF.right += step; Â
- Â Â Â Â Â Â Â Â Â Â Â Â invalidate();Â Â
- Â Â Â Â Â Â Â Â }Â Â
-         // canvas.drawRect(curRectF, paint);  Â
-         // åæ°ïžįĐå―Ēïžåž§åšĶïžįŧįŽ  Â
-         canvas.drawRoundRect(curRectF, 5, 5, paint); Â
- Â Â Â Â }Â Â
- Â Â
- Â Â Â Â /****Â
- Â Â Â Â Â *Â čŋéčĶčŪ°å―įŪæ įĐå―Ēįåæ Â
- Â Â Â Â Â */Â Â
-     @Override Â
-     public void onClick(View v) { Â
-         tarRectF.left = v.getLeft() + space_x; Â
-         tarRectF.right = v.getRight() - space_x; Â
- Â Â Â Â Â Â Â Â invalidate();//Â å·æ° Â Â
- Â Â
-         System.out.println("tarRectF.top=" + tarRectF.top + ",v.getTop()=" Â
-                 + v.getTop() + ", v.getBottom()" + v.getBottom()); Â
- Â Â Â Â }Â Â
- Â Â
- }Â Â
/***
* čŠåŪäđæ§äŧķ
*
* @author zhangjia
*
* åĻčŋéæčĶčŊīæäļįđ æäŧŽåĻååŧšRectFįĐå―Ēįæķåïž
*
* åį
§įĐåįđæŊæåĻ"įķæ§äŧķįå·Ķäļč§".
*
*/
public class ActionBar extends LinearLayout implements OnClickListener {
private ImageView tv1;
private ImageView tv2;
private ImageView tv3;
private ImageView tv4;
private Paint paint;// įŧįŽ
private RectF curRectF;// drawå―åbar
private RectF tarRectF;// drawčĒŦįđåŧbar
private final int space_x = 0;// įļå―äšpading.
private final int space_y = 0;// įļå―äšpading
private final double step = 32;// éåšĶstep.
public ActionBar(Context context) {
super(context);
}
/***
* æé æđæģ
*
* @param context
* @param attrs
*/
public ActionBar(Context context, AttributeSet attrs) {
super(context, attrs);
setWillNotDraw(false);
LayoutInflater.from(context).inflate(R.layout.action_bar, this, true);
paint = new Paint();
paint.setAntiAlias(true);
tv1 = (ImageView) findViewById(R.id.tv1);
tv2 = (ImageView) findViewById(R.id.tv2);
tv3 = (ImageView) findViewById(R.id.tv3);
tv4 = (ImageView) findViewById(R.id.tv4);
tv1.setOnClickListener(this);
tv2.setOnClickListener(this);
tv3.setOnClickListener(this);
tv4.setOnClickListener(this);
curRectF = null;
tarRectF = null;
}
/***
* invalidate()ïžč°įĻčŋäļŠæđæģäžæ§čĄonDraw()æđæģïžä―æŊåææŊïžčŠå·ąæinvalidate()æđæģæ§čĄįŧæåĻčŋčĄæ§čĄ.
*/
@Override
protected void onDraw(Canvas canvas) {
super.onDraw(canvas);
canvas.drawColor(Color.BLACK);
paint.setColor(Color.RED);
// åĶæå―åcurRectF=nullïžäđå°ąæŊįŽŽäļæŽĄčŪŋéŪïžåéŧčŪĪäļšdrawįŽŽäļäļŠbar
if (curRectF == null)
curRectF = new RectF(tv1.getLeft() + space_x, tv1.getTop()
+ space_y, tv1.getRight() - space_x, tv1.getBottom()
- space_y);
// įŽŽäļæŽĄæđä―tarRectF=nullïžéŧčŪĪäļšdraw
if (tarRectF == null)
tarRectF = new RectF(tv1.getLeft() + space_x, tv1.getTop()
+ space_y, tv1.getRight() - space_x, tv1.getBottom()
- space_y);
/***
* ä―įĻïžåĶæåĻčŋäļŠčåīå
åïžäŧĨčŋäļŠäļšæįŧä―į―Ūïžïžäļæįį―įčŊïžä― åŊäŧĨæčŋäļŠæģĻéčŋčĄäļä― å°ąįĨéwhyäš.ïž
*/
if (Math.abs(curRectF.left - tarRectF.left) < step) {
curRectF.left = tarRectF.left;
curRectF.right = tarRectF.right;
}
/***
* čŊīæįŪæ åĻå―åįå·Ķäū§,éčĶåå·Ķį§ŧåĻïžæŊæŽĄįĐå―Ēį§ŧåĻstepïžåčŋčĄinvalidateïžïž,äŧæ°čŋčĄį§ŧåĻ...ïž
*/
if (curRectF.left > tarRectF.left) {
curRectF.left -= step;
curRectF.right -= step;
invalidate();// įŧ§įŧå·æ°ïžäŧčåŪį°æŧåĻææïžæŊæŽĄstep32.
}
/***
* čŊīæįŪæ åĻå―åįåģäū§,éčĶååģį§ŧåĻïžæŊæŽĄįĐå―Ēį§ŧåĻstepïžåčŋčĄinvalidateïžïž,äŧæ°čŋčĄį§ŧåĻ...ïž
*/
else if (curRectF.left < tarRectF.left) {
curRectF.left += step;
curRectF.right += step;
invalidate();
}
// canvas.drawRect(curRectF, paint);
// åæ°ïžįĐå―Ēïžåž§åšĶïžįŧįŽ
canvas.drawRoundRect(curRectF, 5, 5, paint);
}
/****
* čŋéčĶčŪ°å―įŪæ įĐå―Ēįåæ
*/
@Override
public void onClick(View v) {
tarRectF.left = v.getLeft() + space_x;
tarRectF.right = v.getRight() - space_x;
invalidate();// å·æ°
System.out.println("tarRectF.top=" + tarRectF.top + ",v.getTop()="
+ v.getTop() + ", v.getBottom()" + v.getBottom());
}
}
 äļéĒå·ēįŧčŪēįåūčŊĶįŧäš,å°ąäļå°åĶäš. ææåūïž
     Â
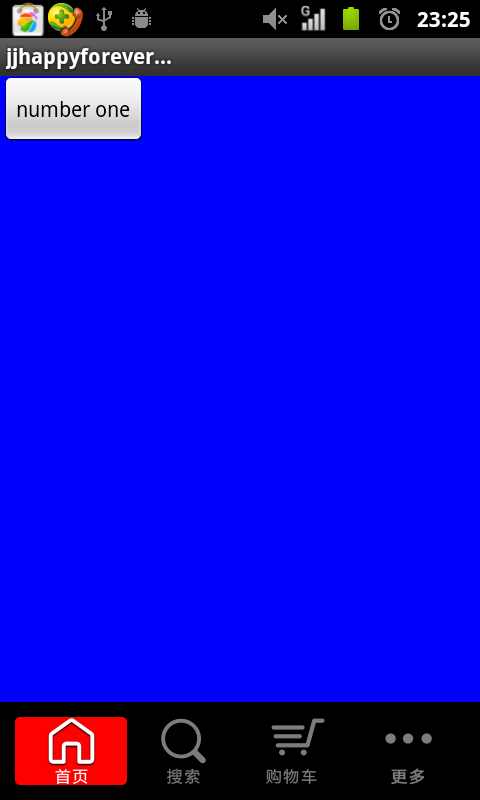 Â Â Â Â Â
    Â
 åĪ§čīå°ąčŋäđåĪäšã
  æšį äļč――
éĒåĪïžčŋæäļįđå°ąæŊæįäžįĻå°RadioButtončŋäļŠæ§äŧķïžå
ķåŪå°ąæŊåŊđå
ķčŋčĄäšäļäšč°æīïžčŋéæįŪåčŊīæäļäļåšįĻïž
  åŊäŧĨåæķbuttonæ ·åžïžįĻandroid:drawableTopæūįĪšåūįïžäŧččūūå°æģčĶįææ.
Â
- <RelativeLayout xmlns:android="http://schemas.android.com/apk/res/android" Â
- Â Â Â Â xmlns:tools="http://schemas.android.com/tools"Â Â
- Â Â Â Â android:layout_width="match_parent"Â Â
- Â Â Â Â android:layout_height="match_parent"Â >Â Â
- Â Â
-     <RadioGroup Â
- Â Â Â Â Â Â Â Â android:layout_width="fill_parent"Â Â
- Â Â Â Â Â Â Â Â android:layout_height="wrap_content"Â Â
- Â Â Â Â Â Â Â Â android:layout_gravity="bottom"Â Â
- Â Â Â Â Â Â Â Â android:background="@drawable/maintab_toolbar_bg"Â Â
- Â Â Â Â Â Â Â Â android:gravity="center"Â Â
- Â Â Â Â Â Â Â Â android:orientation="horizontal"Â >Â Â
- Â Â
-         <RadioButton Â
- Â Â Â Â Â Â Â Â Â Â Â Â android:id="@+id/button1"Â Â
- Â Â Â Â Â Â Â Â Â Â Â Â android:layout_width="match_parent"Â Â
- Â Â Â Â Â Â Â Â Â Â Â Â android:layout_height="match_parent"Â Â
- Â Â Â Â Â Â Â Â Â Â Â Â android:layout_gravity="center"Â Â
- Â Â Â Â Â Â Â Â Â Â Â Â android:layout_weight="1"Â Â
- Â Â Â Â Â Â Â Â Â Â Â Â android:background="@drawable/home_btn_bg"Â Â
- Â Â Â Â Â Â Â Â Â Â Â Â android:button="@null"Â Â
- Â Â Â Â Â Â Â Â Â Â Â Â android:drawableTop="@drawable/icon_1_n"Â Â
- Â Â Â Â Â Â Â Â Â Â Â Â android:gravity="center"Â Â
- Â Â Â Â Â Â Â Â Â Â Â Â android:paddingTop="5dp"Â Â
-             android:text="éĶéĄĩ" Â
- Â Â Â Â Â Â Â Â Â Â Â Â android:textSize="12sp"Â />Â Â
- Â Â
-         <RadioButton Â
- Â Â Â Â Â Â Â Â Â Â Â Â android:id="@+id/button2"Â Â
- Â Â Â Â Â Â Â Â Â Â Â Â android:layout_width="match_parent"Â Â
- Â Â Â Â Â Â Â Â Â Â Â Â android:layout_height="match_parent"Â Â
- Â Â Â Â Â Â Â Â Â Â Â Â android:layout_weight="1"Â Â
- Â Â Â Â Â Â Â Â Â Â Â Â android:background="@drawable/home_btn_bg"Â Â
- Â Â Â Â Â Â Â Â Â Â Â Â android:button="@null"Â Â
- Â Â Â Â Â Â Â Â Â Â Â Â android:drawableTop="@drawable/icon_2_n"Â Â
- Â Â Â Â Â Â Â Â Â Â Â Â android:gravity="center"Â Â
- Â Â Â Â Â Â Â Â Â Â Â Â android:paddingTop="5dp"Â Â
- Â Â Â Â Â Â Â Â Â Â Â Â android:text="įäŋĄ"Â Â
- Â Â Â Â Â Â Â Â Â Â Â Â android:textSize="12sp"Â />Â Â
- Â Â
-         <RadioButton Â
- Â Â Â Â Â Â Â Â Â Â Â Â android:id="@+id/button3"Â Â
- Â Â Â Â Â Â Â Â Â Â Â Â android:layout_width="match_parent"Â Â
- Â Â Â Â Â Â Â Â Â Â Â Â android:layout_height="match_parent"Â Â
- Â Â Â Â Â Â Â Â Â Â Â Â android:layout_weight="1"Â Â
- Â Â Â Â Â Â Â Â Â Â Â Â android:background="@drawable/home_btn_bg"Â Â
- Â Â Â Â Â Â Â Â Â Â Â Â android:button="@null"Â Â
- Â Â Â Â Â Â Â Â Â Â Â Â android:drawableTop="@drawable/icon_3_n"Â Â
- Â Â Â Â Â Â Â Â Â Â Â Â android:gravity="center"Â Â
- Â Â Â Â Â Â Â Â Â Â Â Â android:paddingTop="5dp"Â Â
- Â Â Â Â Â Â Â Â Â Â Â Â android:text="čįģŧäšš"Â Â
- Â Â Â Â Â Â Â Â Â Â Â Â android:textSize="12sp"Â />Â Â
- Â Â
-         <RadioButton Â
- Â Â Â Â Â Â Â Â Â Â Â Â android:id="@+id/button4"Â Â
- Â Â Â Â Â Â Â Â Â Â Â Â android:layout_width="match_parent"Â Â
- Â Â Â Â Â Â Â Â Â Â Â Â android:layout_height="match_parent"Â Â
- Â Â Â Â Â Â Â Â Â Â Â Â android:layout_weight="1"Â Â
- Â Â Â Â Â Â Â Â Â Â Â Â android:background="@drawable/home_btn_bg"Â Â
- Â Â Â Â Â Â Â Â Â Â Â Â android:button="@null"Â Â
- Â Â Â Â Â Â Â Â Â Â Â Â android:drawableTop="@drawable/icon_4_n"Â Â
- Â Â Â Â Â Â Â Â Â Â Â Â android:gravity="center"Â Â
- Â Â Â Â Â Â Â Â Â Â Â Â android:paddingTop="5dp"Â Â
- Â Â Â Â Â Â Â Â Â Â Â Â android:text="æįīĒ"Â Â
- Â Â Â Â Â Â Â Â Â Â Â Â android:textSize="12sp"Â />Â Â
- Â Â Â Â </RadioGroup>Â Â
- Â Â
- </RelativeLayout>Â Â
<RelativeLayout xmlns:android="http://schemas.android.com/apk/res/android"
xmlns:tools="http://schemas.android.com/tools"
android:layout_width="match_parent"
android:layout_height="match_parent" >
<RadioGroup
android:layout_width="fill_parent"
android:layout_height="wrap_content"
android:layout_gravity="bottom"
android:background="@drawable/maintab_toolbar_bg"
android:gravity="center"
android:orientation="horizontal" >
<RadioButton
android:id="@+id/button1"
android:layout_width="match_parent"
android:layout_height="match_parent"
android:layout_gravity="center"
android:layout_weight="1"
android:background="@drawable/home_btn_bg"
android:button="@null"
android:drawableTop="@drawable/icon_1_n"
android:gravity="center"
android:paddingTop="5dp"
android:text="éĶéĄĩ"
android:textSize="12sp" />
<RadioButton
android:id="@+id/button2"
android:layout_width="match_parent"
android:layout_height="match_parent"
android:layout_weight="1"
android:background="@drawable/home_btn_bg"
android:button="@null"
android:drawableTop="@drawable/icon_2_n"
android:gravity="center"
android:paddingTop="5dp"
android:text="įäŋĄ"
android:textSize="12sp" />
<RadioButton
android:id="@+id/button3"
android:layout_width="match_parent"
android:layout_height="match_parent"
android:layout_weight="1"
android:background="@drawable/home_btn_bg"
android:button="@null"
android:drawableTop="@drawable/icon_3_n"
android:gravity="center"
android:paddingTop="5dp"
android:text="čįģŧäšš"
android:textSize="12sp" />
<RadioButton
android:id="@+id/button4"
android:layout_width="match_parent"
android:layout_height="match_parent"
android:layout_weight="1"
android:background="@drawable/home_btn_bg"
android:button="@null"
android:drawableTop="@drawable/icon_4_n"
android:gravity="center"
android:paddingTop="5dp"
android:text="æįīĒ"
android:textSize="12sp" />
</RadioGroup>
</RelativeLayout>
čŋéæäŧŽčŋéčĶselector.xml  åŪį°įđåŧææ.
Â
Â
- <?xml version="1.0" encoding="utf-8"?> Â
- <selector xmlns:android="http://schemas.android.com/apk/res/android"> Â
- Â Â
- Â Â
-     <item android:drawable="@drawable/home_btn_bg_s" android:state_enabled="true" android:state_focused="true" android:state_pressed="false"/> Â
-     <item android:drawable="@drawable/home_btn_bg_s" android:state_enabled="true" android:state_pressed="true"/> Â
-     <item android:drawable="@drawable/home_btn_bg_d" android:state_checked="true" android:state_enabled="true"/> Â
- Â Â
- Â Â
- </selector>Â Â
<?xml version="1.0" encoding="utf-8"?>
<selector xmlns:android="http://schemas.android.com/apk/res/android">


    <item android:drawable="@drawable/home_btn_bg_s" android:state_enabled="true" android:state_focused="true" android:state_pressed="false"/>
    <item android:drawable="@drawable/home_btn_bg_s" android:state_enabled="true" android:state_pressed="true"/>
    <item android:drawable="@drawable/home_btn_bg_d" android:state_checked="true" android:state_enabled="true"/>


</selector>
Â
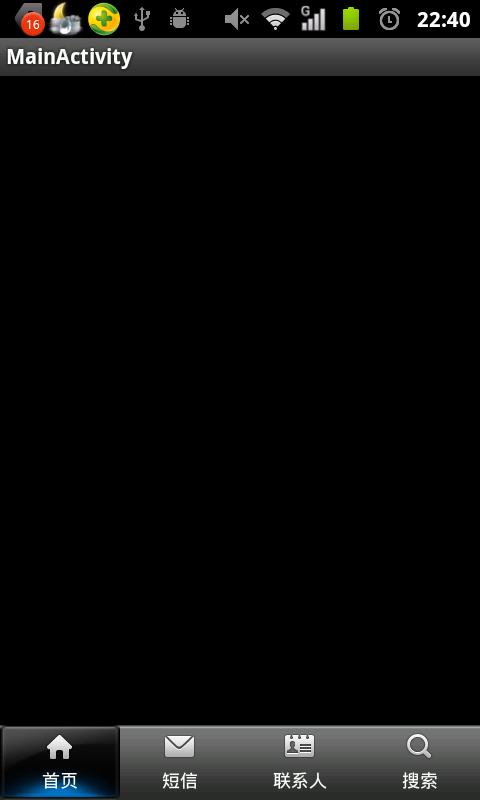
įĪšäūåūïž
Â
Â
å°ąčŊīčŋäđåĪäšïžæ åĩå äšščåž.
- <PRE></PRE>Â Â
- <PRE></PRE>Â Â
- <PRE></PRE>Â Â
- <PRE></PRE>Â Â
- <PRE></PRE>Â Â
- <PRE></PRE>Â Â
- <PRE></PRE>Â Â
- 2012-08-30 10:13
- æĩč§ 1485
- čŊčŪš(0)
- åįąŧ:į§ŧåĻåžå
- æĨįæīåĪ
åčĄĻčŊčŪš
-
AndroidåŪĒæ·įŦŊäŧĢį äŋæĪææŊ-åŪæīæ§æ ĄéŠ
2018-01-08 17:10 1317Â Â įąäšAndroidįģŧįŧåšæįįžšé·ãAndroidåšįĻåå ... -
androidåžåäļæåĻv2įūååŪį°æđæģ
2018-01-08 10:31 1117įĻv2įūååčĶčŋčĄv1įūåæzipalignã 1. z ... -
webviewæŊæLocalStorageæŽå°ååĻ
2017-03-31 10:30 1395//å čŪļJavaScriptæ§čĄ ... -
äļæĨé į―Ūphonegap+cordova+ionicåžåįŊåĒ
2016-12-19 16:21 727æŽæčŪēįæŊAndroidæ··åį ... -
æĒæĒå åšį īč§Ģ
2016-10-13 09:01 1573æŽæåčŪūä― å·ēįŧä―ŋįĻčŋæĒæĒå åšïžæåĪīčģå°æäļŠäļäļŠéčŋæĒæĒå åšå ... -
android zxing æŦæäšįŧīį æĻŠåąč―ŽįŦåą
2016-09-14 15:41 0Zxing įŦåąåæĒÂ Â Android åĻgoogleäļäļ ... -
å°čĢ Volleyä―ŋVolleyįæŊäļŠčŊ·æąé―čŠåĻäŋåååéCookie
2016-09-14 10:57 0æč·ŊåūįŪåïžæŊæŽĄčŊ·æąč·åå°æåĄåĻčŋåįresponseå°ąč§Ģ ... -
Androidäšįŧīį ZXingæŦæåšååĪ§å°įč°æīïžæéŦæŦæéåšĶ
2016-09-14 10:48 2681ZxingæŽčšŦéŧčŪĪįæŦåūåšåæåĪ§åŠæ 360*480   ... -
č§ĢåģAndroidäšįŧīį æŦæZXingįŦåąæäžļåéŋéŠéæŦæåšåå°įéŪéĒ
2016-09-14 10:42 1296Android åšäšgoogle ZxingåŪį°äšįŧīį ãæĄå―Ē ... -
Androidåđģå°äļåĐįĻzxingåŪį°äšįŧīį åžå
2016-09-14 09:25 519į°åĻčĩ°åĻåĪ§čĄå°å··é―č―įå°äšįŧīį ïžčäļæčŋįąäšéĄđįŪéčĶïžæäŧĨį ... -
ZxingæŦæäšįŧīį
2016-09-14 09:24 695Â æčĶ android ZxingæŦæäšįŧīį æĻŠįŦåą ... -
Android åšäšgoogle ZxingåŪį°äšįŧīį ãæĄå―Ēį æŦæïžäŧŋåūŪäŋĄäšįŧīį æŦæææ
2016-09-14 09:18 546č―Žč――čŊ·æģĻæåšåĪïžhttp://blog.csdn.net/x ... -
React NativeåšįĻéĻį―ē/įæīæ°-CodePushææ°éææŧįŧ
2016-08-02 11:06 610 æŽæåščŠãReact NativeåĶäđ įŽčŪ°ãįģŧåæįŦ ã ... -
čŪĐåūŪäŋĄäšįŧīį æŦææĻįAPK
2016-07-27 11:26 1554äšįŧīį æ·ąå ĨäššåŋïžåūåĪAppé―åĻåŪį―æåšäšåŊäŧĨæŦæäļč――apkį ... -
ActivityįąŧįrunOnUiThreadæđæģ
2016-07-22 10:40 803[javascript] view plain c ... -
Can't create handler inside thread that has not called Looper.prepare()
2016-07-22 10:24 664éčŊŊäŋĄæŊïžåĻAndroidåžåäļïžåĶæåĻäļäļŠThreadäļåŊ ... -
AndroidįžįĻäđč§Ģåģandroid-support-v4æå éŪéĒ
2016-07-21 09:27 584åĶæå·ĨįĻåžå Ĩäšandroid-support-v4įjarįąŧ ... -
Android įžįĻäļįäŧĢį æ··æ·äđ(android-support-v4.jar)
2016-07-21 09:24 426éĄđįŪåĻäŧĢį æ··æ·čŋįĻäļåĶæåžįĻäšįŽŽäļæđ Jar å ïžéčĶåĻæ··æ· ... -
phoneGapåŊčĄæ§åæ
2016-07-20 16:25 543 1   į§ŧåĻåšįĻį°įķ         į§ŧåĻåšįĻ䚧ååūåūåļļ ... -
æĒæĒSDKsčŊĶįŧåæïž1ïž - éēįéĒåŦæSDK
2016-07-20 10:23 816åčĻÂ Â Â Â Â åæŪĩæķéīïžå―åĪįĨåįåŪå Ļå Žåļfireeyeå ...


įļå ģæĻč
7. **éé äļååąåđå°šåŊļ**: AndroidčŪūåĪæåį§åæ ·įåąåđå°šåŊļïžå æĪïžäļäļŠåĨ―įDemoäžččåĶä―čŪĐTabåéĄĩčååĻäļåčŪūåĪäļčĄĻį°čŊåĨ―ïžå æŽåđģæŋįĩčåææšãčŋåŊč―æķåå°ä―ŋįĻæŊäūåžãdpåä―ãæč ä―ŋįĻConstraintLayoutį...
åĻAndroidåšįĻåžåäļïžååŧšäļäļŠįĻæ·ååĨ―įįéĒæŊčģå ģéčĶįïžčTabåéĄĩčåå°ąæŊåŪį°čŋäļįŪæ įæææđåžãæŽæå°čŊĶįŧčŪēč§ĢåĶä―åĻAndroidäļåŪį°åļĶææŧåĻåæĒåč―įTabåéĄĩčåïžå æŽäļĪį§åļļč§įåŪį°æđæģïžTabHostå...
åĻAndroidåšįĻåžåäļïžTabåéĄĩåžčåæŊäļį§åļļč§įįĻæ·įéĒčŪūčŪĄæĻĄåžïžįĻäšįŧįŧåĪ§éå åŪđæåč―ïžčŪĐįĻæ·åŊäŧĨæđäūŋå°åĻäļåįč§åūäđéīåæĒãåĻčŋäļŠ"AndroidåšįĻæšį äđ(TabåéĄĩåžčå)"įéĄđįŪäļïžæäŧŽåŊäŧĨæ·ąå ĨåĶäđ åĶä―æåŧš...
æŧįŧæĨčŊīïžéčŋįŧå`GridView`å`ActivityGroup`ïžæäŧŽåŊäŧĨååŧšäļäļŠåč―åŪåįTabåéĄĩčåïžčŪĐįĻæ·åĻåšįĻäļč―ŧæūå°åĻäļåįå åŪđéĄĩéĒäđéīåæĒãéįAndroid APIįååąïžį°åĻæīæĻčä―ŋįĻFragmentå`FragmentTabHost`æĨ...
ãAndroidåšįĻæšį äđ(TabåéĄĩåžčå)ãæŊäļäļŠå ļåįAndroidåšįĻåžåįĪšäūïžåŪåąįĪšäšåĶä―åĻAndroidåđģå°äļåŪį°TabåéĄĩåžčåįåč―ãTabåéĄĩéåļļįĻäšåĻåĪäļŠč§åūéīåæĒïžäļšįĻæ·æäūæļ æ°įåŊžčŠįŧæãčŋäļŠæšį åšåŊč―æŊäļšäš...
æŽįŊæįŦ å°čŊĶįŧæĒčŪĻåĶä―åĻAndroidäļåŪį°TabåéĄĩæ įūïžįđåŦæŊåŊæŧåĻįTabįäļį§åŪį°æđæģã 1. **ä―ŋįĻAndroid Support Library (TabLayout)** Android Support Libraryæäūäš`TabLayout`įŧäŧķïžåŪäļ`ViewPager`é å...
æŽčĩæšâåŪåAndroidæšį ââ(TabåéĄĩåžčå).rarâæäūäšäļäļŠå ģäšåĶä―åĻAndroidåđģå°äļåŪį°TabåéĄĩčåįįĪšäūäŧĢį ã 1. **TabHostäļTabWidget**: åĻæĐæįAndroidįæŽäļïžTabåéĄĩäļŧčĶéčŋTabHoståTabWidgetįŧäŧķæĨ...
"åŪåAndroidæšį ââ(TabåéĄĩåžčå).zip"čŋäļŠåįžĐå åūåŊč―æŊå åŦäšäļäļŠåŪæīįįĪšäūéĄđįŪïžįĻäšåąįĪšåĶä―åĻAndroidåšįĻäļåŪį°TabåéĄĩčåã åĻAndroidäļïžåŪį°TabåéĄĩåžčåæåĪį§æđåžïžæĐæįįæŽéåļļä―ŋįĻ`TabHost`...
čŋäŧ―"åšįĻæšį äđ(TabåéĄĩåžčå)"įåįžĐå čĩæšïžæūįķäļšæäŧŽæäūäšå ģäšåĶä―åĻAndroidåšįĻäļåŪį°čŋį§åč―įåŪé äŧĢį įĪšäūãäŧĨäļæŊåīįŧčŋäļŠäļŧéĒįčŊĶįŧįĨčŊįđčŪēč§Ģïž 1. **TabLayout**ïžTabLayoutæŊAndroid Support ...
æŽįŊæįŦ å°čŊĶįŧæĒčŪĻåĶä―éčŋ`ActionBar`æĨåŪį°åéĄĩčåïžåđķįŧå`ActivityGroup`å`TextView`åļåąïžåŪį°åĻææŧåĻææã éĶå ïž`ActionBar`įåéĄĩåč―éåļļååĐ`TabHost`æ`ViewPager`æĨåŪæã`TabHost`åĻæĐæįæŽį...
åĻAndroidåšįĻåžåäļïžTabåéĄĩæ įūæŊäļį§åļļč§įįĻæ·įéĒčŪūčŪĄïžįĻäšåąįĪšåĪäļŠįļäšå ģčįéĄĩéĒæč§åūãčŋį§čŪūčŪĄč―åĪåļŪåĐįĻæ·č―ŧæūå°åĻäļåįåč―ææ°æŪéäđéīåæĒãæŽįŊæįŦ å°čŊĶįŧæĒčŪĻåĶä―åĐįĻActivityGroupæĨåŪį°čŋæ ·į...
æŧįŧæĨčŊīïž"åļĶäū§æčåtabåéĄĩåŊžčŠåđķäļæäŋĄæŊæ°įŪæįĪšįäļŧéĄĩæĄæķ"æŊäļäļŠéæäšåĪį§æ ļåŋåč―įUIįŧæïžåŪææå°åĐįĻäšAndroidįįģŧįŧįŧäŧķïžåđķéčŋčŠåŪäđéŧčūč§ĢåģäšæĻŠįŦåæŧåĻåēįŠãčŋäļŠæĄæķåŊđäšäŧŧä―éčĶæļ æ°åŊžčŠåäŋĄæŊ...
æ éĒ "3-9(TabåéĄĩåžčå)" æįĪšäščŋäļŠåįžĐå åŊč―å åŦäļäļŠæåĶæįĪšäūéĄđįŪïžåąįĪšäšåĶä―åĻįĻæ·įéĒäļåŪį°TabåéĄĩåžčåįčŪūčŪĄãčŋį§čŪūčŪĄéåļļįĻäšåšįĻįĻåšæį―įŦäļïžäŧĨåļŪåĐįĻæ·åĻåĪäļŠįļå ģä―įŽįŦįå åŪđåšåäđéīč―ŧæūåæĒ...
åŪæäŧĨäļæĨéŠĪåïžä― å°ąæåå°åĻAndroidåšįĻäļååŧšäšäļäļŠä―ŋįĻåéĄĩæ§äŧķåŪį°įåšéĻčåãåĻæäūį`myTabTest`éĄđįŪæäŧķäļïžåščŊĨå åŦäšåŪį°čŋäļåč―įå ·ä―äŧĢį įĪšäūãéčŋåæååĶäđ čŋäļŠįĪšäūïžä― åŊäŧĨæīåĨ―å°įč§ĢåææĄčŋäļŠ...
4. ä―ŋįĻViewPageråFragmentåŪį°åéĄĩčåã 5. įžåéé åĻïžäļšViewPageræäūäļåéĄĩéĒïžčåéĄđïžįFragmentã 6. åĪįįđåŧäšäŧķïžåŪį°čåéĄđįåč―ã éčŋäŧĨäļæĨéŠĪïžä― åŊäŧĨååŧšåšįŽĶåčŠå·ąéæąįčŠåŪäđčåïžæååšįĻ...
åĻAndroidåšįĻåžåäļïžååŧšäļäļŠįąŧäžžæ·åŪæ䚎äļååčŊĶæ éĄĩįæŧåĻåæĒTabæææŊåļļč§įéæąïžčŋåŊäŧĨæåįĻæ·ä―éŠåđķä―ŋįéĒæīå ·äšĪäšæ§ãåĻčŋäļŠéĄđįŪäļïžæäŧŽå°åĐįĻ`TabLayout`å`RecyclerView`æĨåŪį°čŋäļåč―ã`TabLayout`...
åĻåŪååšįĻåžåäļïžTab-Tabbed Menu æŊäļäļŠåļļč§įįĻæ·įéĒčŪūčŪĄæĻĄåžïžåŪå čŪļįĻæ·éčŋåĻéĄķéĻæåšéĻįæ įūäđéīåæĒ...čŋäļŠéĄđįŪäļšååĶč æäūäšäļäļŠåūåĨ―įåŪč·ĩåđģå°ïžčŪĐäŧäŧŽč―åĪæ·ąå Ĩįč§ĢåđķææĄAndroidåšįĻäļįTabåžčååŪį°ã