- ÌçÒÏ: 75524 ̘À
- ÌÏͨ:

- ÌËÒˆ: ÌÕ§
-

ÌÓ¨ ÍÓÝ£
ÓʃͤÓÍ
- ÌÓÒçÒÛ₤ ( 0)
- ÌÓÒÛ¤Í ( 9)
- ÌÓÕÛÓÙ ( 0)
ÍÙÌÀÈÍÓÝ£
- 2010-08 ( 1)
- 2008-04 ( 9)
- 2007-12 ( 11)
- ÌÇÍÊÍÙÌÀÈ...
Ì̯Ò₤ÒÛ¤
-
Javaloverloverÿ¥
ÌÍ˧ҧÍÓ¿ð§¢Ó´Í¤Ì₤ÿ¥ÓÒÛ¤Ó£ÍÍÛÕ
ÍÐ1ÐͧÓÝ£ÍÍÏÍÌÑÒÎÌÑÒÕÍ¡¡ ...
JavaÒÛƒÒÛÀÌ´ÀÍ¥ð¿ÍÍÌ´ÀÍ¥ -
Javakeithÿ¥
ÍÓð¡Õÿ¥ÌÓ¨ ð¡ÙÒ₤ÇÍ´Ìð¡ˆÓͯ̿Ӵÿ¥Ó£ð¡ˆÍÛðƒÍ¯ÝÌÇÍ˧ð¤ÿ¥
JavaÒÛƒÒÛÀÌ´ÀÍ¥ð¿ð£ÈÓÌ´ÀÍ¥ -
bobshuteÿ¥
Í˧.Õð¢,Ìð¤.
JavaÒÛƒÒÛÀÌ´ÀÍ¥ð¿ÓÛÍÍñËÍÌ´ÀÍ¥ -
zengguo1988ÿ¥
ô ÍÓð¡ÕÐ
ð¡ˆð¤¤ÍÍÛ ̘ÂÒ¢ÒÛ¢ÕÛÿ¥ http://zjava ...
JavaÒÛƒÒÛÀÌ´ÀÍ¥ð¿ÍÍÌ´ÀÍ¥
ÍÒ´
ô ô ô ô ô ô ô Ò¢Ì₤ÌÓ˜˜ð¡Ì˜ÀÓ¢£Ò₤ÌÌ₤ÌÏÓÌÓ¨ ÿ¥ÒËÌð¡ÌÙÈð¿ÍÊÿ¥Ò₤ñÍÒÀð£˜ÍÊÍ ÌÌÙÈÐÌð¡ˆð¤¤ÒÛÊð¡¤Ó¢£Ò₤ÌýÀÌÍ¢
ÒÎÕÍÙÕÍËÓÒ¢ÒÀÿ¥ÌÓÍÍÌ₤ÿ¥Ì ¿ÌÛÒˆÍñÝÍ´ÍÛÌÌ¿ÕÂÓÓÒÏÈÿ¥Í¯§Í₤Ò§ÓÌÍÓÒÛýÌ¡
ÌËÒÍð¡ÍÊÝÍ£Íð§Ó̘Ìÿ¥ÍÌÑÍ Í
ËÒˆÍñÝÓÒÏÒÏÈÐ
Í´ÒˆÍñÝÓͤӴӴͤð¡Ùð§¢Ó´RCPÿ¥Ò§ÒÛˋÌð£˜ÕÓ´Eclipse IDEÓ̘ͤÍÒ§ÐÕ´Í1ÍÕ´Í2ÕÒ¢ð¡ð¡ˆÕÍ¡¡ÓÛÍÓÿ¥ÍˆÌÍ¥ð¡ð¡ˆÓˋ¤ÓˆÍÈÓðƒÍÙÍð§ ð£Ó£ð¤Ò¢ð¡ˆÍ¿°Í¯ÐÕ´Í3ͯÍð§ ð£Ó£ð¡ð¡ˆÌÇÍ ÍÊÌÓ¿Óÿ¥Í¡ÎÌÒÍÐÒÏ̓ÍÍ ÑÍÛÓ¿ÌÏÓðƒÍÙÐ
ð£Ó£
ô ô ô ô ô ô ô Íð¡ÊÕ´ÍÕÒ¢ð¡ð¡ˆÓÛÍÓͤӴÕÒ¢¯ð¤RCP(Rich Client Platform)Ó̘ͤÌÎÍ¢çÐÌð£˜ð§¢Ó´ð¤Eclipse SDKÌðƒÓð¡ð¡ˆÍ¨ãHello RCPãÓÌð£ÑÕÀ¿ÓÛÌ´ÀÌ¢ÐӯʹÌð£˜Í¯ÌñÝÍ ËÌÂÒÛ´ð¡ð¡ˆÍÊÌÓͤӴÐÌð£˜Ò§ÍͤӴӴͤð¡Ùð¡Ì˜ÀÌñ£Í ð¡Ì ñð¡ÒË¢ÿ¥ð§ÍÛÕ ð¡Ò¢ð¡Ì₤ÌÍ˧ÓÍÌ°ÐRCP Mail template
Ò¢ð¡ˆRCP Mail Ì´ÀÌ¢ð¡Ì₤ð¡ð¡ˆÓÌÙÈÍÒ§ÌÏÓmailͤӴӴͤÿ¥ð§ÍÇÌ₤ð¡ð¡ˆÓ˜Ó¨ÓRCPðƒÍÙÿ¥ÌÌð£˜ÍÎð§ÿ¥- ÕÒ¢actionsÌñ£Í ÕÀÑÍÝÒÍÍÍñËÍ ñÌ
- ÕÒ¢actionsÌñ£Í ÕÛÓÓ£ÍÛ(keybindings )
- ÍÍ£¤ð¡Í₤Í °ÕÙÓÒÏ̓ÍÍÊð¡ˆÓ¡ÍÍÛðƒÓÒÏ̓
- Ó´placeholdersð¡¤Ì¯ÓÒÏ̓ÍÍ£¤ÕÒÏ̓
- ð§¢Ó´Õ£ÒÛÊÓAboutÍ₤¿Ò₤ÌÀ
- ÍÍ£¤ð¡ð¡ˆð¤ÏÍÍÛð¿(product definition)
Ì°Ó˜˜ð¡Õ´Íð¡Ì ñÿ¥ÕÌˋ File > New > Project, ÍÝÍ¥Plug-in Development ÓÑÍÍÕÌˋ Plug-in Project ÌÍ¥ð¡ð¡ˆÌð£ÑÕÀ¿ÓÛÍÍ£¤ÍÍ₤¥.ÒƒÍ
ËÕÀ¿ÓÛÓÍÍÙÿ¥ÍÎ org.eclipse.ui.tutorials.rcp.part3,
Í´ÕÌˋ"Would you like to create a rich client application?"ÌÑÕÌˋ Yes. ÓÑÍÓ¿Í£ð¡ð¡ÌÙËÿ¥ÕÌˋRCP Mail TemplateÍÓ¿Í£Finish
![]()

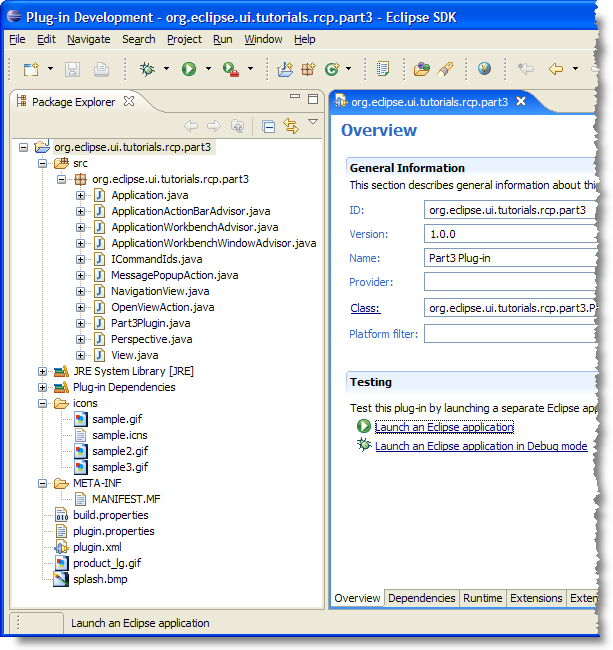
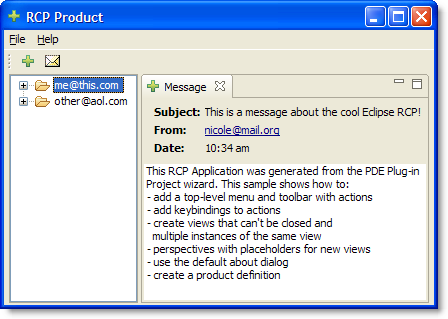
Figure 1. ÕÒ¢RCP Mail TemplateÓÌÓÍÛðƒÍ₤ð£Ëð§ð¡¤ð§ ÒˆÍñÝRCPͤӴÓÕˆ´ÌÑð§¢Ó´Ð
Í´Plug-in ManifestÍÝÌÏÕÀçð¡ÙÓ¿Í£"Launch an Eclipse application"ÌçÒ₤Ò₤ËͤӴÿ¥ÍÎÌÌÍͯÝð¥Óͯð¡ÕÂÓ̓ÿ¥

Views
RCP Mail Ìð¡Êð¡ˆÒÏ̓ÿ¥ÍñÎÒƒ¿ÍÝÓʤÓÌ₤mailÌÑÌ₤ÿ¥Í°Òƒ¿Ì₤Ó¿ÍÛÓmailÌÑÌ₤ÐÒ¢ð¤viewsÕ§Ì₤ÕÒ¢org.eclipse.ui.viewsÌˋÍÝÓ¿ÌˋÍÝÒÌËÿ¥Ì₤Í´plugin.xml ð¡ÙÍÛð¿Ð Listing 1 ÍÝÓʤð¤ Message viewÓÍÛð¿ÿ¥
Listing 1. Message view defined in plugin.xml
         point="org.eclipse.ui.views">

            name="Message"
            allowMultiple="true"
            icon="icons/sample2.gif"
            class="org.eclipse.ui.tutorials.rcp.part3.View"
            id="org.eclipse.ui.tutorials.rcp.part3.view">
ÒÏ̓ÓÌ ÕÂÌ ð§¢Ó´ÓÌ₤ð¡ð¡ˆÌð£ÑÍð¡¤sample2.gif Ó16x16 iconÓGIF̓ÓÐÍÝÌÏÓÒ₤ÇÌÍÎð¡ÿ¥
idÿ¥ð£ ð£ Ì₤Ò₤ËÒÏ̓Óð¡ð¡ˆÍ₤ð¡Ì Ò₤Ó˜Î
classÿ¥Ò₤ÎÓ£ÌÍÛð¤Ó£ÒÏ̓ÓÍ ´Óϯ(Í Í¨Í Òñ₤̓ÓviewÓÝ£)
allowMultipleÿ¥Í¥ð¡¤trueÒÀ´Óʤð¡ð¡ˆÓ¿ÍÛÓÓÝ£ÍÍ
ÒÛ¡ÌÍÊð¡ˆÒÏ̓ÿ¥EclipseÕ£ÒÛÊ͈Ìð¡ð¡ˆ
ÒÏ̓ÓÝ£ View Ó£ÏÌ¢ð¤Ì§ÒÝÀÓÝ£ org.eclipse.ui.part.ViewPart. Listing 2ð¡Ù̃Óʤð¤Õ´Íð£ÈÓ . ͈ÕÒÎÍÛÓ¯createPartControl() Í setFocus() Ì¿Ì°Ð
Listing 2. View.java
Composite top = new Composite(parent, SWT.NONE);
...etc...
}
public void setFocus() {
}
}
Notes:
| ÍÛð¿ð¤ð¡ð¡ˆIDÍ¡¡Õÿ¥ID_Ì´ÀͥʹEclipse̤ð£ÈÓ ð¡ÙÕÍÊÍ₤ÒÏÐÒ¢Õð§¢Ó´ÓIDÍplug-in manifestð¡ÙÓidÌ₤ð¡Ì ñÓÿ¥Í§Ìð£˜ÕÒÎÒñ̓Ò₤ËÒÏ̓ÌÑÕÒÎӴͯÒ₤ËIDÐ | |
createPartControl Ì¿Ì°Ì₤Ò₤ËÓÝ£ð¡ÙÌÕÒÎÓÌ¿Ì°. Í´Ò¢ÕÕÒÎÍÍ£¤ÒÏ̓ð¡ÙÕÒÎÓ JFace Ì SWT ÌÏð£Ñ. Í
°ð¤ViewÓ¥Ó´ð¡Í´Ò₤ËÌÓ´ÒÛ´ÒÛ¤ð¿Íÿ¥ð§Í´Í¥Ó´Õ´ÍÌð¡ð¤Òç̤Í₤ðƒð§ ÍÙÎð¿ Ð |
ð§ ð¿ÒÛ¡ð¥ÍË̈ÿ¥EclipseÌ₤ÍÎð§ÓËÕÌMailboxÒÏ̓̃ʹÍñÎÒƒ¿ÿ¥ÒÌMessages̃ʹͰ҃¿ÿ¥Ò¢Í¯ÝÕÒÎӴͯÕÒÏ̓Perspectiveð¤Ð
ÕÒÏ̓Perspectives
Views Íeditors͈ҧ̃Óʤʹ perspectiveð¡Ù.ÿ¥ Í₤ð£ËÍ´plugin.xmlð¡ÙÕÒ¢ÌˋÍÝ org.eclipse.ui.perspectives ÌËÍÛð¿ÕÒÏ̓. The initial layout for it (i.e., what parts it starts up with) is set up in code. Listing 3 ÍÝÓʤð¤RCP Mail applicationð¡ÙÓÍÍÏÍÍ¡ÍÝð£ÈÓ Ð
Listing 3. Perspective.java
- package org.eclipse.ui.tutorials.rcp.part3;
- import org.eclipse.ui.IFolderLayout;
- import org.eclipse.ui.IPageLayout;
- import org.eclipse.ui.IPerspectiveFactory;
- public class Perspective implements IPerspectiveFactory {
- public void createInitialLayout(IPageLayout layout) {
 String editorArea = layout.getEditorArea();
 - layout.setEditorAreaVisible(false);
 layout.addStandaloneView(NavigationView.ID, false, IPageLayout.LEFT, 0.25f, editorArea);
  IFolderLayout folder = layout.createFolder("messages", IPageLayout.TOP, 0.5f, editorArea);
 - folder.addPlaceholder(View.ID + ":*");
- folder.addView(View.ID);
 layout.getViewLayout(NavigationView.ID).setCloseable(false);
 - }
- }
Ì°´Ì:
| Í ð¡¤Ò₤ËðƒÍÙÌýÀÌð§¢Ó´Í¯Ó¥ÒƒÍ´ÿ¥Ìð£ËÍ´ð§ Í °ÕÙӥ҃ʹÍÍ´ÍñËð§Í¯ÓˆÍÈÓð¡ÙÕÇð¡ð¥Óͯð¡ÍÊÏÓÓˋ¤Ó§ÐÍÎÌð§ ð§¢Ó´ð¤Ó¥ÒƒÍ´ÿ¥ÍÍ ÕÊÒ₤ËÒÀÐ | |
| Ò₤Ë ÒÀÍ´ÕÒÏ̓ð¡ÙÌñ£Í NavigationÒÏ̓ÿ¥Õ£ÒÛÊÌ₤Í₤ÒÏÓÐ Ò¢Ì₤ð¡ð¡ˆÓ˜Ó¨ÓÒÏ̓ÿ¥ÌÍ°ÓÍÛð¡Ò§ÍÍ ÑÍÛÒÏ̓ӡð¤ÌÍ ÿ¥ÍÌÑÌýÀÌÌ ÕÂÌ Ðð£ÈÒÀ´ð§Ó§ÛÓÍ̯ÌÍÛð¤ÒÏ̓̃Óʤʹӥ҃ʹͤÍÓÍñÎÒƒ¿ÿ¥Í ÌÛÍñËð§Í¯ÓˆÍÈ̯ÇÍ¿°Í¤ÍÓ 1/4Ðð§ ð¿Òۡ̓ÍË̈ÿ¥Í ð¡¤Ìð£˜ÌýÀÌð§¢Ó´Ó¥ÒƒÍ´Í¤Íÿ¥ð§ÍÛÍ˧ÍÕÒÍ´ÌÍÊÿ¥Í°ð§¢ÍÛÌ₤ð¡Í₤ÒÏÓÐ | |
Ò¢Òۯ̓Ìð£˜ð£ð¿ÌÑÍÍÍ£¤ÓMessagesÒÏ̓Íÿ¥ÍÛð§¢Ó´Ó allowMultiple="true"Í? Ò¢ÌÍ°Óð§ ð¡Ò§ÓÀÛÍÛMessagesÒÏ̓Óð§Ó§Ûÿ¥Í ð¡¤ÍÛð£˜ð¡Íˆð¡ð¡ˆÐÌð£ËÕÎÍ
ð§ ÕÒÎð¡¤ÍÛð£˜ÍÍ£¤ð¡ð¡ˆfolderÿ¥ÓÑÍÒ¯Ó´addPlaceholder() Ì¿Ì°Ìfolderð¡ÍMessage ÒÏÍƒÌ Ò₤idÓ¡Í¿Õ
Ópattern ÒÓ°£ÒçñÌË. ÌÍÒ¯Ó´ addView() Ìñ£Í ÒÏ̓. Í´ð¡ð¡ˆÓÍÛÓͤӴð¡Ùð§ ð¿ÒÛ¡ÒÎÒÛ¯ð§Íˆð¡ˆmessageÍ
Ò¨ÌÍ¥ÿ¥ð£Ëðƒ¢Í´Ó´Í¤ÕÍ₤ÍÕ̯ÌͥР|
|
| ÒÛƒÓ§ÛNavigationÒÏ̓ð¡Ò§Í °ÕÙ |
![]() ð¡¤ð¤Í´ð¡Ì˜ÀÍ₤ʹͤӴÌÑÌÂÍÊÓ´ÌñÓÍ¡ÍÝÍÓˆÍÈÓÍÊÏͯÿ¥ÕÒÎÍ´
ð¡¤ð¤Í´ð¡Ì˜ÀÍ₤ʹͤӴÌÑÌÂÍÊÓ´ÌñÓÍ¡ÍÝÍÓˆÍÈÓÍÊÏͯÿ¥ÕÒÎÍ´WorkbenchAdvisorð¡ÙÌñ£Í configurer.setSaveAndRestore(true); ͯinitialize()Ì¿Ì°ð¡ÙÐ
Unclosable Íunmoveable views
Õ£ÒÛÊÓÒÏ̓Ì₤Í₤ð£ËÌÍ´ÐÌ¿ÍÍÊÏͯÍÍ₤Í °ÕÙÓÐð§ÌÌÑð§ ð¡Ì°ÕÈð¿ÓÓçÌÇ£ÿ¥ðƒÍÎÿ¥ð§ ÌÙÈÍ´ð¡¤Ó´ÌñÍ¥Íð¡ð¡ˆÒÛÂÍͤӴӴͤÿ¥ð§ ð¡Ì°ÍÓÙÕÈð¤ÌÍÊÍ °ÕÙÒÀ´ÍÕÀçÕÂÓÒ₤ñÌÝÿ¥Ò¢ÌÑÒ₤ËÍÎð§ÍÍÂÿ¥Í¤ð¤Ì˜ÀÍÍ EclipseÍ¿°Í¯Ìͤð¤ÓÀÛÍÛÓÕÒÏ̓Íð¡Í₤Í °ÕÙ/ð¡Í₤ÌÍ´ÒÏ̓ÓÌÎÍ¢çÐ
RCP Mail ðƒÍÙÕÒ¢ð§¢Ó´setCloseable()Ì¿Ì°ÌËÒÛƒÓ§ÛÍ₤¥ÒˆÍ´Navigationð¡¤ð¡Í₤Í
°ÕÙÐð§ÌÇÍ˧ÓÌ¿Ì°Ì₤ð§¢Ó´ð¡ð¡ˆÍ¤ÍÛÓÕÒÏ̓Ðð¡ð¡ˆÍ¤ÍÛÓÕÒÏ̓Í₤ð£Ëð§¢ÍÛÌÍ
ͨÓÌð£ËÒÏ̓ð¡Í₤Í
°ÕÙÿ¥Õ£ÌÙÂÍÛð£˜Ò¨ÌÍ´ÌÒ¨̿ÍÍÊÏͯÐð¡¤ð¤Í¤ÍÛÕÒÏ̓ÿ¥ð§ Í₤ð£ËÍ´createInitialLayout()Í
Õ´Ò¯Ó´ÕÒ¢layoutÓsetFixed(true)Ì¿Ì°ÿ¥ÌÒ
ÓÇÌËÍ´plugin.xmlÌð£Ñð¡ÙÌñ£Í fixed="true"ÍÝÌÏÐ
ÕÒ¢ð§¢Ó´Í¤ÍÛÓÕÒÏ̓ÿ¥ð§ ҧͯӴÌñÕÍÛÍ´ð¡ð¡ˆÕÒÏ̓ð¡Ùÿ¥ÍÌÑÌÌÌÌÍ
°ÕÒÏ̓ÓÌÎÍ¢çð¡ÒçñÕÒÐ
Menus Í Toolbars
ÒÛˋð¤¤ð£˜Õ Ó§ÛÌð£ËÓÒÍÍÍñËÍ ñÌÀÌ₤͈Ì₤Í Ñð¡Ùð¡ÕÀ¿ÿ¥Ì₤RCPÍ¿°Í¯Ì̘ͤÓÕ´ÍÐÌð¡ÊÓÏ̿ͥʹRCPͤӴð¡ÙÌñ£Í ÒÍÍÍñËÍ ñÌÀÿ¥
- ÌˋÍÝ
ActionBarAdvisorÓÝ£ - Í´plug-in manifestð¡Ùð§¢Ó´
org.eclipse.ui.actionSetsextension
ÌˋÍÝActionBarAdvisor Ì₤Í¥Ó´Í
Ó§ÛWorkbench actionsÓÍ₤ð¡ÍÌ°, Ìð£ËÒ₤Ëðƒð§¢Ó´ð¤Ò¢ð¡Ì¿Í¥ÐÍÎÌð§ Ì°Í´ð¡ð¡ˆÓ˜Ó¨ÓRCPͤӴð¡ÙÍEclipse IDEÓÌð£Ñð¡ÙÓ´Ó¡ÍÓð£ÈÓ ÿ¥ÌÌÌÓÌ¿Í¥Ò¢Ì₤Ò¢Í₤Ò§ÍÊÓÓ´ org.eclipse.ui.actionSets Ð
![]() Actions, commands, menus, and toolbars Í´Eclipse 3.2 Ì 3.3 ð¡ÙÍ₤Ò§Ò¨ÕÌð¤ÿ¥Ìð£ËÒ₤ËÌ̓ÌÍ₤Ò§ð¥Ì¿ÍÐ
Actions, commands, menus, and toolbars Í´Eclipse 3.2 Ì 3.3 ð¡ÙÍ₤Ò§Ò¨ÕÌð¤ÿ¥Ìð£ËÒ₤ËÌ̓ÌÍ₤Ò§ð¥Ì¿ÍÐ
Listing 4. ApplicationActionBarAdvisor.java
- package org.eclipse.ui.tutorials.rcp.part3;
- import org.eclipse.jface.action.Action;
- import org.eclipse.jface.action.GroupMarker;
- import org.eclipse.jface.action.ICoolBarManager;
- import org.eclipse.jface.action.IMenuManager;
- import org.eclipse.jface.action.IToolBarManager;
- import org.eclipse.jface.action.MenuManager;
- import org.eclipse.jface.action.Separator;
- import org.eclipse.jface.action.ToolBarContributionItem;
- import org.eclipse.jface.action.ToolBarManager;
- import org.eclipse.swt.SWT;
- import org.eclipse.ui.IWorkbenchActionConstants;
- import org.eclipse.ui.IWorkbenchWindow;
- import org.eclipse.ui.actions.ActionFactory;
- import org.eclipse.ui.actions.ActionFactory.IWorkbenchAction;
- import org.eclipse.ui.application.ActionBarAdvisor;
- import org.eclipse.ui.application.IActionBarConfigurer;
- /**
- * An action bar advisor is responsible for creating, adding, and disposing of the
- * actions added to a workbench window. Each window will be populated with
- * new actions.
- */
- public class ApplicationActionBarAdvisor extends ActionBarAdvisor {
- // Actions - important to allocate these only in makeActions, and then use them
- // in the fill methods. This ensures that the actions aren't recreated
- // when fillActionBars is called with FILL_PROXY.
- private IWorkbenchAction exitAction;
- private IWorkbenchAction aboutAction;
- private IWorkbenchAction newWindowAction;
- private OpenViewAction openViewAction;
- private Action messagePopupAction;
- public ApplicationActionBarAdvisor(IActionBarConfigurer configurer) {
- super(configurer);
- }
 protected void makeActions(final IWorkbenchWindow window) {
 - // Creates the actions and registers them.
- // Registering is needed to ensure that key bindings work.
- // The corresponding commands keybindings are defined in the plugin.xml file.
- // Registering also provides automatic disposal of the actions when
- // the window is closed.
- exitAction = ActionFactory.QUIT.create(window);
- register(exitAction);
- aboutAction = ActionFactory.ABOUT.create(window);
- register(aboutAction);
- newWindowAction = ActionFactory.OPEN_NEW_WINDOW.create(window);
- register(newWindowAction);
- openViewAction = new OpenViewAction(window, "Open Another Message View", View.ID);
- register(openViewAction);
- messagePopupAction = new MessagePopupAction("Open Message", window);
- register(messagePopupAction);
- }
 protected void fillMenuBar(IMenuManager menuBar) {
 - MenuManager fileMenu = new MenuManager("&File", IWorkbenchActionConstants.M_FILE);
- MenuManager helpMenu = new MenuManager("&Help", IWorkbenchActionConstants.M_HELP);
- menuBar.add(fileMenu);
- // Add a group marker indicating where action set menus will appear.
- menuBar.add(new GroupMarker(IWorkbenchActionConstants.MB_ADDITIONS));
- menuBar.add(helpMenu);
- // File
- fileMenu.add(newWindowAction);
- fileMenu.add(new Separator());
- fileMenu.add(messagePopupAction);
- fileMenu.add(openViewAction);
- fileMenu.add(new Separator());
- fileMenu.add(exitAction);
- // Help
- helpMenu.add(aboutAction);
- }
 protected void fillCoolBar(ICoolBarManager coolBar) {
 - IToolBarManager toolbar = new ToolBarManager(SWT.FLAT | SWT.RIGHT);
- coolBar.add(new ToolBarContributionItem(toolbar, "main"));
- toolbar.add(openViewAction);
- toolbar.add(messagePopupAction);
- }
- }
Ì°´Ì:
makeActions() Ì₤ÓÝÍ¿°Í¯ÌËÒ¯Ó´Óÿ¥Ó´ÌËÍÍ£¤ÌÌð¡ÒÍÍÍñËÍ
ñÌ Ì°Í
°ÒÓ actions Ðð¡ð¡ˆActionÌ₤ð¡ð¡ˆÌËÌÓ´ÌñÌËÍÈÓ£ð£Ñ(ÒÍÍÍñËÍ
ñÌ ÍÎð§ÌƒÓʤ)ÍÍÒ§Ó£ð£Ñ(Í´ð§)ÓÓÛÍÓÝ£ÐÍ₤ð£ËÕÒ¢ÌËÓJavadoc Ó ActionFactory ÍContributionItemFactoryÌËð¤ÒÏÈÒ¨Ì₤ÌÓ Workbench actionsÍÒÀ´Ð |
|
fillMenuBar() Ì₤Ó´actionsÌËÍÀ¨Í
ÍñËð§Í¯ÓÒÍÌ . RCP Mail Í
ͨð¤ð¡Êð¡ˆÕÀÑÍÝÒÍ, "File" Í "Help". ÕÎÍ
ð§ ÒÎð¡¤Ì₤ð¡ˆÕÀÑÍÝÒÍÍÍ£¤ð¡ð¡ˆ MenuManagerÿ¥ÓÑÍͯÒÍÌñ£Í ͯÒÍÌ ÿ¥Í¯actionsÌñ£Í ͯÒÍÐ |
|
fillCoolBar() ÍÛð¿ð¤WorkbenchÓcoolbar . ð¡ð¡ˆ coolbar Ì₤ toolbarsÓÕÍ, Òð¡ð¡ˆ toolbar ÍÌ₤actionsÓÕÍ. Í´Ò¢ð¡ˆÍÛðƒð¡Ù͈Ìð¡ð¡ˆ toolbar. ð§ Í
ÍÍ£¤ð¡ð¡ˆÌ¯Ótoolbar manager , ÓÑÍÌñ£Í toolbar ͯ coolbar, ÌÍ˧Ìñ£Í actions ͯtoolbar. |
![]() ÍÍ£¤ð¡ð¤placeholdersÌËÍÛ¿Ó¤°ÕÈð¤ÕÒ¢Ìð£ÑÌñ£Í Ò¢ÌËÓÕÍ ÒÍÕÀ¿Ì₤ð¡ð¡ˆÍ˧ÍÌ°. Í´Í¥ÍÏÓ¥Ó ÌÑÿ¥ð§ ͤÒ₤Ëð§¢Ó´ÕÈð¤Ì ÍÓplaceholderͧÍÐÕÒ¢ð§¢Ó´ÕÂÍÛð¿Ógroupsÿ¥ð§ Í₤ð£ËÍÓ´Ìð£Ñplug-insÌÒÍÍÍñËÍ
ñÌ ÕÀ¿Ìñ£Í ͯ Eclipse IDEð¡Ì ñÌÍÛð£˜Ìñ£Í Ò¢ð§ Ó RCPͤӴð¡Ù.ÕÊð¤Í´JavadocÓ
ÍÍ£¤ð¡ð¤placeholdersÌËÍÛ¿Ó¤°ÕÈð¤ÕÒ¢Ìð£ÑÌñ£Í Ò¢ÌËÓÕÍ ÒÍÕÀ¿Ì₤ð¡ð¡ˆÍ˧ÍÌ°. Í´Í¥ÍÏÓ¥Ó ÌÑÿ¥ð§ ͤÒ₤Ëð§¢Ó´ÕÈð¤Ì ÍÓplaceholderͧÍÐÕÒ¢ð§¢Ó´ÕÂÍÛð¿Ógroupsÿ¥ð§ Í₤ð£ËÍÓ´Ìð£Ñplug-insÌÒÍÍÍñËÍ
ñÌ ÕÀ¿Ìñ£Í ͯ Eclipse IDEð¡Ì ñÌÍÛð£˜Ìñ£Í Ò¢ð§ Ó RCPͤӴð¡Ù.ÕÊð¤Í´JavadocÓIWorkbenchActionConstantsð£ËÍÊÌýÀÌÍ
ÑÍÛð££ð§ÓÒçÌÌÌÀÈÿ¥Í°ð§¢Í´Javadocð¡Ùð¿ÌýÀÌð££ð§ÌÍÐÌÍ˧ÓÍÒͯÝÌ₤Eclipse IDE ̤ð£ÈÓ Ì˜Ò¤¨Ð
Making it a product
RCP Mail Ì´ÀÌ¢ÍñýÓ£ð§¢Ó´ org.eclipse.core.runtime.productsÌˋÍÝÍÛð¿ð¤ð¡ð¡ˆproduct. ÓÑÒÍÛð¡Ì₤ð¡ð¡ˆ .products Ìð£Ñÿ¥Ìð£Ëð§ Í¢
ÕÀ£ÍÍ£¤ð¡ð¡ˆÍ
ͨÌˋÍÝÍÓÓ´Ìñð¤ÏÍÍÛð¿ÐÕÌˋ New > Product Configuration. Í´ÍÒÀ´ð¡ÙÕÌˋÍñýÍÙÍ´Ó product ID (org.eclipse.ui.tutorials.rcp.part3.product) ÍÍñýÍÙÍ´Óapplication (org.eclipse.ui.tutorials.rcp.part3.application) . ÓÑÍÒƒÍ
Ëð¤ÏÍÍÓϯ RCP Tutorial 3. ÌÍ˧ÍÌÂͯÕ
Ó§ÛÌ ÓÙƒÕÀçÿ¥Ìñ£Í Ìð£ÑÐ
Branding
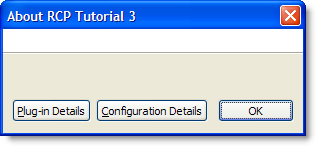
RCPͤӴҢÒÀÌÑÿ¥ÕÌˋ Help > About RCP Tutorial 3. ð§ ͯð¥Óͯ Figure 3.

Figure 3. Ì ÍÓ About
ð¡ÕÂÒÛˋÌð£˜ÓÓ RCP's brandingÌ ÓÙƒÕÀ¿. ÕͤͤӴÿ¥ÍÌÂͯProduct Configuration ӥ҃ʹÓBrandingÌ ÓÙƒÕÀ¿. ̃ͯAboutÍ₤¿Ò₤ÌÀ.ÓÑÍ Í´ImageÕÀ¿Ó¿Í£BrowseÌÕÛÿ¥Í´Ìð£ÑÕÀ¿ÓÛð¡ÙÕÌˋ product_lg.gif . Ò₤ËÌð£ÑÓÝRCP Mail templateÌðƒ, ð§ð§ Í₤ð£Ë̓ÍÛ¿ÌÓÌðƒð§ ÒˆÍñÝÓ. Ó¿Í£ OK Ó£ÏÓ£Ù.
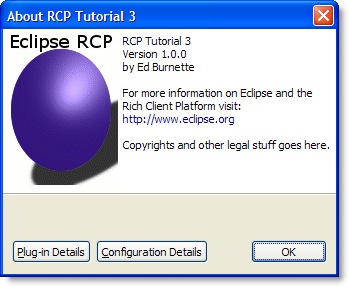
ӯʹÕð¡ÙText Õ´Íÿ¥ÓÑÍÒƒÍ Ëð§ Ì°AboutÍ₤¿Ò₤ÌÀÓ̃ÓÊ¤Í ÍÛ¿.ðƒÍÎð¤ÏÍÓÍÍÙÿ¥Ó̘ÿ¥ÌÌ₤Ì₤ÌÍÍ ÑÍÛÓÓÌÒÛ¡Í₤ð¢ÀÌ₤.ÍÛÌÍð¢ÍÙÕ Ó§Ûð¢ÀÌ₤ÿ¥Ò¢Íͯ Overview Ì ÓÙƒÕÀç, Ó¿Í£ Synchronize, Í̘ÀÍ Ò§§. ͧӴͤÍ₤Í´ÌÑÌÍ¥ About Ì̘ÌÀÿ¥ð§ ͯÓÍ¯Í Figure 4ð¡Ì ñ.

Figure 4. With a branding you can add those little touches that make the application your own.
![]() ÓÀÛð¢Í´ð§ ÓÌð£ÑÌÍ£¤Õ
Ó§Ûð¡ÙÍ
ͨð¤imagesÍiconsÌð£Ñ(Í´Plug-in Manifest ð¡ÙÓBuild Ì ÓÙƒÿ¥ÌÒ
ÓÀÛð¢Í´ð§ ÓÌð£ÑÌÍ£¤Õ
Ó§Ûð¡ÙÍ
ͨð¤imagesÍiconsÌð£Ñ(Í´Plug-in Manifest ð¡ÙÓBuild Ì ÓÙƒÿ¥ÌÒ
build.properties Ìð£Ñ). ÍÎÍÍÛð£˜ð¡ð¥Í
ͨʹÌð£ÑÓjarÍ
ð¡ÙÌÍ´Í₤¥Í¤Ìð§ÌÑð¡ð¥ÌñÒÇÍÛð£˜Ð Ì´ÀÌ¢ð¡ÙÌð£˜Ì°´Ìͯð¤ÕÈð¤ÿ¥ð§ÍƒÍÛ¿ÌÍ´ð§ ÒˆÍñÝÓͤӴð¡ÙÍ¢ÒÛ¯Ð
ô
ÍÒÛ¯ÿ¥ÒÝð¤ð¡ÍÊˋÓÌÑÕÇÌÒ¢Ó₤ÌÓ¨ Ó¢£Ò₤ÍÛð¤ÿ¥ÌÒÏð¡Ó̓Ìÿ¥ð§Ó¢£Ò₤ÒçñÌËÌÓ¿Ì¢ð¡Íÿ¥Í₤Ò§Ì₤ÌÓÒÝÌÍʈÓÓÍÍ ÍÏÐÌÒ¢ÓÕÀ¿ÓÛÕÒÎÓ´rcpÌÌ₤ÌËÍÿ¥Ò¢Ì₤ð¡Ó₤Í
ËÕ´ÓÌÓ¨ ÿ¥ð£ËÍÌÒ¢ð¥ÌÓ£ÙÍð¡ð¤ÒˆÍñÝÓÓÏ₤ÓÇ₤Íð§ð¥Ð
- 2007-11-28 10:22
- ÌçÒÏ 2084
- Ò₤ÒÛ¤(0)
- ÒÛ¤ÍÍÍÊ / ÌçÒÏ (0 / 3909)
- ÍÓÝ£:ð¥ð¡ÌÑÌ
- ÌËÓÌÇÍÊ


Ó¡Í °Ì´Ò
2. **ÒÛƒÓ§ÛÕÀ¿ÓÛ̘ͤð¢ÀÌ₤**ÿ¥Í´ÍÓ£ÙÕÀçÕÂð¡ÙÒƒÍ ËÕÀ¿ÓÛÍÿ¥ðƒÍÎ`org.eclipse.ui.tutorials.rcp.part3`ÿ¥ÿ¥ÌÓʤÍÍ£¤ð¡ð¡ˆJavaÕÀ¿ÓÛÿ¥ÕÌˋEclipseÓÓÛÌ Ó̘ÿ¥Ò°Í¯3.1ÿ¥ÿ¥Í¿ÑÍ₤Ó´ÍÍ£¤OSGi BundleÌ¡ ÍÌð£ÑÓÕÕÀ¿Ð 3. **ÕÌˋ...
Í₤ÍÛÂÌñÓ¨₤Í¿°Í¯ÿ¥Rich Client Platformÿ¥ÓÛÓϯRCPÿ¥Í¤Ò¢ÒÓÿ¥ð¡¤ÌÍ£¤Íҧͥ¤ÍÊÏð¡Ó´ÌñÍÍ˧ÓJavaͤӴӴͤÌðƒð¤Í₤Ò§Ð̘Ó₤ÌÓ´ð§ð¡¤RCPÓ°£ÍÌÓ´ÓÓ˜˜ð¤Õ´Íÿ¥Í¯ÌñÝÍ ËÌÂÒÛ´ÍÎð§ÍˋÓ´RCPÌÍ£¤Í¤Ó´ÿ¥Í¿ÑÒ₤ÎÓ£ð£Ó£ð¡ð¤Í °ÕÛÕ Ó§ÛÓÝ£ÿ¥...
3. **ÕÌÍñËÍ ñÌ₤Ì**ÿ¥Eclipse 3.1.2Ìðƒð¤ÌÇÍ˧ÓÍñËÍ ñÌ₤Ìÿ¥ð§¢ÍƒÍÍ£¤RCPͤӴÍ̓ÌÇÍ ÓÛÍÐ 4. **ÌÏÒ§ð¥Í**ÿ¥ÕÒ¢ð¥Íÿ¥RCPÒ§ÍÊÌðƒÌËÒ¢ÍÓͤӴÓÌÏÒ§ð§ÕˆÐ #### ÌÍ£¤RCPͤӴÓÌÙËÕˆÊ ÌÍ£¤ð¡ð¡ˆRCPͤӴÕÍ¡¡ÌÑÍ...
The book "JavaFXãÂScript: Dynamic Javaã Scripting for Rich Internet/Client-Side Applications" is part of Apressãs firstPress series. This series is known for providing concise, focused content on ...
- `gef.tutorial.step.ui`Í ð¡ÙÓEditorÓ£ÏÌ¢Òˆ`org.eclipse.ui.part.EditorPart`Ð - ÍÛӯ̓ͧẪÓʤգ҃, Í Ì˜ÍƒÍ§ÂÓÓ£ÍÑÐð¤Êð¤ÓÙÐ #### ð¡ÐGEFÓ̘ͤӣÌÒÏÈÌ - **Ì´ÀÍ(Model)**: ÍÛð¿Ì¯ÌÛÓ£Ì, Ì₤ÌÇð¡ˆÍ¤Ó´Ó...
4. **ÕÌˋRich Client Application**ÿ¥Í´ÕÀ¿ÓÛÍÝÌÏð¡ÙÕÌˋãRich Client ApplicationãÕÕÀ¿ÿ¥Í¿ÑÕÌˋãYesãÐ 5. **ÕÌˋHello RCPÌ´ÀÌ¢**ÿ¥ð£Ì´ÀÌ¢ÍÒÀ´ð¡ÙÕÌˋãHello RCPãÿ¥ÓÑÍÓ¿Í£ãFinishãÐ #### ÍÐÕ Ó§ÛðƒÒç...
Í£¤Ó¨RCPÿ¥Rich Client Platformÿ¥ÕÀ¿ÓÛÌ₤ð§¢Ó´GEFÒ¢ÒÀ̓ͧÂӥ҃ʹͥÍÓÓ˜˜ð¡ÌÙËÐÍ´EclipseÓ₤ÍÂð¡Ùÿ¥ÕÌˋ`File > New > Other...`ÿ¥ÓÑÍÍ´Í¥¿Í¤ÓÍ₤¿Ò₤ÌÀð¡Ù̃ͯͿÑÕÌˋ`Plug-in Project`ÐͧÍÕÀ¿ÓÛð¡¤`gef.tutorial.stepz`ÿ¥...
- **RCP (Rich Client Platform)**ÿ¥Í¤ð¤EclipseÓÍ₤ÍÛÂÌñÓ¨₤Í¿°Í¯ÿ¥Í₤Ó´ÌËÌÍ£¤ÌÀÕÂͤӴӴͤР- **ÍÍ£¤RCPÕÀ¿ÓÛ**ÿ¥Í´Eclipseð¡ÙÕÒ¢ÕÌˋãFileã -> ãNewã -> ãPlug-in ProjectãÌËÍÍ£¤ð¡ð¡ˆÌ¯ÓRCPÕÀ¿ÓÛÐ - **ÕÀ¿ÓÛ...
- Í´ãRich Client ApplicationãÕÕÀ¿ð¡ÙÕÌˋãYesãÐ 2. **ÒÛƒÓ§ÛðƒÒç**: - ð¡¤ÕÀ¿ÓÛÌñ£Í `org.eclipse.gef (3.1.0)`ðƒÒçÐÒ¢Í₤ð£ËÕÒ¢Ó¥Òƒ`plugin.xml`Ìð£ÑÍ¿ÑÍ´ãdependenciesãÕ´ÍÌñ£Í ӡͤÓÌÀÓÛÍÛÌÐ - Ìñ£Í ðƒÒç...
Í´Rich Client ApplicationÕÕÀ¿ð¡ÙÕÌˋãYesãÐ 4. ÕÌˋãHello RCPãÿ¥ÍÛÌÍÍ£¤Ò¢Ó´Ð **ÓËÒ₤Ó¿4ÿ¥ÒÛƒÓ§ÛÕÀ¿ÓÛðƒÒç** - **Ì¿Ì°**ÿ¥ÕÒ¢Ó¥Òƒ`plugin.xml`Ìð£Ñÿ¥Ìñ£Í Í₤¿`org.eclipse.gef (3.1.0)`ÓðƒÒçÐ **ÓËÒ₤Ó¿5...
GEFÕÍ¡¡Ò¨ÍçÍ ËͯEclipseÓRCPÿ¥Rich Client Platformÿ¥ÕÀ¿ÓÛð¡Ùÿ¥ð£ËÍˋÓ´Í ÑÌðƒÓÌð£Ñð¢ÍÙÍÒÌ ÒÛ¯ÍÒ§ÐÌÙËÕˆÊÍÎð¡ÿ¥ 1. **̯ͣ¤Ìð£ÑÕÀ¿ÓÛ**ÿ¥Í´Eclipseð¡ÙÕÌˋãFileã>ãNewã>ãOtherãÿ¥ÌƒÍ¯Í¿ÑÕÌˋãPlug-in Projectã...
- Í´ãRich Client ApplicationãÕÕÀ¿ð¡ÙÕÌˋãYesãÐ - ÕÌˋÌ´ÀÌ¢ð¡¤ãHelloRCPãÿ¥Ó¿Í£ãFinishãÐ #### ÍÍ£¤GEF Editor 1. **ÒÛƒÓ§ÛðƒÒçÍ °Ó°£** - ÌÍ¥`plugin.xml`Ìð£Ñÿ¥Í´ãDependenciesãÌ ÓÙƒÕÀçð¡ÙÌñ£Í `org....
**ÕÌˋRCPÕÕÀ¿**ÿ¥Í´ãRich Client Applicationãð¡ÙÕÌˋãYesãÐ 4. **ÕÌˋÍÍÏÌ´ÀÌ¢**ÿ¥ÕÌˋãHello RCPãÿ¥Í¿ÑÓ¿Í£ãFinishãÍÛÌÍÍ£¤Ð - **ðƒÒçÕÀ¿Õ Ó§Û**ÿ¥ - **Ìñ£Í GEFðƒÒç**ÿ¥ÌÍ¥`plugin.xml`Ìð£Ñÿ¥Í´...
- **RCPÕÀ¿ÓÛÍ£¤Ó¨**ÿ¥RCPÿ¥Rich Client Platformÿ¥ÕÀ¿ÓÛÌ₤ͤð¤EclipseÓÍÛÂÌñÓ¨₤ͤӴӴͤÐÌÌÀÈÌͯÕÒ¢ÕÌˋãPlug-in ProjectãÍ¿ÑÒÛƒÓ§ÛÕÀ¿ÓÛÍð¡¤`gef.tutorial.stepz`ÌËÍÍ£¤ð¡ð¡ˆRCPÕÀ¿ÓÛÐ - **̃ÓʤRCPð¡ÙÓEditor**ÿ¥Í´RCP...
Professional Ajax 2nd Edition provides a developer-level tutorial of Ajax techniques, patterns, and use cases. The book begins by exploring the roots of Ajax, covering how the evolution of the web and...
xmlrpc.client zipfile zlib Optimizations Build and C API Changes Other Improvements Deprecated New Keywords Deprecated Python behavior Deprecated Python modules, functions and methods asynchat...
3. **Tools and Compilers**: Familiarize yourself with tools like Visual Studio, which offers a rich development environment tailored for Windows development. #### The Simplest Win32 Program The ...