
网上都有很多在windows平台下JAVA调用C/C++方法的介绍说明。但是,在此过程中,绝大多数都是利用VC等其他工具来进行DLL的生成。试想一下,在eclipse平台开发了JAVA,突然又要打开VC的工作环境,多不爽!何况如果内存不够的话,还得先把其中一个退出。到需要再重新打开,多费劲啊!!现在,我们让这一系列的工作都在eclipse上完成!
首先、安装eclipse3.2。
这个安装过程我就不在这里介绍了,大家都懂。
第二、安装MinGW。
1.用户可以直接登陆以下地址下载MinGW http://prdownloads.sourceforge.net/mingw/MinGW-5.0.3.exe
2. 鼠标双击执行安装文件,选择“Download and Install”,下一步
3.选择软件安装的版本,这里我们选择“Candidate”,下一步
4.选择安装的编译器
1) g++ compiler
2) g77 compiler
3) Objective C Compiler
4) MinGW Make
下一步
5. 选择安装路径,下一步
这里用默认路径C:\MinGW
6. 等待下载软件版本及安装。安装会自动完成,但是你要保证你的网络是可用的。
第三、MinGW的环境变量设置
1. 系统变量里面的Path添加“MinGW安装目录\bin;”(例如;C:\MinGW\bin;)
2. 系统变量里添加 C_INCLUDE_PATH,值为:C:\MinGW\include
3. 系统变量里添加 CPLUS_INCLUDE_PATH,值为:C:\MinGW\include\c++\3.4.2;C:\MinGW\include\c++\3.4.2\mingw32;C:\MinGW\include\c++\3.4.2\backward;C:\MinGW\include (这里要注意你的版本号哦)
第四、做一个小技巧修改
先将MinGW安装目录\bin底下的 mingw32-make.exe复制一份副本,将副本更名为make.exe (因为eclipse默认用了make,不是mingw32-make,当然,你也可以修改eclipse的设定,自己喜欢吧)。
第五、安装CDT插件。
1、 到Eclipse的网站上面找到CDT插件的压缩包,然后下载至电脑硬盘上;
下载地址:(http://www.eclipse.org/cdt/downloads.php )
2、就像你安装其他安装插件一下的方式安装CDT插件吧。怎么安装不是关键问题,按你喜欢,能用就可以了。
第六、简单介绍CDT的使用吧。
1. 新建一个C++项目 点击菜单栏上的 File / New / Standard Make C++ Project
如果想建立一个C项目则选择Standard Make C Project;
2. 输入New Project名字,直接按Finish完成Project添加
3. 给项目新建一个的源文件,点击菜单栏上的 File / New / File
4. 接着出现文件添加的窗口,在File Name栏里面写上文件名
C++的源文件后缀名为cpp 如hello.cpp
而C的源文件后缀名为c 如hello.c
5.
编辑刚刚添加的hello.cpp 文件,添加一段C++的代码,内容如下:
 #include <iostream>using namespace std; int main()
  {
{  cout<<"hello world!!\n"; return 1;
 }
}
若你新建的项目为C的话,则需添加相应的C代码,内容如下:
#include "stdio.h"int main(){ printf("Hello world!\n"); return 1;}
添加一个编译命令
Target Name:MAKE FILE
Builder Command:g++ hello.cpp -g -o run
这里如果是c环境就改成gcc hello.c -g -o run
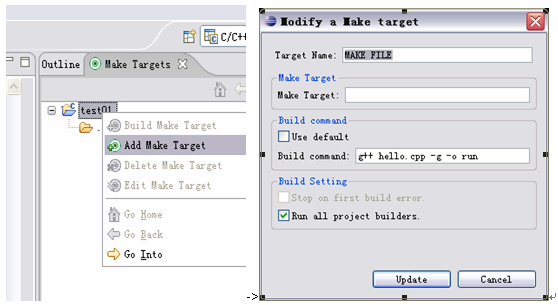
双击MAKE FILE,此时Eclipse在项目文件的根目录创建一个run.exe的文件,此文件根据hello.cpp代码编译生成。
双击run.exe可以预览效果,控制台输出结果:Hello world!
第七、让我们开始进入真正的工作吧!
The Java side
1.建立Java工程JavaHello,编写java类
// Hello.class ,这里主要包名,因为后面的函数命名同包名也有联系的。
package test;class Hello{ public native void sayHello(); static { System.loadLibrary("hello");
 } public static void main(String[] args) { Hello h = new Hello(); h.sayHello(); }}
2.用命令生成头文件
在bin目录下建立批处理文件,名称随意,用bat作为扩展名就行了。这里命名为run.bat
内容为:
set java_home=F:\dev-software\dev-soft\jdk\jdk1.5.0set path=%java_home%\binset class_path=%java_home%\lib;%java_home%\lib\dt.jar;%java_home%\lib\tools.jarjavah -jni test.Hello@pause
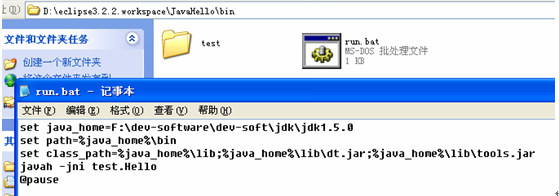
保存,执行(可以双击执行,也可在eclipse的“Run As”调用bat批处理文件来执行),则在bin目录下生成test_Hello.h 文件。内容为:
/* DO NOT EDIT THIS FILE - it is machine generated */#include <jni.h>/* Header for class test_Hello */#ifndef _Included_test_Hello#define _Included_test_Hello#ifdef __cplusplusextern "C" {#endif/* * Class: test_Hello * Method: sayHello * Signature: ()V */JNIEXPORT void JNICALL Java_test_Hello_sayHello (JNIEnv *, jobject);#ifdef __cplusplus}#endif#endif
The C side-Compiling the Library
1.建立标准C工程Cpro,并生成dll文件
1) 将生成的头文件test_Hello.h拷贝到C工程Cpro下
2) 编写C类Hello.c,内容为:
#include <jni.h>#include "test_Hello.h"#include <stdio.h>JNIEXPORT void JNICALL Java_test_Hello_sayHello(JNIEnv *env, jobject obj){printf("Hello world !\n");return;}
3) 在C工程Cpro下建立hello.def文件(用于定义导出的函数),内容为:
EXPORTSJava_test_Hello_sayHello
4)在C工程Cpro下建立makefile文件,内容为:
step1: gcc -c -I"F:\dev-software\dev-soft\jdk\jdk1.5.0\include" -I"F:\dev-software\dev-soft\jdk\jdk1.5.0\include\win32" -o hello.o Hello.cstep2: gcc -shared -o hello.dll hello.o hello.def
5) 再Make Targets视图下,为Cpro工程添加两个Make Target(对应makefile文件的内容),如下图:
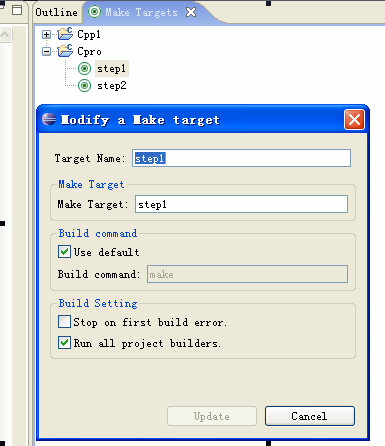
6) Make Targets视图下双击step1,在C工程Cpro下生成hello.o 文件。
7) Make Targets视图下双击step1,在C工程Cpro下生成hello.dll 文件。
JAVA调用DLL
1. 将hello.dll拷贝到Java工程JavaHello下。
2. 运行Hello.java,则可以看到输出结果:
Hello world!
注:如果上面不是C工程而是是C++工程
1) 将Hello.c改为Hello.cpp
2) 将makefile内容改为:
step1: g++ -c -I"F:\dev-software\dev-soft\jdk\jdk1.5.0\include" -I"F:\dev-software\dev-soft\jdk\jdk1.5.0\include\win32" -o hello.o Hello.cpp step2: g++ -shared -o hello.dll hello.o hello.def
3) 其他的几乎都不用改变也可以。
电信100元仅售98.60
联通100仅售99.00
移动100仅售99.30


相关推荐
本文旨在详细介绍如何在Eclipse平台上实现Java对C/C++的直接调用,避免使用额外的工具如Visual C++来生成DLL文件。这不仅提高了开发效率,还确保了整个开发流程在统一的环境中进行。 #### 二、准备工作 1. **安装...
#### 五、Eclipse + CDT + MinGW 进行Java调用C/C++ - **安装Eclipse 3.2。** - **安装MinGW:** - 下载并安装。 - 设置环境变量。 - **安装CDT插件:** - 下载并安装。 - **使用CDT:** - 新建C++项目。 - ...
它与Eclipse + CDT(C/C++ Development Tools)集成,能够帮助开发者创建JNI(Java Native Interface)代码,进而实现Java程序对本地C或C++代码的调用。JNI是一种规范,允许Java代码与其他语言编写的代码进行交互,...
开发者通常使用JNI与Android的Native Development Kit(NDK)结合,以便利用C、C++等语言实现高性能计算或调用已有的本地库。 描述中的链接指向了一篇CSDN博客文章,虽然具体内容未给出,但可以推测该博客可能详细...
在日常的工作和学习中,你是否常常为处理复杂的数据、生成高质量的文本或者进行精准的图像识别而烦恼?DeepSeek 或许就是你一直在寻找的解决方案!它以其高效、智能的特点,在各个行业都展现出了巨大的应用价值。然而,想要充分发挥 DeepSeek 的优势,掌握从入门到精通的知识和技能至关重要。本文将从实际应用的角度出发,为你详细介绍 DeepSeek 的基本原理、操作方法以及高级技巧。通过系统的学习,你将能够轻松地运用 DeepSeek 解决实际问题,提升工作效率和质量,让自己在职场和学术领域脱颖而出。现在,就让我们一起开启这场实用又高效的学习之旅吧!
在日常的工作和学习中,你是否常常为处理复杂的数据、生成高质量的文本或者进行精准的图像识别而烦恼?DeepSeek 或许就是你一直在寻找的解决方案!它以其高效、智能的特点,在各个行业都展现出了巨大的应用价值。然而,想要充分发挥 DeepSeek 的优势,掌握从入门到精通的知识和技能至关重要。本文将从实际应用的角度出发,为你详细介绍 DeepSeek 的基本原理、操作方法以及高级技巧。通过系统的学习,你将能够轻松地运用 DeepSeek 解决实际问题,提升工作效率和质量,让自己在职场和学术领域脱颖而出。现在,就让我们一起开启这场实用又高效的学习之旅吧!
ACM动态规划模板-区间修改线段树问题模板
# 踏入C语言的奇妙编程世界 在编程的广阔宇宙中,C语言宛如一颗璀璨恒星,以其独特魅力与强大功能,始终占据着不可替代的地位。无论你是编程小白,还是有一定基础想进一步提升的开发者,C语言都值得深入探索。 C语言的高效性与可移植性令人瞩目。它能直接操控硬件,执行速度快,是系统软件、嵌入式开发的首选。同时,代码可在不同操作系统和硬件平台间轻松移植,极大节省开发成本。 学习C语言,能让你深入理解计算机底层原理,培养逻辑思维和问题解决能力。掌握C语言后,再学习其他编程语言也会事半功倍。 现在,让我们一起开启C语言学习之旅。这里有丰富教程、实用案例、详细代码解析,助你逐步掌握C语言核心知识和编程技巧。别再犹豫,加入我们,在C语言的海洋中尽情遨游,挖掘无限可能,为未来的编程之路打下坚实基础!
在日常的工作和学习中,你是否常常为处理复杂的数据、生成高质量的文本或者进行精准的图像识别而烦恼?DeepSeek 或许就是你一直在寻找的解决方案!它以其高效、智能的特点,在各个行业都展现出了巨大的应用价值。然而,想要充分发挥 DeepSeek 的优势,掌握从入门到精通的知识和技能至关重要。本文将从实际应用的角度出发,为你详细介绍 DeepSeek 的基本原理、操作方法以及高级技巧。通过系统的学习,你将能够轻松地运用 DeepSeek 解决实际问题,提升工作效率和质量,让自己在职场和学术领域脱颖而出。现在,就让我们一起开启这场实用又高效的学习之旅吧!
本项目为Python语言开发的PersonRelationKnowledgeGraph设计源码,总计包含49个文件,涵盖19个.pyc字节码文件、12个.py源代码文件、8个.txt文本文件、3个.xml配置文件、3个.png图片文件、2个.md标记文件、1个.iml项目配置文件、1个.cfg配置文件。该源码库旨在构建一个用于表示和查询人物关系的知识图谱系统。
在日常的工作和学习中,你是否常常为处理复杂的数据、生成高质量的文本或者进行精准的图像识别而烦恼?DeepSeek 或许就是你一直在寻找的解决方案!它以其高效、智能的特点,在各个行业都展现出了巨大的应用价值。然而,想要充分发挥 DeepSeek 的优势,掌握从入门到精通的知识和技能至关重要。本文将从实际应用的角度出发,为你详细介绍 DeepSeek 的基本原理、操作方法以及高级技巧。通过系统的学习,你将能够轻松地运用 DeepSeek 解决实际问题,提升工作效率和质量,让自己在职场和学术领域脱颖而出。现在,就让我们一起开启这场实用又高效的学习之旅吧!
rtsp实时预览接口URL:/evo-apigw/admin/API/MTS/Video/StartVideo HLS、FLV、RTMP实时预览接口方式 :接口URL/evo-apigw/admin/API/video/stream/realtime 参数名 必选 类型 说明 data true string Json串 +channelId true string 视频通道编码 +streamType true string 码流类型:1=主码流, 2=辅码流,3=辅码流2 +type true string 协议类型:hls,hlss,flv,flvs,ws_flv,wss_flv,rtmp hls:http协议,m3u8格式,端口7086; hlss:https协议,m3u8格式,端口是7096; flv:http协议,flv格式,端口7886; flvs:https协议,flv格式,端口是7896; ws_flv:ws协议,flv格式,端口是7886; wss_flv:wss协议,flv格式,端口是7896; rtmp:rtmp协议,端口是1975;
Simulink永磁风机飞轮储能系统二次调频技术研究:频率特性分析与参数优化,Simulink永磁风机飞轮储能二次调频技术:系统频率特性详解及参数优化研究参考详实文献及两区域系统应用,simulink永磁风机飞轮储能二次调频,系统频率特性如下,可改变调频参数改善频率。 参考文献详细,两区域系统二次调频。 ,核心关键词: 1. Simulink 2. 永磁风机 3. 飞轮储能 4. 二次调频 5. 系统频率特性 6. 调频参数 7. 改善频率 8. 参考文献 9. 两区域系统 以上关键词用分号(;)分隔,结果为:Simulink;永磁风机;飞轮储能;二次调频;系统频率特性;调频参数;改善频率;参考文献;两区域系统。,基于Simulink的永磁风机与飞轮储能系统二次调频研究:频率特性及调频参数优化
MATLAB驱动的ASR防滑转模型:PID与对照控制算法对比,冰雪路面条件下滑移率与车速轮速对照展示,MATLAB驱动的ASR防滑转模型:PID与对照控制算法对比,冰雪路面条件下滑移率与车速轮速对照图展示,MATLAB驱动防滑转模型ASR模型 ASR模型驱动防滑转模型 ?牵引力控制系统模型 选择PID控制算法以及对照控制算法,共两种控制算法,可进行选择。 选择冰路面以及雪路面,共两种路面条件,可进行选择。 控制目标为滑移率0.2,出图显示车速以及轮速对照,出图显示车辆轮胎滑移率。 模型简单,仅供参考。 ,MATLAB; ASR模型; 防滑转模型; 牵引力控制系统模型; PID控制算法; 对照控制算法; 冰路面; 雪路面; 控制目标; 滑移率; 车速; 轮速。,MATLAB驱动的ASR模型:PID与对照算法在冰雪路面的滑移率控制研究
芯片失效分析方法介绍 -深入解析芯片故障原因及预防措施.pptx
4131_127989170.html
内容概要:本文提供了一个全面的PostgreSQL自动化部署解决方案,涵盖智能环境适应、多平台支持、内存与性能优化以及安全性加强等重要方面。首先介绍了脚本的功能及其调用方法,随后详细阐述了操作系统和依赖软件包的准备过程、配置项的自动生成机制,还包括对实例的安全性和监控功能的强化措施。部署指南给出了具体的命令操作指导,便于新手理解和执行。最后强调了该工具对于不同硬件条件和服务需求的有效应对能力,特别是针对云计算环境下应用的支持特点。 适合人群:对PostgreSQL集群运维有一定基础并渴望提高效率和安全性的数据库管理员及工程师。 使用场景及目标:本脚本能够帮助企业在大规模部署时减少人工介入时间,确保系统的稳定性与高性能,适用于各类需要稳定可靠的数据库解决方案的企业或机构,特别是在大数据量和高并发事务处理场合。 其他说明:文中还提及了一些高级功能如自动备份、流复制等设置步骤,使得该方案不仅可以快速上线而且能满足后续维护和发展阶段的要求。同时提到的技术性能数据也为用户评估其能否满足业务需求提供了直观参考。
房地产开发合同[示范文本].doc
在日常的工作和学习中,你是否常常为处理复杂的数据、生成高质量的文本或者进行精准的图像识别而烦恼?DeepSeek 或许就是你一直在寻找的解决方案!它以其高效、智能的特点,在各个行业都展现出了巨大的应用价值。然而,想要充分发挥 DeepSeek 的优势,掌握从入门到精通的知识和技能至关重要。本文将从实际应用的角度出发,为你详细介绍 DeepSeek 的基本原理、操作方法以及高级技巧。通过系统的学习,你将能够轻松地运用 DeepSeek 解决实际问题,提升工作效率和质量,让自己在职场和学术领域脱颖而出。现在,就让我们一起开启这场实用又高效的学习之旅吧!
在日常的工作和学习中,你是否常常为处理复杂的数据、生成高质量的文本或者进行精准的图像识别而烦恼?DeepSeek 或许就是你一直在寻找的解决方案!它以其高效、智能的特点,在各个行业都展现出了巨大的应用价值。然而,想要充分发挥 DeepSeek 的优势,掌握从入门到精通的知识和技能至关重要。本文将从实际应用的角度出发,为你详细介绍 DeepSeek 的基本原理、操作方法以及高级技巧。通过系统的学习,你将能够轻松地运用 DeepSeek 解决实际问题,提升工作效率和质量,让自己在职场和学术领域脱颖而出。现在,就让我们一起开启这场实用又高效的学习之旅吧!