- 浏览: 193204 次
- 性别:

- 来自: 北京
-

文章分类
最新评论
-
Dream01:
这个版本太老了,admob更新了。我后来尝试[url]http ...
unity3d中加入admob的方法 -
cony138:
为什么我做出来的ui无法用鼠标操作?滑块拖不动,里面的文字删不 ...
[Unity3D]GUI 效果一览 -
htlxiao:
黑苹果系统或者虚拟机的苹果系统怎么安装这个呢?^_^
(转)在Mac下结合Xcode搭建Cocos2d-X开发环境! -
tank2308635:
codeone 写道运行不了,提示BASE SDK MISSI ...
(转)在Mac下结合Xcode搭建Cocos2d-X开发环境! -
codeone:
运行不了,提示BASE SDK MISSING
(转)在Mac下结合Xcode搭建Cocos2d-X开发环境!
原文地址:http://blog.csdn.net/xys289187120/article/details/6961080
3D 世界中自定义模型的使用恐怕是重中之重,因为系统自身提供的模型肯定是无法满足GD对游戏的策划,所以为了让游戏更加绚丽,我们须要调用美术制作的精品模型与动画,本章MOMO将带领盆友们学习Unity3D中模型的载入与动画的播放,哇咔咔~~
由于MOMO手头上没有现成的模型,所以我将在Unity3D 官网中下载官方提供的游戏DEMO 中的模型来使用。另外官方提供了很多Unity3D 游戏DEMO,与详细的文档。可以帮助我们学习Unity.有兴趣的盆友可以去看看哈。
下载页面:http://unity3d.com/support/resources/
本章博文的目的是利用上一章介绍的游戏摇杆来控制人物模型的移动,与行走动画的播放。

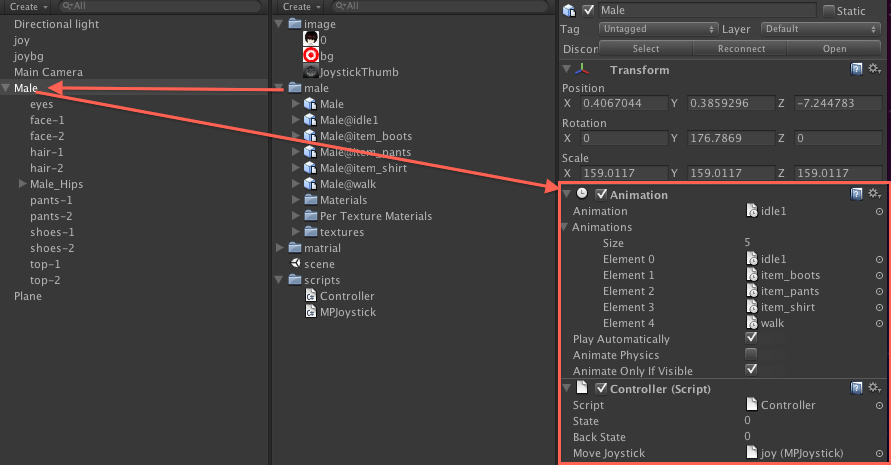
如上图所示Create中的文件夹male中存放着模型动画与贴图等,这个应该是美术提供给我们的。然后将整个male用鼠标拖动到左侧3D世界中,通过移动,旋转,缩放将人物模型放置在一个理想的位置。右侧红框内设置模型动画的属性。
Animation
idle1 该模型默认动画名称为idle1
Animations
size 该模型动画的数量
Element 该模型的动画名称
Play Automatically 是否自动播放
Animation Physics 是否设置该模型物理碰撞
Animation Only if Visable 是否设置该模型仅自己显示
给该模型绑定一个脚本Controller.cs 用来接收摇杆返回的信息更新模型动画。
Controller.cs
- using UnityEngine;
- using System.Collections;
- public class Controller : MonoBehaviour {
- //人物的行走方向状态
- public const int HERO_UP= 0;
- public const int HERO_RIGHT= 1;
- public const int HERO_DOWN= 2;
- public const int HERO_LEFT= 3;
- //人物当前行走方向状态
- public int state = 0;
- //备份上一次人物当前行走方向状态
- //这里暂时没有用到
- public int backState = 0;
- //游戏摇杆对象
- public MPJoystick moveJoystick;
- //这个方法只调用一次,在Start方法之前调用
- public void Awake() {
- }
- //这个方法只调用一次,在Awake方法之后调用
- void Start () {
- state = HERO_DOWN;
- }
- void Update () {
- //获取摇杆控制的方向数据 上一章有详细介绍
- float touchKey_x = moveJoystick.position.x;
- float touchKey_y = moveJoystick.position.y;
- if(touchKey_x == -1){
- setHeroState(HERO_LEFT);
- }else if(touchKey_x == 1){
- setHeroState(HERO_RIGHT);
- }
- if(touchKey_y == -1){
- setHeroState(HERO_DOWN);
- }else if(touchKey_y == 1){
- setHeroState(HERO_UP);
- }
- if(touchKey_x == 0 && touchKey_y ==0){
- //松开摇杆后播放默认动画,
- //不穿参数为播放默认动画。
- animation.Play();
- }
- }
- public void setHeroState(int newState)
- {
- //根据当前人物方向 与上一次备份方向计算出模型旋转的角度
- int rotateValue = (newState - state) * 90;
- Vector3 transformValue = new Vector3();
- //播放行走动画
- animation.Play("walk");
- //模型移动的位移的数值
- switch(newState){
- case HERO_UP:
- transformValue = Vector3.forward * Time.deltaTime;
- break;
- case HERO_DOWN:
- transformValue = -Vector3.forward * Time.deltaTime;
- break;
- case HERO_LEFT:
- transformValue = Vector3.left * Time.deltaTime;
- break;
- case HERO_RIGHT:
- transformValue = -Vector3.left * Time.deltaTime;
- break;
- }
- //模型旋转
- transform.Rotate(Vector3.up, rotateValue);
- //模型移动
- transform.Translate(transformValue, Space.World);
- backState = state;
- state = newState;
- }
- }
上一章介绍了javaScript脚本使用游戏摇杆的方法,本章MOMO告诉大家使用C#脚本来使用游戏摇杆,上面我用 Controller.cs C#脚本来接收系统提供的Joystick.js是肯定无法使用的,须要修改成.cs文件,我在国外的一个网站上看到了一个老外帮我们已经修改了,那么我将他修改后的代码贴出来方便大家学习,有兴趣的朋友可以研究研究。哇咔咔~
MPJoystick.cs
- using UnityEngine;
- /**
- * File: MPJoystick.cs
- * Author: Chris Danielson of (monkeyprism.com)
- *
- // USED TO BE: Joystick.js taken from Penelope iPhone Tutorial
- //
- // Joystick creates a movable joystick (via GUITexture) that
- // handles touch input, taps, and phases. Dead zones can control
- // where the joystick input gets picked up and can be normalized.
- //
- // Optionally, you can enable the touchPad property from the editor
- // to treat this Joystick as a TouchPad. A TouchPad allows the finger
- // to touch down at any point and it tracks the movement relatively
- // without moving the graphic
- */
- [RequireComponent(typeof(GUITexture))]
- public class MPJoystick : MonoBehaviour
- {
- class Boundary {
- public Vector2 min = Vector2.zero;
- public Vector2 max = Vector2.zero;
- }
- private static MPJoystick[] joysticks; // A static collection of all joysticks
- private static bool enumeratedJoysticks = false;
- private static float tapTimeDelta = 0.3f; // Time allowed between taps
- public bool touchPad;
- public Vector2 position = Vector2.zero;
- public Rect touchZone;
- public Vector2 deadZone = Vector2.zero; // Control when position is output
- public bool normalize = false; // Normalize output after the dead-zone?
- public int tapCount;
- private int lastFingerId = -1; // Finger last used for this joystick
- private float tapTimeWindow; // How much time there is left for a tap to occur
- private Vector2 fingerDownPos;
- //private float fingerDownTime;
- //private float firstDeltaTime = 0.5f;
- private GUITexture gui;
- private Rect defaultRect; // Default position / extents of the joystick graphic
- private Boundary guiBoundary = new Boundary(); // Boundary for joystick graphic
- private Vector2 guiTouchOffset; // Offset to apply to touch input
- private Vector2 guiCenter; // Center of joystick
- void Start() {
- gui = (GUITexture)GetComponent(typeof(GUITexture));
- defaultRect = gui.pixelInset;
- defaultRect.x += transform.position.x * Screen.width;// + gui.pixelInset.x; // - Screen.width * 0.5;
- defaultRect.y += transform.position.y * Screen.height;// - Screen.height * 0.5;
- transform.position = Vector3.zero;
- if (touchPad) {
- // If a texture has been assigned, then use the rect ferom the gui as our touchZone
- if ( gui.texture )
- touchZone = defaultRect;
- } else {
- guiTouchOffset.x = defaultRect.width * 0.5f;
- guiTouchOffset.y = defaultRect.height * 0.5f;
- // Cache the center of the GUI, since it doesn't change
- guiCenter.x = defaultRect.x + guiTouchOffset.x;
- guiCenter.y = defaultRect.y + guiTouchOffset.y;
- // Let's build the GUI boundary, so we can clamp joystick movement
- guiBoundary.min.x = defaultRect.x - guiTouchOffset.x;
- guiBoundary.max.x = defaultRect.x + guiTouchOffset.x;
- guiBoundary.min.y = defaultRect.y - guiTouchOffset.y;
- guiBoundary.max.y = defaultRect.y + guiTouchOffset.y;
- }
- }
- public Vector2 getGUICenter() {
- return guiCenter;
- }
- void Disable() {
- gameObject.active = false;
- //enumeratedJoysticks = false;
- }
- private void ResetJoystick() {
- gui.pixelInset = defaultRect;
- lastFingerId = -1;
- position = Vector2.zero;
- fingerDownPos = Vector2.zero;
- }
- private bool IsFingerDown() {
- return (lastFingerId != -1);
- }
- public void LatchedFinger(int fingerId) {
- // If another joystick has latched this finger, then we must release it
- if ( lastFingerId == fingerId )
- ResetJoystick();
- }
- void Update() {
- if (!enumeratedJoysticks) {
- // Collect all joysticks in the game, so we can relay finger latching messages
- joysticks = (MPJoystick[])FindObjectsOfType(typeof(MPJoystick));
- enumeratedJoysticks = true;
- }
- int count = Input.touchCount;
- if ( tapTimeWindow > 0 )
- tapTimeWindow -= Time.deltaTime;
- else
- tapCount = 0;
- if ( count == 0 )
- ResetJoystick();
- else
- {
- for(int i = 0; i < count; i++) {
- Touch touch = Input.GetTouch(i);
- Vector2 guiTouchPos = touch.position - guiTouchOffset;
- bool shouldLatchFinger = false;
- if (touchPad) {
- if (touchZone.Contains(touch.position))
- shouldLatchFinger = true;
- }
- else if (gui.HitTest(touch.position)) {
- shouldLatchFinger = true;
- }
- // Latch the finger if this is a new touch
- if (shouldLatchFinger && (lastFingerId == -1 || lastFingerId != touch.fingerId )) {
- if (touchPad) {
- //gui.color.a = 0.15;
- lastFingerId = touch.fingerId;
- //fingerDownPos = touch.position;
- //fingerDownTime = Time.time;
- }
- lastFingerId = touch.fingerId;
- // Accumulate taps if it is within the time window
- if ( tapTimeWindow > 0 )
- tapCount++;
- else {
- tapCount = 1;
- tapTimeWindow = tapTimeDelta;
- }
- // Tell other joysticks we've latched this finger
- //for ( j : Joystick in joysticks )
- foreach (MPJoystick j in joysticks) {
- if (j != this)
- j.LatchedFinger( touch.fingerId );
- }
- }
- if ( lastFingerId == touch.fingerId ) {
- // Override the tap count with what the iPhone SDK reports if it is greater
- // This is a workaround, since the iPhone SDK does not currently track taps
- // for multiple touches
- if ( touch.tapCount > tapCount )
- tapCount = touch.tapCount;
- if ( touchPad ) {
- // For a touchpad, let's just set the position directly based on distance from initial touchdown
- position.x = Mathf.Clamp( ( touch.position.x - fingerDownPos.x ) / ( touchZone.width / 2 ), -1, 1 );
- position.y = Mathf.Clamp( ( touch.position.y - fingerDownPos.y ) / ( touchZone.height / 2 ), -1, 1 );
- } else {
- // Change the location of the joystick graphic to match where the touch is
- Rect r = gui.pixelInset;
- r.x = Mathf.Clamp( guiTouchPos.x, guiBoundary.min.x, guiBoundary.max.x );
- r.y = Mathf.Clamp( guiTouchPos.y, guiBoundary.min.y, guiBoundary.max.y );
- gui.pixelInset = r;
- }
- if (touch.phase == TouchPhase.Ended || touch.phase == TouchPhase.Canceled)
- ResetJoystick();
- }
- }
- }
- if (!touchPad) {
- // Get a value between -1 and 1 based on the joystick graphic location
- position.x = ( gui.pixelInset.x + guiTouchOffset.x - guiCenter.x ) / guiTouchOffset.x;
- position.y = ( gui.pixelInset.y + guiTouchOffset.y - guiCenter.y ) / guiTouchOffset.y;
- }
- // Adjust for dead zone
- var absoluteX = Mathf.Abs( position.x );
- var absoluteY = Mathf.Abs( position.y );
- if (absoluteX < deadZone.x) {
- // Report the joystick as being at the center if it is within the dead zone
- position.x = 0;
- }
- else if (normalize) {
- // Rescale the output after taking the dead zone into account
- position.x = Mathf.Sign( position.x ) * ( absoluteX - deadZone.x ) / ( 1 - deadZone.x );
- }
- if (absoluteY < deadZone.y) {
- // Report the joystick as being at the center if it is within the dead zone
- position.y = 0;
- }
- else if (normalize) {
- // Rescale the output after taking the dead zone into account
- position.y = Mathf.Sign( position.y ) * ( absoluteY - deadZone.y ) / ( 1 - deadZone.y );
- }
- }
- }
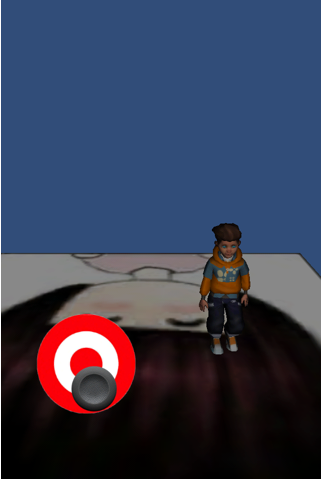
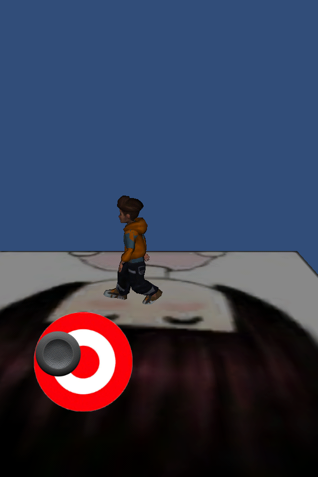
导出 build and run 看看在iPhone 上的效果,通过触摸游戏摇杆可以控制人物的上,下,左,右 ,左上,右上,左下,右下 8个方向的移动啦,不错吧,哇咔咔~~


发表评论
-
ios 支付宝
2013-11-04 11:08 0支付宝无线产品介绍: https://b.alipay.com ... -
ios随时记录
2013-10-18 14:56 0关于iOS测试机个数上限的详细规则 http://blog.d ... -
UIView的autoresizingMask的详细研究
2013-05-22 18:35 0UIViewAutoresizingNone � ... -
xcode4.5 各种不能运行在真机上
2013-01-23 13:55 0自从xocde升级到4.5又换了台新mac之后,xcode就一 ... -
iTunes store Search API
2012-12-04 13:07 0根据appid查找某个软件信息 http://itunes.a ... -
Core Image人脸检测
2012-11-26 14:36 0此次iOS5的一个新特性就 ... -
10大iOS开发者最喜爱的库
2012-11-26 14:34 010大iOS开发者最喜爱的� ... -
手机游戏社交平台考
2012-11-08 16:26 0手机游戏社交平台考 � ... -
提取iOS App中的png图片资源
2012-06-12 17:32 0挺邪恶的,直接看人家的图片资源,无奈个人艺术设计实力实在不强, ... -
github objective-c most_watched
2012-06-11 16:20 0https://github.com/languages/Ob ... -
objective-c block 详解
2012-05-30 09:24 0Block Apple 在C, Objective-C, C ... -
iOS官方Sample大全
2012-05-29 15:34 0http://developer.apple.com/libr ... -
网络编程总结 & 使用NSOperation和NSOperationQueue启动多线程
2012-05-29 09:45 0一:确认网络环境3G/WIFI 1. 添加源文件和f ... -
添加Tapku框架到Xcode4工程
2012-05-28 12:30 0添加Tapku框架到Xcode4工程 Tapku下载地址:h ... -
(转)苹果应用商店审核指南中文翻译
2012-05-11 12:11 1349前言 我们希望帮助您加入 这个成功的组织。这是我们首次发布《 ... -
详解IOS SDK兼容性引导
2012-04-23 16:08 0IOS SDK兼容性引导是本文要介绍的内容,主要是基于IOS ... -
EZGUI使用问题记录
2012-01-09 12:07 1940使用Building Atlases后,图片边缘出现毛刺 制 ... -
27款国外最新Photoshop色板
2012-01-05 11:57 173427款国外最新Photoshop色板 -
(转)一些iOS高效开源类库
2012-01-05 11:10 1412原文链接: 一些iOS高效开源类库——————————— ... -
unity3d 拖拽GUI窗体
2011-12-05 11:45 63using UnityEngine;using System. ...


相关推荐
雨松MOMO Unity3D 游戏开发系列博文之Unity3D Unity3D 游戏引擎之FBX模型的载入与人物行走动画的播放,欢迎大家下载阅读,哇咔咔~~
在Unity3D游戏开发中,FBX模型的载入与人物行走动画的播放是至关重要的环节,这涉及到游戏场景的构建、角色交互以及游戏体验的提升。FBX是一种跨平台的三维模型交换格式,广泛应用于游戏开发、电影制作等领域。Unity...
此外,模型的骨骼绑定和动画也需要与Unity的Mecanim动画系统兼容,这样角色才能在游戏世界中正确地移动和交互。 标签中的“人物模型”表明这是一个专为角色设计的3D模型,这意味着它可能包括了面部细节、服装、发型...
Unity3D是一款强大的跨平台游戏开发引擎,被广泛应用于创建2D和3D的互动内容,包括游戏、模拟器、虚拟现实(VR)和增强现实(AR)应用。在这个特定的场景中,我们讨论的是一个"Unity3D女孩FBX模型"。FBX全称是Film...
总结来说,"Unity3D男孩FBX模型"是用于游戏开发的3D模型资源,它包含了一个3D男性角色的所有必要信息,包括几何体、纹理、动画等,并且已经优化为适合Unity3D引擎的FBX格式。开发者可以将其导入Unity,进行角色设定...
Unity是一款广泛应用于游戏开发、虚拟现实(VR)和增强现实(AR)的跨平台3D引擎,它允许开发者创建各种复杂的游戏场景、角色和交互式体验。在这个特定的资源包中,我们有一个专为Unity设计的亚裔男性3D模型,以FBX格式...
Unity3D角色FBX模型带动作动画,已经做好了动作动画的切割,直接导入即可使用,动画名称见FBX文件夹。Unity4.x版本的东西,应该是各个版本兼容。本资源收集于互联网,本人讲过整理与加工,仅供学习交流使用。毕竟在...
3DMAX做的汽车模型。FBX格式。直接导入unity3d就可以用
白色短袖的男人,亚洲面孔,T-pose姿态,有骨骼绑定,骨骼绑定方法来源于mixamo网站自动绑骨
在Unity3D中,FBX模型文件是非常重要的,因为它们包含了所有必要的元素,如网格、纹理、骨骼和动画,使得这些3D模型可以在游戏环境中正常工作。当导入"girlWarrior"的FBX文件时,Unity会解析模型数据,并将其转换为...
通过UniFBX插件完成的一个模型加载案例 1 unity3d的版本要在5.5以上版本 2 使用语言c# 3 自制案例路径在 “CSUE/load2.unity” 4 使用时应对自身需求做出更改,本案例只做参考学习
Unity3D作为一款强大的游戏引擎,支持fbx文件格式,并提供了相关的动画编辑工具。 一、fbx文件在Unity3D中的应用 在Unity3D中,fbx文件可以作为动画资源被导入和使用。读者可以从官方提供的示例中找到主角的fbx...
总结来说,这个资源提供了Unity3D中的3D人物模型,包含多种预设动作,这对于学习3D建模、动画制作以及Unity的游戏开发是非常宝贵的。通过研究和实践,你可以了解到3D Max中的建模和动画流程,以及Unity中的导入设置...
Unity3D是一款强大的跨平台3D游戏开发引擎,被广泛应用于游戏制作、虚拟现实(VR)、增强现实(AR)以及交互式应用的设计。在这个"unity3D人物模型下载"中,我们关注的是如何在Unity中有效地使用和管理3D人物模型。 ...
Unity工地工人模型是一款专为游戏开发或虚拟现实应用设计的3D资源,它包含了丰富的动画效果,如说话和手势,可以方便地导入到Unity引擎中直接使用。在本文中,我们将深入探讨Unity游戏引擎、3D动画制作以及如何在...
迷你动画骑士游戏unity3d模型 fbx格式 带有动画空闲,死亡,跳跃,翻滚,奔跑,走路,攻击等动画的动画骑士!以FBX,OBJ和Blend格式提供。可以用于弓箭手大作战类似敌人的角色unity3d开发。或者迷你卡通风格rpg游戏...
Unity3D是一款强大的跨平台游戏开发引擎,广泛应用于制作各种类型的游戏,从简单的2D小游戏到复杂的3D大作。在Unity中,人物模型是构建游戏世界和交互体验的重要组成部分。本资源提供了一系列的人物模型,包括小孩、...
UnityFBXExporter 1.1.1 是一款专为Unity开发者设计的插件,它极大地简化了将Unity项目中的3D模型导出为FBX格式的过程。FBX(Filmbox)是Autodesk开发的一种跨平台的3D模型交换格式,广泛应用于游戏开发、动画制作...
Unity3D角色FBX模型带动作动画,已经做好了动作动画的切割,直接导入即可使用,动画名称见FBX文件夹。适合于新手开发人员,可导入测试动画效果,本资源收集于互联网,本人讲过整理与加工,仅供学习交流使用。
这款插件可以有效的减少模型的面数,先加头文件using OrbCreationExtensions; 再调用函数: GameObjectExtensions.GetSimplifiedMesh(obj,2.5f, false, 1);就可以用了,非常方便,由于我把插件里面多余的东西剔除掉...