正如你所看到的,Blend是一个非常强大的节约时间的设计工具,在Blend下能够设计出很多满意的动画作品,或许他具体是怎么实现的,通过什么方式实现的我们还是一无所知。本篇将续前面几篇基础动画之上,详细介绍Silverlight里提供故事板(StoryBorards)的属性和各种不同类型的动画(Animations)的详细知识点,揭晓在Blend下设计动画的内幕故事。
一、故事板(StoryBoard)属性
Silvelight中的故事板(StoryBoard)提供了管理时间线的功能接口,可以用来控制一个或多个Silverlight动画进程,故我也称其为动画时间线容器。如下XAML代码块演示了通过StoryBoard来管理了名为GreenBall的元素在X坐标方向上的偏移变换动画。
<!--<br/ /><br/ />Code highlighting produced by Actipro CodeHighlighter (freeware)<br/ />http://www.CodeHighlighter.com/<br/ /><br/ />--><Storyboardx:Name="MoveBall">
<DoubleAnimationUsingKeyFramesBeginTime="00:00:00"Storyboard.TargetName="GreenBall"
Storyboard.TargetProperty="(UIElement.RenderTransform).(TransformGroup.Children)[3].(TranslateTransform.X)">
<EasingDoubleKeyFrameKeyTime="00:00:02"Value="540"/>
</DoubleAnimationUsingKeyFrames>
</Storyboard>
StoryBoard提供了六个常用的动画属性选项,它们分别是:AutoReverse,BeginTime,Duration,FillBehavior,RepeatBehavior,SpeedRatio。通过这六个属性可以用来控制动画的基本行为动作,比如想要实现动画的缓冲时间,就需要用到Duration属性;设置动画的开始时间则用BeginTime;如果动画执行完后根据执行路线反向执行到原始状态则需要使用AutoReverse;如果需要设置动画的运行速度则使用SpeedRatio就可以完成。以下代码块演示了AutoReverse属性的使用,动画运行完后将按着原来的运行路线进行反向运行。更多详细可参考这篇博文介绍:《动画基础快速入门Animation》或者MSDN。
<!--<br/ /><br/ />Code highlighting produced by Actipro CodeHighlighter (freeware)<br/ />http://www.CodeHighlighter.com/<br/ /><br/ />--><Storyboardx:Name="MoveBall"AutoReverse="True">
<DoubleAnimationUsingKeyFramesBeginTime="00:00:00"Storyboard.TargetName="GreenBall"
Storyboard.TargetProperty="(UIElement.RenderTransform).(TransformGroup.Children)[3].(TranslateTransform.X)">
<EasingDoubleKeyFrameKeyTime="00:00:02"Value="540"/>
</DoubleAnimationUsingKeyFrames>
</Storyboard>
Storyboard的属性是可以组合应用的,如上代码块给动画设置了AutoReverse属性,使其在动画执行完后通过原来的运行路径进行回滚动画,可以给该动画时间线容器添加一个BeginTime属性,使其在程序加载后5秒钟才开始执行动画,这样就使用到了两个属性,如下代码块:
<!--<br/ /><br/ />Code highlighting produced by Actipro CodeHighlighter (freeware)<br/ />http://www.CodeHighlighter.com/<br/ /><br/ />--><Storyboardx:Name="MoveBall"AutoReverse="True"BeginTime="00:00:05">
......
</Storyboard>
二、动画类型(Types of animation)
Silverlight中的动画主要分From/To/By和关键帧动画两种类型。
From/To/By动画也称为线性插值动画(Linear Interpolation),是Silverlight类型中最简单的一种动画,只需要设置开始(From)、结束(To)和动画值(By)就可以完成动画的创建,Silverlight 3中提供了三种基础的From/To/By动画类型:DoubleAnimation、ColorAnimation和PointAnimation.
关键帧动画比From/To/By动画更加强大,无需指定动画的开始、结束以及动画缓冲时间等相关参数,只需要关注关键帧和如何去控制动画就行了。Silverlight 3中提供了四种基本的关键帧动画:缓和(Easing)、线性(Linear)、样条(Spline)和离散(discreet)。
DoubleAnimation的使用是非常简单的,只需要搞清楚From/To/By三要素就基本掌握了该类型动画的使用,下面是一个简单的通过DoubleAnimation实现的圆形移动的示例。
<!--<br/ /><br/ />Code highlighting produced by Actipro CodeHighlighter (freeware)<br/ />http://www.CodeHighlighter.com/<br/ /><br/ />--><UserControlx:Class="DoubleByAnimation.MainPage"
xmlns="http://schemas.microsoft.com/winfx/2006/xaml/presentation"
xmlns:x="http://schemas.microsoft.com/winfx/2006/xaml"
Width="800"Height="600">
<UserControl.Resources>
<Storyboardx:Name="Storyboard1">
<DoubleAnimationStoryboard.TargetName="Ellipse"
Storyboard.TargetProperty="(UIElement.RenderTransform).(TransformGroup.Children)[3].(TranslateTransform.X)"
From="0"
By="150"
Duration="00:00:01"/>
</Storyboard>
</UserControl.Resources>
<Canvasx:Name="LayoutRoot"Background="White">
<EllipseHeight="200"Width="200"Fill="#FFFF0000"Canvas.Top="181"Canvas.Left="92"RenderTransformOrigin="0.5,0.5"x:Name="Ellipse">
<Ellipse.RenderTransform>
<TransformGroup>
<ScaleTransform/>
<SkewTransform/>
<RotateTransform/>
<TranslateTransform/>
</TransformGroup>
</Ellipse.RenderTransform>
</Ellipse>
</Canvas>
</UserControl>
下面通过一个稍复杂的示例来演示DoubleAnimation动画的使用,如下动画代码块实现了名称为Slider对象的X坐标方向的移动动画:
<!--<br/ /><br/ />Code highlighting produced by Actipro CodeHighlighter (freeware)<br/ />http://www.CodeHighlighter.com/<br/ /><br/ />--><Storyboardx:Name="SlideOut">
<DoubleAnimationStoryboard.TargetName="Slider"
Storyboard.TargetProperty="(UIElement.RenderTransform).(TransformGroup.Children)[3].(TranslateTransform.X)"
Duration="00:00:00.50"To="150"/>
</Storyboard>
<Storyboardx:Name="SlideIn">
<DoubleAnimationStoryboard.TargetName="Slider"
Storyboard.TargetProperty="(UIElement.RenderTransform).(TransformGroup.Children)[3].(TranslateTransform.X)"
Duration="00:00:00.50"To="0"/>
</Storyboard>
如上动画定义代码块中定义了两个动画,一个实现将对象Slider向X坐标方向移动到150像素点的位置,第二个动画实现将名为Silder的对象向X方向移动到0像素点的坐标位置,这样其实就实现了一个呈现与不呈现的效果。这里我们发挥大脑的潜力想象一下,如果Slider是一个面板对象,通过鼠标指向和离开的事件使用上面两个动画进行控制其不就实现了面板的鼠标指向就显示,离开就退回到原来的位置了?答案却是如此,详细见下代码块:
<!--<br/ /><br/ />Code highlighting produced by Actipro CodeHighlighter (freeware)<br/ />http://www.CodeHighlighter.com/<br/ /><br/ />-->publicpartialclassMainPage:UserControl
{
publicMainPage()
{
InitializeComponent();
Slider.MouseEnter+=newMouseEventHandler(Slider_MouseEnter);
Slider.MouseLeave+=newMouseEventHandler(Slider_MouseLeave);
}
privatevoidSlider_MouseLeave(objectsender,MouseEventArgse)
{
SlideIn.Begin();
}
privatevoidSlider_MouseEnter(objectsender,MouseEventArgse)
{
SlideOut.Begin();
}
}

通过上面的示例,是否觉得要在Silverlight中实现一个动画是非常简单的?上面的示例就是掩饰了如何使用From/To/By的DoubleAnimation实现了对象的移动动画,同样也可以使用关键帧动画(DoubleUsingKeyframes)来实现这一功能。如下代码片段演示了元素Silder向X坐标方向移动到150像素点。
<!--<br/ /><br/ />Code highlighting produced by Actipro CodeHighlighter (freeware)<br/ />http://www.CodeHighlighter.com/<br/ /><br/ />-->StoryboardMoveRight=newStoryboard();
DoubleAnimationUsingKeyFramesAnim=newDoubleAnimationUsingKeyFrames();
Storyboard.SetTargetName(Anim,"Slider");
Anim.SetValue(Storyboard.TargetPropertyProperty,
newPropertyPath("(UIElement.RenderTransform).(TransformGroup.Children)[3].(TranslateTransform.X)"));
Anim.BeginTime=newTimeSpan(0,0,0);
SplineDoubleKeyFrameSKeyFrame=newSplineDoubleKeyFrame();
SKeyFrame.KeyTime=KeyTime.FromTimeSpan(TimeSpan.FromSeconds(0.5));
SKeyFrame.Value=150;
Anim.KeyFrames.Add(SKeyFrame);
MoveRight.Children.Add(Anim);
......
ColorAnimation类型动画主要应用于颜色上的变换动画效果,比如有一个圆,默认的填充颜色是红色(Red),设计一个动画通过2秒钟的动画换成将圆的填充颜色变换为蓝色。
<!--<br/ /><br/ />Code highlighting produced by Actipro CodeHighlighter (freeware)<br/ />http://www.CodeHighlighter.com/<br/ /><br/ />--><EllipseHeight="218"Width="218"Canvas.Left="294"Canvas.Top="195"Fill="#FFFF0000"Cursor="Hand"x:Name="RedEllipse"/>
可以通过Blend的设计器来完成这样的动画的创建,在对象和时间轴面板里新建动画容器时间线,然后选中RadEllipse圆形对象在0秒的时间线上填充其颜色为红色,2秒的时间线上填充其颜色为蓝色,详细设计如下图:
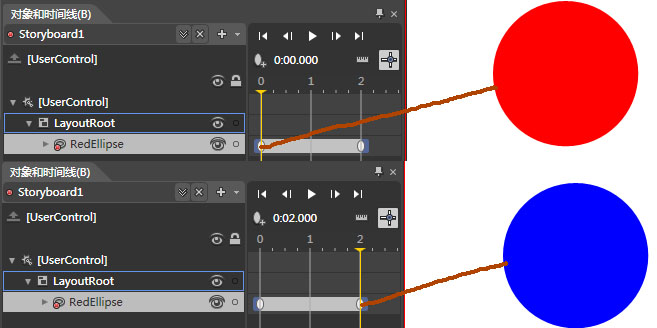
Blend最终生成的XAML代码如下:
<!--<br/ /><br/ />Code highlighting produced by Actipro CodeHighlighter (freeware)<br/ />http://www.CodeHighlighter.com/<br/ /><br/ />--><Storyboardx:Name="Storyboard1">
<ColorAnimationUsingKeyFramesBeginTime="00:00:00"Storyboard.TargetName="RedEllipse"
Storyboard.TargetProperty="(Shape.Fill).(SolidColorBrush.Color)">
<EasingColorKeyFrameKeyTime="00:00:00"Value="Red"/>
<EasingColorKeyFrameKeyTime="00:00:02"Value="Blue"/>
</ColorAnimationUsingKeyFrames>
</Storyboard>
有Blend这样强大的设计工具是很幸运的,对于设计人员来说要实现一些动画需求直接通过界面设计就完成了。对于程序员来说就烦恼了,由于不熟悉设计工具,要实现某种动画只能通过编写程序代码来完成,这将是一个很庞大的工程,比如说当鼠标指向一圆的时候其填充颜色慢慢的向蓝色(Blue)渐变,鼠标离开的时候慢慢的恢复其默认颜色红色。实现这动画效果则需要写上如下长篇的程序代码:
<!--<br/ /><br/ />Code highlighting produced by Actipro CodeHighlighter (freeware)<br/ />http://www.CodeHighlighter.com/<br/ /><br/ />-->privateStoryboardTurnBlue=newStoryboard();
privateStoryboardTurnRed=newStoryboard();
privateColorAnimationBlueColor=newColorAnimation();
privateColorAnimationRedColor=newColorAnimation();
publicMainPage()
{
InitializeComponent();
BlueColor.SetValue(Storyboard.TargetNameProperty,"RedEllipse");
BlueColor.SetValue(Storyboard.TargetPropertyProperty,newPropertyPath("(Shape.Fill).(SolidColorBrush.Color)"));
BlueColor.To=Colors.Blue;
TurnBlue.Children.Add(BlueColor);
LayoutRoot.Resources.Add("TurnBlue",TurnBlue);
RedColor.SetValue(Storyboard.TargetNameProperty,"RedEllipse");
RedColor.SetValue(Storyboard.TargetPropertyProperty,newPropertyPath("(Shape.Fill).(SolidColorBrush.Color)"))
RedColor.To=Colors.Red;
TurnRed.Children.Add(RedColor);
LayoutRoot.Resources.Add("TurnRed",TurnRed);
RedEllipse.MouseEnter+=(senderRed,eRed)=>
{
TurnRed.Begin();
};
RedEllipse.MouseLeave+=(senderBlue,eBlue)=>
{
TurnBlue.Begin();
};
}
这样的代码实现其实就是用程序代码创建了两个动画,一个由红色变换到蓝色,一个则由蓝色变换到红色,按照前面的方法直接在Blend中设计也是可以的。最终的运行效果如下图:

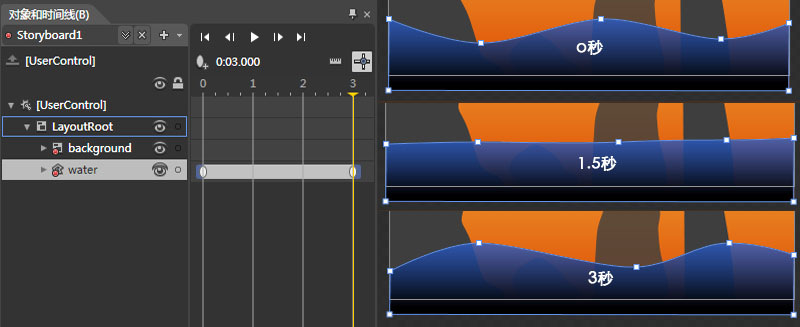
PointAnimation类型动画更好理解,也就是动画效果是通过不同的坐标点来控制的。比如说浪涛的效果,下面就以浪涛为示例来演示PointAnimation类型动画的使用。

 代码
代码
<!--<br/ /><br/ />Code highlighting produced by Actipro CodeHighlighter (freeware)<br/ />http://www.CodeHighlighter.com/<br/ /><br/ />--><Storyboardx:Name="Storyboard1"RepeatBehavior="Forever"FillBehavior="HoldEnd">
<PointAnimationUsingKeyFramesBeginTime="00:00:00"Storyboard.TargetName="water"Storyboard.TargetProperty="(Path.Data).(PathGeometry.Figures)[0].(PathFigure.Segments)[1].(BezierSegment.Point2)">
<EasingPointKeyFrameKeyTime="00:00:00"Value="351.732116699219,36.4064197540283"/>
<EasingPointKeyFrameKeyTime="00:00:03"Value="415.732116699219,84.4064178466797"/>
</PointAnimationUsingKeyFrames>
<PointAnimationUsingKeyFramesBeginTime="00:00:00"Storyboard.TargetName="water"Storyboard.TargetProperty="(Path.Data).(PathGeometry.Figures)[0].(PathFigure.Segments)[1].(BezierSegment.Point3)">
<EasingPointKeyFrameKeyTime="00:00:00"Value="425.502014160156,32.8349914550781"/>
<EasingPointKeyFrameKeyTime="00:00:03"Value="489.502014160156,80.8349914550781"/>
</PointAnimationUsingKeyFrames>
<PointAnimationUsingKeyFramesBeginTime="00:00:00"Storyboard.TargetName="water"Storyboard.TargetProperty="(Path.Data).(PathGeometry.Figures)[0].(PathFigure.Segments)[2].(BezierSegment.Point1)">
<EasingPointKeyFrameKeyTime="00:00:00"Value="499.271911621094,29.2635669708252"/>
<EasingPointKeyFrameKeyTime="00:00:03"Value="563.271911621094,77.2635650634765"/>
</PointAnimationUsingKeyFrames>
<PointAnimationUsingKeyFramesBeginTime="00:00:00"Storyboard.TargetName="water"Storyboard.TargetProperty="(Path.Data).(PathGeometry.Figures)[0].(PathFigure.Segments)[0].(BezierSegment.Point2)">
<EasingPointKeyFrameKeyTime="00:00:00"Value="112.729011535644,80.834991455078"/>
<EasingPointKeyFrameKeyTime="00:00:03"Value="104.729011535645,32.8349914550781"/>
</PointAnimationUsingKeyFrames>
<PointAnimationUsingKeyFramesBeginTime="00:00:00"Storyboard.TargetName="water"Storyboard.TargetProperty="(Path.Data).(PathGeometry.Figures)[0].(PathFigure.Segments)[0].(BezierSegment.Point3)">
<EasingPointKeyFrameKeyTime="00:00:00"Value="185.502014160156,80.834991455078"/>
<EasingPointKeyFrameKeyTime="00:00:03"Value="177.502014160156,32.8349914550781"/>
</PointAnimationUsingKeyFrames>
<PointAnimationUsingKeyFramesBeginTime="00:00:00"Storyboard.TargetName="water"Storyboard.TargetProperty="(Path.Data).(PathGeometry.Figures)[0].(PathFigure.Segments)[1].(BezierSegment.Point1)">
<EasingPointKeyFrameKeyTime="00:00:00"Value="258.275024414062,80.834991455078"/>
<EasingPointKeyFrameKeyTime="00:00:03"Value="250.275024414063,32.8349914550781"/>
</PointAnimationUsingKeyFrames>
<PointAnimationUsingKeyFramesBeginTime="00:00:00"Storyboard.TargetName="water"Storyboard.TargetProperty="(Path.Data).(PathGeometry.Figures)[0].(PathFigure.Segments)[2].(BezierSegment.Point2)">
<EasingPointKeyFrameKeyTime="00:00:00"Value="600.704162597656,72.7879943847655"/>
<EasingPointKeyFrameKeyTime="00:00:03"Value="608.704162597656,32.8349229097365"/>
</PointAnimationUsingKeyFrames>
<PointAnimationUsingKeyFramesBeginTime="00:00:00"Storyboard.TargetName="water"Storyboard.TargetProperty="(Path.Data).(PathGeometry.Figures)[0].(PathFigure.Segments)[2].(BezierSegment.Point3)">
<EasingPointKeyFrameKeyTime="00:00:00"Value="665.502014160156,72.7879943847655"/>
<EasingPointKeyFrameKeyTime="00:00:03"Value="673.502014160156,32.8349229097365"/>
</PointAnimationUsingKeyFrames>
<PointAnimationUsingKeyFramesBeginTime="00:00:00"Storyboard.TargetName="water"Storyboard.TargetProperty="(Path.Data).(PathGeometry.Figures)[0].(PathFigure.Segments)[3].(BezierSegment.Point1)">
<EasingPointKeyFrameKeyTime="00:00:00"Value="730.299926757813,72.7879943847655"/>
<EasingPointKeyFrameKeyTime="00:00:03"Value="738.299926757813,32.8349229097365"/>
</PointAnimationUsingKeyFrames>
<PointAnimationUsingKeyFramesBeginTime="00:00:00"Storyboard.TargetName="water"Storyboard.TargetProperty="(Path.Data).(PathGeometry.Figures)[0].(PathFigure.Segments)[3].(BezierSegment.Point2)">
<EasingPointKeyFrameKeyTime="00:00:00"Value="801.502014160156,40.8349914550781"/>
<EasingPointKeyFrameKeyTime="00:00:03"Value="801.502014160156,56.8349229097366"/>
</PointAnimationUsingKeyFrames>
<PointAnimationUsingKeyFramesBeginTime="00:00:00"Storyboard.TargetName="water"Storyboard.TargetProperty="(Path.Data).(PathGeometry.Figures)[0].(PathFigure.Segments)[3].(BezierSegment.Point3)">
<EasingPointKeyFrameKeyTime="00:00:00"Value="801.502014160156,40.8349914550781"/>
<EasingPointKeyFrameKeyTime="00:00:03"Value="801.502014160156,56.8349229097366"/>
</PointAnimationUsingKeyFrames>
<PointAnimationUsingKeyFramesBeginTime="00:00:00"Storyboard.TargetName="water"Storyboard.TargetProperty="(Path.Data).(PathGeometry.Figures)[0].(PathFigure.Segments)[4].(BezierSegment.Point1)">
<EasingPointKeyFrameKeyTime="00:00:00"Value="801.502014160156,40.8349914550781"/>
<EasingPointKeyFrameKeyTime="00:00:03"Value="801.502014160156,56.8349229097366"/>
</PointAnimationUsingKeyFrames>
<PointAnimationUsingKeyFramesBeginTime="00:00:00"Storyboard.TargetName="water"Storyboard.TargetProperty="(Path.Data).(PathGeometry.Figures)[0].(PathFigure.StartPoint)">
<EasingPointKeyFrameKeyTime="00:00:00"Value="1.50201416015619,32.834991455078"/>
<EasingPointKeyFrameKeyTime="00:00:03"Value="1.50201416015625,88.8349914550779"/>
</PointAnimationUsingKeyFrames>
<PointAnimationUsingKeyFramesBeginTime="00:00:00"Storyboard.TargetName="water"Storyboard.TargetProperty="(Path.Data).(PathGeometry.Figures)[0].(PathFigure.Segments)[0].(BezierSegment.Point1)">
<EasingPointKeyFrameKeyTime="00:00:00"Value="1.50201416015619,32.834991455078"/>
<EasingPointKeyFrameKeyTime="00:00:03"Value="1.50201416015625,88.8349914550779"/>
</PointAnimationUsingKeyFrames>
</Storyboard>
关于Silverlight中的动画相关的理论概论暂时就介绍这些,希望上面的简单介绍能帮助大家深入的理解和使用Blend进行各种不同的动画功能设计。更多信息可查阅下面的推资源连接。
推荐资源:
MSDN:http://msdn.microsoft.com/zh-cn/library/cc189090(VS.95).aspx
http://www.silverlight.net/learn/quickstarts/animations/
http://blog.csdn.net/ghj1976/archive/2009/12/22/5056916.aspx
Silverlight & Blend动画设计系列一:偏移动画(TranslateTransform)
Silverlight & Blend动画设计系列二:旋转动画(RotateTransform)
Silverlight & Blend动画设计系列三:缩放动画(ScaleTransform)
Silverlight & Blend动画设计系列四:倾斜动画(SkewTransform)
分享到:


相关推荐
【标题】"Silverlight及Blend学习电子书(一)"所涵盖的知识点主要集中在Microsoft的两个关键技术上:Silverlight和 Blend。Silverlight是微软推出的一种基于浏览器的插件技术,用于创建丰富的交互式Web应用程序,它...
在本文中,我们将深入探讨如何使用Blend for Visual Studio来创建WPF应用中的循环动画和路径动画。Blend是一款强大的设计工具,它可以与Visual Studio配合使用,为Windows Presentation Foundation(WPF)应用程序...
5. **动画和视觉效果**:Silverlight的动画系统允许开发者创建复杂的交互式动画,增强用户体验。 6. **XAML语言**:XAML是一种声明式语言,用于描述用户界面和应用逻辑。它的直观性和可读性使得非程序员也能参与到...
8. ** Blend工具**:Microsoft Expression Blend是设计Silverlight应用的强大工具,它提供了直观的界面来创建和编辑动画,使得非编程背景的设计者也能参与到动画的设计中。 通过以上知识点,我们可以构建出富有吸引...
Blend 是 Microsoft 提供的一款强大的设计工具,用于创建丰富的用户体验,特别是针对 Silverlight 和 WPF 平台。Silverlight 是一种浏览器插件技术,用于构建具有交互性和富媒体内容的Web应用程序。 ...
6. 动画和多媒体:Silverlight支持丰富的动画效果和多媒体处理,学习如何利用这些功能增强用户体验。 7. 高级主题:可能涵盖Silverlight的高级特性,如插件模型、安全性、性能优化等。 总之,这套合集提供了一个...
Expression Blend 4中文版WPF和Silverlight项目设计基础.pdf
《Expression Blend 4中文版WPF和Silverlight项目设计基础》是一本专为初学者和有一定基础的开发者设计的教程,旨在深入浅出地讲解如何使用Microsoft Expression Blend 4进行Windows Presentation Foundation (WPF)...
* Learn how to create stunning animations using Silverlight 4 Storyboards and incorporate video and sound into your RIAs with the Silverlight MediaElement. * Learn how to develop quickly and ...
网页课程设计与毕业设计是IT领域中常见的实践项目,旨在帮助学生掌握网页开发的核心技能,包括前端布局、交互设计和动态效果实现等。这个资源"全屏大气的CSS3动画HTML5互联网产品模板5322.zip"显然是一个用于此类...
在本课程中,我们将深入探讨如何在Silverlight项目中实现开发人员与设计人员的有效协作,以创建出更高质量的应用程序。Silverlight,作为一款强大的富互联网应用程序(RIA)框架,为构建互动性强、视觉效果丰富的Web...
减少不必要的计算,合理使用硬件加速,以及适时地利用“故事板”(Storyboard)进行动画组织,都有助于提高动画的执行效率。 总结来说,利用 Blend 制作弧形转动动画涉及以下几个关键步骤: 1. 创建WPF项目并设计界面...
Blend 是微软推出的一款强大的设计工具,它使得开发者可以更加直观、高效地创建丰富的用户体验,而 Silverlight 则是一种用于构建和部署互动媒体体验和富互联网应用的开发平台。这份教程的出现,旨在帮助 ...
《Expression Blend实例中文教程系列》是由CSDN社区Silverlight版主jv9精心编写的教程,旨在帮助开发者深入理解和高效使用Expression Blend这一强大的设计工具。教程分为基础篇和实例篇,作者以其丰富的实际开发经验...
Silverlight4 Blend SDK 中文文档
本书通过一系列的实战项目教授读者如何使用Blend 4和Silverlight 4。项目涵盖了从简单的界面设计到复杂的应用程序开发,帮助读者逐步掌握Blend 4和Silverlight 4的核心概念和技术。这些项目不仅包括了基本的界面设计...
SketchFlow是Blend 4的核心特性,它允许设计师通过一系列预先定义的模板、控件和动画来快速构建UI原型。SketchFlow提供了一个非线性的设计流程,让设计师可以在设计早期就探索不同的布局和交互模式。设计师可以利用...
在本文中,我们将深入探讨如何使用Microsoft Expression Blend创建一个功能完备的Silverlight时钟应用。Silverlight是一种强大的RIA(Rich Internet Application)开发平台,它允许开发者构建交互式、丰富的网络应用...
我们将学习如何利用绘图API创建自定义形状,以及如何通过故事板和关键帧实现平滑的动画效果。 5. **数据绑定与MVVM模式**:在Silverlight 2.0中,数据绑定是连接UI和业务数据的关键机制。此外,Model-View-...
本教程主要讲解如何利用Blend4进行动画和特效的制作。 在 Blend4 中,你可以发现资源面板提供了丰富的形状资源,包括18种预设的常用形状,如圆形、矩形、星形等。这些形状不仅可以直接使用,还可以通过调整它们的...